More Help
For more help with Audacity you can try these avenues:
Audacity Documentation
You should first look at the very good documentation at the developers site - http://manual.audacityteam.org/help/manual/
Also try the Audacity FAQ (Frequently Asked Questions) - http://manual.audacityteam.org/help/manual/man/faq.html
Online Forums
You can also try searching through the forums for information.
http://audacityteam.org/forum/
The forums contain a lot of postings from users on many topics. You can use the search system to locate topics or just browse the categories. If you don't find what you want then try subscribing to the forums and posting your question to the relevant category.
There are a few things to keep in mind when asking a question in a forum or to a mailing list. First, be as clear as you can with your question and provide any information that you might think would help some to try to help you. You might, for example, include information about the operating system you are using, or various specifics that relate to what you are trying to achieve. Additionally, it is always good practice to also post back to any forum or mailing list if you manage to solve your query and include clear information on how you solved the puzzle. This is so that someone else that may have the same issue can resolve it using what you have found out. If possible post back to the same thread (discussion topic) so that anyone searching through the forum can follow the discussion including the solution.
Mailing Lists
Mailing lists are good places to look through for answers to questions. The subscription (also the archives are listed on each info page) information is located here :
http://audacity.sourceforge.net/contact/lists
You can also subscribe to the mailing lists and ask a question. Please note the suggestions about posting to forums and mailing lists in the above section.
IRC
IRC is a type of online chat. it is not the easiest to use if you are not familair with it but it is a very good system. There are a variety of softwares for all operating systems that enable you to use IRC. The IRC channel for Audacity is where a number of the developers are online and some 'superusers'. So logging into this channel can be useful but it is very important that you know exactly what you are trying to find out before trying this route. The protocol for using the channel is just to log in, and ask the question immediately. Don't try and be too chatty as you are probably going to be ignored. It is also preferable if you have done some research using the other methods above before trying the channel. The details for the IRC channel are:
- IRC network: freenode
-
Channel: #audacity
Web Search
Searching the web is always useful. If you are looking for problems arising from errors reported by the software then try entering the error text into the search engine. Be sure to edit out any information that doesn't look generic when doing this. Some search engines also enable you to try searches of mailing lists, online groups etc, this can also provide good results.
ASSESSMENT TASK FOR BASIC USE
This assessment chapter aims to look at what we covered in the Basic Use section of the Audacity Workbook. It gives you the chance to review and check your knowledge with a specific task.
This chapter is a work in progress. We are evaluating how best to test and recognise learning in Flossmanuals. There is also a p2pu challenge here which contains the same material. 1
Audacity Basic Use Task
You can download a sample audio file to undertake this task from here. http://soundcloud.com/mickradio/pancake-keith/download
Your mission is to ;
- open an audio file
- play the audio file
- use the zoom and select tools to select a 10-15 second piece of audio
- trim the audio file so you are left with only this 10-15 second clip
- fade out the last second of the remaining audio so that it ends smoothly
- save your work as an Audacity project file
- export your work as a compressed mp3 or ogg file
Assessment Check List
- Did you successfully use the Open > File dialogue box to import a file into Audacity?
- Did you use the transport toolbar to successfully Play, pause, stop, skip to start and skip to end of the file.
- Did you use the Zoom In and Zoom Out functions to get a closer look at the waveform of the audio
- Did you use the Select tools and the Trim function to choose one part of the file and get rid of the rest?
- Did you apply the Fade effect to fade the last second of audio
- Did you use the Save option to save an Audacity project file .aup
- Did you use the Export function to export the edited audio to a compressed audio file (mp3 or ogg)
Read the following, at the end is a task for you to complete.
You edit audio files in Audacity in much the same way as you would edit text in a word-processing document. When you are editing text you first select the text you want to change and then choose what you want to do with it. You might want to cut or copy the text, delete it, paste new text in it's place, or change it to bold. You can do the same kind of thing in Audacity with audio files.
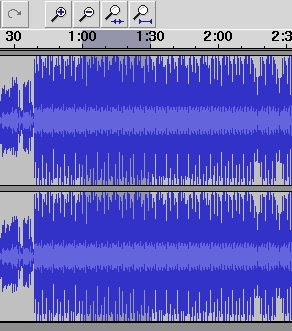
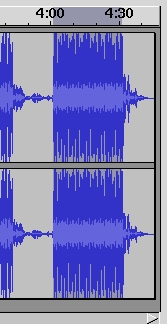
Before you edit an audio file you will need to zoom in to the area you wish to edit.

The image above shows the Edit Toolbar with the Zoom buttons highlighted. This  is the Zoom Intool, and this
  is the Zoom Out tool.
Use the Zoom commands to see as much detail as you need, or to make sure you see the entire file when necessary.
Selecting regions
The easiest way to select a region of audio to edit is to use the 'select tool' and click and drag. First you choose the Selection tool  from Tools Toolbar, below:

Now click the left mouse button anywhere inside of an audio track, and drag to the other edge of your selection, and release.
Some tips:
- You can drag from left to right or from right to left, it doesn't matter.
- If you move the mouse past the left or right edge of the window while dragging, Audacity will scroll the window in that direction as long as the mouse button is down.
Trimming
If you want to delete everything except for your selection this is called trimming, it is a type of editing. Make sure you have pressed Space to stop if the track is still playing then click on Edit > Remove Audio > Trim.
If you make a mistake, you can always click on Edit > Undo.
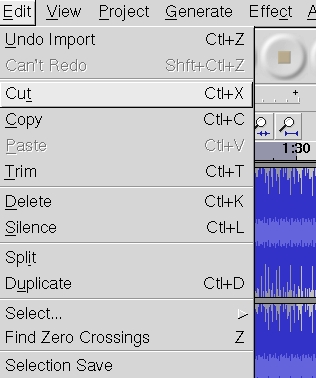
Cutting
You can also cut and paste audio. You need to know select a small part of your audio file as described above. To delete the selection and copy it to your clipboard click on the Edit menu and choose 'cut' :
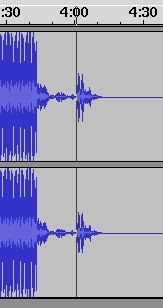
When you release the mouse button you will see that the selected area has disappeared and the length of your file will have been reduced.
Pasting
To paste the segment you have just cut click on the audio file at the point you where you want this audio to be pasted.
Choose the Edit menu and select Paste:
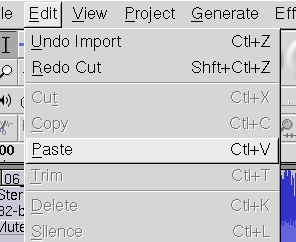
The audio will now be inserted and you if you look at the Audacity window you should see the selected audio in its new place :
Task
- use the Zoom In and Zoom Out functions to get a closer look at the audio file
- use the Select tools and the Trim function to choose one part of the file and get rid of the rest
- select a small part of the file and paste it into another point in the file
Saving and Exporting
It is important to know the different between saving your Audacity project file and exporting a file from Audacity. This becomes important when you start to use more than one track of audio and use the more advanced features of editing.
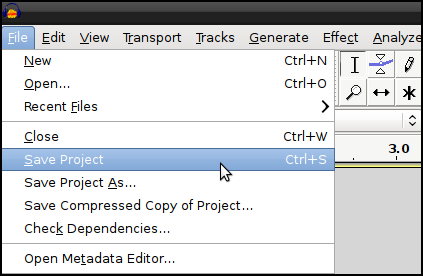
Saving Work as Audacity Projects
Projects created in Audacity are always saved in Audacity's own unique file format that cannot be opened by most other software.
If you are working on a project with more than one track then when you have finished your project you should save it as an Audacity file .aup. Audacity can save all the tracks separately the small changes to volume levels and effects that you have made. In this way you can come back and work on your project again. This may be impossible to do if you save your work only as an audio file like an MP3 or WAV.
If you want to archive your project onto portable media, an external hard drive for example then you should copy not only the .aup file that is created when you save it, but also the directory of the same name. Inside the _data directory is the raw audio data, so your project won't open properly if you don't copy that as well.
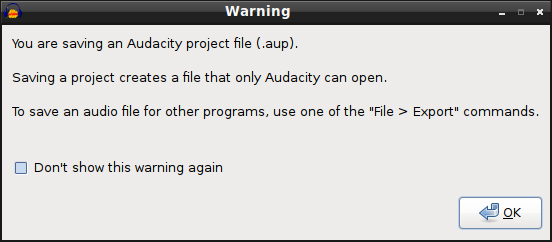
Because it is necessary to export projects to more common file formats in order to use them with other audio software or media players, Audacity will give you a warning when you start to save as .aup project files.
Exporting Projects as Audio Files
Audacity can export in a multitude of different formats these include: AIFF, MP3, WAV, FLAC and Ogg Vorbis.
AIFF, WAV and FLAC files provide uncompressed CD quality audio so this format should be used if you want to open your Audacity project with other music production software or CD authoring software.
MP3 and Ogg Vorbis are both compressed? audio formats so they have lower sound quality but much smaller file sizes making them ideal for use in media players. The most important difference between these two formats is that Ogg Vorbis is completely open while MP3 is not. For this reason you will need to download and install the LAME MP3 encoder before you can export in MP3 format.
To export a file from Audacity you need to have your an Audacity project open.
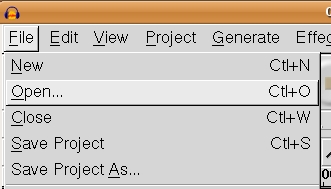
To export the file click 'File' then click on 'Export'.
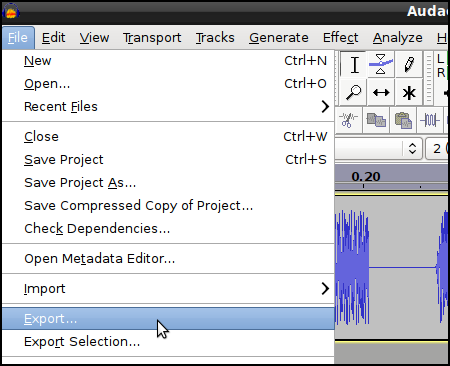
You should now see the Export File window.
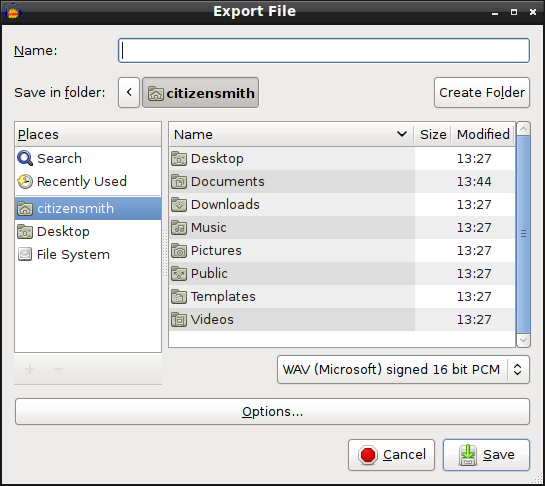
This file browser gives you an option on where to save your files, what to call it (Name) and the file format you save it in.
You can choose from several popular audio file formats by clicking on the arrow next to the WAV (Microsofr) signed 16 bit PCM text.
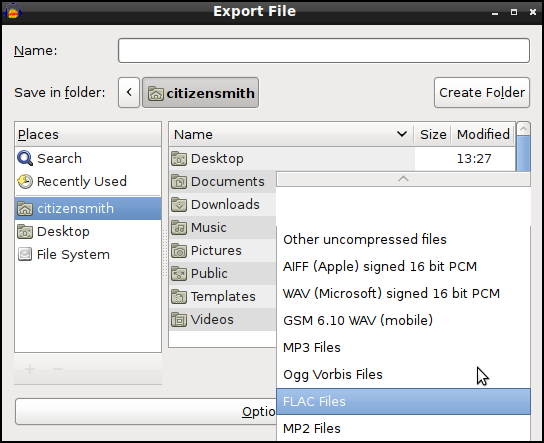
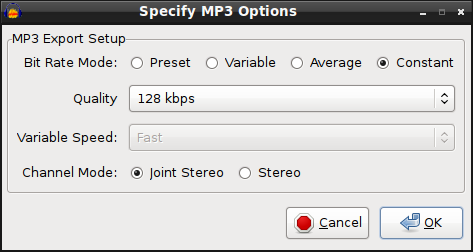
If you choose the mp3 format, you may need to download and install the LAME MP3 encoder if you want to save as Mp3. See the separate information about that.
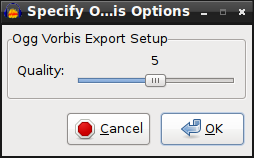
There may also be Options for the kind of file you have chosen. Click on the Options button to set them.
Once you are happy with the name, file format and folder then click on Save.
The next window you see should be Edit Metadata.
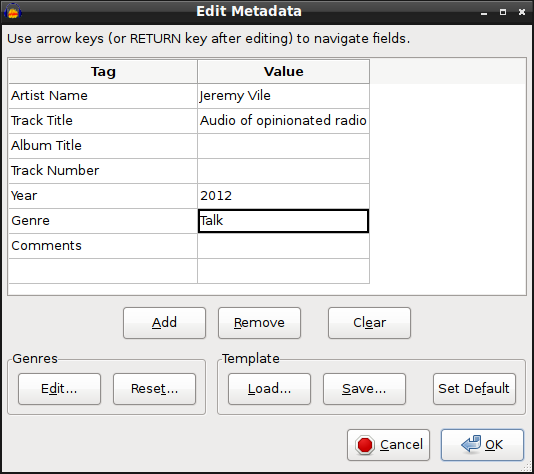
Use this window to edit the Metadata for the file you are creating. This will show up in mp3 and other hardware audio file players. Also it may be recognised by websites when uploading to the Internet. It's worth entering some information even if it's just the Artist and Track name. When you are happy with the information click on the 'OK' button.
You may see see a window which asks says Warning: Your tracks will be mixed down to a single mono/ stereo track in the exported file.
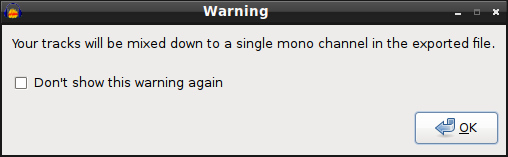
Mixing down our tracks into two stereo channels is exactly what we want here so click OK. If we think we'll want to come back to edit our multi track project then we should save that later as a .aup audacity file.
The time it takes to export the project will depend on the length of the recording and the speed of your computer.
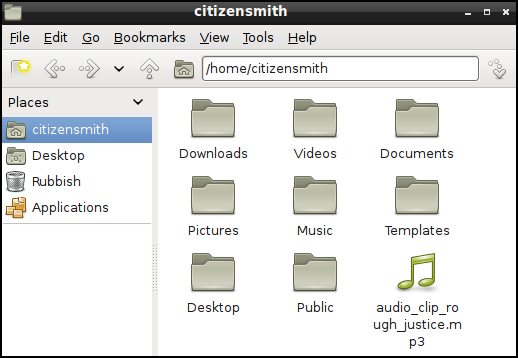
When exporting is complete the above window will disappear. You should now be able to see the file in the folder that you chose to save it into.
That's it. You can now enjoy listening to the results of your Audacity project through other audio software, upload it to the Internet or transfer it on to your portable media player.
Uploading Audio Files
There are many sources of help on distributing audio files and podcasting which can be found by using a search engines.
However two popular websites stand out as being easy to use and a reliable home for your audio files; Sound Cloud [soundcloud.com] and the Internet Archive [archive.org]. There is help on using the Internet Archive as a Floss manual [http://en.flossmanuals.net/archiveorg/index/].1 There is also good help on using Soundcloud on their website.2
Task
Save and Export your audio
- use the File > Save Project As option to save your project as an .aup file to re-edit later
- use the File > Export option to save your project as a compressed audio file to distribute
- http://en.flossmanuals.net/archiveorg/index/^
- http://help.soundcloud.com/^
Introduction to Audacity
You may wish to learn to use Audacity if you would like to record or edit audio. Audacity is a very simple software and extremely useful for recording interviews, making podcasts, making sound collages, creating documentaries, recording songs etc.
Audacity is an example of a type of software known as an 'audio editor'. This means that Audacity can record and edit audio. Typically, you use Audacity for recording sounds, like interviews or musical instruments. You can then use the program to combine these sounds and edit them to make documentaries, music, and podcasts.
It is a relatively simple application compared to a lot of commercial audio editors.
In the past, audio editing was done with huge machines that recorded sound to tape (similar to the tape in tape cassettes).

Audio engineers would then edit these tapes using razor blades and sticky tape. Much of the jargon used in audio editing today comes from this process. Making a 'cut' meant literally cutting the audio tape at a certain point. 'Multitrack' referred to recording many separate sounds onto extra wide tape to fit more 'tracks'. The recording industry still uses these terms today. Many of the fundamental techniques which formed good audio recording and editing practices in the past, laid the foundation for recording and editing software today.
While many of the terms and techniques remain the same today, computers replaced tape machines, and digital files succeeded tapes. Hence, you now record audio and edit with a computer using software such as Audacity. You then store these sounds in files on a computer. This makes the process faster and requires a lot less physical storage space.

Audacity is a powerful tool for recording and editing audio on a home computer. It's a very sophisticated program and can do everything you would expect from a modern audio editor. Audacity perhaps falls short of meeting the needs of professional recording studios, but not by much.
You can install and run Audacity on Linux, Mac OS X and Windows.
Task
To show your understanding of this chapter and to check that Audacity is right for you, please write as a comment below, one or two sentences on how you use or want might use Audacity. If you have used Audacity please describe how you find it.
Example: "I would use Audacity to combine recorded voices and music to create short radio jingles for a hospital radio I work for. I have never used Audacity but my collegues have and recommend it."
Open a Sound File
Download the following audio file - http://soundcloud.com/mickradio/pancake-keith/download
If you have any problems then ask for help in the comment section below. Otherwise mark this task as complete and move on to the next task.Choose the 'Open' option from the File menu :
You will then be presented with a window where you can browse to the location of the audio file on your computer :
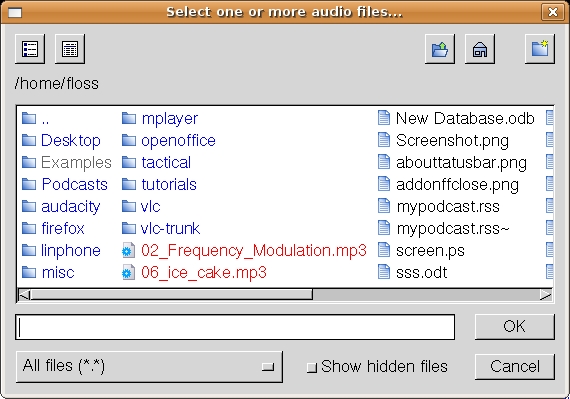
You can see in the above example there are a couple of audio files. I will click on one (06_ice_cake.mp3) :
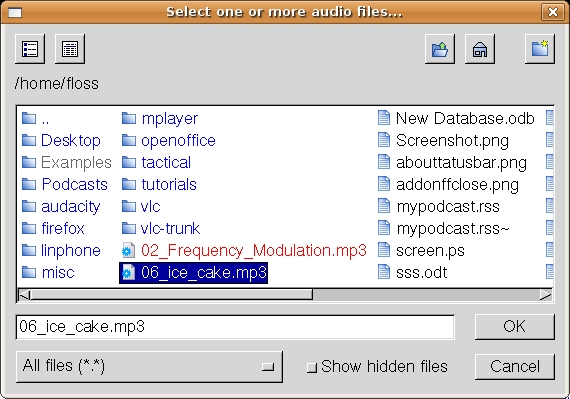
If I now press OK the file will be imported into Audacity.

Now its worth noting that Audacity has its own way of storing audio files. These are known as 'Audacity project files'. So when audio is imported into Audacity it is stored in the Audacity format. You cannot then go and edit these files with another audio editor unless you first export the file to another format (for example, to MP3).
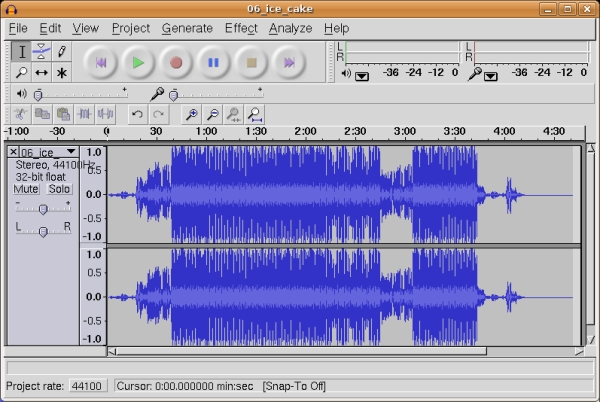
Once the import has finished you will see the audio file displayed in the Audacity window :
Listen to a File
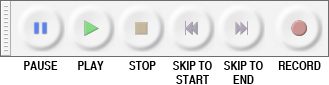
Audacity controls the playback of an audio file with buttons for Play, Pause, Stop and other functions. These buttons are located on the 'transport toolbar' and it looks something like this:
Each of the buttons can be clicked on with the mosue or you can also use keyboard shortcuts. Below is a description of what each button does and its keyboard shortcut, and at the very end is a short task for you to complete.
 Play Button
Clicking on this button starts the playback at normal speed. If an area of track is selected, only that selection will be played. Otherwise, playback begins wherever the selection cursor is.
Keyboard shortcut: Spacebar
 Pause Button
Temporarily pauses playing or recording without losing your place. Press Pause a second time to resume.
Keyboard shortcut: p
 Stop Buton
Stops playing or recording immediately. You have to Stop before you can use the "Skip" buttons below and before you can edit any audio. By default, Space on the keyboard functions as a shortcut to Play or Stop.
Keyboard shortcut: Spacebar
 Skip to Start Button
Move the cursor to the beginning of the project. This is useful if you want to play everything, or record a new track starting from the beginning.
Keyboard shortcut: Home
 Skip to End Button
Move the cursor to the end of the project.
Keyboard shortcut: End
 Record Button
We won't use this button in this task but clicking this button starts recording.
Keyboard shortcut: r
Task
Use the transport toolbar to ;
- play, pause and stop the file
- skip to start and skip to end of the file


