Installing on Windows
Software name : Avidemux
Homepage : http://avidemux.sourceforge.net/
Software version used for this installation : 2.4 Preview 2
Operating System use for this installation : Windows 2000
Recommended Hardware : 500MHz
To start the installation process first visit the homepage for Avidemux : http://avidemux.sourceforge.net/
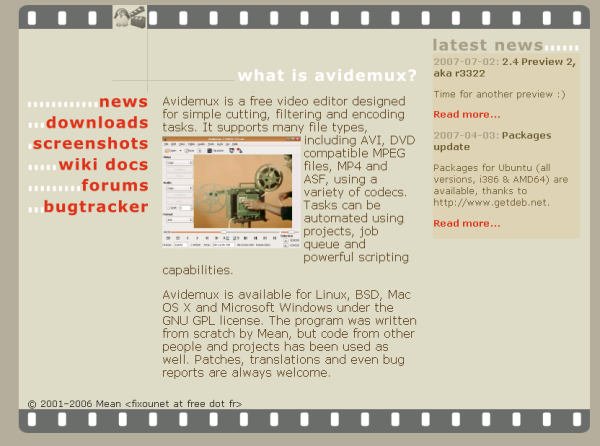
You now need to click on the 'downloads' button on the left and your browser should display something like this:
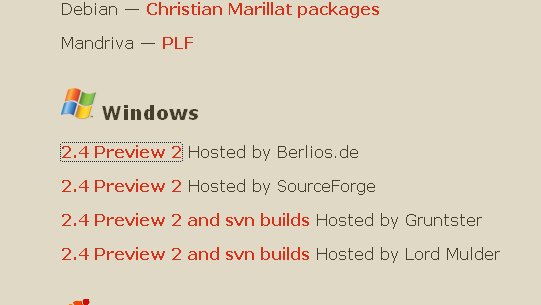
In this example we will choose the first link under the 'Windows' download section. You will then see a page with a list of files you can download :

Choose the latest version. For me this was the top link. If you click on this you will be directed to a second page with download options :

If you click on either link the installer will start downloading. Download it to your Desktop or somewhere else you will be able to find it. Once the download is complete then you will see the installer file on your desktop, or in the folder you chose to save it to. It should look something like this :

Double click on this icon and the installer window will appear :
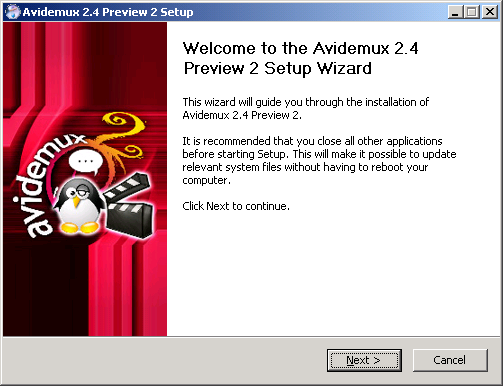
For this installation process you will need only to select the default settings. So in the above window just press 'Next >' :
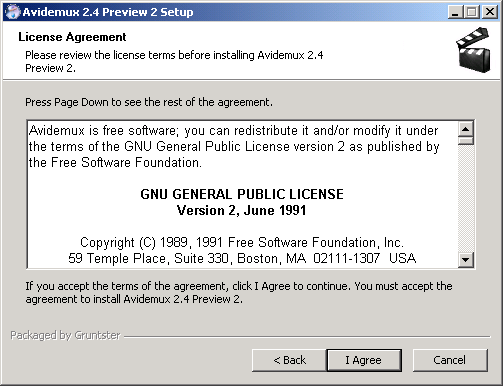
This is the license agreement. Unless you are a bored lawyer press 'I Agree' :
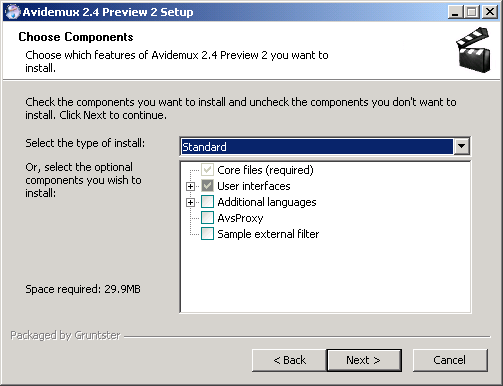
You should just leave the above screen as the default unless you wish to add any more languages. Press 'Next >' :
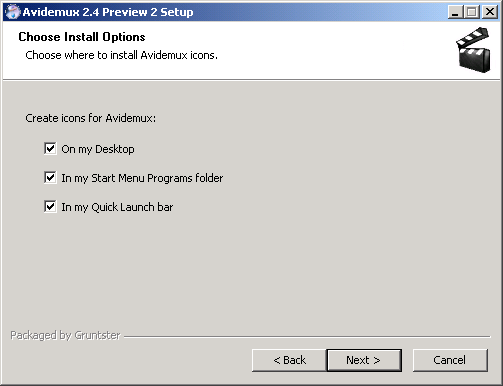
The above options only dictate if you will have icons placed in the listed places so you can quickly start Avidemux by clicking on them. Leave it as the default unless you have any reason you do not wish to create these 'short cuts'. Press 'Next >' :
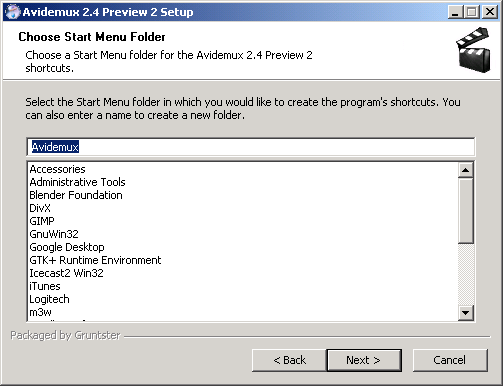
This window merely asks you what the name of the folder that appears in the Windows Start menu should be. Its wise to leave this with the default setting. Press 'Next >' and you will be lead to the following window which asks you where on your harddrive all the installation files should be kept :
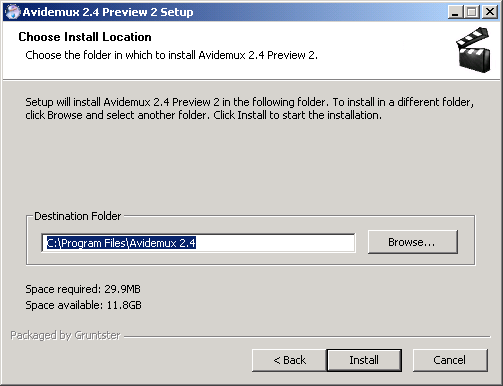
If you ask me, all these options can just be fast forwarded through. It will be a relief the day when Windows installers have a simple 'Install with all defaults' button as these processes are a little tedious. However the above screen is that last screen so just press‚ 'Install' and the installation progress window will appear showing you that everything is being installed :
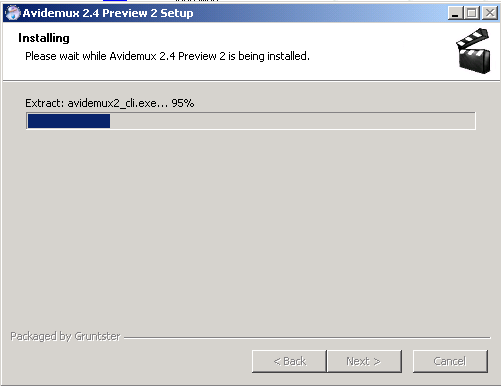
When all is done you will see this last window :
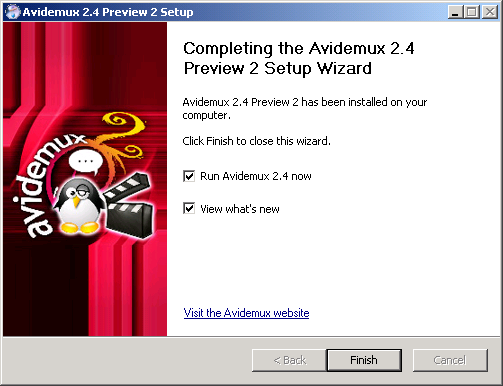
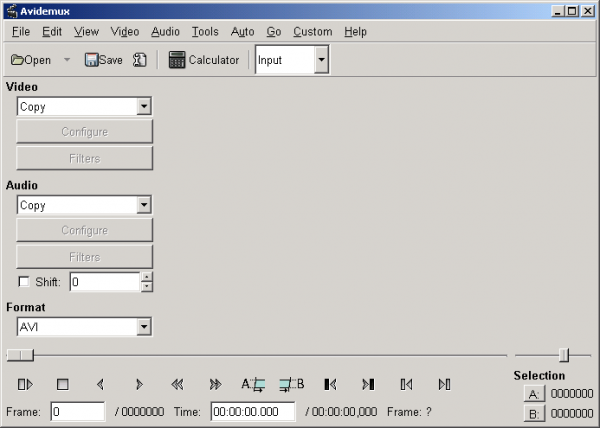
If you wish to open Avidemux now then leave the top option checked. The second option will (perhaps a little annoyingly) pop up a browser window infront of Avidemux. Perhaps best to uncheck the last option and press 'Finish' and Avidemux should appear in front of you :
Installing Avidemux on Ubuntu
Software name : Avidemux
Homepage : http://avidemux.sourceforge.net/
Software version used for this installation : 2.3
Operating System use for this installation : Ubuntu 7.10
Recommended Hardware : 500MHz CPU
Installing Avidemux on Ubuntu is fairly straight forward. First you need to configure what is known as the Package Manager for Ubuntu. The Package Manager is a program that assists you when you wish to install software.
Synaptic Package Manager
The Synaptic Package Manager (SPM) is used for more than just installing software. It can also upgrade your entire operating system, and manage all software installed on your computer. However most people use SPM for just installing new software. Before you embark on this process, there are a few concepts that you may wish to get familiar with. It's not crucial you understand them thoroughly, so just read the explanations and then let it soak in over time. The ideas behind SPM will become clearer with use.
What is a repository?
SPM can automate the installation of software on your computer because it has a direct connection to one or more online software repositories. These repositories are vast archives of programs that have been pre-configured for installation on your operating system. When your computer is online, SPM can connect to these archives, check what software is available for installation, and present you with a list of installable software. All you have to do is select the software from the list that you want. SPM then downloads the software from the repository and takes care of the installation process.
So SPM is actually a repository manager: it manages which repositories (there are many) you wish to access, and which programs to download and install from those repositories.
SPM allows you to choose which repositories it accesses through its settings. The default repositories used by Ubuntu can be extended through the SPM settings so you can access a wider range of programs. Ubuntu calls each repository by a simple name. They are: Main, Universe, Multiverse, Restricted. By default Ubuntu only uses the Main online repository. If you wish to access you the other repositories, you must do this by changing repository settings of SPM.
What is a package?
When SPM downloads a programs for installation, it is in the form known as a 'package'. This means that it is a compressed archive of the program, pre-configured so that it can install nicely on your computer. If the package has been configured nicely (and the Ubuntu project team spends a lot of time making sure this is the case), then many of the headaches that installing software can bring are taken away — it's the aspirin of software installation. One of the biggest issues with installing software on any form of Linux (Ubuntu is one of many types of Linux), is dependencies. Dependencies are all the other packages required by a particular package. If, for example, I want to install an audio editor, that audio editor software may use some functionality of other programs to do its job.
SPM takes the (often) dark art of dependencies away from you, and manages this itself. So if you wish to install a program and it has dependencies (and the list can be long), you don't have to work this out yourself. SPM knows already what is needed, finds it, and installs it along with the software you have chosen.
So, SPM, as well as managing which repositories you access, is also a package management software. Hence the name: Synaptic Package Manager.
apt
You don't really need to know about 'apt', so if you are on the verge of being confused then don't read this short section. If you are a geek wannabe, then read on.
Ubuntu is a form of Linux that has derived from another form of Linux called Debian. This family of Linux has in common (amongst other things) the package/repository management system. Both Ubuntu and Debian use the apt system for managing packages. APT is an acronym for Advanced Package Tool.
SPM is actually a 'front end' (graphical interface) for controlling 'apt'. So SPM is the nice user interface that you see, but the real work is done by 'apt'. There are other ways of managing 'apt', such as the command line interface known as apt-get. In the world of Linux, there are many varieties of Linux users and they have their own ways of doing things. In general it's safe to say most Debian users use apt-get, and most Ubuntu users are happier using SPM.
Configuring Synaptic Package Manager
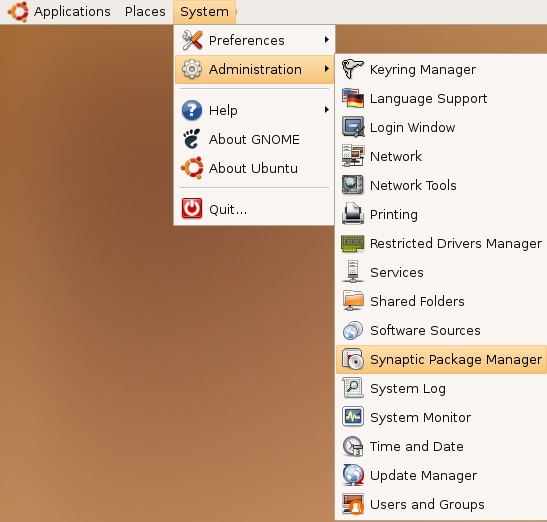
To install most software on Ubuntu, you need to change the default repository settings of SPM, because many programs are not contained in the default repository. To do this, you need to open the Synaptic Package Manager, which you can do via the System menu. If you haven't changed the default Desktop of Ubuntu, then the System menu can be accessed at the top left of your screen:
If all is good, you are prompted for a password.
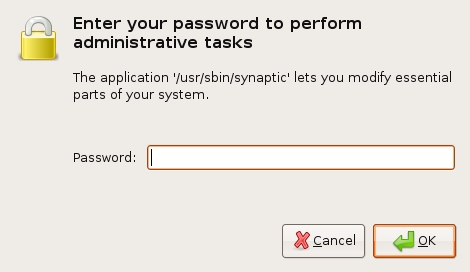
Here you must enter your password (the same one you use to log into the system). If you don't know the password, then you have a problem and it's probably caused by the fact that the computer you are using is not yours. In this case you have to find the computer's owners and ask them for the password (which is usually not polite unless you know them well) or ask them to input the password while you look casually in the other direction.
Assuming the password entered is correct, you now see the SPM open in front of you. It may be that you first see the following 'Quick Introduction' (which appears if you haven't used SPM before).
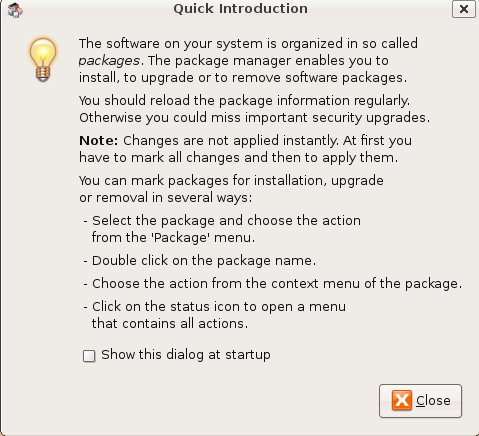
Just click Close and move on.
Let's look at the Synaptic Package Manager interface.
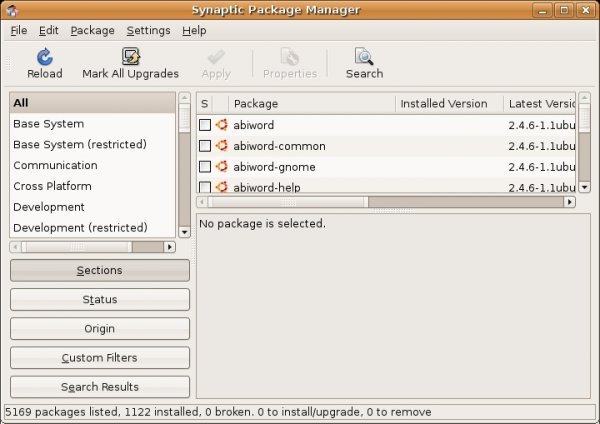
Let's not worry about the details of the interface for now. All we want to do is change the repository settings. To do this, on the Settings menu, click Repositories.
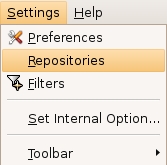
Now we get to where we can do some business. Make sure that all the options are selected:
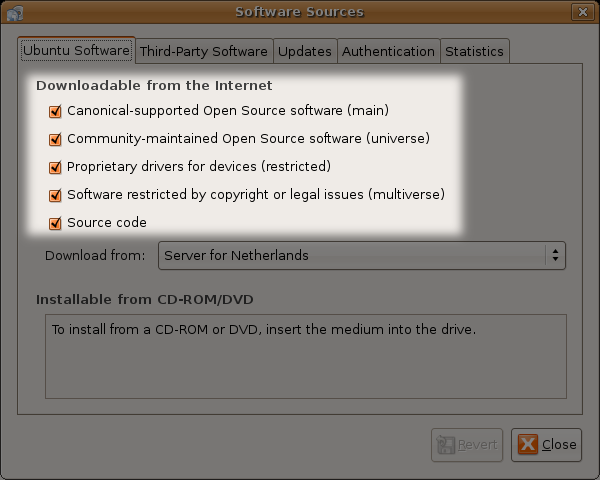
Now close that window by clicking the big Close button at the bottom right.

Next, you see a warning telling you the repository has changed:
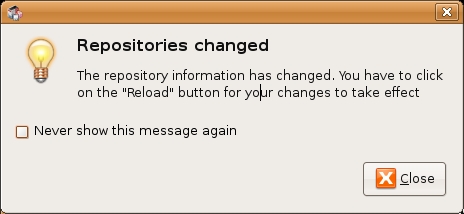
Click the Close button.
Back in the SPM interface, you need to refresh the repositories as the warning suggests. To do this, click Reload:

You then see a status window saying the repositories are being updated and showing the progress.
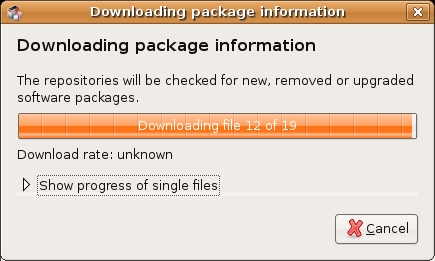
Installing Avidemux with Synaptic Package Manager
Now that you have Synaptic configured you can use it to install Avidemux. To do this click on the Search button in the Synaptic Package Manager interface. The search button looks something like this :

when you click on this button you see something like this:
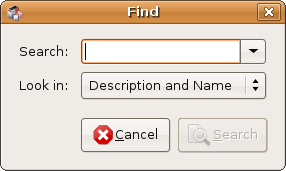
Now type 'avidemux' into the text field at the top:
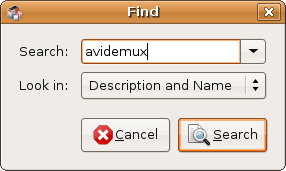
Now click on the 'Search' button you can see here, and you should see the Package Manager searching for your request. The final result will be that the small search window will close automatically and you will be left with the main Package Manager window displaying something like this:
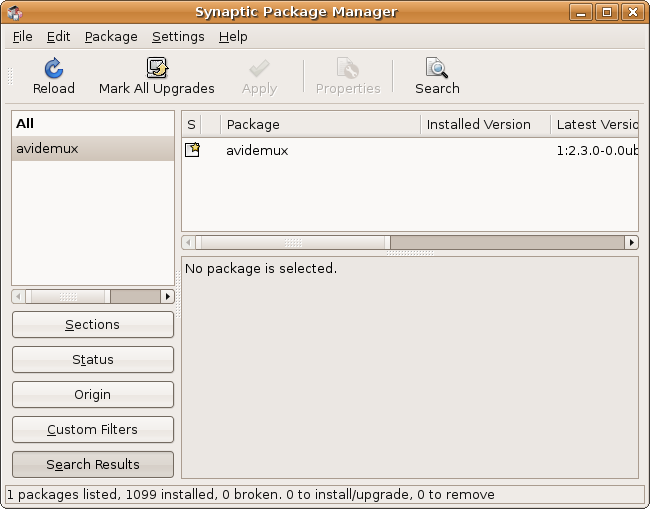
If you see Avidemux listed with a little star by its name then you are good to go! You can now actually install the software. So, right click on the title of the software and choose 'Mark for Installation' :
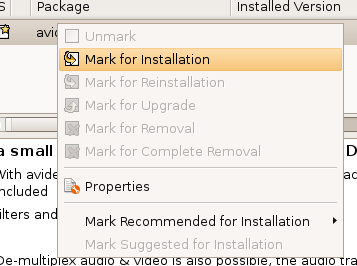
This should present you with a little pop-up window :
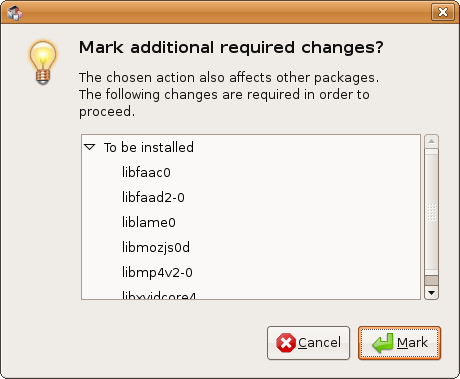
This lists all the software that must be installed so that avidemux can actually work. Don't be surprised if the list of software during your installation process to be installed looks different to the above list. Now, there is only one real choice here (as 'cancel' will stop the installation process) - click 'Mark'. When you do this the window will disappear and leave you, perhaps a little confusingly, with the main Synaptic Package Manager window again. It would probably be better if the Package Manager gave a little more feedback, but all things in time I guess...
Now you want to click on the 'Apply' button at the top of the window:
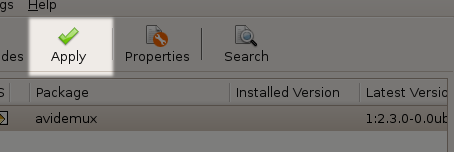
When you have clicked on this you be shown a confirmation window:
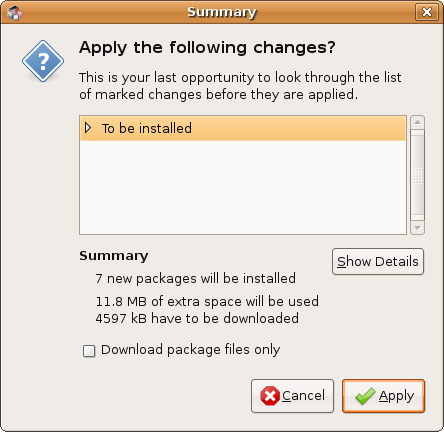
Just click on 'Apply 'once again and the download process will begin :
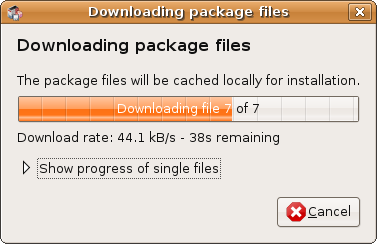
Followed by the installation process:
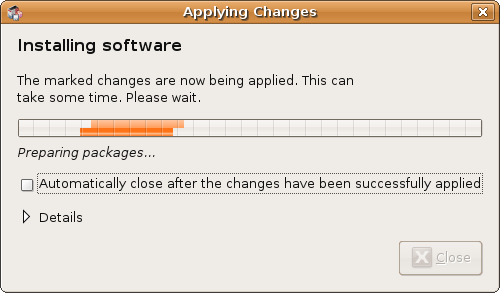
Then finally you will see a screen telling you all is complete :
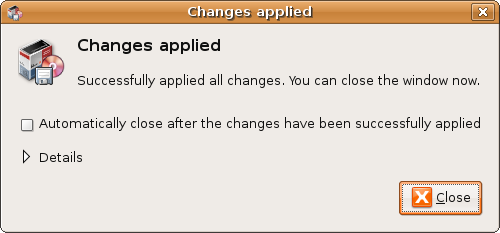
You can now click on 'Close' and you will be left with a blank Synaptic Package Manager which you can quit :
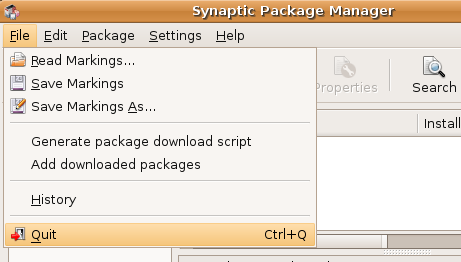
Starting Avidemux
Now that Avidemux is installed, you can might wish to try starting it. The nice interface designers at Ubuntu place newly installed software automatically in the drop down menus at the top of the desktop for easy access. So we just need to kick on 'Applications' then mouse down to 'Sound & Video' and you will see Avidemux listed :
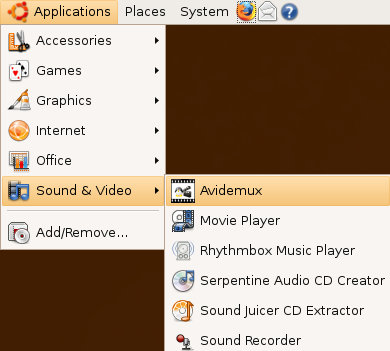
When you place you mouse over 'Avidemux' in the menu and release the mouse button you will see it open:
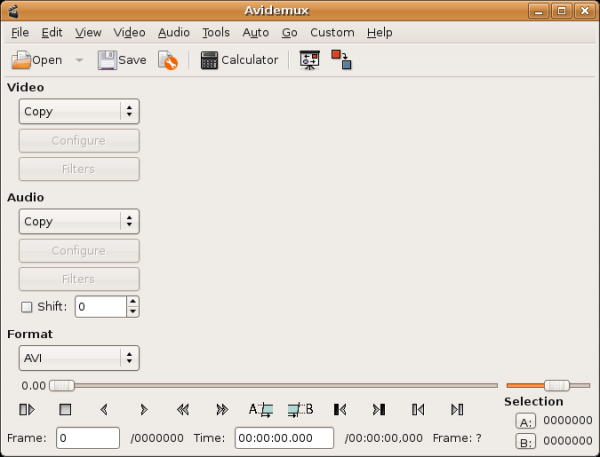
Opening a File
Software name : Avidemux
Software version : 2.4
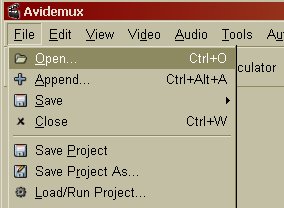
You probably have a file on your harddrive that you wish to open. To do this go to the main tool bar and click on 'File' and then 'Open' :
You will be presented with a file browser similar to this:
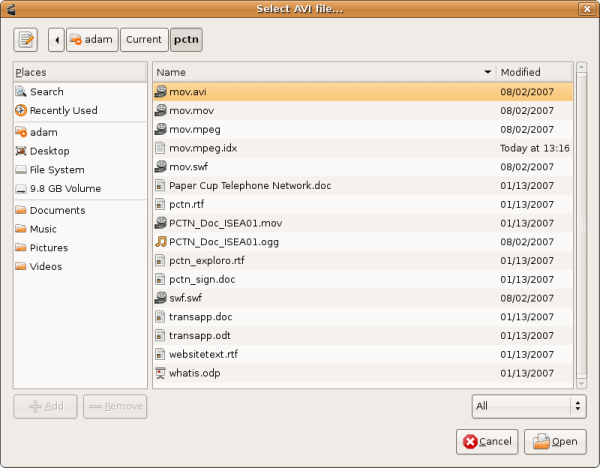
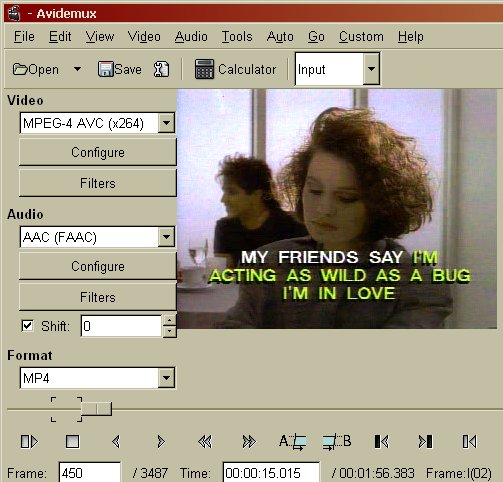
Find the DV file or similar on your computer by browsing the files and folders. You can't mess anything up doing this so just click around until you find the file you want. When you have found it, highlight it by clicking on it and then either double-click on it or press 'Open'. You should see Avidemux with the video file open like so:
Trimming a Video File
If needed you can trim the video file using Avidemux before you save it.
To do this click on the rectangle shaped slider at the bottom of the window :

Drag it to the new in point or starting point you wish to define. When you do this you will see the video fastfoward as you drag the button. When you are at the right starting point click on the symbol with an 'A' as part of it just below of the centre of the playing head line:

You can then move the playing head to where you want the end point to be and click on the button marked 'B' :

That's all you have to do, when you save the file it will be trimmed.
Note that in order to be able to save the trimmed file in .mp4 format the starting point has to be a key frame. Dragging the start point on the slider as described above will do this for you.
If instead you decide to use the arrows to move the start point you could land on a frame that is not a key frame, resulting in the impossibility to save.
Screen Size and Bitrate
Software name : Avidemux
Software version : 2.4.1
The screen size and bitrate you use really depends on what you want to do with the video file you are creating. There are some simple things to keep in mind:
The higher the bitrate the larger the file size of your video (how much space on your computer it takes up). This means that if you use a very high bitrate then it will be slower to download - this may or may not make a difference to you. You may want to try and imagine what kind of internet connection your audience may have. If they have fast connections then the final file size isn't as important. The final choice is yours and it usually means balancing a compromise of quality vs download time.
The screen size (height and width) of the movie will also affect file size. Additionally of course, the height and width affect the playback experience for the viewer. The larger you make the height and width‚ the easier it is to watch, but the bigger the file size. The compromise you strike is also one of judgement.
If you want a high quality Internet TV file for people that have a good quality connection to the internet, or to upload to a video sharing site then you could use the following settings
- 1200 kp/s bittrate
- 640 (width) x 480 (height) size for 4:3 aspect ratio (or 640 x 352 for 16:9 )
If you are creating a file for people who have a much slower connection then you may want to choose the following settings
- 300 kp/s bittrate
- 320 (width) x 240 (height) size for 4:3 aspect ratio (or 320 x 176 for 16:9 )
The decision is yours as to the most appropriate height and width, bitrate, and resulting file size. Let's assume you have made that decision and look at how to change the bitrate and height/width using figures for our high quality video file option.
Changing Bitrate
Click on the Configure button on the left of the Avidemux interface after you have chosen the video codec that you are going to use. For the example we are using the MPEG-4 Xvid codec.
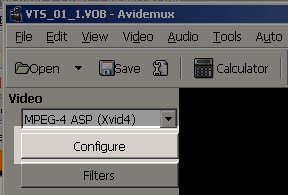
You will see a pop up window appear
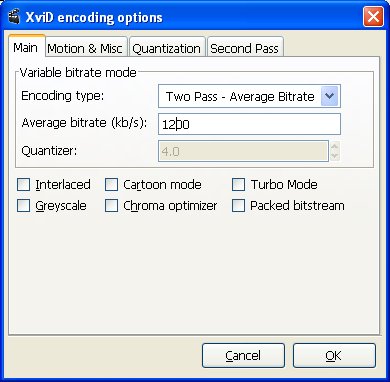
Make sure the 'Encoding mode' is set to Two Pass - Average bitrate from the drop-down menu. Change the setting in the text box ('Dual pass, avg bitrate') to 1200. Then click on 'OK'.
Change Screen Size
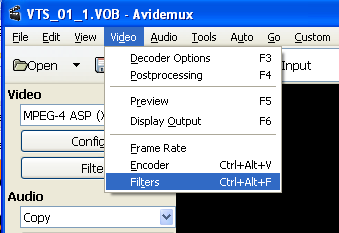
Now click on Video and choose Filters:
Choose the transform tab on the left if this is not already selected (this should be the default view).
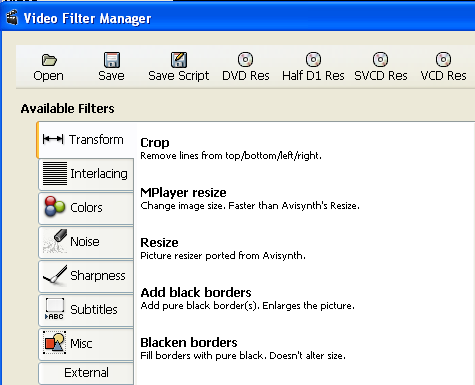
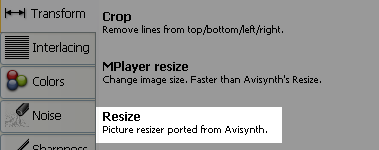
Then double click on Resize.
A pop up box will appear.
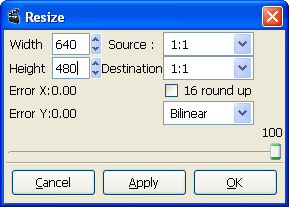
In this example we are working with a video that has a 4:3 aspect ratio. The original size is 720 (wide) by 576 (high). We are going to reduce the size to 640 (wide) and 480 (high).
Now select the correct aspect ratio from Source and Destination options. In this case it is 4:3.
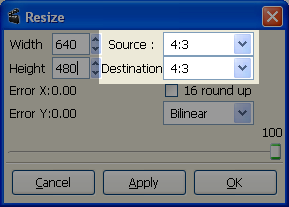
Then Click on OK
Click 'Close' to return to the main screen.
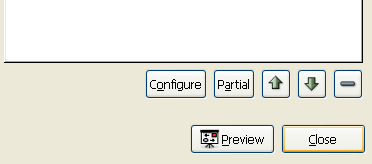
When you save the file the video will be resized.
More on Aspect Ratio
If you are not sure about the aspect ratio of the video you are working with then have a look at the next image.
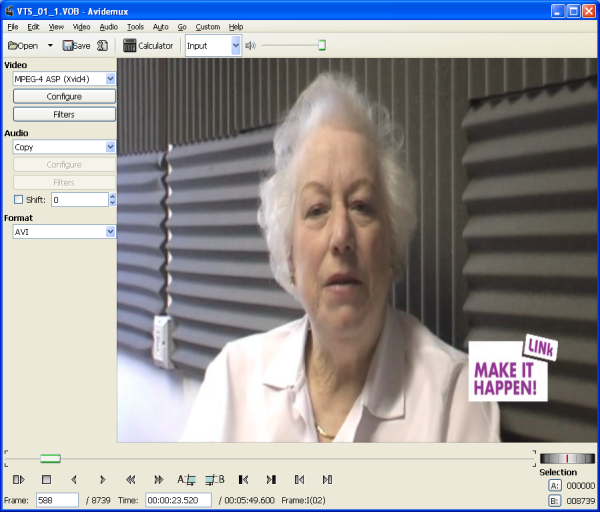
Here we can see a Video that should be displayed as 16:9, displayed as 4:3 aspect ratio. This was because the video was shot on a widescreen setting, and made into a DVD. When Avidemux opened up the DVD file it hasn't changed the shape of the image.
It's up to us to change the Image shape to be the correct aspect ratio. Repeat the steps shown above for resizing the Video and choose the following settings.
Width: 640
Height: 352
Source: 16:9
Destination: 16:9
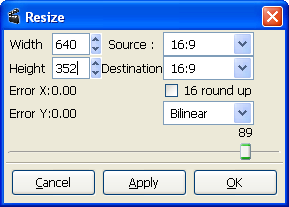
Click OK.
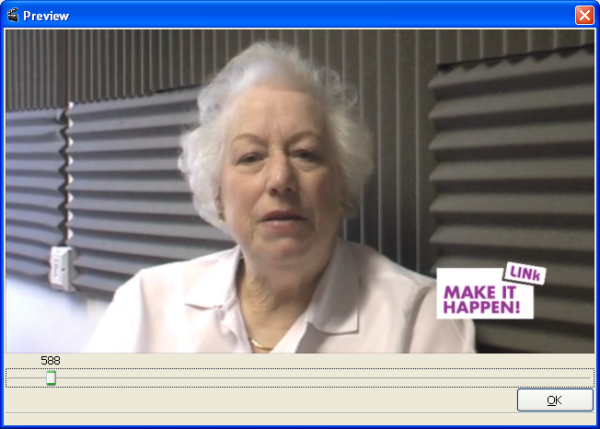
You can then preview this to see if the image appears to the right shape.
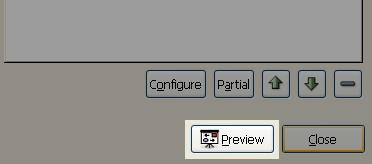
In this case we can see that the image is the right shape when we click on Preview.
Deinterlacing
Software name : Avidemux
Software version : 2.4
When processing video files you might want to add a deinterlace filter. This would be appropriate if you had a video that was edited from a DV camera and is still interlaced. If we create a DVD that isn't played on a standard TV then we might see the effects of the interlacing which will look like strange horizontal lines through the video.
If you don't know what the effects of interlacing are you can see them in the screen shot below (most clearly visible on the face of the man at the top left).

We can remove this unwanted effect by adding a deinterlace filter.
To do this click on Filters under the Video section.
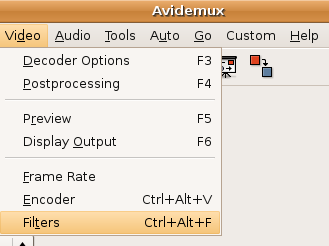
Then click on the Interlace tab, and select yadiff.
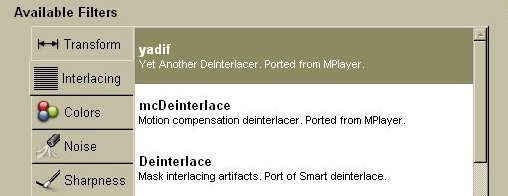
Then click on the '+' sign at the bottom of the window :
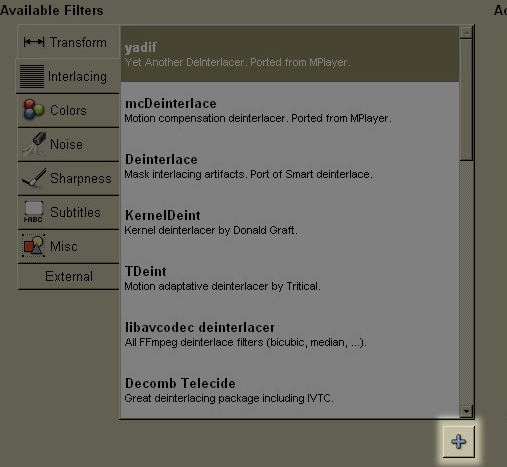
You will then be shown a pop-up window like this:
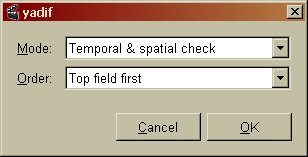
Click 'OK' to the default settings shown, and Yadif should appear on the section on the right :
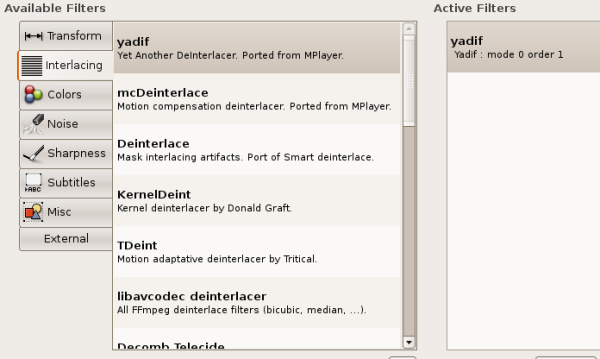
It's important that the deinterlace filter is the first filter you add.
Then click Close on the bottom right of the screen :

When you save the file the filter will do its work deinterlacing the video.
Creating MP4 Files
Software name : Avidemux
Software version : 2.4
This chapter will show you how to create an MPEG-4 file from an existing video file. There are many reasons why you may need to create a MPEG4 file from an existing video file - to make a downloadable preview file for a longer movie that can be viewed in VLC player, for example.
Before we start however it is useful to note that MPEG4 files created by Avidemux won't play in a Quicktime ('QT') player (which makes them unsuitable for wide distribution as podcasts). There are numerous posts on the Avidemux forum about this issue and hopefully a future version will solve this problem. If you want to create a QT compatible file you'll have to use the softwares known as SUPER (Windows only), or FFMPEGX (MacOSX) and FFmpeg in Linux. There is help elsewhere on these applications.
I will assume that you already have a video file which you want to turn encode.
If you don't already have a suitable video file, then you may need to either :
- export a file from a video editing programme
- capture a DV tape to a file on your hard drive
Opening the Original File
So, assuming you have a file ready to go...Open the video file you already have. This should be as high quality as you can - this is because every time you convert a video file into another type of file quality is lost. So you want to start with the highest quality file as possible to ensure the newly created file is the highest quality it can be. Ideally it will be a DV file exported from a video editing program or captured from a camera or an MPEG-2 file or VOB from a DVD.
Click on 'File' and then on 'Open'. You will see a window appear that you can use to browse your computer to find the file you want. Highlight the file you wish to open and either double-click on it or press 'Open'.
Encoding Settings
When you have opened a video, copy the settings shown below by selecting them from the drop down menus on the left. Select MPEG-4 AVC (x264) from the Video drop down menu. Select AAC (FAAC) from the Audio drop down menu. Finally select MP4 from the 'Format' list at the bottom of that section :
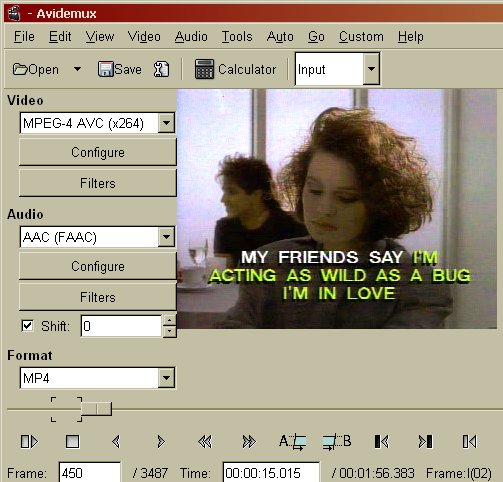
If you see neither of these options listed then try another MP4 option for video or another audio option (eg. MP3).
Deinterlacing
The next thing that we might want to do to the video file is to add a deinterlace filter. This would be appropriate if you had a video that was edited from a DV camera and is still interlaced.
There is help elsewhere on how to Deinterlace.
Screen size and Bitrate
The screen size and bitrate you use really depends on what you want to do with the MP4 file you are creating.
There is help elsewhere on how to change screen size and bitrate.
Saving the file
To save the file click on the 'Save' button.
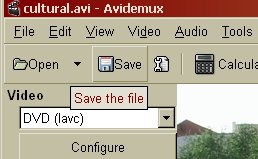
You will see a pop-up box that may look a little like this:
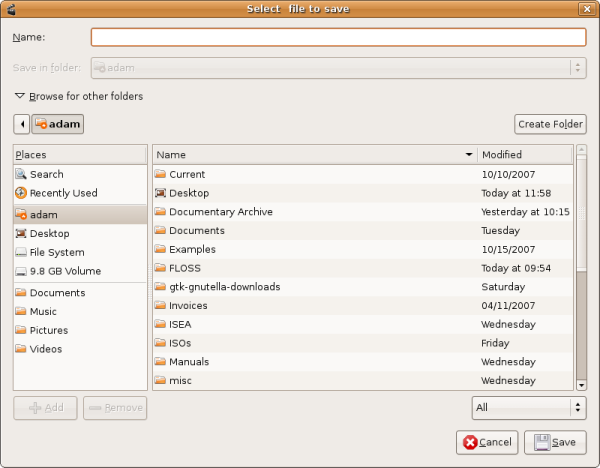
Choose a place to save the file by browsing your computer using the list of folders displayed. Then in the name field:
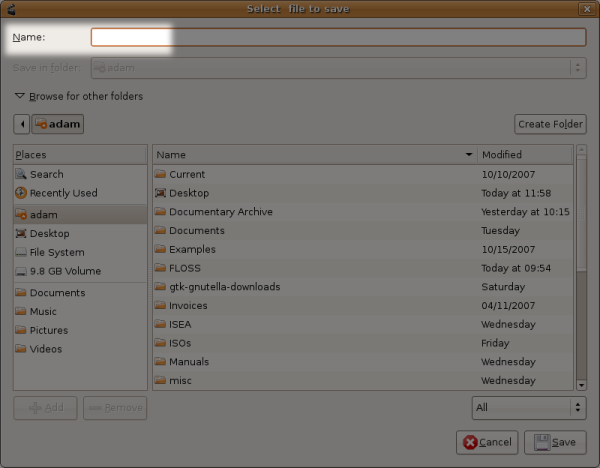
write in the name you want the file to be called and end the name in ".mp4". When you are finished press 'Save'.
You should see a box which lets you know how long you have to wait for the encoding to finish and shows the encoding progress.
You'll get a success message if the encoding works correctly. You can now play the file in a media player.
Creating MPEG-4 AVI
Software name : Avidemux
Software version : 2.4
This chapter will show you how to create a AVI file from an existing video file. There are many reasons why you may need to create a AVI file from an existing video file - to make a downloadable preview file for a longer movie that can be viewed in VLC player, for example.
I will assume that you already have a video file which you want to turn encode.
If you don't already have a suitable video file, then you may need to either :
- export a file from a video editing programme
- capture a DV tape to a file on your hard drive
Opening the Original File
So, assuming you have a file ready to go...Open the video file you already have. This should be as high quality as you can - this is because every time you convert a video file into another type of file quality is lost. So you want to start with the highest quality file as possible to ensure the newly created file is the highest quality it can be. Ideally it will be a DV file exported from a video editing program or captured from a camera or an MPEG-2 file or VOB from a DVD.
Click on 'File' and then on 'Open' :
You will see a window appear that you can use to browse your computer to find the file you want. Highlight the file you wish to open and either double-click on it or press 'Open'.
Encoding Settings
When you have opened a video, copy the settings shown below by selecting them from the drop down menus on the left. Select MPEG-4 ASP (Xvid4) from the Video drop down menu (please note the relationship between the encoder and format in the drop-down menu - Xvid is the software library that's used for encoding, while MPEG-4 ASP is the video format the Xvid library encodes into). Select MP3 (LAME) from the Audio drop down menu. Finally select AVI from the 'Format' list at the bottom of that section :
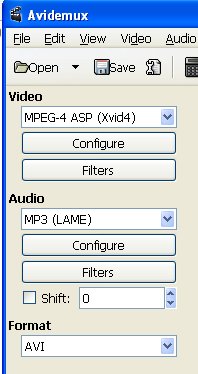
Click .
Deinterlacing
The next thing that we might want to do to the video file is to add a deinterlace filter. This would be appropriate if you had a video that was edited from a DV camera and is still interlaced.
There is help elsewhere on how to Deinterlace.
Screen size and Bitrate
The screen size and bitrate you use really depends on what you want to do with the MP4 file you are creating.
There is help elsewhere on how to change screen size and bitrate.
Saving the file
To save the file click on the 'Save' button.

You will see a pop-up box that may look a little like this:

Choose a place to save the file by browsing your computer using the list of folders displayed. Then in the name field:

write in the name you want the file to be called and end the name in ".avi". When you are finished press 'Save'.
You should see a box which lets you know how long you have to wait for the encoding to finish and shows the encoding progress.
You'll get a success message if the encoding works correctly. You can now play the file in a media player.
Create DVD file
Software name : Avidemux
Software version : 2.4
The following material will show you how to create a MPEG-2 file which can be used to create a Video DVD. The process does not cover creating the DVD itself, just preparing a file that can be used for creating a DVD.
It's assumed that you already have a video file which you want to turn into a DVD file that will play on PAL system TVs. This may be a DV or AVI file, or other file. Usually this file has come from capturing video from a tape or it's a file from a video editing programme. It may also be a file you have downloaded from the Internet.
If you don't already have a suitable file, then you may need to:
- export a file from a video editing programme
- capture a DV tape to a file on your hard drive
- download an appropriate file
The file should be as high quality as you can get - this is because every time you convert a video file into another type of file quality is lost. So you want to start with the highest quality file as possible to ensure the newly created file is the highest quality it can be. Ideally it will be a DV file exported from a video editing program or captured from a camera or an MPEG-2 file or VOB from a DVD.
Opening the File
So, assuming you have a file ready to go... Open the source file you have for your DVD. Click on 'File' and 'Open' :
You will be presented with a file browser. Find the DV file or similar on your computer by browsing the files and folders. You can't mess anything up doing this so just click around until you find the file you want. When you have found it, highlight it by clicking on it and then either double-click on it or press 'Open'.
The video should then open up in the screen in the centre of Avidemux.
DVD Encoding Settings
Now you will see the front of the Avidemux application again. Select from the top menu 'Auto' and then 'DVD'
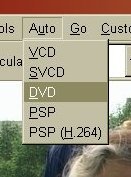
You will see a pop-up window from which you can choose the relevant aspect ratio for source and destination of your project. 16:9 gives a widescreen effect in this example our video is 4:3 shape.
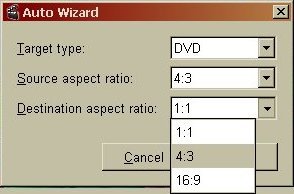
Choose the correct settings from the drop down menu. When you have done so click 'OK' on this pop-up window.
Saving the File
To save the file click on the 'Save' button.
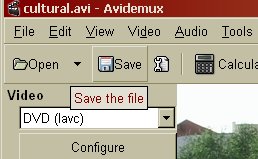
You will see a file browser open :

Choose a place to save the file by clicking on the folders you see. The you need to give the file a name by typing this into the text box at the top:

Make sure the name ends in ".mpg". When you have done this click 'Save'.
You should see a box which lets you know how long you have to wait for the encoding to finish and shows the progress:
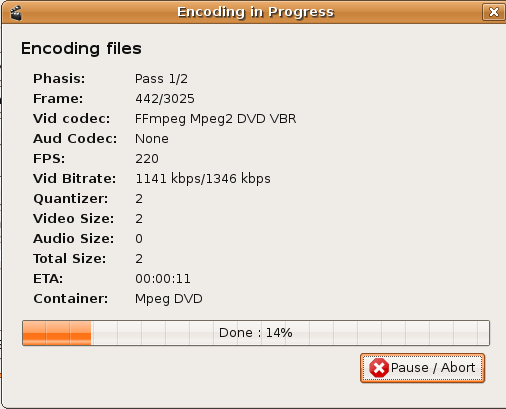
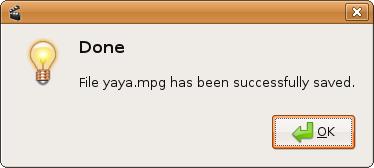
When it's done you'll get a success message if the encoding works correctly :
Next steps
The ultimate test to see if your file has been encoded currently is to try to make a DVD with it. Most DVD authoring programmes will tell you if your file is the right format or not when you try to import it.
Create MPEG-1 / VCD File
Software name : Avidemux
Software version : 2.4
MPEG-1 files are useful for use in computers with low specifications. They can also be played by nearly all computers without having to install additional software. This makes them ideal when creating a CD-ROM or an internet video file that you want to be very compatible.
I assume that you already have a video file which you want to turn encode.
If you don't already have a suitable file, then you may need to :
- export a file from a video editing programme
- capture a DV tape to a file on your hard drive
- download an appropriate file
The file should be as high quality as you can get - this is because every time you convert a video file into another type of file quality is lost. So you want to start with the highest quality file as possible to ensure the newly created file is the highest quality it can be. Ideally it will be a DV file exported from a video editing program or captured from a camera or an MPEG-2 file or VOB from a DVD.
Opening a File
You probably have a file on your harddrive that you wish to open. To do this click on main tool bar 'File' and then 'Open' :
Find the DV file or similar on your computer by browsing the files and folders. You can't mess anything up doing this so just click around until you find the file you want. When you have found it, highlight it by clicking on it and then either double-click on it or press 'Open'.
Deinterlacing
The next thing that we might want to do to the video file is to add a deinterlace filter. This would be appropriate if you had a video that was edited from a DV camera and is still interlaced.
There is help elsewhere on how to Deinterlace
Select VCD template
Next we want to select 'VCD' from the 'Auto' menu item :
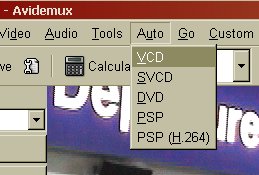
This pop-up window will appear :
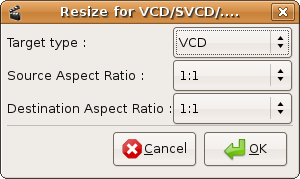
Select the Aspect Ratio from the drop down menu that matches your original file (the Source) and the file you are creating (the Destination). Usually you will use '4:3' for mpeg1 files. When you have chosen the right setting press 'OK' on this window and you will be returned to the interface of Avidemux.
This template will sort out the screen size and bitrate of your output file for you.
Saving the file
To save the file click on the 'Save' button.

You will see a file browser open :

Choose a place to save the file by clicking on the folders you see. The you need to give the file a name by typing this into the text box at the top:

Make sure the name ends in ".mpg". When you have done this click 'Save'.
You should see a box which lets you know how long you have to wait for the encoding to finish and shows the encoding progress.
When its done you'll get a success message if the encoding works correctly :

Create a DV file
If you are working with Video recorders that don't record as a DV file then you might need to convert them before you can edit them.
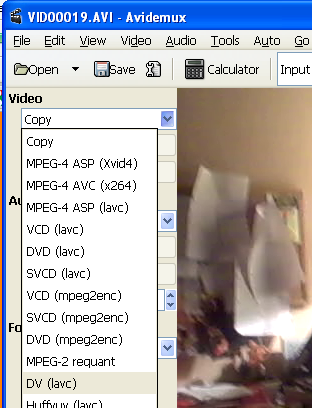
First open up your file and the select DV from the drop down list.
Then you should select Filters.
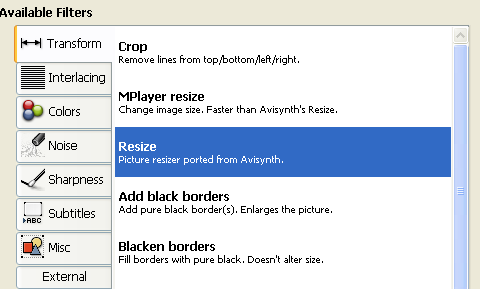
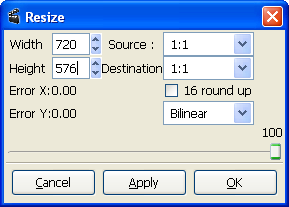
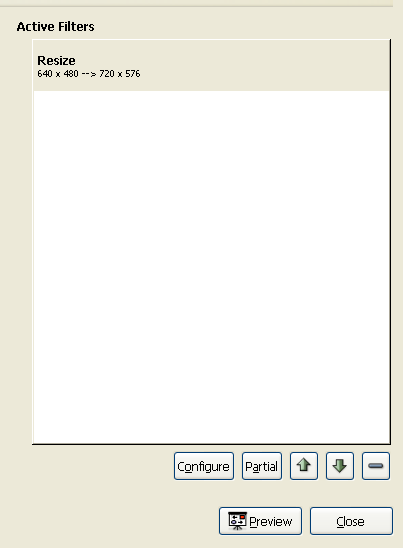
Click on 'Resize' as our DV file needs to be 720 x 576 (if we are working with PAL video )
Fill out the details as below and then click 'OK'
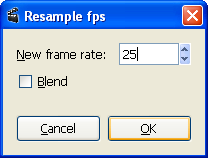
Now we need to resample the frame rate of the Video.
Click on Filters again and select Resample Framerate.
Fill out 25 as the frame rate per second.

Click 'OK'. Then click on 'Close' for the filter window.
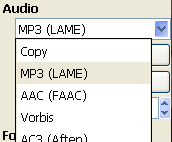
Then select wav PCM from the Drop down Audio list.
(Or if that doesn't work you can try mp3 as a bit of hack)
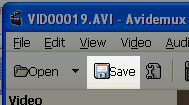
Then you can click on Save to save the file.
You can now try to edit the file in your video editing programme by Importing it in to a project.
If this doesn't work try using a camera that shoots in DV format!
Permanent Subtitles
Software name : Avidemux
Software version : 2.4
If you want your subtitles to be 'burned' permanently into the video image rather than overlayed then you can do this with the Subtitler filter in Avidemux. It is much quicker to create an external timecoded subtitle file and burn it to the image than to manually create and place them in a video editing programme.
First open your video file. In this case we are using a MPEG-2 file in order to create a DVD but the process will work with an MP4 or MPEG-1 file or similar.
Select 'File' and 'Open':
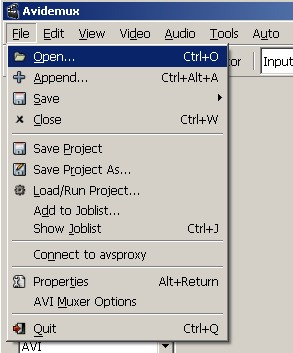
In this example we are going to select the 'Auto' and 'DVD' option to create an MPEG2 file ready for a DVD. Look at other parts of the help to make sure that you choose the right encoding options.

Add Subtitler Filter
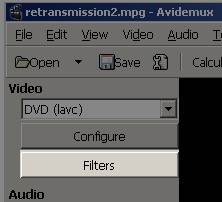
Click on the 'Filters' button on the left of the screen
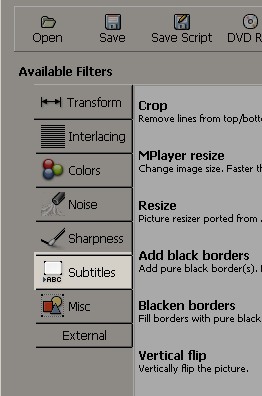
Then in the filters menu click on the 'Subtitles' image on the left.
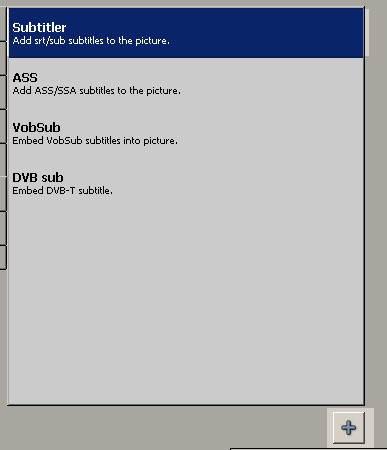
Click on the 'Subtitler' option and click on the '+' button at the bottom of the window.
Choose the srt file you want to add to the video file.
Change Font Type and Size
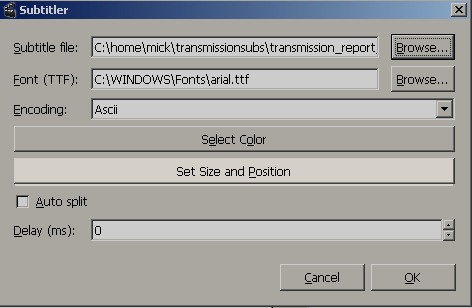
Choose the font. Make sure this window points to a valid font. The default is set for a Linux installation. So if you are on Windows or Mac you will need to choose one from your fonts directory. A typical location for a font in windows is 'C:WINDOWS\Fonts\arial.ttf'
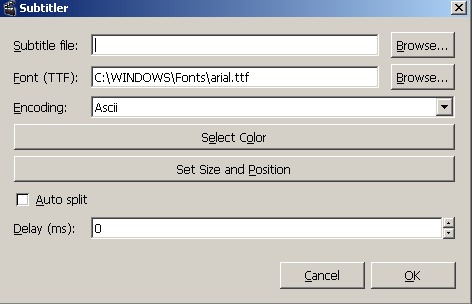
To change the font size and position, click on the 'Set Size and Position' button.
Choose a size for your font. '32' seems a good choice if your video file is full screen (ie 720 pixels wide). A font size of '24' seems to work quite will for a video file that is quarter screen (around 320 pixels wide).
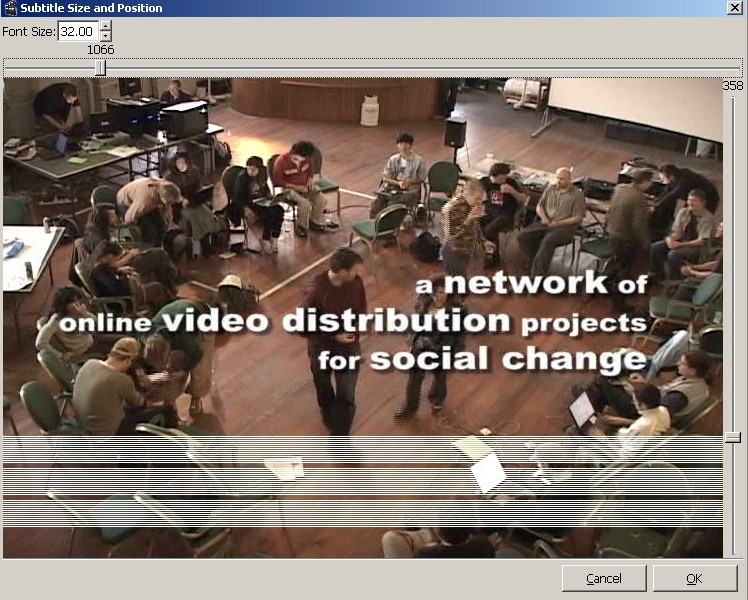
There is a slider on the left which allows you to alter the position of the subtitle on the screen. The slider at the top of the screen allows you to preview the video file and check that the position is correct.
Click 'OK'.
Previewing the Subtitles
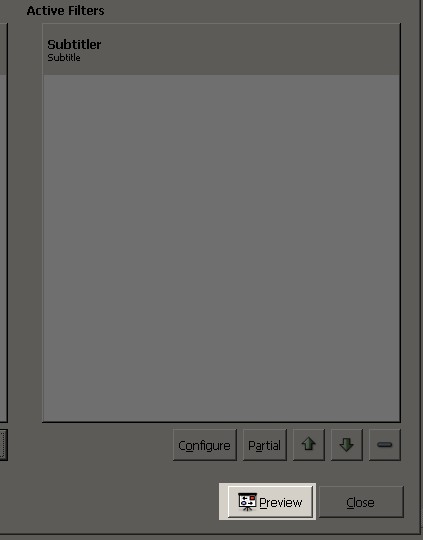
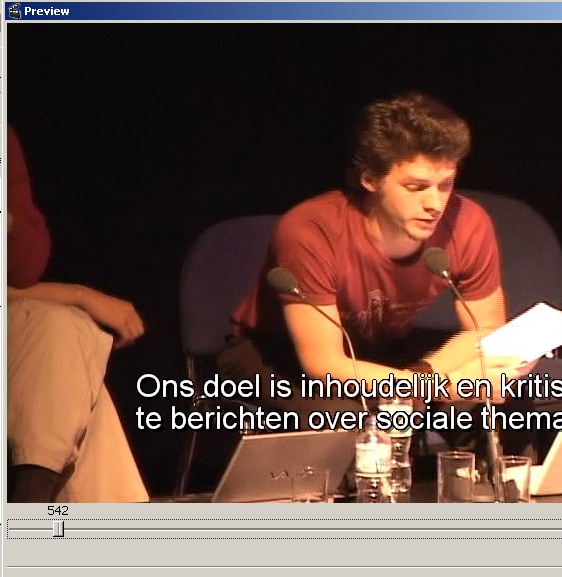
In the 'Filters' menu click on 'Preview' to check that the subtitles are readable and appear in the right place.
There is a slider at the bottom of the screen to allow you to preview each part of the video.
Then click 'Close' to return to the main menu
Saving your File
Click on the 'Save' button at the top of the screen and choose a location for your video file.
Your file with hard burned subtitles is now ready to use in a DVD project or to upload to the Internet as you need.
Extracting a DVD file from a DVD
Software name : Avidemux
Software version : 2.4
This is something you might want to do if you are creating a compilation DVD or adding language support to a DVD. You'll need to extract an MPEG-2 file from the DVD in order to use it in a DVD authoring program. If the DVD is encrypted this will not work and you will need to decrypt the DVD first (we will not look at how to decrypt DVDs here).
If you want to save a video file of a different kind (mp4 or xvid avi) then you should follow the first part of this chapter and then follow the instructions in other chapters.
Opening your DVD file
To extract the MPEG-2 file we need to import one or several VOB files that make up the content of the DVD.
To see more clearly what this means have a look at the structure of a DVD. If you insert one into a computer and use a file browser to look at what is on the disk you will see a VIDEO_TS directory and some files of various names inside of it. For example, you might see something like this :
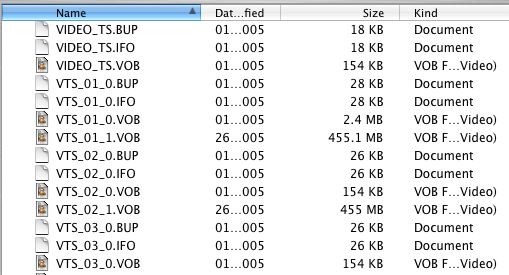
It is the large VOB files that we are interested in. VOB means Video OBjects, so it might sound like these files are just video files but they also contain audio and subtitle information. To make it a little more confusing, VOB files can actually contain more than one video file - this would be the case for a DVD that lets you switch perspective (camera angle) for example.
Some of the VOB files also contain menu information. The first VOB file we see in this example that is likely to contain a Video is VTS_01_1.VOB. To test if it is the one you want you might try to open the file in a player like VLC player.
The other thing we are likely to see when opening a DVD VIDEO_TS file is several large video files of the same size followed by a smaller one. This is likely to be a large film, as there is a maximum filesize on DVD's of just over 1GB.

However sometimes there might be several films that are divided up by 'chapters'.
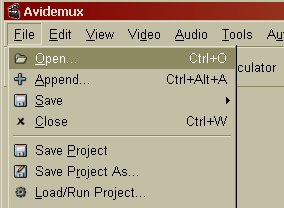
To import these VOB files into Avidemux Select 'File' from the Avidemux top menu and choose 'Open' :
You will now see a file browser and you must locate the DVD and open the VIDEO_TS folder :
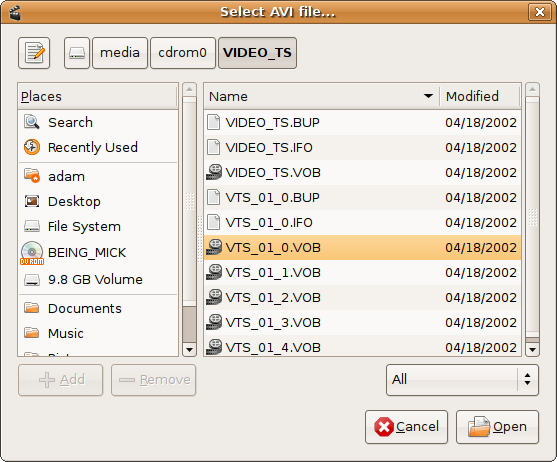
Now you need to locate the VOB file you wish to extract. Just highlight it and press on the 'Open' button at the bottom left - we will choose the VTS__01_0.VOB file in the example above. This will open up a small window which will ask you if you wish to index the file:

Its a good idea to index the file so press 'YES' (infact Avidemux won't open MPEG files that are not indexed). If there are more than one VOB file in the directory then Avidemux will ask you if you wish to append the files :
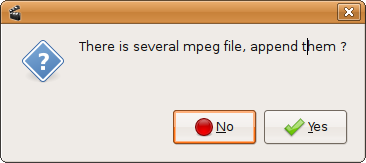
You can press 'Yes' if you wish to append (join) the files together. If this doesn't happen (or if you click on 'No') then you can add the files manually by clicking on selecting 'File' from the top menu of Avidemux and clicking on 'Append'.
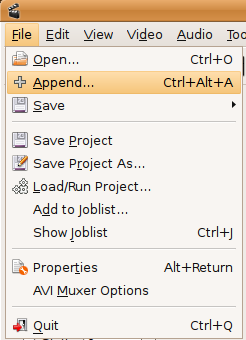
Using the 'Append' will enable you to choose one or more additional VOB files to join together. This adds the contents of the other files without disgarding the first one you opened. However we are not going to do this in this example, instead we will just press 'No' and then we will see a box telling us that the VOB file we have chosen is being indexed :
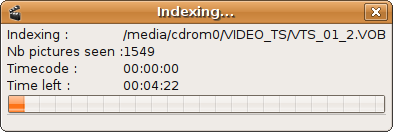
This might take a while depending on the size of your file and how fast your machine is. When this process is finished then Avidemux will open the file, this will take a while also. While this is happening you should see a dialog like this :
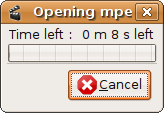
When this dialogue box has finished you are ready to change the settings to save your file. If you don't want to create an Mpeg2 (DVD compliant file) then you should follow instructions in other chapters.
Changing settings and saving as Mpeg2 file
We don't want to re-encode the Video and Audio as they are already compatable for a DVD but we do want to change the container to a VIDEO - PS. To do this click on 'Format' on the front of Avidemux and choose MPEG PS :
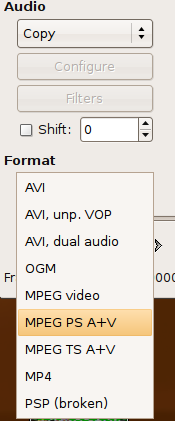
Then choose 'Save' :

You will be presented with a pop-up browser window
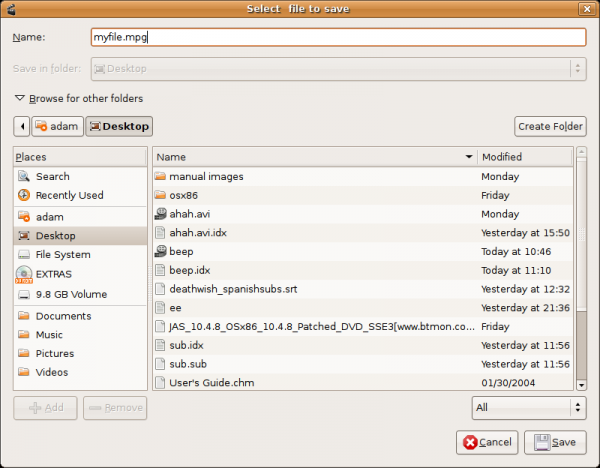
In the top text field you need to type a name for the file you will save (make sure it ends with '.mpg') and then press 'Save' at the bottom right of the above window. You will see a progress bar displaying how the save process is going:
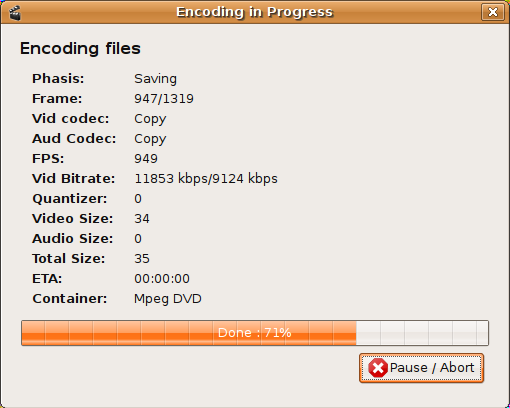
When the process is finished you will not receive any feedback but you will find the file where you told Avidemux to save it.
Extracting DVD Subtitles
Software name : Avidemux
Software version : 2.4
If you want to extract subtitle files from a DVD you should understand a little how they work. Subtitles in DVDs are contained in VOB files along with the main video and audio streams. We can call them all streams here to account for the difference between a self contained file and a stream. Several streams can be included in a file.
The subtitles you see on a DVD are streams of images files which appear one after the other. Each stream displays a different language. When we extract these streams of subtitles the most handy format we can save them as is actually a text file which has the timecode of when the text appears. If the subtitle file you have is in text rather than image format it makes it easier to edit it and translate it. You can easily send that file via the internet or put it on a website for others to download.
In order to create a text-based subtitle file we first need to extract the images files from the DVD to two files:
- an *.idx file which has the time code of the image subtitles (this is called a VobSub file)
- and a *.sub file and contains the image information.
We can then convert those files into a single text based subtitle file. There are many different formats but Avidemux uses a very compatible one with the '.srt' extention.
note : Screenshots in the following explanation are a combination of Ubuntu (Linux) and Windows operating systems. Avidemux works well in both and the interface looks the same except for a few color differences.
Extracting to an idx / VobSub file
From the Tools menu select 'VOB' and then 'VobSub'
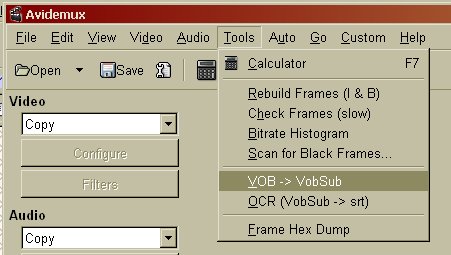
Then you should see the following screen asking you to Browse for three things.
- VOB file(s)
- IFO file
- VobSub file
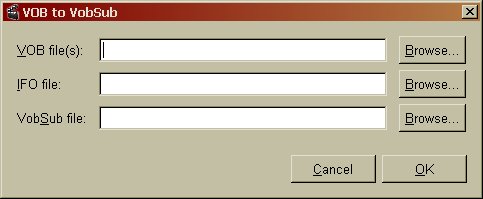
Finding the VOB Files
When you click on the first Browse button in the above image we are asked to browse for the VOB files :
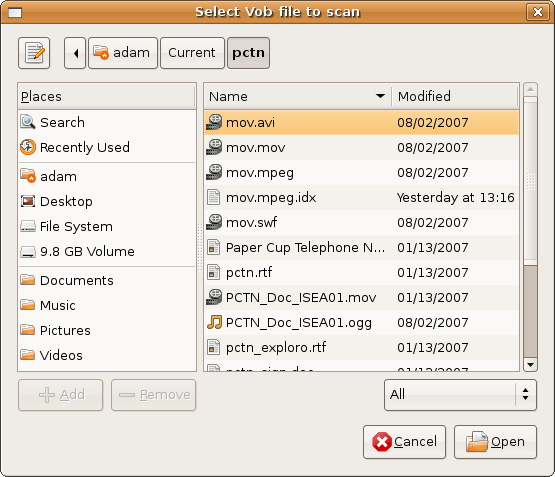
However sometimes it's not that clear where they are. The files we want are in a folder on the DVD (if you are doing this for files on a DVD) called VIDEO_TS folder.
Normally for a short film there is only one VOB file with video data in it. For longer films there is normally more than one, because there is a maximum file size for the VOB files.
Let's have a look at a complicated DVD structure. There are some small entries in the structure which are system files and files for the menu - we should ignore these. The files with the video, audio and subtitle files we need are the big ones. They start with names like VTS_02_1.VOB,VTS_02_2.VOB, VTS_02_3.VOB, VTS_02_4.VOB. If you click 'Browse' next to 'VOB Files' then you should browse to the appropriate directory ('VIDEO_TS') and you should see something like this :
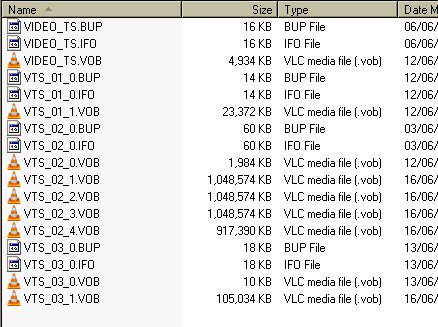
For this task we need to select the first big VOB which in this case is VTS_02_1.VOB. The ones following it will be selected automatically. When you have selected the right one click on 'open' :

Locating the IFO file
If you click on the second button :
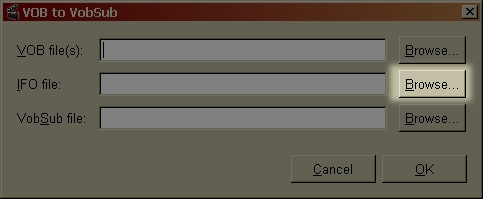
you will be asked to look for the IFO file. The IFO file has information on what language the different subtitle streams are, so we need to browse to find this file. If there is more that one IFO file in the DVD we need find the one that has the same beginning as the large VOB files. In this case it is VTS_02_0.IFO
When you have found it click on 'open' :

Select where to save the VobSub files
The third button :
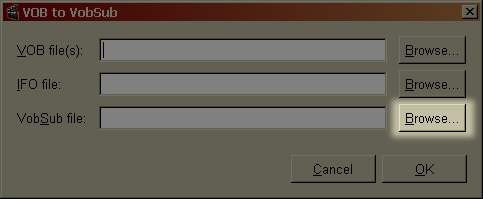
will ask you to browse for a place to save the VobSub file. When you have found the right directory write the name of it in the box next to 'Name:' and make sure it ends with '.idx'. The below is an example (you can use any name, 'subs' is just my example) :
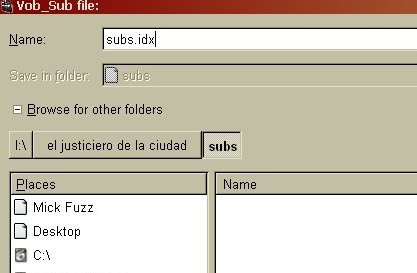
When you have done this, and if the other three boxes are complete, then press 'Save' :
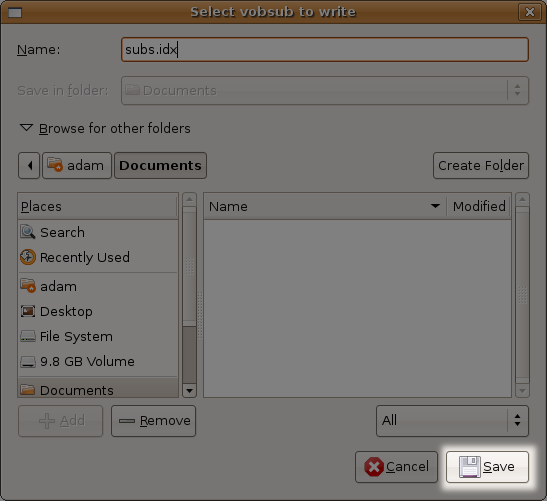
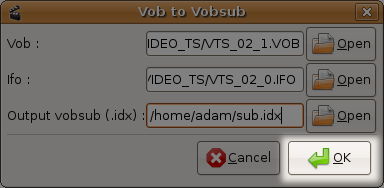
Saving your files
When you have found or selected all the files. Then click 'OK' to shut the small window with the small buttons :
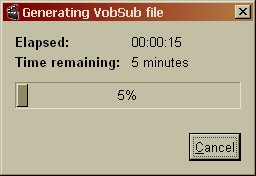
and you'll get a window telling you how long the process will take.
When this process is complete you will have created a new .idx file and and new .sub file. These will be saved in the directory you choose for saving the .idx file. In my case I saved them to the desktop :
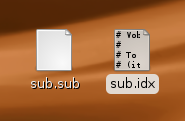
Making the '.srt' File
Now we want to merge the idx file and the .sub file into a '.srt' file. Click on the top menu 'Tools' and then 'OCR (VobSub -> Srt)':
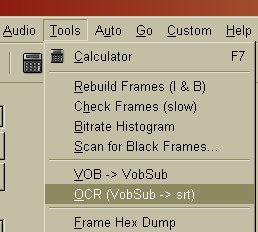
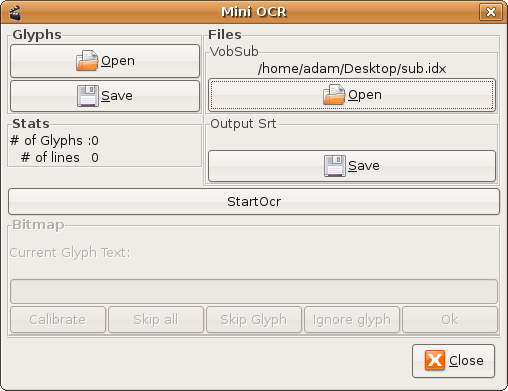
You should see a window titled 'MiniOCR'.
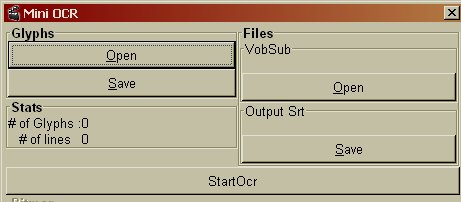
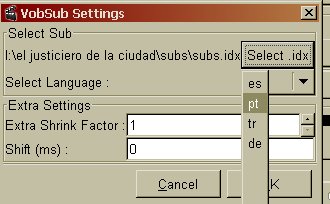
Click on the 'Open' button under 'VobSub'. You will then see a window called 'VobSub Settings'.
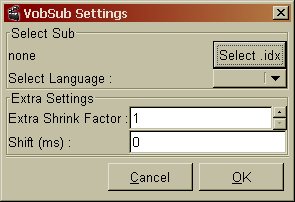
Click on 'Select .idx' and browse for and select the idx file you created in the 'Extracting to an idx / VobSub file' section.
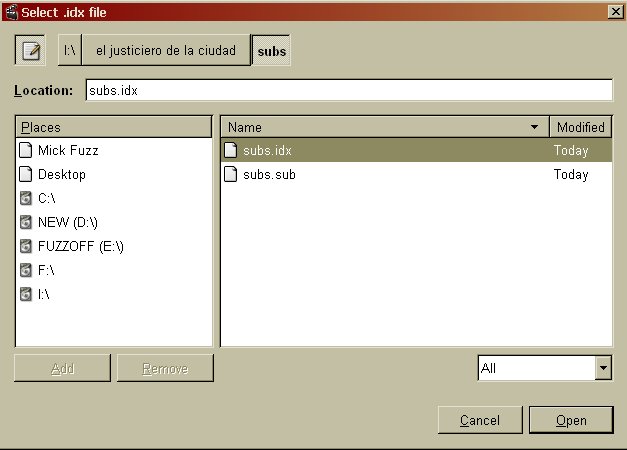
Click on 'Open' when you have selected the idx file. You should return to the 'VobSub Settings' window :
If the DVD you are using has more than one language it should be displayed in the 'Select Language' drop down box. Select the language you want to create a subtitle file for.
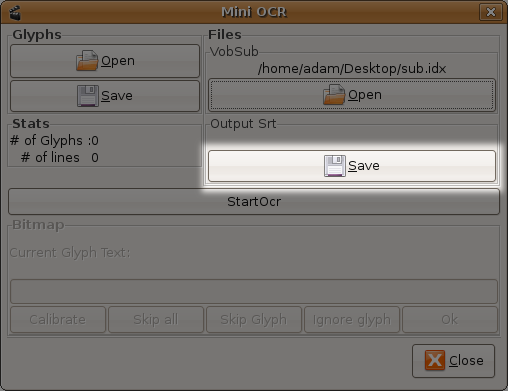
When you have the right language selected click 'OK', and you should return to the 'MiniOCR' window. Now you need to select a place on your computer to save the target *.srt file to. Click on the 'Save' button in the 'Output srt' section :
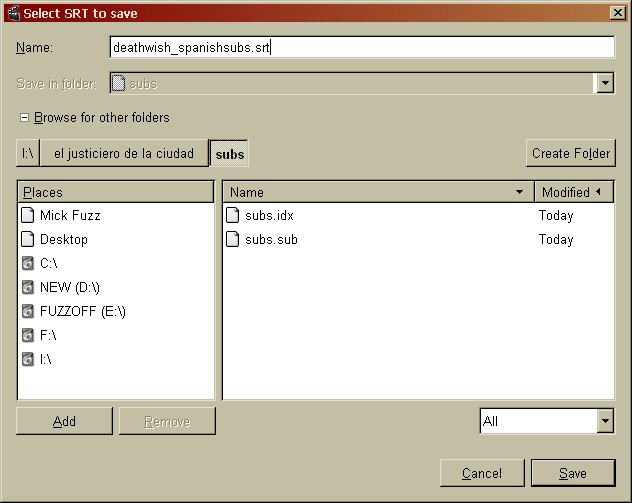
You will see a window asking you to choose a folder to save the srt file in.
 '
'
Browse until you find the right place. When you have, give the file a name by typing in a name in the box at the top

make sure the name ends in '.srt' and then click 'Save'

Now you have set your input and output files you can start the process of converting the images file in to a text file. This process is called OCR. Click 'Start OCR'.
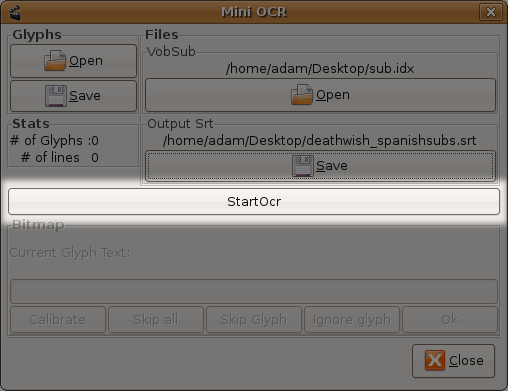
You should see a window like this:
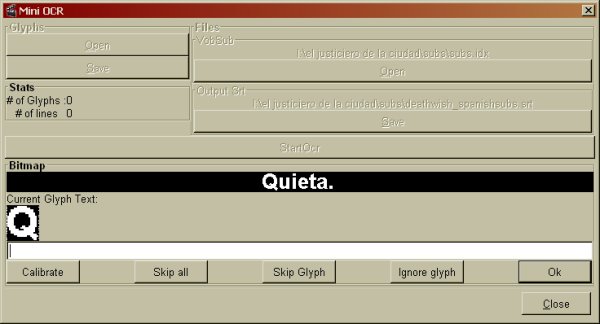
The OCR (Optical Character Recognition) process needs you to tell it what the characters (letters and numbers + symbols) in the subtitles are. It will display a character from the image subtitle and you have to then tell the application what the corresponding text character is. Avidemux will show you a phrase and one character for that phrase like this:
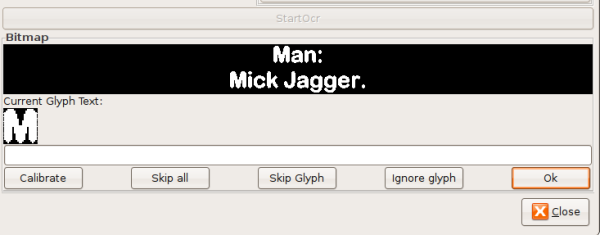
Now you must type the right character in the empty text field.
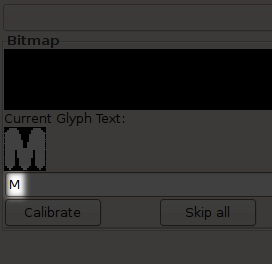
You do this because it is more accurate for you to specific exactly what the characters are than for the application to guess.
Where it says 'Current Glyph Text:' and shows an image of a character you need to enter that character using the keyboard in the box below and then click 'OK'. It does make a difference if it is a capital letter or a lower case letter. Also this process is very unforgiving at the moment. There is no undo option, so don't get it wrong!
Sometimes 2 characters well be selected. You should enter those two characters and click enter. This may seem to be taking a long time but when you have entered all the characters and numbers the program should fly through the subtitles. You should be able to process a 90 minute film in 5 -10 minutes.
When you are finished the '.srt' file you saved will have the right timecode and subtitle information in it. You can open it with a text editor and it should look something like this:
1
00:00:10,991 --> 00:00:13,991
 Man:
 Mick Jagger
2
00:00:18,565 --> 00:00:21,565
 - Mick Jagger
 - Thank you
3
00:00:32,479 --> 00:00:35,479
 - Man: Mick Jagger.
 - ( police radio squelch )
4
00:01:04,778 --> 00:01:06,011
 Man:
 one minute! one minute!
Creating Templates
Software name : Avidemux
Software version : 2.4
To make encoding as easy possible, many encoding applications have groups of options that are pre-set for different purposes. Most applications let you set these 'templates' yourself. Avidemux is no exception except that the presets for Avidemux are a bit tricky to use. I am going to assume you have a video file open already in Avidemux: my file looks like this:
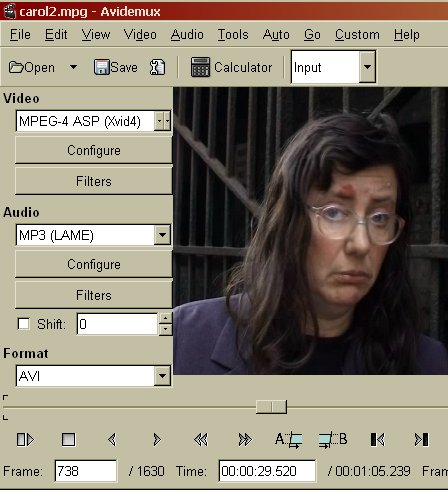
Creating the Template
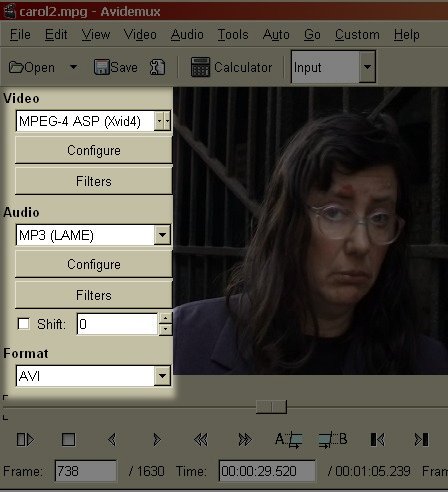
Now change the settings under 'Video', 'Audio' and 'Format' as you want them.
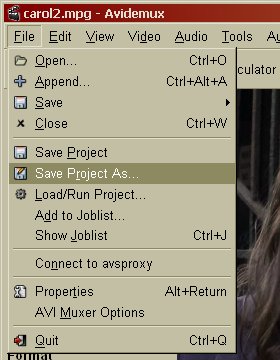
Then select 'File' from the top menu and click on 'Save Project as'.
You will see a pop up file browser, it should look something like this :
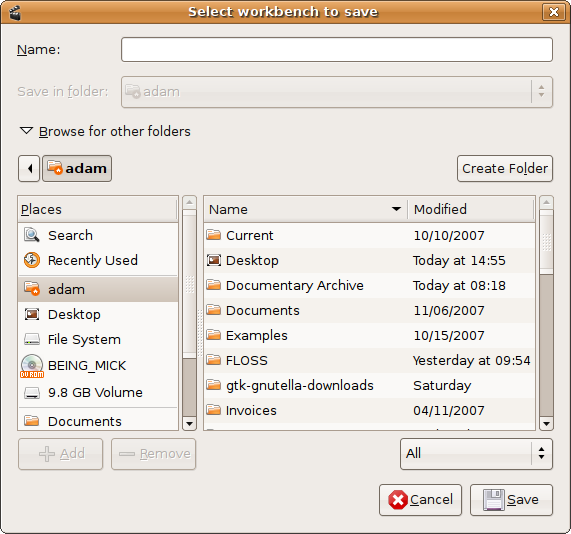
Browse around until you find the directory where you wish to save the 'preset' information. Now in the top text field type in a name for the preset :

Give it any name and save it in your home folder or somewhere easy to find. Then click 'Save' :

Editing the Template
This process has just created a text file. You can now open this text file with a simple text editor like notepad or text exit. If you do this it should look something like this :
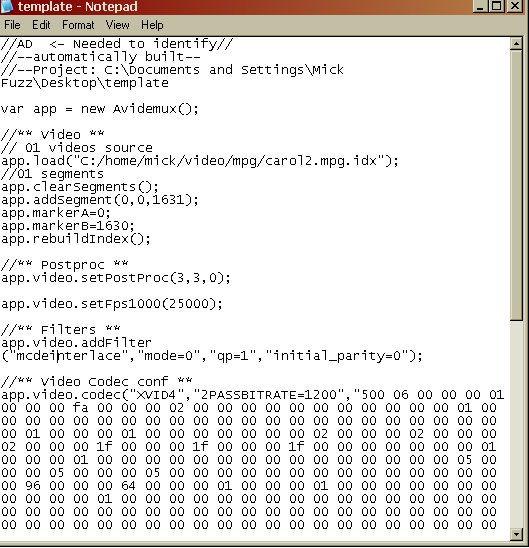
Remove the part of the document which details the video source (where the video file is located on your computer). Because we are making a template Avidemux doesn't need to know this.
To do this delete the text in the example file which reads
 // 01 videos source
 app.load("C:/home/whatever/yourvideo.avi");
Also under video, remove all lines right under the '// 01 videos source', including, marked '//01 segments', for a total of 6 lines.
And then Save this file from within your text editor. When saving make sure that you give it a descriptive name and that the file ends in a '.js' suffix. For example, if you are using Notepad (Windows) then when you save the file it would look something like this:
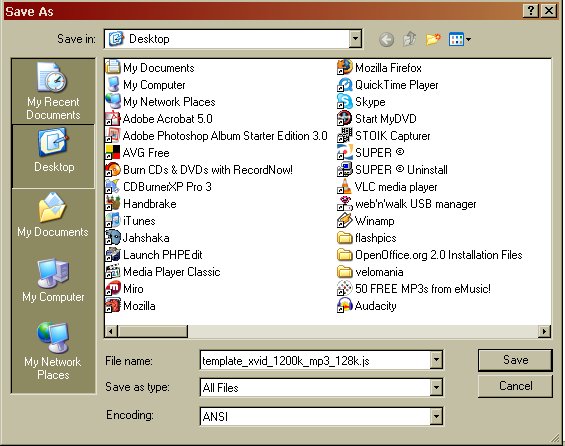
Saving the Template (Windows)
If you using Windows then you can save the file to the Avidemux directory, typically this can be located here:
C:Documents and SettingsYour Nameavidemuxcustom
Now restart avidemux and the template should appear in the Custom Menu.

Saving the Template (Ubuntu)
If you are using Ubuntu (or any type of Linux) the file has to be saved in another location. Linux applications, in general, have a hidden folder where configuration files are kept. These folders are usually located in your 'home' directory (the directory you are in when you first log-in).
Saving the template in this directory is a little more tricky and will differ between operating systems. Let's look at the way you would do it in Ubuntu. First you will need to click 'Places' on the top menu :
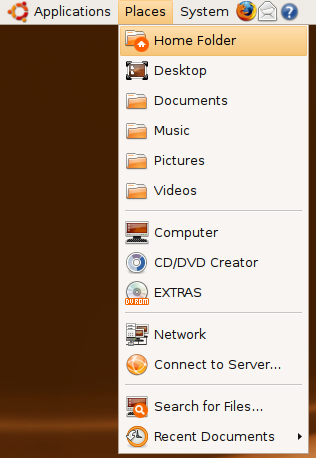
A file browser window will open :
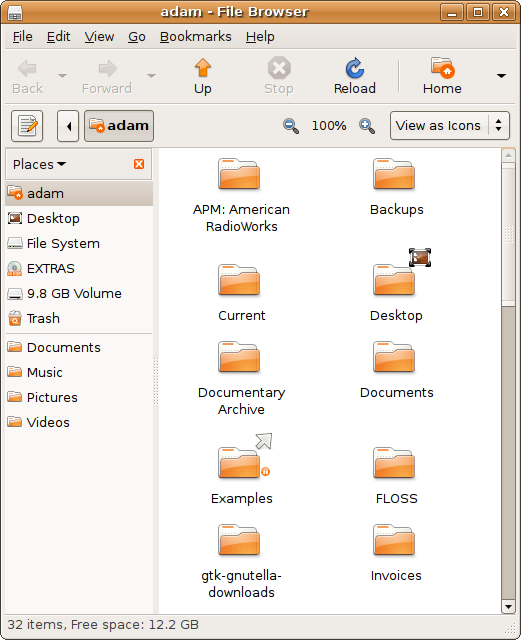
Now you will see a list of files and folder similar to the above image. The folder we want to see is actually hidden, so we have to ask the file browser to show us all the hidden files. Hidden files start with a '.' (point) so we need to find the '.avidemux' directory. To see the hidden files and folders click on the 'View' item in the file browser menu:
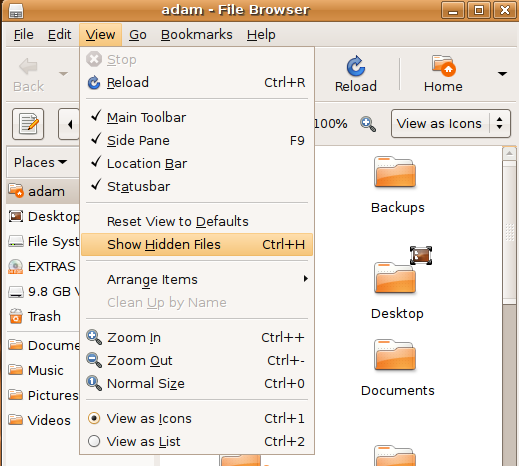
Now, to see the newly visible hidden files click on 'View' again and choose 'As list':
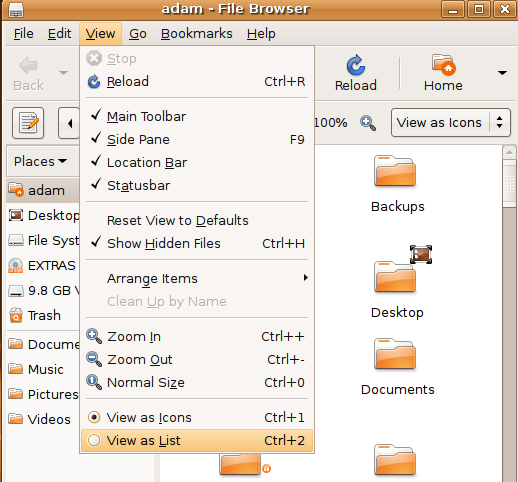
You should see the view of the file browser change.
If you use the scroll bar on the right and scroll down you will soon see the '.avidemux' folder:
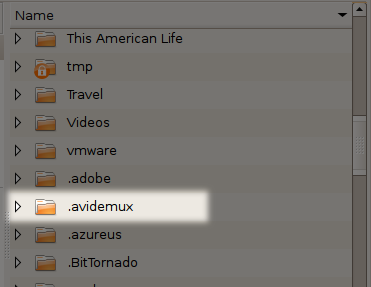
Now double click on the folder and you will see its contents :
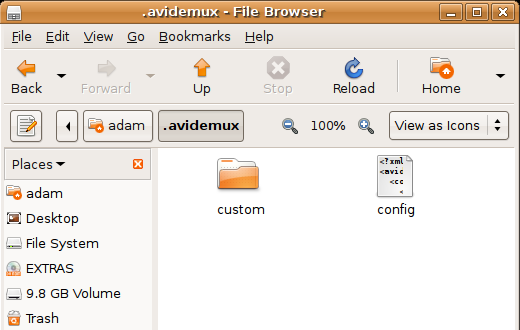
Now you can drag the '.js' file to the 'Custom' folder icon. This will move the '.js' file to the 'Custom' folder.
To make sure it has been moved you can double click on the 'Custom' folder and check to see if the file is there:
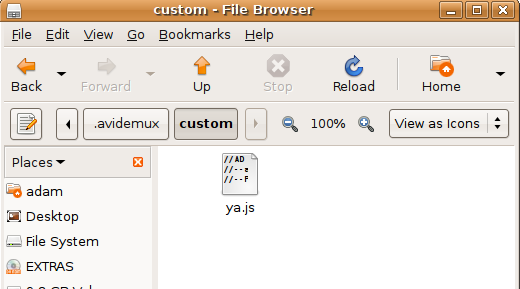
When you have done this restart Avidemux and you should see the new template listed :
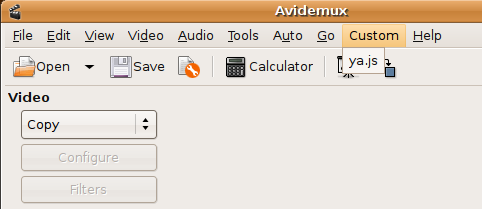
To use a template, first load the file you want to edit then click on the custom template.
License
All chapters copyright of the authors (see below). Unless otherwise stated all chapters in this manual licensed with GNU General Public License version 2
This documentation is free documentation; you can redistribute it and/or modify it under the terms of the GNU General Public License as published by the Free Software Foundation; either version 2 of the License, or (at your option) any later version.
This documentation is distributed in the hope that it will be useful, but WITHOUT ANY WARRANTY; without even the implied warranty of MERCHANTABILITY or FITNESS FOR A PARTICULAR PURPOSE. See the GNU General Public License for more details.
You should have received a copy of the GNU General Public License along with this documentation; if not, write to the Free Software Foundation, Inc., 51 Franklin Street, Fifth Floor, Boston, MA 02110-1301, USA.
Authors
CREATE MPEG1 / VCD FILES
© mick fuzz 2007, 2009
Modifications:
adam hyde 2007, 2008
Jakub Misak 2008
Robert Hammer 2007
Zita Joyce 2008
CREATE XVID AVI FILES
© mick fuzz 2008, 2009
Modifications:
adam hyde 2008
Jakub Misak 2008
CREATE DV FILES
© mick fuzz 2009
CREATE MP4 FILES
© mick fuzz 2007, 2009
Modifications:
adam hyde 2007, 2008
Jakub Misak 2008
Robert Hammer 2007
Zita Joyce 2008
CREDITS
© adam hyde 2006, 2007, 2008
DEINTERLACING VIDEO
© mick fuzz 2007
Modifications:
adam hyde 2007, 2008
Robert Hammer 2007
CREATE DVD FILES
© mick fuzz 2007, 2009
Modifications:
adam hyde 2007, 2008
Jakub Misak 2008
Robert Hammer 2007
Zita Joyce 2008
EXTRACT DVD SUBTITLES
© mick fuzz 2007
Modifications:
adam hyde 2007, 2008
Robert Hammer 2007
Zita Joyce 2008
UBUNTU
© adam hyde 2007, 2008
Modifications:
Janet Swisher 2008
Matteo Cortese 2008
WINDOWS
© adam hyde 2007, 2008
Modifications:
Robert Hammer 2007
Zita Joyce 2008
INTRODUCTION
© mick fuzz 2006, 2008
Modifications:
adam hyde 2006, 2007, 2008
Andrew Lowenthal 2008
Go Linux 2008
Robert Hammer 2007
Samuel Chapelin 2008
Zita Joyce 2008
EXTRACT DVD FILES
© mick fuzz 2007, 2008, 2009
Modifications:
adam hyde 2007, 2008
Jakub Misak 2008
Robert Hammer 2007
Zita Joyce 2008
OPEN A FILE
© mick fuzz 2007
Modifications:
adam hyde 2008
Robert Hammer 2007
Zita Joyce 2008
ADD SUBTITLES TO FILES
© mick fuzz 2007, 2008
Modifications:
adam hyde 2008
Jakub Misak 2008
Robert Hammer 2007
Zita Joyce 2008
RESIZING VIDEO
© mick fuzz 2007, 2009
Modifications:
adam hyde 2008
Andrew Lowenthal 2008
Robert Hammer 2007
Zita Joyce 2008
CREATE PRESETS
© mick fuzz 2007
Modifications:
adam hyde 2007, 2008
Go Linux 2008
Joseph Torzewski 2008
Robert Hammer 2007
Zita Joyce 2008
TRIMMING A FILE
© mick fuzz 2009
Modifications:
Leonardo Zangrando 2010

Free manuals for free software
General Public License
Version 2, June 1991
Copyright (C) 1989, 1991 Free Software Foundation, Inc.
51 Franklin Street, Fifth Floor, Boston, MA 02110-1301, USA
Everyone is permitted to copy and distribute verbatim copies
of this license document, but changing it is not allowed.
Preamble
The licenses for most software are designed to take away your freedom to share and change it. By contrast, the GNU General Public License is intended to guarantee your freedom to share and change free software--to make sure the software is free for all its users. This General Public License applies to most of the Free Software Foundation's software and to any other program whose authors commit to using it. (Some other Free Software Foundation software is covered by the GNU Lesser General Public License instead.) You can apply it to your programs, too.
When we speak of free software, we are referring to freedom, not price. Our General Public Licenses are designed to make sure that you have the freedom to distribute copies of free software (and charge for this service if you wish), that you receive source code or can get it if you want it, that you can change the software or use pieces of it in new free programs; and that you know you can do these things.
To protect your rights, we need to make restrictions that forbid anyone to deny you these rights or to ask you to surrender the rights. These restrictions translate to certain responsibilities for you if you distribute copies of the software, or if you modify it.
For example, if you distribute copies of such a program, whether gratis or for a fee, you must give the recipients all the rights that you have. You must make sure that they, too, receive or can get the source code. And you must show them these terms so they know their rights.
We protect your rights with two steps: (1) copyright the software, and (2) offer you this license which gives you legal permission to copy, distribute and/or modify the software.
Also, for each author's protection and ours, we want to make certain that everyone understands that there is no warranty for this free software. If the software is modified by someone else and passed on, we want its recipients to know that what they have is not the original, so that any problems introduced by others will not reflect on the original authors' reputations.
Finally, any free program is threatened constantly by software patents. We wish to avoid the danger that redistributors of a free program will individually obtain patent licenses, in effect making the program proprietary. To prevent this, we have made it clear that any patent must be licensed for everyone's free use or not licensed at all.
The precise terms and conditions for copying, distribution and modification follow.
TERMS AND CONDITIONS FOR COPYING, DISTRIBUTION AND MODIFICATION
0. This License applies to any program or other work which contains a notice placed by the copyright holder saying it may be distributed under the terms of this General Public License. The "Program", below, refers to any such program or work, and a "work based on the Program" means either the Program or any derivative work under copyright law: that is to say, a work containing the Program or a portion of it, either verbatim or with modifications and/or translated into another language. (Hereinafter, translation is included without limitation in the term "modification".) Each licensee is addressed as "you".
Activities other than copying, distribution and modification are not covered by this License; they are outside its scope. The act of running the Program is not restricted, and the output from the Program is covered only if its contents constitute a work based on the Program (independent of having been made by running the Program). Whether that is true depends on what the Program does.
1. You may copy and distribute verbatim copies of the Program's source code as you receive it, in any medium, provided that you conspicuously and appropriately publish on each copy an appropriate copyright notice and disclaimer of warranty; keep intact all the notices that refer to this License and to the absence of any warranty; and give any other recipients of the Program a copy of this License along with the Program.
You may charge a fee for the physical act of transferring a copy, and you may at your option offer warranty protection in exchange for a fee.
2. You may modify your copy or copies of the Program or any portion of it, thus forming a work based on the Program, and copy and distribute such modifications or work under the terms of Section 1 above, provided that you also meet all of these conditions:
- a) You must cause the modified files to carry prominent notices stating that you changed the files and the date of any change.
- b) You must cause any work that you distribute or publish, that in whole or in part contains or is derived from the Program or any part thereof, to be licensed as a whole at no charge to all third parties under the terms of this License.
- c) If the modified program normally reads commands interactively when run, you must cause it, when started running for such interactive use in the most ordinary way, to print or display an announcement including an appropriate copyright notice and a notice that there is no warranty (or else, saying that you provide a warranty) and that users may redistribute the program under these conditions, and telling the user how to view a copy of this License. (Exception: if the Program itself is interactive but does not normally print such an announcement, your work based on the Program is not required to print an announcement.)
These requirements apply to the modified work as a whole. If identifiable sections of that work are not derived from the Program, and can be reasonably considered independent and separate works in themselves, then this License, and its terms, do not apply to those sections when you distribute them as separate works. But when you distribute the same sections as part of a whole which is a work based on the Program, the distribution of the whole must be on the terms of this License, whose permissions for other licensees extend to the entire whole, and thus to each and every part regardless of who wrote it.
Thus, it is not the intent of this section to claim rights or contest your rights to work written entirely by you; rather, the intent is to exercise the right to control the distribution of derivative or collective works based on the Program.
In addition, mere aggregation of another work not based on the Program with the Program (or with a work based on the Program) on a volume of a storage or distribution medium does not bring the other work under the scope of this License.
3. You may copy and distribute the Program (or a work based on it, under Section 2) in object code or executable form under the terms of Sections 1 and 2 above provided that you also do one of the following:
- a) Accompany it with the complete corresponding machine-readable source code, which must be distributed under the terms of Sections 1 and 2 above on a medium customarily used for software interchange; or,
- b) Accompany it with a written offer, valid for at least three years, to give any third party, for a charge no more than your cost of physically performing source distribution, a complete machine-readable copy of the corresponding source code, to be distributed under the terms of Sections 1 and 2 above on a medium customarily used for software interchange; or,
- c) Accompany it with the information you received as to the offer to distribute corresponding source code. (This alternative is allowed only for noncommercial distribution and only if you received the program in object code or executable form with such an offer, in accord with Subsection b above.)
The source code for a work means the preferred form of the work for making modifications to it. For an executable work, complete source code means all the source code for all modules it contains, plus any associated interface definition files, plus the scripts used to control compilation and installation of the executable. However, as a special exception, the source code distributed need not include anything that is normally distributed (in either source or binary form) with the major components (compiler, kernel, and so on) of the operating system on which the executable runs, unless that component itself accompanies the executable.
If distribution of executable or object code is made by offering access to copy from a designated place, then offering equivalent access to copy the source code from the same place counts as distribution of the source code, even though third parties are not compelled to copy the source along with the object code.
4. You may not copy, modify, sublicense, or distribute the Program except as expressly provided under this License. Any attempt otherwise to copy, modify, sublicense or distribute the Program is void, and will automatically terminate your rights under this License. However, parties who have received copies, or rights, from you under this License will not have their licenses terminated so long as such parties remain in full compliance.
5. You are not required to accept this License, since you have not signed it. However, nothing else grants you permission to modify or distribute the Program or its derivative works. These actions are prohibited by law if you do not accept this License. Therefore, by modifying or distributing the Program (or any work based on the Program), you indicate your acceptance of this License to do so, and all its terms and conditions for copying, distributing or modifying the Program or works based on it.
6. Each time you redistribute the Program (or any work based on the Program), the recipient automatically receives a license from the original licensor to copy, distribute or modify the Program subject to these terms and conditions. You may not impose any further restrictions on the recipients' exercise of the rights granted herein. You are not responsible for enforcing compliance by third parties to this License.
7. If, as a consequence of a court judgment or allegation of patent infringement or for any other reason (not limited to patent issues), conditions are imposed on you (whether by court order, agreement or otherwise) that contradict the conditions of this License, they do not excuse you from the conditions of this License. If you cannot distribute so as to satisfy simultaneously your obligations under this License and any other pertinent obligations, then as a consequence you may not distribute the Program at all. For example, if a patent license would not permit royalty-free redistribution of the Program by all those who receive copies directly or indirectly through you, then the only way you could satisfy both it and this License would be to refrain entirely from distribution of the Program.
If any portion of this section is held invalid or unenforceable under any particular circumstance, the balance of the section is intended to apply and the section as a whole is intended to apply in other circumstances.
It is not the purpose of this section to induce you to infringe any patents or other property right claims or to contest validity of any such claims; this section has the sole purpose of protecting the integrity of the free software distribution system, which is implemented by public license practices. Many people have made generous contributions to the wide range of software distributed through that system in reliance on consistent application of that system; it is up to the author/donor to decide if he or she is willing to distribute software through any other system and a licensee cannot impose that choice.
This section is intended to make thoroughly clear what is believed to be a consequence of the rest of this License.
8. If the distribution and/or use of the Program is restricted in certain countries either by patents or by copyrighted interfaces, the original copyright holder who places the Program under this License may add an explicit geographical distribution limitation excluding those countries, so that distribution is permitted only in or among countries not thus excluded. In such case, this License incorporates the limitation as if written in the body of this License.
9. The Free Software Foundation may publish revised and/or new versions of the General Public License from time to time. Such new versions will be similar in spirit to the present version, but may differ in detail to address new problems or concerns.
Each version is given a distinguishing version number. If the Program specifies a version number of this License which applies to it and "any later version", you have the option of following the terms and conditions either of that version or of any later version published by the Free Software Foundation. If the Program does not specify a version number of this License, you may choose any version ever published by the Free Software Foundation.
10. If you wish to incorporate parts of the Program into other free programs whose distribution conditions are different, write to the author to ask for permission. For software which is copyrighted by the Free Software Foundation, write to the Free Software Foundation; we sometimes make exceptions for this. Our decision will be guided by the two goals of preserving the free status of all derivatives of our free software and of promoting the sharing and reuse of software generally.
NO WARRANTY
11. BECAUSE THE PROGRAM IS LICENSED FREE OF CHARGE, THERE IS NO WARRANTY FOR THE PROGRAM, TO THE EXTENT PERMITTED BY APPLICABLE LAW. EXCEPT WHEN OTHERWISE STATED IN WRITING THE COPYRIGHT HOLDERS AND/OR OTHER PARTIES PROVIDE THE PROGRAM "AS IS" WITHOUT WARRANTY OF ANY KIND, EITHER EXPRESSED OR IMPLIED, INCLUDING, BUT NOT LIMITED TO, THE IMPLIED WARRANTIES OF MERCHANTABILITY AND FITNESS FOR A PARTICULAR PURPOSE. THE ENTIRE RISK AS TO THE QUALITY AND PERFORMANCE OF THE PROGRAM IS WITH YOU. SHOULD THE PROGRAM PROVE DEFECTIVE, YOU ASSUME THE COST OF ALL NECESSARY SERVICING, REPAIR OR CORRECTION.
12. IN NO EVENT UNLESS REQUIRED BY APPLICABLE LAW OR AGREED TO IN WRITING WILL ANY COPYRIGHT HOLDER, OR ANY OTHER PARTY WHO MAY MODIFY AND/OR REDISTRIBUTE THE PROGRAM AS PERMITTED ABOVE, BE LIABLE TO YOU FOR DAMAGES, INCLUDING ANY GENERAL, SPECIAL, INCIDENTAL OR CONSEQUENTIAL DAMAGES ARISING OUT OF THE USE OR INABILITY TO USE THE PROGRAM (INCLUDING BUT NOT LIMITED TO LOSS OF DATA OR DATA BEING RENDERED INACCURATE OR LOSSES SUSTAINED BY YOU OR THIRD PARTIES OR A FAILURE OF THE PROGRAM TO OPERATE WITH ANY OTHER PROGRAMS), EVEN IF SUCH HOLDER OR OTHER PARTY HAS BEEN ADVISED OF THE POSSIBILITY OF SUCH DAMAGES.
END OF TERMS AND CONDITIONS


![]()


 '
'


