


Multiples: Creating Unity
The grid is the principal way of organizing page elements in multi-page documents. A grid divides a page into columns to follow strictly, or to use as a rough guide. The Gutenberg Bible visual example follows a very rigid grid structure: the two columns of text have the same line length, which is a measurement of how long a line of text is before it breaks to a new line. The two columns of text also have the same vertical length. When two pages are viewed together in an open book such as this, the pages read together as a spread. The pages in this spread follow the grid in exactly the same manner.
The grid can also adapt to flexible layouts. In the reference example of the New York Times layout from 1918, the grid is more complex and versatile. This grid divides the page into eight columns.
Counting the columns on the page is easy: find the smallest column and measure its width. Then divide the width of the page with the width of the smallest column. With eight columns, the designer has options. Instead of eight even columns of text flowing down the front page of the newspaper, some larger graphic elements like the headline at the top of the page expand across all eight columns. Other text blocks are given visual emphasis, or create visual hierarchy on the page, by spanning multiple columns. Also notice the distribution of negative space on the page. Since there is a lot of text on this front page, contrast is created by increasing the leading in some areas of the page and by allowing some of the text blocks to expand beyond one column.
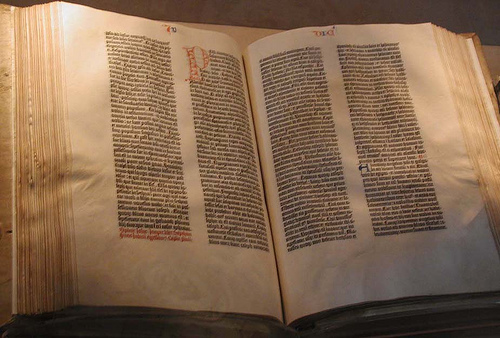
A copy of the Gutenberg Bible by Johannes Gutenberg, owned by the U.S. Library of Congress. 180 copies of the Bible were printed in Mainz, Germany in the fifteenth century.

The front page of the NY Times, 1918.
Results of Chapter 13 Exercises
When you complete all of the Chapter 13 Exercises, you will save a PDF document. The two pages in the document are illustrated here.

Exercise 1: Unity through repetition - master pages
1. When you opening Scribus you will automatically open the New Document dialog. Notice that unlike other New Document dialogs we have seen before, Scribus allows us to specify a multiple number of pages. Set up the document with the following settings: select Single-Page from the Document Layout section, specify Letter from the Size pull-down in the Page Size section, leave your margins on the default settings, select 2 in the Number of Pages field in the Options section, and then press the OK button.

2. Once the new document opens, look to see if the Arrange Pages window is open. If it is not, choose Windows > Arrange Pages. In the Arrange Pages Window there is a section labeled Document Pages. In this section, each icon represents a page in the document. Double-click the page 2 icon to jump to that page and then double-click the page 1 icon to view the first page. Another way to navigate through the pages in a document is to click the Next Page or Previous Page arrows at the bottom of the document window. You can also use the Hand tool to drag the pages around within the document window. When nothing is selected, press the Spacebar key to toggle between the Selection tool and the Hand tool.
Before we start editing the content of our pages, we will create a Master Page. Master pages commonly contain a grid and any recurring design elements. They allow you to create a consistent layout throughout the pages in a publication and they make it possible to automate layout changes, because any modification you make to a master page is automatically reflected on all the pages to which it is applied. You can create multiple master pages, which can be applied to any page within the document.
3. To create your first Master Page, select the Arrange Pages window and double-click the word Normal in the Available Master Pages field. This will open the Edit Master Pages window. You may not be able to tell, but the pages of your document have disappeared, the blank page that now appears in the Main Window is the blank Master Page template for the Normal Master. This is the Master that gets applied to any new page you make by default. Whenever you have the Edit Master Pages window open, you will always be editing your master page or pages. To return to the document pages, close the Edit Master Pages window - but don't do that quite yet.
Click the first icon in the Edit Master Pages window (it looks like a single new document) to add a new master page. Name the new master page Master A in the dialog that opens. Anything you place on the page that now appears in the main window will be stored on Master A and will automatically appear on all the pages to which you apply it. Changes to master pages automatically update on the pages where they have been applied.

4. We will set up guides on the master page similar to the Inkscape exercises in Chapter Four. Guides are created by clicking in the horizontal or vertical ruler areas and dragging onto the page. The rulers are the numbered borders at the top and left of the Main window. If your rulers are not displaying in inches, you can change the units of measurement by clicking on the units pull-down menu at the bottom left of the main window.

| Key Command: Show or hide rulers from the View menu or press Control+Shift+R. |
5. Click inside the ruler and drag to create guides. Starting with the horizontal ruler at the top of the document window, click on the ruler and drag a guide to 3 inches, using the vertical ruler at the left of the Main window as a reference. Then drag a guide from the vertical ruler to 5 inches, using the horizontal ruler as a reference. If you need to reposition a guide, just click and drag.
Note
|

6. Use the Line tool to draw a heavy line along the horizontal guide. Click on the Line tool in the Tools Command Bar (at the top of the Main window) to select it. Starting at the right edge of the page, Click and drag toward the left edge of the page to draw a straight line along the horizontal guide. While you are dragging, pressing the Control key will force the line to stay on orthogonal lines, and will result in a more precise horizontal drawing.
Notice that we didn't draw the line all of the way to the left edge, so the negative space remains active as it did in the Type on the Grid chapter. To make sure that this line goes all the way to the right-most edge of the document, you can "nudge" it using the right arrow key. Make sure you don't move any part of the line off of the page, or it will not appear when you apply the Master page to the Document pages. If you continue with this exercise and find that your line disappears, try coming back to this master page and nudging the line back onto the page.
| Tip: To position a line exactly on the edge of a page or guide, you can use Windows > Align and Distribute. |


7. Now that our line is drawn, we can hide our guides. To hide the guides, select View > Show Guides.
8. Open the Properties window by selecting Windows > Properties. Use the Selection tool to select the line if it isn't already selected. Select the Line panel of the Properties dialog and set the Line Width to 20 points (pts).

9. Select the Colors panel in the Properties dialog. Use the Selection tool to select the line if it isn't already selected. Click the Edit Line Color Properties icon to make it active and then click on the red color swatch from the list. After selecting any color, typing a letter will take you to the first color that begins with that letter. So a quick way to get to a red hue would be to press the letter "r" on the keypad.
If you pick a color and your line doesn't change, it's probably because you're changing the fill of the line and not the line (or what we might think of as the outline or stroke). Since the line does not create a closed shape, the fill color will not produce a color. Consult the image below to see that there are two icons above the list of colors. Make sure you click on the left icon (Line Color) before choosing a color.

10. Turn on the guides again using View > Show Guides.
11. Now we will apply the Master Page we have created to the blank pages in our document. Close the Edit Master Pages window by clicking the X icon in the top right of the dialog. The Main window shows your document pages. Choose Page > Apply Master Page. In the Apply Master Page dialog select Master A from the Master Page pull-down menu and answer the "Apply To" question by pressing the radio button next to All pages. Press the OK button.

12. Double-click the page 1 icon in the Arrange Pages window to view the first page of the document. Notice that the guides and thick, red line should be in place on page 1. Double-click the page 2 icon and notice that the guides and red line are also in place on the second page of the document. Objects on a master page automatically show up on any pages based on that master. It is important to understand that the items on a master page can only be modified or deleted from the master page they belong to. Try to select the red line or move the guides on pages 1 or 2 and you will see that they are not editable.
If you don't see the guides and red line on page 1 and 2, it's time to trouble shoot. Did you close the Edit Master Pages window? Did you draw the line off the edge of the page? Did you apply them correctly?
Exercise 2: Creating B-Master
The document we are creating contains only two pages, so only one master page is needed. However, in larger documents that have several layout variations, it is often necessary to use multiple master pages. We will make a second master page in this document to demonstrate the process.
1. Double click on any Master page in the Arrange Pages window. You should be careful - if the Edit Master Pages Window does not open, it may be because of a minor glitch. To get around this, simply de-select the Arrange Pages Window, and then re-select and attempt your double-click again. Once the Edit Master Pages Window opens, select Master A and click the Duplicate the Selected Master Page button (it's the second button, the one with two documents pictured) at the top of the Edit Master Pages window.
2. In the New Master dialog box, change the name to Master B.
3. In this document, Master B will be similar to Master A, but we will modify the color of the line so that it is cyan instead of red. Select the red line on Master B and then select Cyan from the Colors panel of the Properties window. You need to be careful, though. The Colors panel controls both the LINE color and the FILL color of objects on a page. For us to change the color of a single line we need to click the Edit LINE Color Properties icon before choosing our color. It's the left icon with the tiny drawing of a pencil drawing a line. See below:

4. Close the Edit Master Pages window by clicking the X icon in the top right area of the window. This should return you to your document pages. Choose Page > Apply Master Page. In the Apply Master Page dialog select Master B from the Master Page pull-down menu and select All pages. Now, check the Within Range box and enter from 2 to 2. This will apply Master B only to page 2, but could be used to apply a master page to a any number of additional pages.
5. Double-click the page 2 icon in the Arrange Pages window to view the second page. There is a field at the bottom of the main window that indicates what page you are currently viewing. It indicates 1 of 2 if you're on page one, and 2 of 2 if you are on page 2. Also, page 2 should now have a cyan line, while page 1 has a red one.
We will now create a typographic headline that will be copied to page 1. In theory, this is something that would normally be done on the Master A page, but we want to demonstrate the nature of Scribus' paste function.
Click and drag with the Insert Text Frame tool to draw a text frame, which is like a text box in Inkscape. Make sure you make it large; if it is smaller than the text you enter, the frame will appear blank. You can always resize the text frame later. After it's made, double click inside of it to get a cursor and type the words "Unity on the Grid" into the frame.
Now format the headline by selecting all the text and then specifying a font and type size. In the following example, we are using Bitstream Vera Sans at 40 points. Pay attention to the kerning, making sure that the spaces between the characters in the headline are visually equal. How do you apply all these features? All these options (text size, face, and kerning) are controlled in the Text panel of the Properties window.
Next, use the Selection tool to select the text frame and reposition it so that the left edge of the frame aligns with the left edge of the cyan line and the baseline of the text aligns with the top of the line.

7. Now we will copy this headline to page 1. With the text frame still selected, choose Edit > Copy. Double-click the page 1 icon in the Arrange Pages window to jump to page 1, and choose Edit > Paste. The headline appears in the same position on this page as it is on page 2. Scribus' Copy command copies both the type and its location on the page.

Exercise 3: Linking text frames
Scribus is often used to create multi-page documents for commercial printing or for viewing as a PDF file on a screen. In either case, long documents can contain a lot of text. Scribus allows you to place as much text as you want into one single text frame and then use the linking function to link multiple text frames together so that the text can flow from one frame to another. In this exercise, we will link two text frames on pages one and two with about five paragraphs of Lorem Ipsum dummy text. Scribus has Lorem Ipsum dummy text saved into the application so you can easily fill a text frame with dummy text without pasting it from someplace else.
1. On page 1, use the Text Frame tool to click and drag a large text frame on to the Canvas. We need to make it large so that we can load more dummy text into the frame than we intend to use in order to illustrate the linking feature.
2. Choose Insert > Sample Text. Select Standard Lorem Ipsum from the bottom of the list that opens. This will fill the frame with dummy text.

3. Use the Selection tool to move and resize the text frame so that left edge of the text frame is aligned with the vertical guide. Pull the top edge of the frame down so it starts at 6 inches. The right and bottom edges of the text frame align with the right and bottom margins on the page.

4. At the bottom of the resized text frame there now appears a small grey X in a box. This icon means that there is more text stored (but not visible) in the text frame. It's always good to take notice of this icon during the production of actual documents, as you would not want to accidentally leave textual content out of the document design.

5. Now navigate to page 2. Make an empty text frame in the same size and position as on page 1. Scroll back to page 1 and select the original text box. Click the Link Text Frames button in the command bar. Then scroll back to page 2 and click the empty text box to link the two. A line should appear, and the text should flow into the second frame. Click the Linking tool button again to turn off linking mode.

| Tip: View > Show Text Threads to see a visible line that indicates which frames are linked together. |
6. Double-click inside either of the two text frames and press Control+A to select all of the text. Make a change to the typeface using the Text panel in the Properties window. Our type is set in Bitstream Vera Sans at 12 points with the leading, or the space between the lines, set at 14.4 points. Notice that the typeface only changes in the text frame most recently highlighted. You need to select each one in turn to change the style across the whole document.

After you have changed the text style properties, you will notice that there is still text overflowing the second text frame. Since this is only sample text, delete some of the text so that there is space at the end of the text frame.
Exercise 4: Creating shapes
In "Type on the Grid" we created unity on the page through the repetition of shape and color. We will create unity in this chapter with the same technique, but this time we will place the colored square in the same location on sequential pages.
1. Use the Shape tool set to Rectangle and hold the Control key to draw a square on page 1. Then use the Colors panel of the Properties window to make it red by using the Edit Fill Color button.

| Tip: Pressing the Control key while nudging an object will move it ten units at a time. |
With the Selection tool, drag the red square to align its left side with the vertical guide, and position the bottom of the square against the top of the body copy. If necessary, you can use the arrow keys on your keypad to nudge the square into place. However, the arrow keys will nudge in increments of the units selected in the units pull-down of the main window. Since we set ours to inches in exercise one, a single tap of an arrow key moves our square an entire inch. Switch the units pull-down to points to nudge accordingly. Once the square is just touching the text, press Control+Up Arrow one time to move the square ten points higher than the text.

2. While the square is still selected, choose Edit > Copy then navigate to page 2 and choose Edit > Paste to create a second square in the same relative location on the page as the square on page 1. Use the Colors panel of the Properties window to change the color of this square to cyan.

Exercise 5: Exporting a PDF
It is important to always save a file as you are working on it. The Scribus file, designated by the file extension .sla, is the native file. A .pdf file is most commonly used for sharing a document to view or proof and it can also be used for printing. When an .sla file is exported as a .pdf file, the graphics and fonts can be embedded in the document, making it a portable package that is easy to share with others.
While a few printers can print SLA files, we suggest sending a PDF file to your printer. Sending a PDF ensures compatibility and is more efficient - you only have to send one file containing the whole package.
1. Save the Scribus file by choosing File > Save As. Notice that the file extension is .sla. Specify a name and location for the file and then click the Save button.
2. Now we'll export a copy of the file as a .pdf file for sharing, viewing, or printing purposes. Click the PDF Export button in the Command bar.

You may get the "PreFlight Verifier" Dialog at this point. If so, check any yellow or red warnings to make sure they are fixed. Clicking on each warning will take you to the offending object in the document with a brief description. We're not going to explain every possible error here, but they are generally intuitive to fix.

3. In the Save as PDF dialog box, there are many options. In the General category, notice the Export Range area, which contains two choices: All pages and Choose Pages. For this exercise, leave the All option selected so that all the pages are exported. Notice the Compatibility pull-down menu at the top right corner. If you know that the person you are sharing this PDF with has an older version of Acrobat, or if you need to comply with specifications from a commercial printer, choose an option from this pull-down menu to format the PDF document for a particular Acrobat version. Also be sure to check the setting of the Resolution for EPS Graphics. If you're exporting for an on-screen document or preview, you can select 72 dpi to reduce the file size. If you are making a document for print then you should set it to 300 dpi or more, depending on your printer.

4. Also check the Fonts tab. Every font listed under Available Fonts should be also listed under Fonts to Embed. You can click Embed All to be sure. Now click Save and create the PDF.

4. Open the PDF file in a PDF viewer. Notice that the file opens quickly, but is difficult or impossible to edit. To change the document you should open the native SLA file in Scribus.
