


Making Plain Text Files
Options For Creating Plain Text Files From Scanned Book Pages
Some teachers have expressed an interest in scanning in textbook pages and creating text files from them. Sugar users may wish to do this because plain text files support Text To Speech with word highlighting, which may be an aid to students with reading problems. You may also wish to create texts to donate to Project Gutenberg, or make an EPUB out of the book.
There is more than one way to create a plain text file from a book, and which one will be the least work will depend on how quickly you need the book and how you plan to distribute it. One option you have is to donate a physical copy of a public domain book to Distributed Proofreaders. They will saw the spine off the book, scan it with a sheet-feed scanner, do OCR on it, proof read it, and submit it to PG. The whole process will take several months and will destroy the book.
You could also scan the book yourself and submit the scanned page images to the Distributed Proofreaders Scanning Pool, where one of their volunteers will do OCR on the page images and submit it for proofreading, again by volunteers. This will also take many months but the book won't be destroyed.
You can also do the OCR yourself, then submit your page images plus the text files created by OCR (one text file per page), plus high quality images of any illustrations in the book, to the Distributed Proofreaders FTP server, where it will wait in the queue to be proofread. Proofreading will take a few months, but your contribution will get in the queue sooner.
OCR Software
The most commonly used program for doing Optical Character Recognition is a commercial product called ABBYY Fine Reader. A version of this comes with many flatbed scanners. The Professional version has features that make it easier to do OCR on a complete book. The Internet Archive uses this product, and Distributed Proofreaders uses and recommends it. It is, however, not cheap. The current Professional edition will run you 0. For that reason I will not be recommending it. I think you can get results every bit as good with free software. ABBYY Fine Reader does have a free 15 day trial for its products; the program stops working after 15 days or 50 pages. That should be more than enough to let you decide if it's worth the money. The Distributed Proofreaders site has many suggestions on how to use this product.
If you're a Windows user I recommend FreeOCR. You can download it here:
It looks like this:
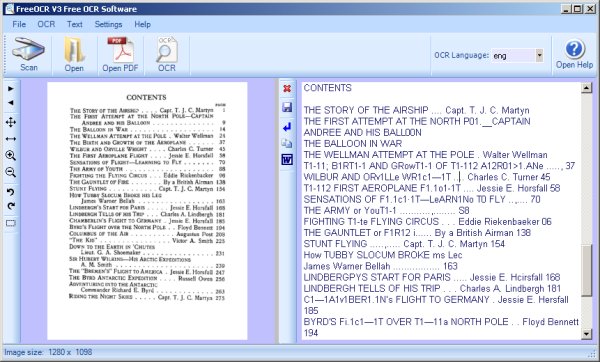
The procedure to use this is to open a PDF or a JPEG file for a single book page. Press the OCR button and text for the page will be copied to the window on the right, where you can correct it. If you open a PDF you can navigate from page to page and do OCR on each one. As you do each page the text will be appended to the window on the right. When you're done you can save your work to a text file or copy it to the clipboard.
Depending on the font used in the book, OCR can be quite accurate:

There is no way to OCR some pages of a PDF, save your work, exit, restart the program and pick up where you left off. Since that's exactly what you need to do to make a plain text file out of an entire book you will want to have a word processor open so you can copy text from the clipboard to the word processor and save it as a text document. That way you can resume FreeOCR, resume your word processor, load the PDF into Free OCR, find the page where you left off, then continue.
Another possibility is to create a separate text file for every page. If you do this, there are tools that can help you with proofing and correcting those pages.
FreeOCR is not available for Linux, but the OCR engine that it uses, called Tesseract, can be used in Linux from the command line. It should be included with your Linux distribution or you can get it here:
http://code.google.com/p/tesseract-ocr/
Tesseract only works on individual, uncompressed TIFF files, and they must be named with the suffix .tif. If the book pages you need to OCR are JPEG's you can use Image Magick mogrify to create TIFFs from them:
mogrify -format tiff *.jpg
will create TIFFs for every JPEG in the current working directory. Tesseract does not like these files to have the suffix .tiff, which is what Image Magick will give them. You can change this to .tif with the following command:
rename .tiff .tif *.tiff
Then you can run tesseract on each one with the command:
tesseract filename.tiff basefilename
for example:
tesseract BoysAviation\ P135.tif BoysAviation\ P135
will create a file named BoysAviation P135.txt which should have the OCR'd text in it. When I tried this on Fedora 10 I just got a file full of gibberish. I did better with Fedora 11:
$ tesseract BoysAviation\ P135.tif BoysAviation\ P135
Tesseract Open Source OCR Engine
$ less BoysAviation\ P135.txt
FIGHTING THE FLYING CIRCUS 135
heads and exploded with their soft ’plonks, releasing varicolored
lights which floated softly through this epochal night until they
withered away and died. Star shells, parachute llares, and
streams of Very lights continued to light our way through
an aerodrome seemingly thronged with madmen. Everybody
was laughing-—drunk with the outgushing of their long p€¤t—up
emotions. "1’ve lived through the war!" I heard one whirling
Dervish of a pilot shouting to himself as he pirouetted alone
in the center of a mud hole. Regardless of who heard the
inmost secret of his soul, now that the war was over, he had
retired off to one side to repeat this fact over and over to
himself until he might make himself sure of its truth.
Another pilot, this one an Ace of 27 Squadron, grasped
me securely by the arm and shouted almost incredulously,
"We won’t be shot at any m0re!" Without waiting for a reply `
he hastened on to another friend and repeated this important
bit of information as though he were doubtful of a complete
understanding on this trivial point. What sort of a new world
will this be without the excitement of danger in it? How
queer it will be in future to fly over the dead line of the silent
Meuse—that significant boundary line that was marked by
Arch shells to warn the pilot of his entrance into danger.
How can one enjoy life without this highly spiced sauce of
danger? What else is there left to living now that the zest
and excitement of lighting aeroplanes is gone? Thoughts such
as these held me entranced for the moment and were after-
wards recalled to illustrate how tightly strung were the nerves
of these boys, of twenty who had for continuous months been
living on the very peaks of mental excitement.
You can run tesseract for each page in the book (or use a Python program to do it) then combine them all together with this command (in Linux or the Macintosh):
cat *.txt > BookTitle.txt
or this command for Windows:
type *.txt > BookTitle.text
Note that in Windows you don't want the concatenated file to have the same suffix as the files you are concatenating. If you do then the type command will try and append your target file to itself. This is not a problem with cat on Linux. Once the file is created you can rename it as you like.
Here is the code for a Python program named runtesseract.py that will run Tesseract for every TIFF image in a directory:
#! /usr/bin/env python

import glob
import getopt
import sys
import subprocess

def run_tesseract(filename):

    filename_tuple = filename.split('.')
    filename_base = filename_tuple[0]
    subprocess.call(["tesseract", filename, filename_base])
    print 'filename', filename
    return

if __name__ == "__main__":
    try:
        opts, args = getopt.getopt(sys.argv[1:], "")
        if len(args) == 1:
            print 'using glob'
            args = glob.glob(args[0])
            args.sort()
        i = 0
        while i < len(args):
            run_tesseract(args[i])
            i = i + 1
    except getopt.error, msg:
        print msg
        print "This program has no options"
        sys.exit(2)
You run this program like this:
python runtesseract.py *.tif
Automatically Fixing Common Problems With guiprep
Before you combine all your separate one-page text files into one large file you might want to use the guiprep utility on them. Guiprep is a program used by the Distributed Proofreaders project to prepare texts and page images for use on their website. It can find "scannos" (common scanning errors) in your files and fix them. It can also do things like deleting the first line in each file, which could be a page heading, and join hyphenated words split across lines.
Scannos are mistakes that OCR software make consistently. For instance, OCR software will confuse a "W" with "V/". Guiprep can identify lots of such patterns and fix them. You can get the program here:
http://home.comcast.net/~thundergnat/guiprep.html
This is what the program looks like:
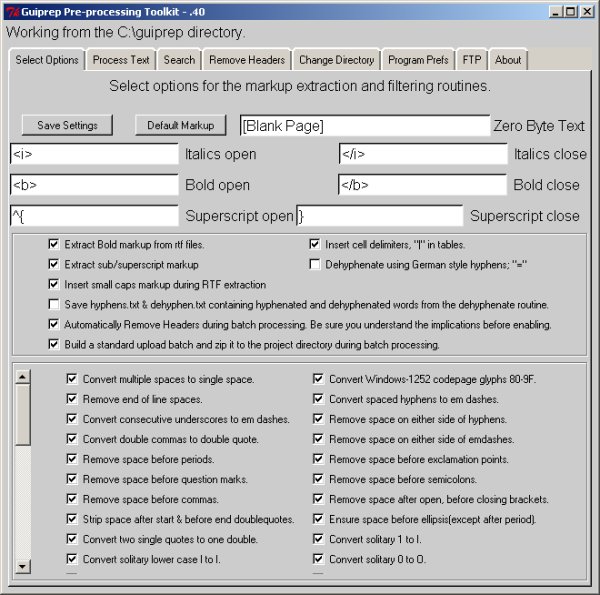
If you use this program you should be aware that some of its options expect that the files will be prepared by ABBYFineReader, and you'll need to avoid those options. ABBYY Fine reader can do a couple of things that Tesseract cannot:
- It can tell the difference between bold text, italicized text, and normal text and save scanned text in Rich Text Format files, which have special markup for that formatting.
- It can figure out where paragraphs begin and end, which makes it easier for Guiprep to figure out how to de-hyphenate text.
Tesseract just saves plain text files with no attempt to preserve text formatting or paragraphs. As a result of this when you run Guiprep you want to have your text files in a subdirectory named text, and you want to avoid the options to extract formatting and do de-hyphenating.
One way Guiprep can do de-hyphenating is to create two separate directories for your text files: textw and textwo. The first one contains text files with line breaks and the second contains text files without line breaks (but with paragraph breaks). Guiprep compares these two versions of your files and does de-hyphenating.
Tesseract cannot produce text files without line breaks, so don't bother creating textw and textwo directories. Just put your text files in a directory named text.
Even without these functions Guiprep still has much to offer.
Proof Reading Individual Pages
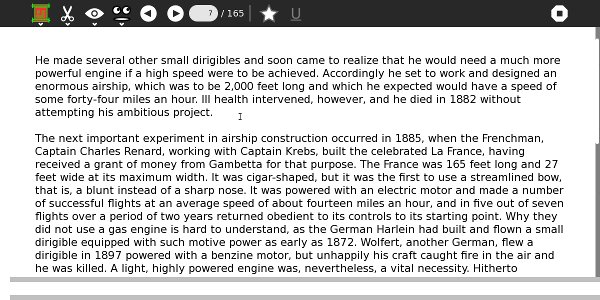
There are a couple of approaches to proofing your text. You can make one big text file and proof it with the book close by, or you can proof individual pages, then combine them. The advantage to proofing one page at a time is that you can use a utility program to view the OCR'd text and the page image it came from on the same screen, like this:
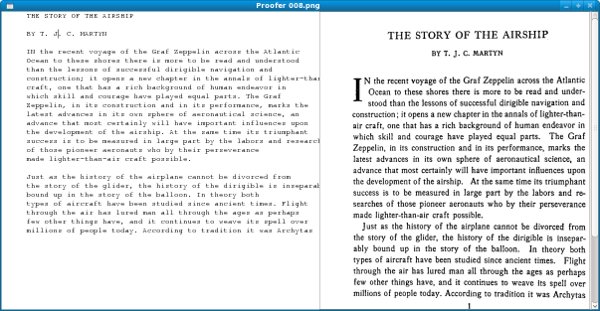
The OCR'd text is shown in the Courier font because that font avoids the problem of letters that look similar to each other. In some fonts, for instance, the first three letters of the word "Illustration" (where the "i" is capitalized) look very similar. The text can't just look right, it has to be right.
When you move from page to page, the page you came from is saved to disk.
Where can you get such a massively useful utility? Glad you asked. This is another one of my Python scripts, which I like to call proofer.py. The code is here:
#! /usr/bin/env python
# proofer.py

import glob
import sys
import os
import gtk
import getopt
import pango

page=0
IMAGE_WIDTH = 600
ARBITRARY_LARGE_HEIGHT = 10000

class Proofer():

    def keypress_cb(self, widget, event):
        keyname = gtk.gdk.keyval_name(event.keyval)
        if keyname == 'F10':
            self.font_increase()
            return True
        if keyname == 'F9':
            self.font_decrease()
            return True
        if keyname == 'Page_Up' :
            self.page_previous()
            return True
        if keyname == 'Page_Down':
            self.page_next()
            return True
        return False

    def font_decrease(self):
        font_size = self.font_desc.get_size() / 1024
        font_size = font_size - 1
        if font_size < 1:
            font_size = 1
        self.font_desc.set_size(font_size * 1024)
        self.textview.modify_font(self.font_desc)

    def font_increase(self):
        font_size = self.font_desc.get_size() / 1024
        font_size = font_size + 1
        self.font_desc.set_size(font_size * 1024)
        self.textview.modify_font(self.font_desc)

    def page_previous(self):
        global page
        self.save_current_file(self.filenames[page])
        page=page-1
        if page < 0: page=0
        self.read_file(self.filenames[page])
        self.show_image(self.filenames[page])

    def page_next(self):
        global page
        self.save_current_file(self.filenames[page])
        page=page+1
        if page >= len(self.filenames): page=0
        self.read_file(self.filenames[page])
        self.show_image(self.filenames[page])

    def read_file(self, filename):
        "Read the text file"
        text_filename = self.find_text_file(filename)
        self.window.set_title("Proofer " + filename)
        etext_file = open(text_filename,"r")
        textbuffer = self.textview.get_buffer()
        text = ''
        line = ''
        while etext_file:
            line = etext_file.readline()
            if not line:
                break
            print line
            text = text + unicode(line, 'iso-8859-1')
        text = text.replace("'I`",  'T')
        text = text.replace("'|`",  'T')
        text = text.replace("l`",  'f')
        text = text.replace("I`",  'f')
        text = text.replace("t`",  'f')
        text = text.replace(" ll",  ' H')
        textbuffer.set_text(text)
        self.textview.set_buffer(textbuffer)
        etext_file.close()

    def find_text_file(self, filename):
        filename_tuple = filename.split('.')
        text_filename = filename_tuple[0] + '.txt'
        return text_filename

    def save_current_file(self, filename):
        text_filename = self.find_text_file(filename)
        f = open(text_filename, 'w')
        textbuffer = self.textview.get_buffer()
        text =  textbuffer.get_text(textbuffer.get_start_iter(),
                                    textbuffer.get_end_iter())
        try:
            f.write(text)
        finally:
            f.close
        return True


    def show_image(self, filename):
        "display a resized image in a full screen window"
        scaled_pixbuf = gtk.gdk.pixbuf_new_from_file_at_size(filename,
                            IMAGE_WIDTH, ARBITRARY_LARGE_HEIGHT)
        self.image.set_from_pixbuf(scaled_pixbuf)
        self.image.show()

    def destroy_cb(self, widget, data=None):
        self.save_current_file(self.filenames[page])
        gtk.main_quit()

    def main(self, args):
        self.filenames = args
        self.window = gtk.Window(gtk.WINDOW_TOPLEVEL)
        self.window.connect("destroy", self.destroy_cb)
        self.window.set_title("Proofer " + args[0])
        self.window.set_size_request(1200, 600)
        self.window.set_border_width(0)
        self.scrolled_window = gtk.ScrolledWindow(
            hadjustment=None,
            vadjustment=None)
        self.scrolled_window.set_policy(gtk.POLICY_NEVER,
                                        gtk.POLICY_AUTOMATIC)
        self.textview = gtk.TextView()
        self.textview.set_editable(True)
        self.textview.set_wrap_mode(gtk.WRAP_WORD)
        self.textview.set_cursor_visible(True)
        self.textview.connect("key_press_event",
                              self.keypress_cb)
        self.font_desc = pango.FontDescription("monospace 12")
        self.textview.modify_font(self.font_desc)
        self.scrolled_window.add(self.textview)
        self.read_file(args[0])
        self.textview.show()
        self.scrolled_window.show()
        self.window.show()

        self.scrolled_image = gtk.ScrolledWindow()
        self.scrolled_image.set_policy(gtk.POLICY_NEVER,
                                       gtk.POLICY_AUTOMATIC)
        self.image = gtk.Image()
        self.image.show()
        self.show_image(args[0])
        self.scrolled_image.add_with_viewport(self.image)

        self.hbox = gtk.HBox()
        self.hbox.add(self.scrolled_window)
        self.hbox.add(self.scrolled_image)
        self.hbox.show()

        self.window.add(self.hbox)
        self.scrolled_window.show()
        self.scrolled_image.show()
        self.window.show()

        gtk.main()

if __name__ == "__main__":
    try:
        opts, args = getopt.getopt(sys.argv[1:], "")
        if len(args) == 1:
            print 'using glob'
            args = glob.glob(args[0])
            args.sort()
        Proofer().main(args)
    except getopt.error, msg:
        print msg
        print "This program has no options"
        sys.exit(2)
This program runs on Windows, but is somewhat troublesome to install because it needs PyGTK (http://www.pygtk.org/downloads.html). The Macintosh does not have a PyGTK download, so for now proofer.py is Linux and Windows only.
You can use FreeOCR to do pretty much the same kind of side-by-side proofing on Windows, and it is easier to install.
This program assumes that you have just run Guiprep on the files, and that your text files are in the same directory as your image files. You make this directory your current working directory and run proofer.py like this:
python proofer.py *.png
If your image files are JPEG's of TIFF's you would change the argument accordingly. proofer.py does not care what kind of image files you have. It will load the first file in the directory into the right pane, then load the matching text file into the left pane. You can navigate from page to page using the Page Up and Page Down keys. You can make the text font smaller or larger by using F9 and F10. When you move to a new page or quit the program the text of the page you were working on gets saved.
Proofer also has code to correct "scannos" I have found in my own books that guiprep doesn't handle. If you know a little Python you can easily add your own correction logic.
Formatting A Plain Text File
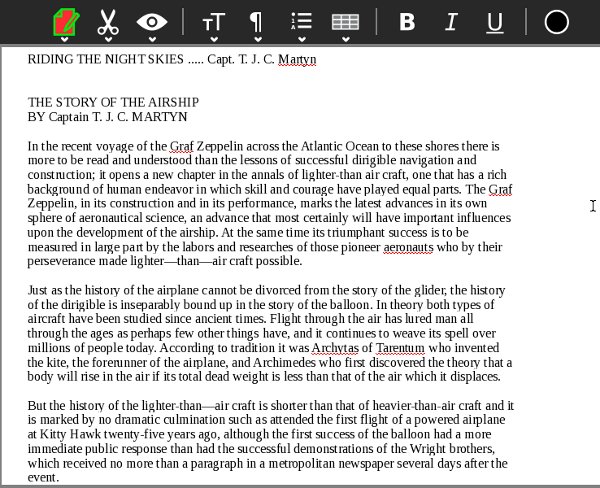
When you have loaded your OCR text file into a word processor what you have is the lines of text on each page, with line endings at the end of each line. What you would like to have is text word-wrapped into paragraphs, with line endings used only to separate paragraphs. It is possible to remove all of the line endings in the document, but to do that you need to give your word processor a way to tell the difference between the end of a line and the end of a paragraph. If you don't, you'll just put all the text in the book into one enormous paragraph.
The way you can do that is by putting a blank line between paragraphs and also between anything you don't want to wrap together. Consider this table of contents:
CONTENTS

THE STORY OF THE A1RSHIP .... Capt. T. J. C. Martin

THE FIRST ATTEMPT AT THE NORTH POLE——CAPTAIN
    ANDREE AND HIS BALLOON

THE BALLOON IN WAR

THE WELLMAN ATTEMPT AT THE POLE . Walter Wellman

THE BIRTH AND GROWTH OF THE AEROPLANE

WILBUR AND ORVILLE WRIGHT .... Charles C. Turner

THE FIRST AEROPLANE FLIGHT .... Jessie E. Horsfall

SENSATIONS OF FLIGHT—LEARN1NG TO FLY

THE ARMY OF YOUTH

FIGHTING THE FLYING CIRCUS . . . Eddie Riekenbacker

THE GAUNTLET or FIRE ....... By a British Airman

STUNT FLYING ........... Capt. T. J. C. Martyn

How TUBBY SLOCUM BROKE HIS LEG
    James Warner Bellah

L1NDBERG’S START FOR PARIS ..... Jessie E. Horsfall

LINDBERGH TELLS OF HIS TRIP . . . Charles A. Lindbergh

CHAMBERLAIN'S FLIGHT TO GERMANY . Jessie E. Horsfall

BYRD’S FLIGHT OVER THE NORTH POLE . . Floyd Bennett

COLUMBUS OF THE AIR .......... Augustus Post

"THE KID`, ................ Victor A. Smith

DOWN TO THE EARTH IN ’CHUTEs
    Lieut. G. A. Shoemaker

SIR HUBERT WILKINS—-—HIS ARCTIC EXPEDITIONS
    A. M. Smith

THE "BREMEN’s" FLIGHT TO AMERICA . Jessie E. Horsfall
Before I reformatted it, there were no blank lines between each entry, and text that wrapped to the second line was not indented. While on the subject of tables of contents, remember to remove any page numbers from the contents. It's a safe bet that those numbers will not correspond to the pages in your new document.
The other things you should do are remove any text representing page headers or footers, plus any gibberish resulting from attempting to OCR an illustration.
One thing that will make your work go much faster is to use a text editor instead of a word processor for this formatting, then use the word processor only for those functions where it is really needed. In Windows Notepad is a text editor but it can't handle files as large as a whole book. On Linux I use gedit, and you can get Windows and Macintosh versions of that editor here:
http://projects.gnome.org/gedit/screenshots.html
The reason to prefer a text editor over a word processor for this work is that a text editor uses less memory and will respond quickly to any editing you do. A word processor doing the same work will feel sluggish.
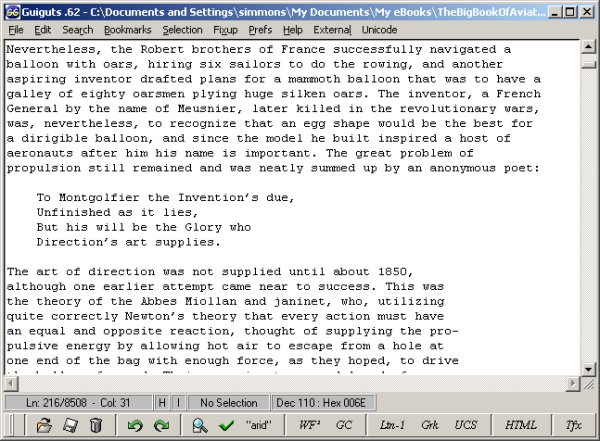
Another possibility for a text editor is guiguts, which was created by the author of guiprep. It's a text editor that can run external utilities like spell checkers, gutcheck (a utility used to check Project Gutenberg e-texts for proper formatting), etc. It can run on Windows or Linux. Guiguts is especially useful for preparing submissions to Project Gutenberg. It can rewrap selected paragraphs to the line size that PG uses, rewrap blocks of text to create indented block quotes, insert HTML tags into plain text files to give you a starting point for making an HTML version of a Plain Text file, and more. You can download guiguts here:
http://home.comcast.net/~thundergnat/guiguts.html
This is what it looks like in action:
Once you have the blank lines between paragraphs and the worst of the gibberish removed, it's time to convert text with line endings at the end of each line into text in paragraphs. If you have MS Word you can try this suggestion from the Project Gutenberg website:
- Edit / Replace / Special and choose Paragraph Mark twice (or, from replace, you can type in ^p^p to get two Paragraph Marks) and replace with @@@@. Replace All. This saves off real paragraph ends by marking them with a nonsense sequence.
- Now Replace one Paragraph Mark (^p) with a space. Replace All. This removes the line-ends.
- Finally, replace @@@@ with one Paragraph Mark. Replace All. This brings back the Paragraph Ends.
If you do not have MS Word, you can run a simple Python script against the text file to remove the extra line endings. This script, called pgconvert.py, is similar to the one built into the Read Etexts Activity that converts Project Gutenberg files into files without extra line endings. The key difference is that Tesseract creates text files where the line ending is a single character, whereas Project Gutenberg uses two characters at the end of each line. The script below would need to be modified to work with Project Gutenberg texts.
#! /usr/bin/env python

import getopt
import sys

# This is a script to take the a file in PG format and convert it to a text
# file that does not have newlines at the end of each line.

def convert(file_path,  output_path):

    pg_file = open(file_path,"r")
    out = open(output_path, 'w')
    previous_line_length = 0
    paragraph_length = 0
    conversion_rejected = False

    while pg_file:
        line = pg_file.readline()
        outline = ''
        if not line:
            break
        if len(line) == 1 and not previous_line_length  == 1:
            # Blank line separates paragraphs
            outline = line + '\r'
            paragraph_length = 0
        elif len(line) == 1 and previous_line_length == 1:
            outline = line
            paragraph_length = 0
        elif line[0] == ' ' or (line[0] >= '0' and line[0] <= '9'):
            outline = '\r' + line[0:len(line)-1]
            paragraph_length = 0
        else:
            outline = line[0:len(line)-1] + ' '
            paragraph_length = paragraph_length + len(outline)
        out.write(outline)
        previous_line_length = len(line)
    pg_file.close()
    out.close()
    print "All done!"
    if conversion_rejected:
        return False
    else:
        return True

if __name__ == "__main__":
    try:
        opts, args = getopt.getopt(sys.argv[1:], "")
        convert(args[0],  args[1])
    except getopt.error, msg:
        print msg
        print "This program has no options"
        sys.exit(2)
You run this script like this:
python pgconvert.py filename.txt newfile.txt
The new file will be converted, and the file you use as input will be left alone. The next thing you'll want to do is load the new file into gedit and use Search and Replace to change a hyphen followed by a space into nothing. This will fix all the hyphenated words that are now no longer at the end of a line:
After conversion you can load the file into any word processor and use your spell checker to find and fix problems. Then you can proofread it against the original book, add formatting and make a PDF out of it, or save it as HTML and make an EPUB out of it.
In my own case, Open Office had no problems with my text file before I removed the line endings, but was convinced it had become a spreadsheet afterwords and could not be persuaded otherwise. Fortunately, the Sugar Write Activity was able to open it without incident and is an excellent choice for proofing and correcting your e-book.
Finally you can load the book into Read Etexts and read it: