


Managing Concepts and Metadata
Having well defined Concepts is crucial for every OpenMRS installation. OpenMRS is delivered with just a few basic concepts and it is up to you to gather the rest.
Creating Concepts is a complex task which requires expertise and experience so we do not recommend doing it on your own. It is best to contact our community and use some of existing Concept dictionaries like MVP or MCL. For more information on how to get in touch with the right people, see the "Getting Help from the OpenMRS Community" chapter.
You can either enter Concepts on your own manually or use a tool like the Metadata Sharing Module to import them. In this chapter, we will present how to enter Concepts manually via the web interface.
Concept Class
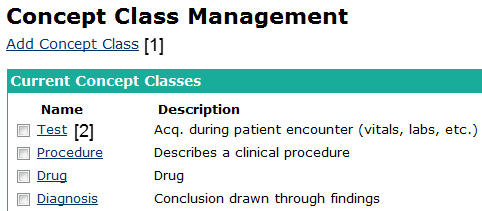
To start with you will need to setup Concept Classes. The standard installation includes around 15 predefined concept classes. To view them enter the Administration page > Manage Concept Classes.
- Add a new Concept Class
- Click to edit an existing Concept Class
You will see a list with names and descriptions. You can edit them by clicking on a name and also delete by selecting check-boxes next to their names. Note that you cannot delete Concept Classes that are used in Concepts already. There is also a link Add Concept Class to enter new ones.
Concept Datatype
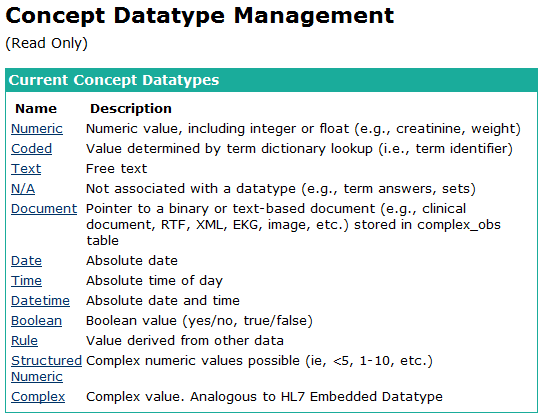
Concept Datatypes are purposed to indicate different formats of data stored in Concepts. They are predefined and read-only. You can view them under Administration > Manage Concept Datatypes.
Concept
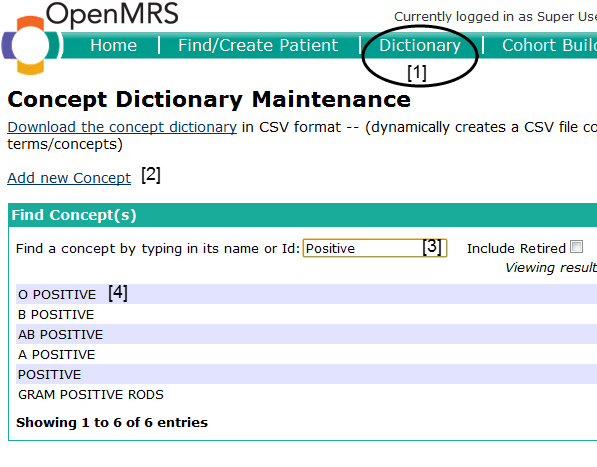
To view Concepts available in your system click Dictionary in the top menu. You will be able to search for particular Concepts by name or id. There is also a check-box that allows to search for retired Concepts which are not supposed to be used anymore or are replaced with new ones. You can also enter a new Concept from here clicking Add new Concept.
- Open Concept Dictionary
- Adding a new Concept
- Searching for Concepts
- Search results
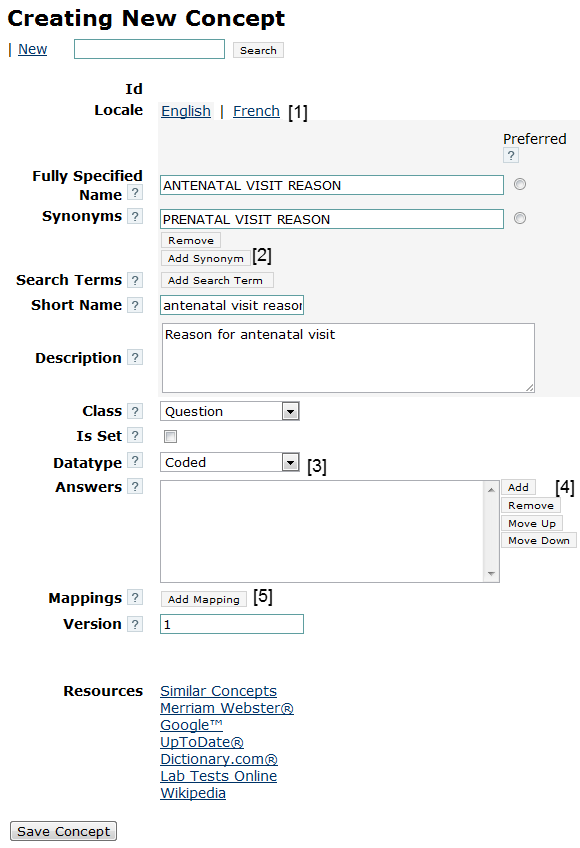
 Let's create a Concept to represent ANTENATAL VISIT REASON. We will use it later in the book in a data entry form. The form for creating a Concept allows you to enter Fully Specified Name as well as synonyms. You can add synonyms with Add Synonym button [2]. At least one of the names needs to be marked as Preferred with the radio button next to it.
While creating a new Concept you need to decide on Datatype. In this case it will be a coded Concept that is you will provide a list of answers. Answers need to be defined as Concepts. You need to create them beforehand or else add them later.
- Switch between languages
- Add a synonym
- Select Datatype
- This section changes depending on the chosen Datatype, in this case we can edit a list of answers
- Allows to add mappings
Concept Mappings
Concept Mappings are added to facilitate managing Concept Dictionaries and point to other Concepts which have the same meaning. For instance we could add here a mapping to a Concept in the MCL dictionary. You can save the Concept now and create some answers.
Repeat the steps and create Concepts PLANNING PREGNANCY and CURRENTLY PREGNANT of Class Finding and Datatype Boolean. The last possible answer will be OTHER of Class Misc and Datatype N/A. After creating three new Concepts, you can edit ANTENATAL VISIT REASON and add them as answers.
Concept Drug
To view Concept Drugs, go to Administration > Manage Concept Drugs. You can either enter a Concept Drug by clicking its name to edit it, or you can create a new one through the Add Concept Drug link. You must enter a name and choose one of Concepts of datatype Drug.
Metadata
There are different types of Metadata which need to be managed. The list includes Locations, Encounter Types, Order Types, etc. You can view and edit them easily via the Administration page.
Patient Identifier
A patient identifier is any unique number that can identify a patient. Examples are a Medical Record Number, a National ID, a Social Security Number, a driver's license number, etc. A patient can have any number of identifiers. The Patient Identifier Type table defines what type of identifiers are collected in your system.
A patient can have multiple identifiers of each type defined in your system. For example, a patient could have five identifiers of type of "Medical Record Number" because they were seen at five different hospitals that collected five different types of ids.
The patient search screen searches across all identifier that are still active for a patient.
New identifier types are generally created if they have different characteristics. For example, one identifier can be only a string of numbers, another is a number with a hyphen plus a check digit, etc.
Identifiers uniquely identify patients within the system. Different types of identifiers are distributed by various health care systems. Some of these systems will be within your control, so you will be able to control how identifiers are created and distributed; however, there will likely be identifiers that are not within your control but are useful to record within your system to aid in patient identification.
In order to see predefined identifiers types, or to add a new one, go to Administration - Manage Identifier Types. Let's examine OpenMRS Identification Number.
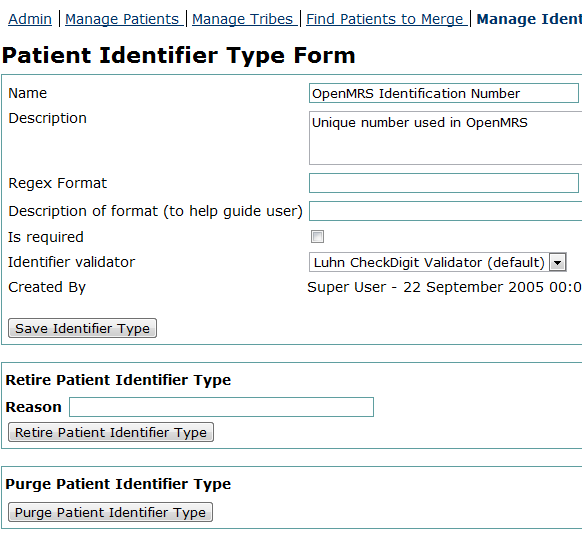
The Regex Format and Description of format fields are empty, but you could add here a regular expression to validate each entered identifier. For example:
\d{1,8}-\d
would allow 1 to 8 digits followed by a dash and a single digit.
It is also possible to choose one of several pre-defined Identifier validators. Here Luhn CheckDigit Validator is used. The purpose of check digits is simple. Any time identifiers (typically number +/- letters) are being manually entered via keyboard, there will be errors. Inadvertent keystrokes or fatigue can cause digits to be rearranged, dropped, or inserted. Have you ever mis-dialed a phone number? It happens.
Check digits helps to reduce the likelihood of errors by introducing a final digit that is calculated from the prior digits. Using the proper algorithm, the final digit can always be calculated. Therefore, when a number is entered into the system (manually or otherwise), the computer can instantly verify that the final digit matches the digit predicted by the check digit algorithm. If the two do not match, the number is refused. The end result is fewer data entry errors.
Internationalization
Concepts can be easily internationalized that is you can enter different Concept names for every allowed locale. The list of allowed locales is stored in a global property locale.allowed.list as comma separated language codes (for instance en, fr, or de). You can edit the global property from Administration > Manage Global Properties. See this link for the full list of ISO 639.2 language codes:
http://go.openmrs.org/book-isolang
Currently, Metadata cannot be internationalized.