


Collecting data
Using your local knowledge of an area is the simplest and most effective way of collecting data for OpenStreetMap. For example, the knowledge you have of the area around your home and workplace is probably very up-to-date and accurate because you spend so much time there. Adding this data to OpenStreetMap using the provided aerial imagery as a guide is quite easy, and as you finish mapping more of your area you can work your way out into surrounding areas you might not know as well.
With this style of mapping, you can contribute some of the best, most up-to-date map data OpenStreetMap has to offer. More importantly, you will have a vested interest in the map of your area, making sure it stays up to date and error-free!
However, if you want to expand your work beyond maps from memory, there are two helpful tools for collecting data and bring them to OpenStreetMap. Lots of OpenStreetMap contributors use a Global Positioning System (GPS) device, or GPS. This chapter will explain what it does and how it works.
If you don't have a GPS or want to gather data without using it, it is also possible to collect data using Walking Papers. This chapter will also explain how to get started with these methods. Later, you'll learn how to use OpenStreetMap editors such as Potlatch 2 and JOSM to add the data you've collected to OpenStreetMap.
Collecting data with a GPS
This chapter will teach you how to operate a GPS, and how to use it to create maps. More precisely, we will explain how to operate the Garmin eTrex Vista HCx, a common GPS used for mapping. There are many other models of GPS which do the same thing, so if you are working with a different one, don’t worry, the principles remain the same. If you don't have a GPS, that's okay too, just refer to Collecting Data with Walking Papers for another option.
What is GPS?
A GPS is like a mobile phone, except that instead of receiving radio signals from telephone companies, it receives signals from satellites that are orbiting the Earth.
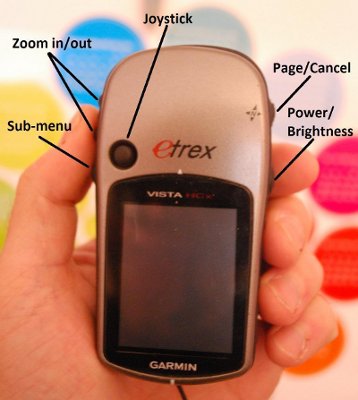
A photo of a Garmin eTrex Vista HCx.
By receiving these signals from the satellites, a GPS is able to calculate your exact location on the planet. It records this location in coordinates, which are two long numbers. One number tells you how far East or West you are: this is called longitude. The second number tells you how far North or South you are: this is called latitude. Every place on Earth has unique geographic coordinates.
For example: -8.639298 Latitude, 116.311607 Longitude is a location in Lombok, Indonesia.
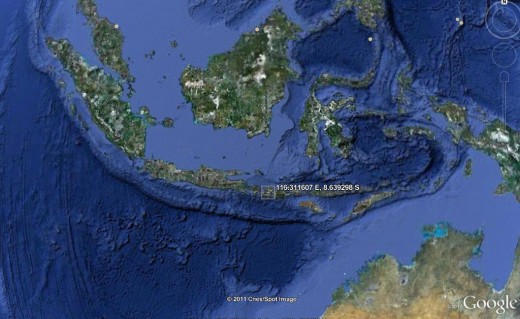
Google Earth software, showing coordinates of a place in Lombok, Indonesia
Turn on the GPS
Before you turn on your GPS, go outside where you have a clear view of the sky. Because the GPS determines your location by receiving signals from satellites, it won’t work indoors.
On the side of your GPS, press and hold the Power button. The GPS starts, and should show you the Satellites page. You might see something like the image below. Your GPS is looking for satellite signals. Once it has connected to three or more satellites, it can determine your location.

Acquiring Satellites
Once the device determines your location, the Satellite screen disappears and you see the main menu (like the picture presented in the next section).
Navigate the GPS menus
This GPS has different screens and menus that enable you to do different things. To switch between screens, press the button marked “X” (Page/Cancel in the photo of a Garmin eTrex Vista HCx), just above the power button on the right side of the device. This button also serves to go back. If you press something by mistake and would like to cancel or go back, press the “X” button.
There are many different screens for the Garmin eTrex Vista HCx below we are displaying the most important ones for gathering data for OpenStreetMap.
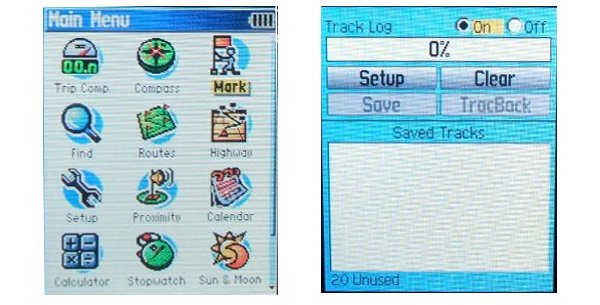 GPS Main Menu and GPS Tracks logs
If you return to the Satellites page (left screen above), you can see that you are connected to three or more satellites. In the upper left corner are your coordinates, your latitude and longitude.
Flip to the Map page (right screen above), and you can see a map of where you are. If you have added OSM maps to your GPS, you may see roads and places. Otherwise, the map may look quite blank. Zoom in and out by pressing the up and down arrow buttons on the left side of the GPS.
Tracks and Waypoints
Your GPS records two kinds of information that are useful for creating maps or saving the coordinates of a place. First, it allows you to save your location in the memory of the GPS. When you save a location, the coordinates will be saved with a name. For example, your first saved point will be named 001, the second 002, and so on. When you save a point, you can write down the number on a piece of paper, along with a note about what it is, and any attributes or indicators you would like to know. Saved locations on your GPS are called waypoints.
Second, your GPS can save what are called tracks. While a waypoint only saves a single location, a track saves a series of locations wherever you move. For example, the track records your location every one second, or every one meter, and the result will be a series of dots that show the path of where you have been. Tracks are useful for mapping objects that are represented by lines or shapes, such as the course of a road, or the shape of a field.
A GPS can record a single point as well as a path of where you travel. On some maps the points are numbered in the order they are recorded. The path, or “track”, is shown in green or teal color.

Path shown in the Potlatch 2 online editor
Save Your Location
To save your current location as a waypoint, click the “X” button until your reach the Main Menu. Using the joystick, move it so that “Mark” is highlighted on the screen. Push the joystick button down to open the “Save Waypoint” page.
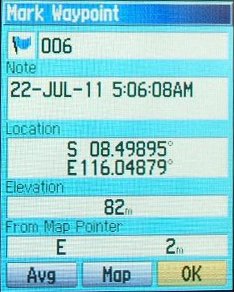
You can see on this page some information about the waypoint that you are saving. First is the number. If this is your first waypoint, it probably reads “001”. This is the number you should record on paper along with the information you want to collect with this object. Next, you will see the time and date when the point was recorded. Below that are the coordinates, followed by the altitude.
Use the joystick to move to the “OK” button at the bottom of the screen. Press the joystick button down to save this point. Be sure to write down the number of the point, along with what the place is and any other information you want to record about the place in your notebook.
Press the “X” button to go to the map page. You should now see your point on the map.
Turn on the Track Log
Now that we have learned how to save points, let’s learn how to turn the track log on and off. When the track log is turned on, it will automatically record your path. It’s good practice to turn on the log when you begin mapping, and turn it off when you are finished. You will then be able to look at the track on a computer and see the path that you mapped. If you would like to map the course of a road, it is a good idea to save a waypoint at the beginning and end of the road, writing in your notebook the name and type of the road, and any other important information about the road.
To turn on the track log, click the “X” button until your reach the page that says Track Log. (See Photo GPS Tracks logs )
If you would like to empty the track log to delete earlier recordings, use the joystick to select “Clear”, and press the joystick down. The bar at the top should read “0%”
To turn on the log, move the joystick to highlight “On”, and press the joystick down. The track log is now recording your path.
Press the “X” button to go to the map page. As you move you will see your track shown as a series of dots.
How to Copy Waypoints and Tracks to the Computer
When you are finished mapping with the GPS you will want to copy the points and tracks to your computer so that you can open them in the OSM editor.
Step 1: Attach GPS to the ComputerFirst, turn off the track log on your GPS, by going to the track page and selecting “Off”.
Attach the GPS to your computer with the cable. One end should plug into your computer’s USB port, and the other goes into the back of the GPS, beneath the rubber flap at the top. The GPS should be turned on to copy the points and tracks.
Step 2: Install GPS DriversYou may need to install GPS drivers on your computer. If you have a copy of USBDrivers_23.exe on your Windows computer, double-click it and install.
If you don’t have this file, you can download it. Open your internet browser and go to: http://www8.garmin.com/support/download_details.jsp?id=591
Click “Download” to get the installation file. Locate it on your computer, and double-click to install.
Step 3: Get the GPSBabel Setup ProgramGPSBabel is a program that allows us to copy data from the GPS. If you have a copy of GPSBabel on a CD or USB flash drive, you can skip to the next section.
If you don’t have GPSBabel already, open your web browser and go to www.gpsbabel.org/download.html.
Click “Downloads” at the top of the page.
Scroll down the page.
- If your computer runs on Windows, you want to download the installation file for Windows. Click “GPSBabel-1.4.2-Setup.exe” to download the file to your computer.
- If your computer runs on Mac OS, click the .dmg file button.
- If your computer runs on a Linux operating system, click the .tar.gz button.
Locate the GPSBabel setup file on your computer. Double-click it to start the installation.
On Windows, you click “Next” and accept all the defaults until the program installs. When the program has finished installing, click “Finish” to start GPSBabel.
On Mac and Linux, the program starts after opening and extracting the program.

GPSBabel Interface
Step 5: Copy Tracks and WaypointsIn the Input area, click in the circle next to the word “Device” at the top of the window.
In the drop-down menu labeled “Format”, select “Garmin serial/USB protocol”
Go down to the middle of the window, under Output. In the drop-down menu labeled “Format”, select “GPX XML”:
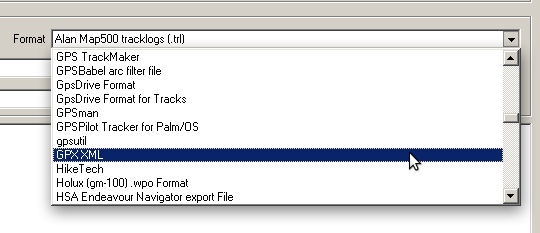
Choose GPX XML
Click “File Name” and type a name for your saved file. It should be something that describes the data, such as the date and the location. For example, jakarta-07-07-2011.
Make sure your GPS is connected to the computer and turned on.
Click “Apply” in the bottom right corner of the window.
If all goes well you should see a bar move across the screen, indicating that the data is being retrieved from the GPS. When it is finished, your points and track are saved in the file that you selected.
If you see an error, you may need to upload your tracks and waypoints using a Garmin web interface, refer to connect.garmin.com for more information.
Summary
Congratulations! You should now have an understanding of how to use the GPS to collect data. If you haven’t already, practice saving points of some important locations.
In the next section, you can learn about Walking Papers, which is another way of collecting information for OpenStreetMap. With Walking Papers, all you need is paper and a pen, and you can collect the coordinates of places just like with a GPS.
Summary of collecting data with Walking Papers
In this section we will see how we can record the coordinates of places without a GPS. We can use a tool called Walking Papers, from http://walking-papers.org/, to print a map of an area, draw on it and add notes, and load the paper back into the OSM editor, where you can add your locations to OpenStreetMap.
Overview of Walking Papers
Before we go into detail about Walking Papers, let’s look at an overview of how the process works and what you need to begin. You need a computer with an Internet connection, a printer, and a scanner or a camera that can take high-resolution images. Here are the basic steps.
Step 1: Print a walking map of the area
Locate the area you want to print a map of on the Walking Papers website. Print out a map of this area. You can choose to print the current map of the area on OpenStreetMap, or you can choose to print aerial imagery, if it is available in your area.
Step 2: Add data to your printed map
Use your printed map to survey the area. Add more places by drawing them directly on the map. Draw lines for roads, shapes for buildings, and so forth. Write notes about each location directly on the map, or write numbers on the map that relate to numbers in your notebook, where you can write more detailed information about each object.
Step 3: Scan your paper into the computer
If you don’t have a scanner, you can take a photograph of the paper, if your camera or smart phone is able to take high quality pictures (1200x1600 will work, for example). Upload the image to the Walking Papers website. Make sure the Walking Papers Barcode is contained in your scan, it is needed by the Walking Papers website.
Walking Papers Barcode
Step 4: Load the Walking Paper in JOSM or Potlatch 2
Use the objects you drew as a reference to add them digitally into OpenStreetMap.
Detailed use of Walking Papers
We will now go into detail on how to use Walking Papers.
Create and print Walking Papers
Go to the walking-papers.org website.
Scroll down the page until you see the map, as shown here:

Create a map print out using Walking Papers
The map that you see shows the area that you would like to print on paper. You can move the map the same way you move the map on the OpenStreetMap website, using your left mouse button to drag the map East or West, and your scroll wheel to zoom in and out of the map. Left-clicking on the + and – buttons in the upper left corner also zooms in and out.
Just above the map is a search box with a “Find” button next to it. You can use this to search for a location and move the map there automatically. Try typing the name of your village or town inside the box, and click “Find”. If Walking Papers finds the location you typed, the map will automatically move there.
Just below the map are some additional options. The first option is labeled “Orientation.” This allows you to change the size and orientation of your printed map. Try changing this by clicking in the box next to “Orientation” and selecting “Landscape (A4)”. You should see the size and shape of the map change to be wide, and sized to be printed on A4 size paper.
Click on the box next to the word “Provider:” Here you can select from different options that will change how the map looks. Most of the options show different styles of map, such as thinner lines, or different colors and text. Click on “Bing Aerial Imagery” and instead of a map you will see imagery provided by Microsoft of the location you are viewing. Note that not all locations are covered by high quality imagery, so what you see may be blurry, and not very useful for making maps!
Make sure that the map shows the area that you want to map. Even after you search for your location, you may want to move the map around to choose the right area. When you zoom in and out of the map, you are changing what are called “zoom levels”, which is simply a way of saying how close you are zoomed in. When you are zoomed as far away as possible and you can see the whole Earth, you are at zoom level 0. When you zoom in as far as you can go you are at zoom level 18. The current zoom level is shown just above the map. Usually zoom level 15, 16, or 17 is good for making Walking Papers.
Let’s make the print now! If you have found the area you are interested in mapping and have selected the options that make your paper look good, you are ready. Click the button labeled “Make”, just below the map.
You will see a new page which says that your print is being processed. When it is finished, you will see your print on this page. It usually take anywhere from a few minutes up to twenty minutes for a print to be completed.
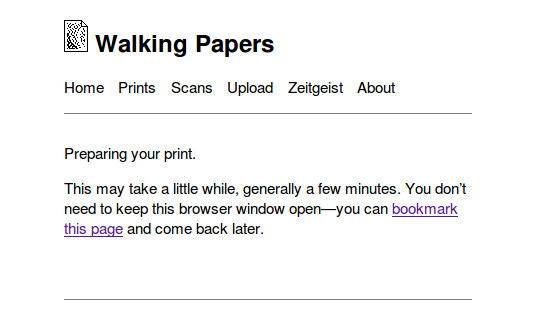
Walking Papers Processing
When your print is ready, click “Download map PDF for print”. The Walking Paper should begin downloading.
When the download is finish, open the PDF file. Connect your computer to a printer and print the page. If everything goes well, you should now have your map printed on paper.

A printed Walking Papers map ready to be scanned
Map with Walking Papers
Take your Walking Paper outside, and use it as a guide to walk and identify new places that are not on the map.
Draw lines for roads, shapes for buildings, and so forth. Write notes about each location directly on the map, or write numbers on the map that relate to numbers in your notebook, where you can write more detailed information about each object.
When you are satisfied with your additions on the paper map, then you can add them digitally into OpenStreetMap.
Scan and Upload
Walking Papers are very useful for mapping with nothing more than paper, but they are not 100% magic. We still need to add our paper into the OSM editor, add our information digitally, and save our changes on OpenStreetMap.
The first step is to scan your Walking Paper into your computer. You can do this by attaching a scanner to your computer, scanning the paper, and saving it as an image file. If you don’t have a scanner, you can take a photography of the paper, but you should be carefuly to take a very good photo. Make sure that the paper is flat and your camera is directly in front of it. Be sure to include the barcode in the image, as Walking Papers will not work without it. Here is an example of a scanned/photographed image:

Once you have your walking paper scanned and saved on the computer, open your web browser and return to walking-papers.org, just as before.
Click on the “Upload” tab.

Click “Browse…” and navigate to the file where you scanned/photographed your Walking Paper.
Click “Send.”
It may take a few minutes for your paper to upload, depending on the speed of your internet connection. When the upload finishes, you will see a new page with a couple questions about your scan.
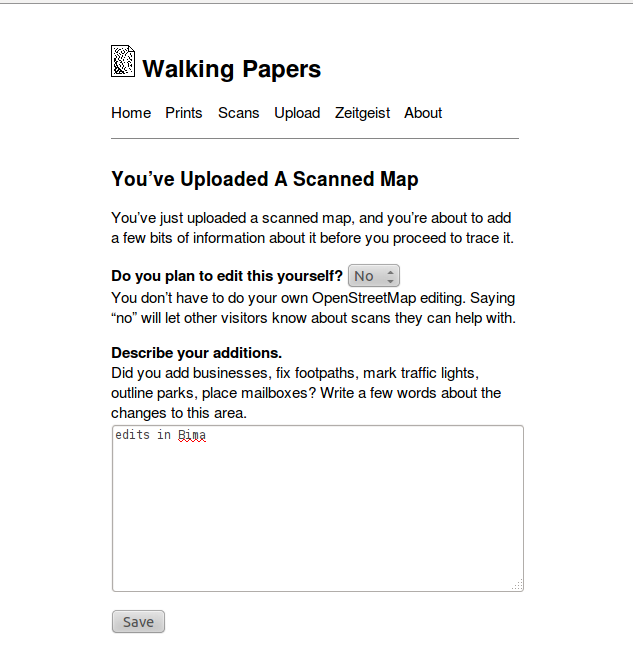
Next to the question, “Do you plan to edit this yourself?” select “No”. This will make your paper public, so that other mappers can see it too.
In the empty box at the bottom, describe what you mapped. This might include the location and the types of objects that you added.
Click “Save.” Your Walking Paper will begin to process. This may take 20 minutes or more. If you made your paper public by selecting “No” on the previous page, you can close your internet browser and return to it later when it has finished processing.
Open in JOSM
When your scan has finished processing, you can load it into JOSM and use it to add your information to OpenStreetMap. Return to the Walking Papers website, by typing walking-papers.org in your web browser, just as before.
Click “Scans”.
Find your paper from the list, and click on it. You should see something like this:

To load the paper into JOSM, we need to copy the ID of the Walking Paper you have scanned. In the URL bar at the top of your internet browser, select the text and press CTRL+C on your keyboard to copy. The text should look similar to this: http://walking-papers.org/scan.php?id=fmxcgdqd
Open JOSM and on the top menu of JOSM, Click “Walking Papers”. Then click “Scanned Map…”
Press CTRL+V on your keyboard to paste the text that you copied from the Walking Papers website. Click OK.
If all went well, you should see your Walking Paper load into JOSM. In the next chapter, we will see how to add the places that you mapped into OpenStreetMap.
Repeat!
After you add your changes to OSM, they are saved on the map. Then the next time you want to improve the map, you can print out a new Walking Paper which includes the changes that you made. As this process is repeated, the map gets better and better, the more you map!
Summary
Congratulations! In this chapter you learned the process of using a GPS or Walking Papers and how they work. You learned how to print, map, and scan a Walking Paper. In the next chapter, we will learn how to add the places that we mapped into OpenStreetMap, and you will have learned the complete process of editing the map.