


Creating and Editing Stages
Stages are web pages on which UpStage performances take place. An UpStage server can have any number of stages, and media uploaded to the server can be assigned to multiple stages.
A player can be "in" more than one stage at a time, simply by having different stages open in different browser tabs.
Audiences enter a stage for a performance by clicking on the stage link - from the foyer page of your UpStage server, from another web site, or from an email. In a similar manner, an audience member could attend concurrent shows on different stages by using tabs or windows.

Create a new stage
To create a new stage, click Create/Edit Stage in the Workshop menu, and then with the dropdown menu showing New Stage, click Select.
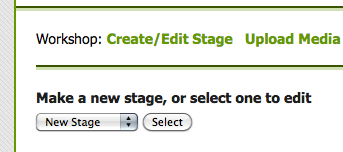
A dialogue box will open over the page. Enter a name for your stage and the URL - this can be the same as the name, but it can't have any spaces in it.

Click Create Stage and, voila! your stage has been created. You will find yourself at the edit screen for your new stage.
Editing a stage
You will arrive at the edit screen when you create a new stage following the steps above. If you wish to edit an existing stage, in the Workshop menu click Create/Edit Stage and then select the stage you wish to edit from the dropdown menu.

Stage name
You can edit the name of the stage, and its URL, by changing the text in the appropriate boxes then scrolling to the bottom of the edit screen to click Save.

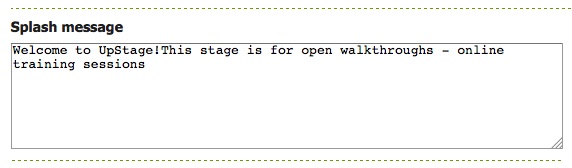
Splash message
The splash message appears on the screen while a stage is loading; you can use this text to give some information about your show. After editing the text, scroll to the bottom and click Save.
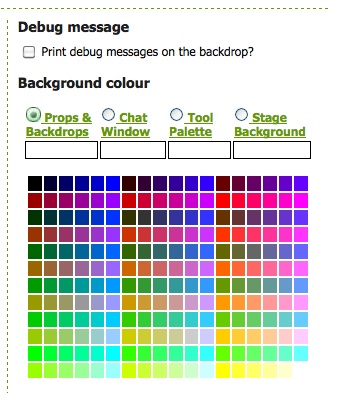
Debug message
The option to print debug messages on the backdrop of your stage is primarily for developers, so that they can identify bugs by seeing what is happening as actions are performed on the stage. However, it can and has been used in performance, to add a layer of performing code to your show.
Background colour
Here you can select background colours for different areas of your stage: the chat window, the tool palette, the props and backdrops bars and the entire stage. Click on the radio button for the area whose colour you wish to change, then select from the colour palette. The chosen colour will be displayed in the box under the name of the area.
Remember to scroll to the end of the screen and click Save in order to save your changes.
Player access
This feature is still in development and will be implemented in version 2.4.3; it will allow you to select which players can access your stage as players, and which other players can edit your stage.
Save buttons
At the end of the screen are a number of different possibilities for saving your stage:

-
Save stage will save the changes you have just made in the edit screen.
- Clear screen changes will remove any changes you have entered in the screen, without saving them, so your stage will not be changed.
- Delete stage will delete the stage completely (note that this does not delete any media that has been assigned to the stage).
- Clear stage SHOULD delete any text in the chat window, remove any media that has been left on the stage (it will still be assigned to the stage, but not actually visible on the stage area) and remove any drawings that have been left in the drawing palette. However, currently this clears everything except text. This is a bug and we are working on it ...
- Save and reload stage will save the changes you have entered, and cause the stage to reload for any players and audience who are currently on it. This is useful during rehearsals when you are trying out different media and want people to see something you have just assigned to the stage, but should be avoided during performances - unless you deliberately want the audience to experience an unexpected stage reload.