Creating a stream avatar
The easiest way to make your stream appear on an UpStage stage is to create a stream avatar. This avatar is created in the same way as a normal avatar, from the Add Media section of the Workshop interface:
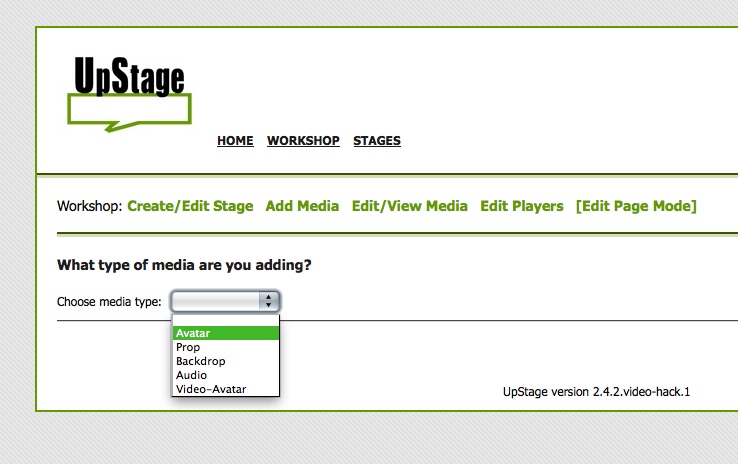
- Click Add Media.
- Select Avatar from the media type dropdown menu.
- Give the avatar a name, tags, and select a voice if you want.
- Check the "Enable streaming?" box.
- In the "Stream server" field, enter the rtmp address of the streaming server you will be using.
- In the "Stream name" field, give the stream a name.
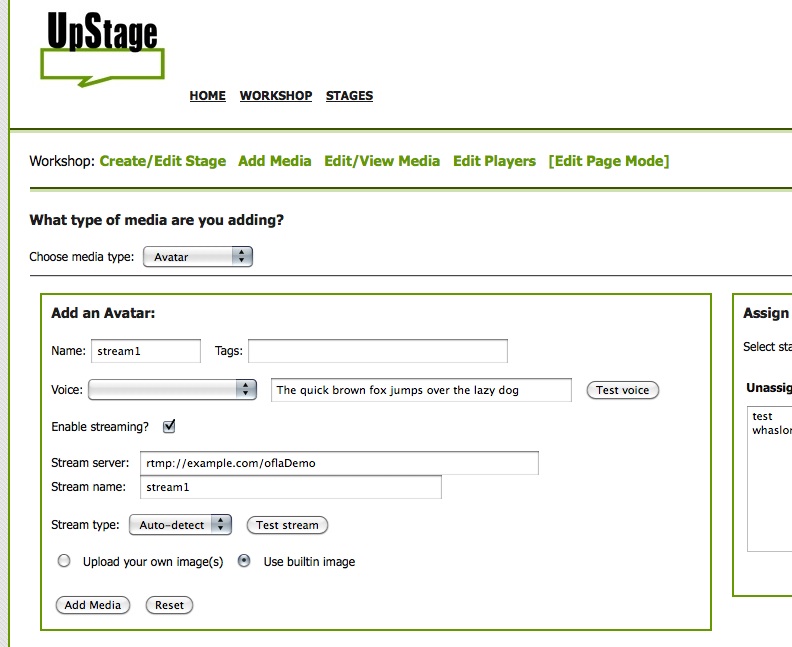
- Assign the avatar to the appropriate stage(s).
- Click Add Media.
You must have the exact same stream server and stream name information entered in whichever streaming application you use.
Stream as part of a graphic avatar
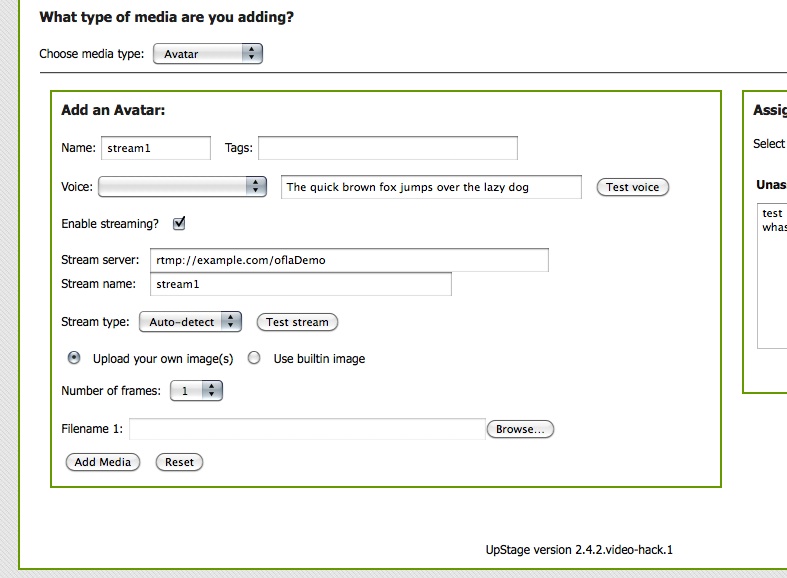
It is possible to have an avatar that is both a static or animated graphic AND a stream. To do this, once you have entered the stream information as described above:
- Select the radio button "Upload your own image(s)".
- Select the appropriate number of frames.
- Browse to the image(s) on your hard drive and select.
- Assign the avatar to the appropriate stage(s).
- Click Add Media.
Note that this means the stream will be visible behind every frame of the avatar, unless you are not actually streaming anything.
Now go to your stage and start your stream in order to see your stream avatar; remember that you must assign the avatar to a stage before you can see it!
Embedding a stream in an .swf graphic
If you have the ability to create .swf graphics (for example using the Adobe Flash application) then you can create UpStage backdrops, props and avatars that have a stream embedded within the file. This enables more precise positioning of a stream within a "frame".
Please note that this is not a tutorial in using Flash; it is intended for someone who already knows the basics of Flash.
Follow these steps to create an .swf graphic with a stream embedded in it:
- In Flash (or another graphics application capable of creating .swf files) create a new document of the dimensions that you want (for UpStage backdrops, use 800 x 500).
- Import your static image(s) into the first layer of the document (.png or .jpg originals).
- Convert the image(s) to symbols and adjust the size as required.
- Create a second layer called video, and place a movie clip symbol of the size and position that you want.
- Create a third layer called code.
- Open the Actions window, and insert the following code (replacing "rtmp://example.com/oflaDemo" with the address of the streaming server you are using, and "mystream" with the name of the stream you want to appear):
/// -------------

var CONNECTION_STRING:String = "rtmp://example.com/oflaDemo";
var STREAM_NAME:String = "mystream";
var BUFFER_TIME:Number = 0.1;

// network
var connection:NetConnection;
var stream:NetStream;

trace("start the streaming ...");

// create connection to red5
connection = new NetConnection();
connection.connect(null);
connection.connect(CONNECTION_STRING);

// connect stream
stream = new NetStream(connection);
stream.setBufferTime(BUFFER_TIME);
stream.play(STREAM_NAME, -1);

// attach video to display
this.video.attachVideo(stream);

/*
// automatically set proper size
stream.onStatus = function(infoObj:Object) {
        switch (infoObj.code) {
                        case 'NetStream.Play.Start':
                        case 'NetStream.Buffer.Full':
                                this.video._width = this.video.width;
                                this.video._height = this.video.height;
                                break;
                }
        }
}
*/

/*
trace("stopping stream ...");

stream.close();
if(connection.isConnected) connection.close();
this.video.clear();
*/
- Go to File > Export > Export Movie and save your movie as a .swf.
- Test the file to see if it works, by opening either in Flash or in a browser. If it's good, then upload it to UpStage in the normal way.
Flash Media Live Encoder (Mac & Windows)
First download and install the cost-free Flash Media Live Encoder application (FMLE); you will need to create an account if you do not already have one, but this does not cost anything. Then select whether you want to download the Mac or Windows version. The current latest version at the time of writing this manual is version 3.2, and that is what the version that the following instructions are for.
Stream settings
Once you have downloaded and installed the FMLE, open the application and enter the following settings in the Encoding Options panel:
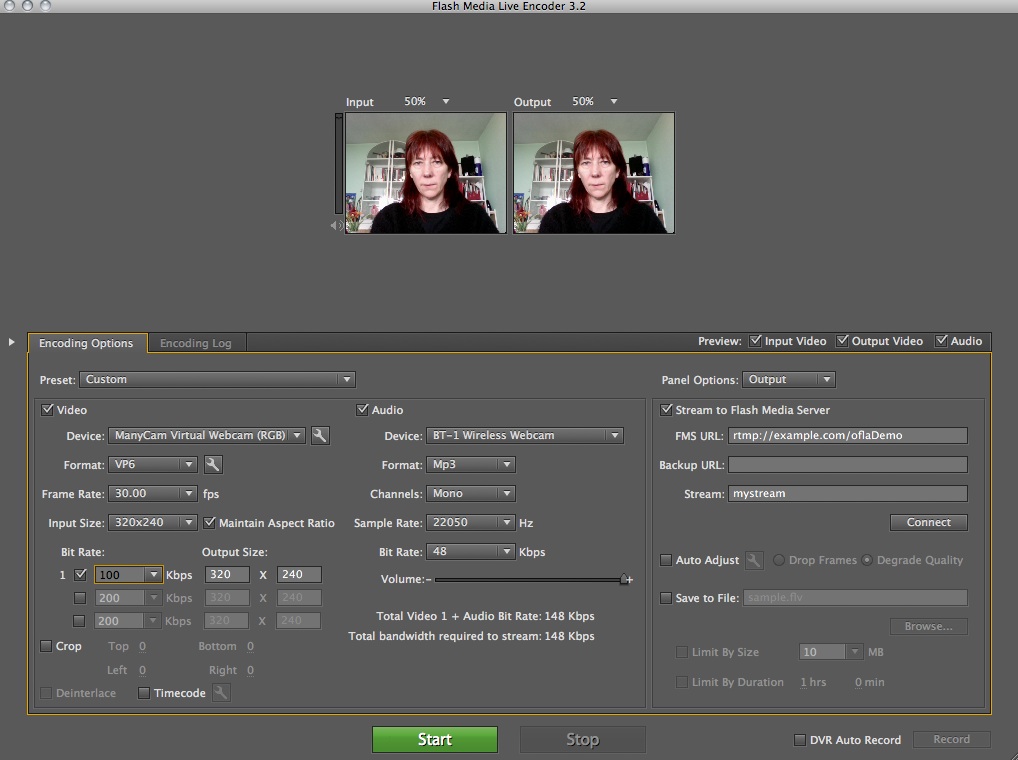
On the right hand side, under Panel Options: Output, ensure the box "Stream to Flash Media Server is checked and enter the appropriate stream server URL and stream name.
Click Connect to test the connection to the server.
Video and audio settings
The video and audio settings will vary according to your hardware, the quality of stream you want to send, and the capability of the streaming server you are using. The following settings are what we are using as standard for UpStage, but you can experiment with them.
- Select your web cam and audio input from the dropdown menus; note - if you do not want to stream audio, uncheck the box beside Audio.
- The formats will normally be VP6 for video and MP3 for audio.
- The video frame rate can be set at 30; if you have a lot of streams or a low capacity streaming server, you can reduce the frame rate to improve performance.
- Select the appropriate input size for your video; for best results, ensure that the Output Size exactly matches the input size.
- Bit rate: a low bit rate will help to ease the load on the server and reduce lag (delay) for those receiving the stream. We recommend 100 for video.
Click the green Start button to start streaming. Click the red Stop button to stop streaming.
Save a profile
If you are going to be using the same streaming server on a regular basis, remember to save a profile once you have entered the settings by going to File > Save Profile. This means that next time you open the FMLE, your settings will automatically be loaded.
If you try different settings to experiment with quality, you can save a new profile and then go back to the original settings by going to File > Open Profile.
Optimum settings
The optimum settings for your video and audio streams will depend on a number of factors, including the hardware you are using (computer operating system, camera, microphone), the capability of your network, and the scale of audience you expect to reach.
Prerecorded streams
It is possible to play a prerecorded video or audio file in the same way as a live stream. This allows you to add additional media to the stage without increasing the initial load time for the audience, and enables a greater variety of formats.
In particular, it allows the playing of prerecorded video at high quality, which was not previously possible to do directly in UpStage (prerecorded video can be played by embedding in .swf files).
File formats that can be streamed are MP3, FLV, or for higher quality MP4 or AAC (note that higher quality also means more bandwidth and potential problems for people on slower networks).
You will need FTP access to the streaming server; ask the person who is administering the streaming server you are using for this information.
Streaming prerecorded video and audio
- Via FTP, upload your video or audio file to the streaming server (note: use only letters and digits in the file name, no special characters or spaces).
- In UpStage, go to Add Media and create a stream avatar with the RTMP URL of the streaming server and the stream name as the filename of the video or audio file.
- Assign the stream avatar to the appropriate stage(s).
- Test the stream in the Add Media interface to ensure it is working.
- Go to the stage, hold the avatar, and place it on the stage; the recording will start playing from the beginning of the file.
- To stop the stream, simply drop or clear the stream avatar from the stage.
Recommended bitrates
The bitrate of your streams are very important: the total bitrate of all the streams on stage at one time should not exceed 800kBit/s, to avoid network overload and stream interruptions for some people.
For videos: a bitrate of 200 - 400 kBit/s should be sufficient.
For audio: a bitrate of 64 - 160 kBit/s should be sufficient.
Red5 Publisher interface
The Red5 Publisher is a browser interface that allows you to publish a stream without having to download and install a streaming application. However, it does not allow as much control or optimisation over the stream you are sending, so if you are going to be regularly streaming and/or wish to have the best quality stream, it is recommended that you use VLC, FMLE or another similar application (see the following chapters for download links and set-up).
To access the Red5 Publisher, you need the publisher URL for the Red5 server you are using. This URL will look something like:
http://example.com:5080/demos/publisher.html
or
http://red5.example.com/demos/publisher.html
(where "example.com" is the url of the host server).
Enter the settings
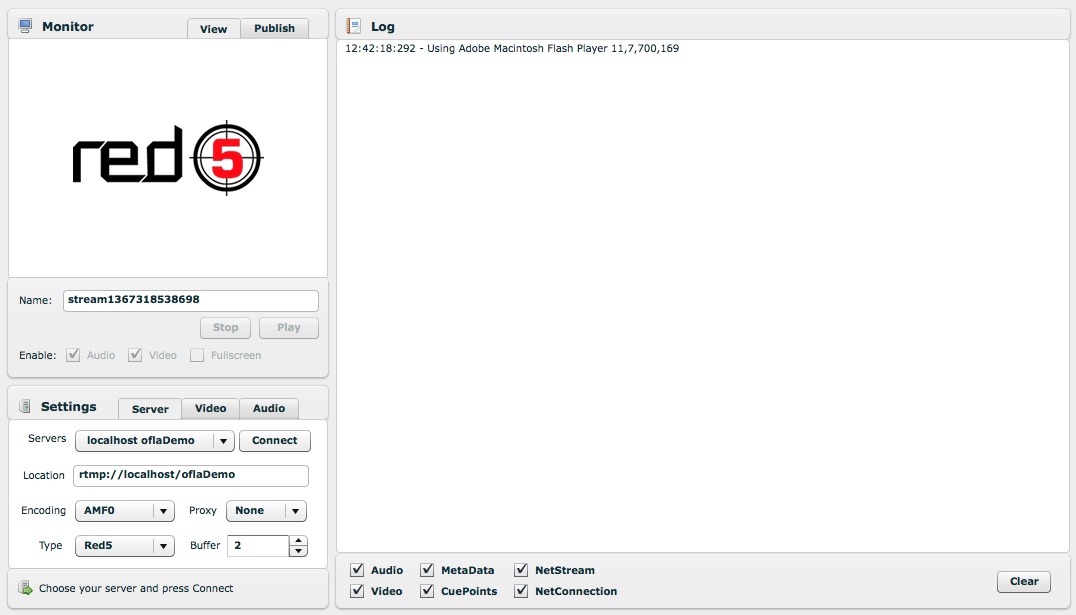
Open the Red5 Publisher URL in a browser (it will look like the screengrab above) then follow these steps:
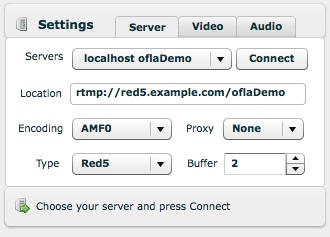
- In the Settings area, select the Server tab and enter the appropriate rtmp URL (in Location), then click Connect:
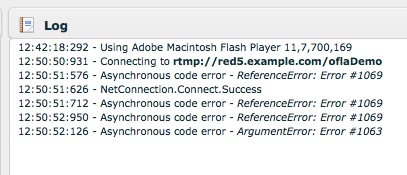
- You should see now in the Log that you are connected, from the line that says "NetConnection.Connect.Success" - don't worry about the error messages.
- Go to the Video settings and choose the video source you want to use, then click Start:

- Click Allow on the pop-up window that asks you if Flash can access your web cam.
- Go to the Audio settings and choose the audio source that you want to use, then click Start:

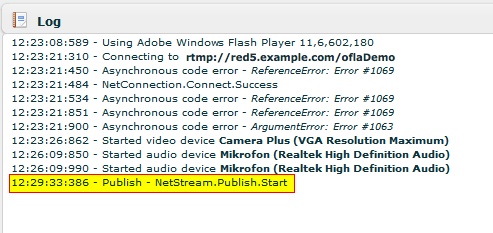
- You should see in the Log that both your video and audio has started (naming could be different depending on your hardware):

- You should also see your webcam image and hear your audio in the preview tab. Now enter the stream name (exactly the same as you have given to the stream avatar in the UpStage workshop, this example shows the name 'mystream') and click Publish:

Note: the Publish tab only shows the capture from your hardware; to see the actual stream select the View tab, enter the stream name and click Play.
- If your stream is successfully published you will see it in the Log (you will also see error messages, but these can be ignored):
- To stop the stream, just click Stop in the Publish tab.
Sending a stream
You need to have access to a streaming server in order to send an audio-visual stream from your computer to UpStage.
Please note: this manual is not about how to install a streaming server; for information this and on installing the UpStage video hack version, please click here. Normally you will not need to install your own streaming server, just have access to one.
The information in this manual is based on the Red5 streaming server; this is not the only option, but it is the one that we have tested and found to work well.
Stream server name
The Red5 server will have an rtmp URL that will look something like this (with "example.com" being the URL of the host server):
rtmp://red5.example.com/oflaDemo
or:
rtmp://example.com/oflaDemo
You will need to enter this into the "Stream server" field when you create your stream avatar in UpStage (see the chapter Creating a stream avatar), and you will also need to enter it into the streaming application that you use to send the stream from your computer.
Streaming client or publisher interface
There are two ways to send a stream from your computer to a Red5 server:
- Using the Red5 Publisher - the browser interface provided by the Red5 server.
- Using a streaming client, such as VLC (Linux) or Flash Media Live Encoder (Mac & Windows).
Using a streaming client rather than the Red5 publisher gives more control over the quality and other variables of your stream. It also allows you to save the settings in a profile, so that when you reopen the client to restart a stream, all your settings are automatically loaded and you do not have to enter them all again.
Whichever option you use, you will need to:
- enter the server URL (rtmp:// ... )
- enter the stream name, exactly the same as it is for the UpStage avatar
- select the appropriate video and audio devices
- create a connection to the server
- start your stream.
It is easy to make small errors in any of these steps that will stop your stream from working. For example, a space at the end of the server URL will prevent the connection from being made. If your stream does not work, please carefully check all of these settings to be sure you have everything right, no extraneous spaces or small typos.
This manual provides configuration instructions for the Red5 Publisher interface (no download required), VLC and the Flash Media Live Encoder (FMLE). For the latter two, you will need to first download and install the application; then follow the instructions in this manual.
Video tutorial
Here is a 10-minute video tutorial which gives examples of how streaming has been used in UpStage and explains how to send a stream using the FMLE.
VLC (for Linux users)
VLC offers the possibility to stream on Linux using video4linux (can access different kinds of hardware like webcams but also TV tuners etc.) and FFmpeg for transcoding (transcoding to FLV and sending RTMP to a stream server).
The file STREAMING.txt contains some links to in-depth information about streaming parameters for use with VLC.
Sample script
For easy setup please use the avstream_vlc_linux_example.sh script (download here by right clicking and saving as file).
Modify settings
Adjust to your hardware:
-
VIDEO_CAPTURE_DEVICE:
e.g. /dev/video0 for your internal webcam, or /dev/video1 and so on for further external hardware
-
AUDIO_CAPTURE_DEVICE_SLAVE:
use alsa://hw:0,0 for your internal microphone or alsa://hw:1,0 and so on for external microphones
-
set the stream url
STREAM_PUBLISH_URL, for example if your stream name is
stream1:
rtmp://red5.example.com/oflaDemo/stream1
Additionally you may want to adjust all settings starting with STREAM_…, all other settings probably won't need to be touched. The standard configuration is to stream with VP6 and MP3 codecs, 320 x 240 pixels at 30 fps and a total bandwidth of 196 kBit/s.
Start streaming
Please ensure the script is executable and can be run:
-
using the terminal: execute chmod 755 ./avstream_vlc_linux_example.sh
-
using a graphical windowmanager: right-click the file and select Properties, then search for the settings to allow execution of the script by the user
If your script is executable you can run it:
Note: In case you want to see a live preview of the streamed video you can uncomment the line in the section “watch stream?” of the script. You will need the software rtmpdump and mplayer to watch the stream.
