


Encoding Video
Software name : VLC
Software version : 0.8.6
It is a good idea to get as good a quality a file as you can before you start encoding. If you can get a DV file if exported from a video editing application or captured from tape or an MPEG-2 or VOB file if taken from a DVD.

Choose the file you want to encode to another format.
Select Stream/Save by ticking the box in the lower, Advanced Options part of the Open File box.
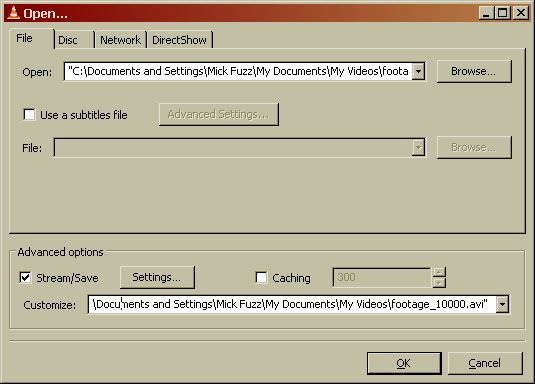
Then click on Settings again in Advanced Options
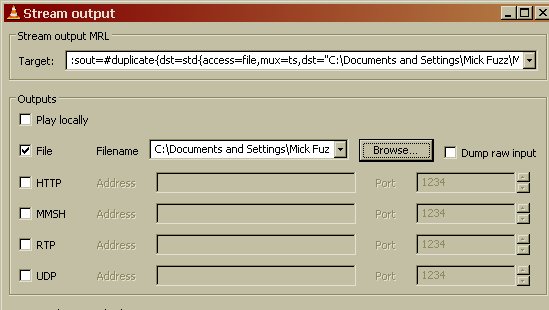
In the Outputs Section click File. Then click on the Browse button next to it an select where you woud like your target file to be saved.
Creating an MP4 file
Make sure the filename you created in the above step ends *.mp4
In the Encapsulation part of the Stream output box select MP4
Video codec : h264 Bitrate 1024
Audio codec: mp4a Bitrate 128

The next bit is a bit tricky part. Go back up to the "Stream output MRL Target:" box. Notice that the box is full of text. Look for the part that has :
#transcode{ }, and type width=352,canvas-height=288
this will be somewhere inside the { }. Do not add extra spaces. You might need to add a comma, as you'll notice all the values are seperated by a comma.
Be careful here. If you change any of the settings below this box, you will have to re-enter the width and height settings.
You may wish to use other width and height settings or user a lower video or audio bitrate if you want to make the file size smaller. This setting will create files that are about 10Mb per minute. This file should be iPod compatible.
Click OK to close the Stream ouput dialog, then click OK to close the File open dialog. The movie should now start playing without showing the picture on the screen.
When it has finished, you can check to see if your file works by playing it in VLC. Don't forget to take the tick out of the Stream / Save box when you open the file.
Creating an Ogg Theora file
Make sure the filename you created in the Outputs section ends *.ogg
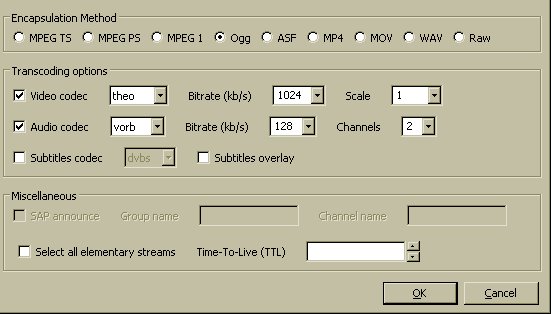
Choose
Encapsulation Method: Ogg
Video codec : theo Bitrate 1024
Audio codec: vorb Bitrate 128
The next bit is a bit tricky part. Go back up to the "Stream output MRL Target:" box. Notice that the box is full of text. Look for the part that has :
#transcode{ }, and type width=352,canvas-height=288
the above appears somewhere inside the { }. Do not add extra spaces. You might need to add a comma, as you'll notice all the values are seperated by a comma.
Be careful here. If you change any of the settings below this box, you will have to re-enter the width and height settings.
Click OK to close the Stream ouput dialog, then click OK to close the File open dialog. The movie should now start playing without showing the picture on the screen.
When it has finished, you can check to see if your file works by playing it in VLC. Don't forget to take the tick out of the Stream / Save box when you open the file.
Creating an MPEG-1 file
The MPEG-1 container and video encoding method is so old now that all computers support it in their default video player with no extra downloads. Also older and cheaper computers can play these files without problems. This can be especially useful if you are creating a CDrom that you want to be universally compatible.
Follow the process opening a file in VLC to encode to another file format to open your file and get it ready to re-encode to another format.
Make sure the file name you choose ends with *.mpg
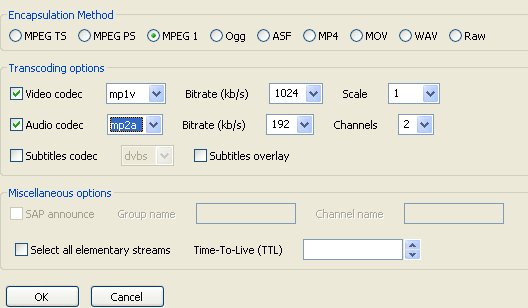
Choose
Encapsulation Method: Mpeg1
Video codec : mp1v Bitrate 1024
Audio codec: mp2a Bitrate 192
The next bit is a bit tricky part. Go back up to the "Stream output MRL Target:" box. Notice that the box is full of text. Look for the part that has :
#transcode{ }, and type width=352,canvas-height=288
somewhere inside the { }. Do not add extra spaces. You might need to add a comma, as you'll notice all the values are seperated by a comma.
Be careful here. If you change any of the settings below this box, you will have to re-enter the width and height settings.
Click OK to close the Stream ouput dialog, then click OK to close the File open dialog. The movie should now start playing without showing the picture on the screen.
When it has finished, you can check to see if your file works by playing it in hopefully any Media player on any system.