


Using Automation
Automation is a way of representing and specifying changes in audio processing parameters over time. The Fader, Panning and any of the parameters of the Plugins used in that Track can be automated. An automated parameter is displayed underneath the parent track in its own Automation Track. Automation data is visually represented as an Automation Line, made up of a number of Automation Points. Here's how a track with Fader Automation looks like:
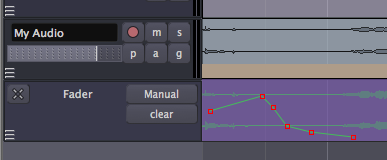
In the image above, the Automation Track called "Fader" is associated to the parent Track called "My Audio". The Automation Line controls Gain changes over time.
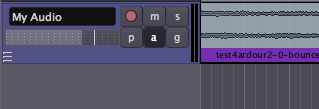
Creating an Automation Line
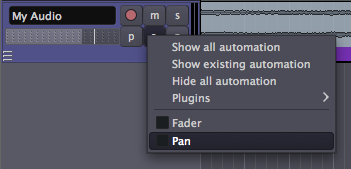
To add Automation to a Track, click the "a" button or Right-Click on the Track area.
A menu will appear, where you can select the parameter you would like to Automate. Plugin parameters are accessed from the Plugins submenu.
An Automation Track will then appear. With the Select/Move Objects tool active, Automation Points can be created by clicking anywhere in an Automation Track. An Automation Line joins the Automation Points you add.
Selecting a Plugin for Automation
You may add Automation to any Plugin which has already been added to a Track. In order to select a Plugin parameter for Automation, click the button on the Track marked "a", or Right-Click on the Track area. A menu will appear, listing the Plugins you have added.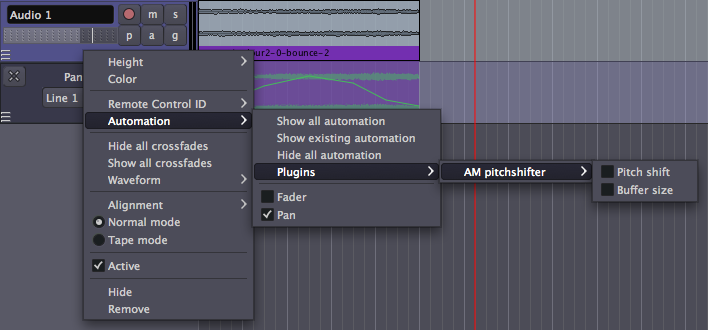
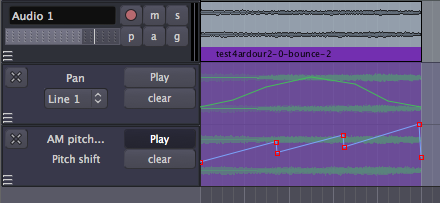
Within each listed Plugin, you may choose which parameter you want to Automate from a list. In the example, we chose the parameter "Pitch shift" of the Plugin "AM pitchshifter". An Automation Track for that parameter appears. Note that as you open several Automation Tracks, they will appear one after the other below the main parent Track.
You can hide an Automation Track by clicking on the "X" at the upper left corner of the Automation Track. Note that a hidden Automation Track continues to function even when it is not visible.
Adding Better Visual Resolution to Automation
You can achieve a greater amount of vertical precision by increasing the height of the Automation Track by Right-Clicking on the gray region of the Automation Track and selecting the "Height" sub-menu.

Working with Automation Points
An Automation Point can be dragged in any direction with the mouse. To remove an Automation Point, hold down the "Shift" key while Right-Clicking on it.
Any segment of the Automation Line between Automation Points may be dragged vertically, affecting both end points at once, without affecting their horizontal position.
Useful variations for Automation Point adjustment include:
- "Alt" + left mouse button mouse drag gives increased precision of movement in any direction.
- Middle mouse button drag allows vertical movement, constrains horizontal.
- "Alt" + middle mouse button drag constrains vertical, allows horizontal (with increased precision).
- "Ctrl" + "Alt" + middle mouse button drag allows vertical (with increased precision), constrains horizontal.
- "Ctrl" + left mouse button mouse drag moves the current point in any direction, and also all subsequent points horizontally only.
- "Shift" + Right-Click deletes a point.
It is also possible to select multiple Automation Points by dragging a box starting on the track background around the points. Then the selected points may be deleted by hitting "Delete" (or "Fn" + "Backspace" if you do not have a true "Delete" key) on the keyboard.
The end points in the Automation Line have special significance. They determine the value of the Automated parameter before and after the Automation. In other words, the starting point determines the value of the Automation from the beginning of the Region to the start of the Automation, regardless of whether or not you have drawn Automation all the way to the beginning of that Region. Likewise, the Automated parameter remains the same value as the last Automation Point until the end of the Region, regardless of whether or not you have drawn the Automation to the end or not.
Playback of Automation
In order to make automation lines to actually playback after you draw them, select Play mode in the first drop-down button in the automation track (set by default to Manual).
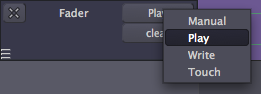
Automation Modes
Play mode will apply the existing Automation data during playback. No recording of Automation data will take place in this mode.
Manual mode tells Ardour to ignore Automation data during playback.
Write mode will continuously record user changes to the Automated parameter as the Transport plays, creating an Automation Line. For instance, you may start playback and then make real-time changes in gain using the Fader on the Mixer Strip of your Track. All the changes you make will be written (recorded) as an Automation Line, which then you can play back later by switching the Automation Mode back to Play. The process of "live recording" Automation Lines is the same for Plugins. Open an existing Plugin by double-clicking on it via the Mixer Strip. While the Plugin interface is open, start playback. Any changes you make by moving the controls of the Automated parameter in Plugin interface will be written as an Automation Line. Warning: leaving the Automation in Write mode during playback can over-write any previous Automation you have created!
Touch mode is similar to Write mode. Unlike Write mode though, Touch mode won't record over existing Automation data unless the parameter is being changed.
Continuing
Once you have your Automation in place, you're just about ready to Export your Stereo Mix to an audio file which you can listen to, burn as a CDR or convert to an MP3/OGG to share on a website. Please continue on to the next section, Exporting Sessions, to learn the different ways of doing this. However, if at any point during the Editing process you move a Region which contains Automation, you will discover that the Automation does not move with the Region. To find a solution for this problem, read the next chapter, Moving Automation.