


Voice menus
Voice menus enable you to create an information tree which your callers can navigate through with the aid of dialing keys on a telephone keypad. You can imagine a voice menu as a grouping of similar content which you would like your callers to access. Each content item in your menu will be linked to a unique digit on your telephone keypad.
The process of embedding voice menus within existing voice menus, which we call nesting, allows you to extend your information tree and hence provide more content to your callers.
Functionality
The administrator is able to build a variety of Voice Menus based on customised audio files and synthesized text messages called content.
A voice menu consists of:
- Menu Instructions
A set of mandatory voice prompts which include: - Welcome message
The welcome message specifies the initial greeting that is played when a caller reaches the IVR. The welcome file will be played only once when a call is first answered by the system. An example would be "Thank you for calling ABC company" - Instructions
The instructions file specifies the instructions the caller has to execute to listen to the menu options. This file will be played out to the caller repeatedly at various points of the call. An example would be "For issues on domestic violence, press 1; to leave a message, press 2, ...etc". You can refer to the chapter "create voice menu" to get tips on how to make your instructions efficient. - Invalid
The invalid-sound attribute specifies the message that is played when a caller makes an invalid entry. - Goodbye
The Goodbye message is played when a caller makes too many invalid entries or too many timeouts occur. This file is played before disconnecting the caller. - Menu Options
A menu option can be made up of the following which your callers can select on the telephone to hear the content: - Content
- Leave a Message
- Voice Menu
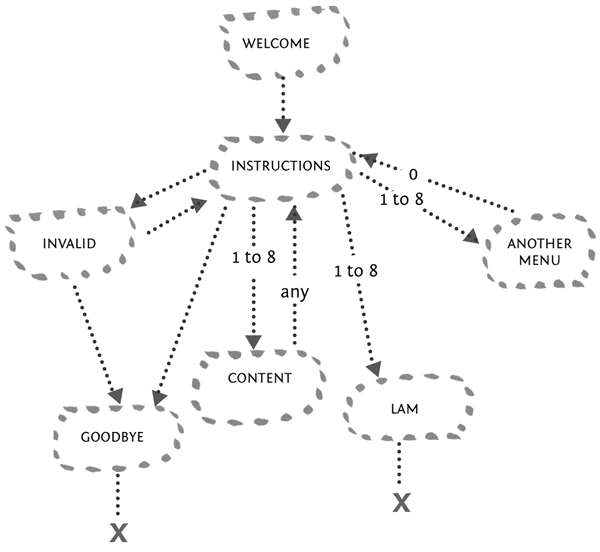
The design of a Voice Menu is illustrated above.
Designing a Menu
When creating a voice menu, the best practice is to sketch out the intended structure for how you wish users to navigate your content.
MENU 1.WELCOME AUDIO "Welcome to Local News FM"
INSTRUCTIONS "To listen to info from your area, press one To listen to global news headlines, press two To leave us a message, press three"
CALLER PRESSES 1.
MENU 2. INSTRUCTIONS "To get traffic info, press one To get local weather, press two To return to the previous menu, press zero"
CALLER PRESSES 1. CONTENT AUDIO "Todays traffic...."
CALLER PRESSES 2. CONTENT AUDIO "Todays weather is...."
CALLER PRESSES 0. USER RETURNS TO PREVIOUS MENU
CALLER PRESSES 2. CONTENT AUDIO "Todays global headlines are...."
CALLER PRESSES 3. CONTENT AUDIO "Please leave us a message after the tone"
INVALID AUDIO "Oops, please enter a valid option"
GOODBYE AUDIO "Goodbye"
Creating Content
Once you have designed the structure of your menu, it is time to create the audio files.
The audio files must be uploaded in either .mp3 or .wav format through the user interface. They should be recorded as mono, 8Khz files, and must be less than 10MB in size. Once uploaded, they can be listened to from the administration GUI via the built-in Flashplayer. Audio files can at any time be overwritten with a new audio file.
Once you have created the menu instructions, record the menu options and upload them in the content section, IVR Centre > Content > Upload.
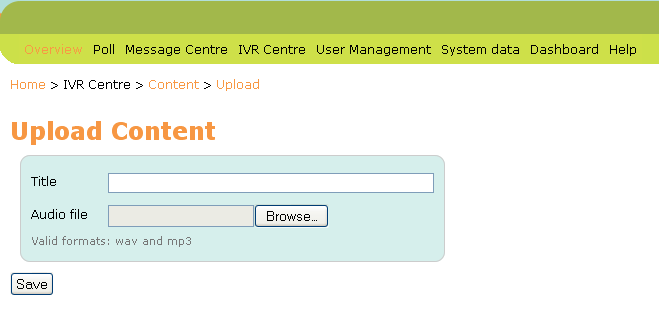
Give your audio file a title and save.
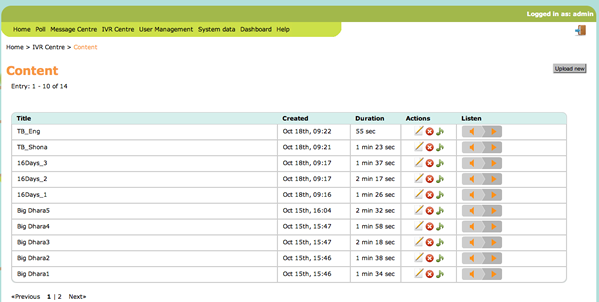
When all audio content has been uploaded, you are now able to find it in IVR Centre -> Content.
Creating the Voice Menu
When creating an voice menu with sub menus, you must create all sub menus before creating their parent. This will become apparent when putting them together as you need to link to an existing menu.
To create a Voice Menu, follow these simple steps:
- You will need to create the menu structure at IVR Center -> Voice menus -> Create New
- Name the menu, and then assign the audio files you have just created to the four respective sections.
- Within the Menu Options select the type you wish to appear for the assigned digits.
- In the example above, we have to create MENU 2 before we create MENU 1. When creating MENU 1, we can select MENU 2 in the Voice Menu dropdown selection for digit #1. And then select the appropriate audio Content for digit #2. Finally selecting your Leave a Message for digit #3 (Please see the Leave a Message chapter on how to create your Leave a Message menu).
- Save, and you're finished!

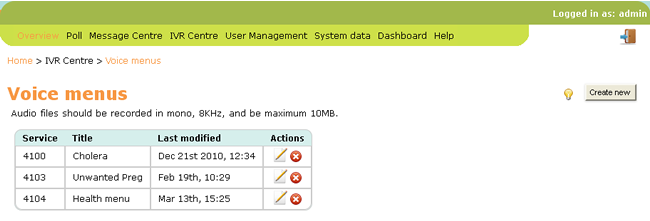
All existing Voice Menus will now appear in IVR Center > Voice menus
Audio Files In Depth
This section helps to provide you with a bit more about the audio files within Freedom Fone, and other approaches to creating menus.
A Menu Instruction can be generated in three ways:
- Customised audio files
- Customised text to speech
- Default text to speech
Customised audio files: If the administrator associates an audio file with a message, that file will be played to the caller when she enters the voice menu.
If an audio file has been uploaded to the voice menu, it can be exported as an .mp3 file by clicking the download icon  .
.
Customised text to speech: If no audio file is provided for a message, but a customised text message exists, the text message will be synthesized and played to the caller.
If the voice menu includes one or more text prompts in the place of audio files AND you are NOT using a licensed copy of the default Cepstral voice, you will hear an automated voice play before each text prompt is synthesized, reminding you to buy a license. If you use your own audio files you do not need to use text to speech at all.
A license for the Allison 8 Khz voice for Linux can be bought from https://www.cepstral.com/. Once you get the license you can register the voice by running the swift executable from the command prompt as follows:
- Open a terminal window by clicking the terminal icon in the centre of the title bar at the top of your screen.
- If you are prompted to do so, enter the password you have set in the installation.
- At the prompt type
/opt/swift/bin/swift --reg-voice
- Follow the instructions to enter the details associated with your license. You will be asked for Name, Organisation and License key
Default text to speech: If neither an audio file, nor a customised text is provided, the default text will be synthesized and played to the caller.
A Menu option file can be used in one or more different Voice Menus. These files cannot be deleted if they are currently associated with a Voice Menu. The administrator can at any time add, edit or delete a Voice Menu. The administrator can create multiple Voice Menus and all can be active at the same time. Freedom Fone v.2.S offers the possibility to assign eight Menu Options to a Voice Menu. It is possible to link voice menus such that a menu option can lead to another voice menu which in turn gives more options to a caller.
Note that digits 0 and 9 are reserved for navigation.