Advanced Video Effects
In the chapter on Single Track editing we learned how to Fade to Black. Fade to black is a basic effect and is only one from a large range that you could use to make an appealing video.
Minimal / invisible effects
Many video effects, including the Fade to Black, should not be noticeable to the viewer. For example, fading, cropping or adjusting the colour balance of a clip. These effects are often designed to fix problems caused by the recoding or editing process, for example jumpy cutting, mismatching footage or ugly/sudden changes in colour - so, while these effects change the video in an "artificial" way, they should look in fact look natural.

Above is an example of a colour correction effect. The unedited footage (left) was an unnatural looking shade of green. On the right, the colour has been corrected and looks quite normal: this effect would be invisible to the audience.
Narrative Effects
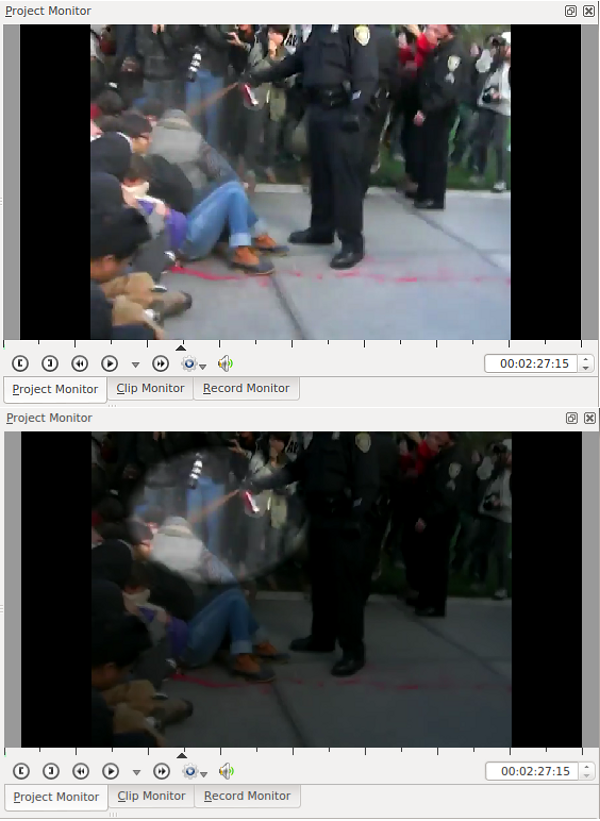
Some effects can be useful to create a stronger narrative. You may often see footage slow down and freeze while a voice-over describes what is happening on the screen or gives background information. A particular area of the footage may be physically highlighted too, for example, an assault weapon may be circled while the footage is paused (see image below). While these effects
are noticeable, they add flow and clarify, rather than confuse the footage.
Fun and creative effects
When you want to use something more noticeable, there are lots of fun and creative effects to choose from, however, make sure that you don't go overboard - less is (often) more in video editing. It is perhaps ideal to use these effects in celebratory videos, for example, footage of a party or a Mash up video.
Hands on - Masking video with the Automask Effect
There may be times where you wish to pixeleate an area of your video to protect the identity of a colleague/minor or disguise a disturbing image. It's likely that you have seen this effect before.
Auto-masking can be a dramatic tool, as well as a practical one: it can reiterate the serious or upsetting nature of a video. For example, as people become desensitised to images of suffering and/or violence - pixelating an upsetting image could create a bigger impact than the exposed image itself. Also, by drawing attention to the need to protect an activists identity, you are saying "we are in danger because we fight for what we believe in." This task will show you how to create an Automask.
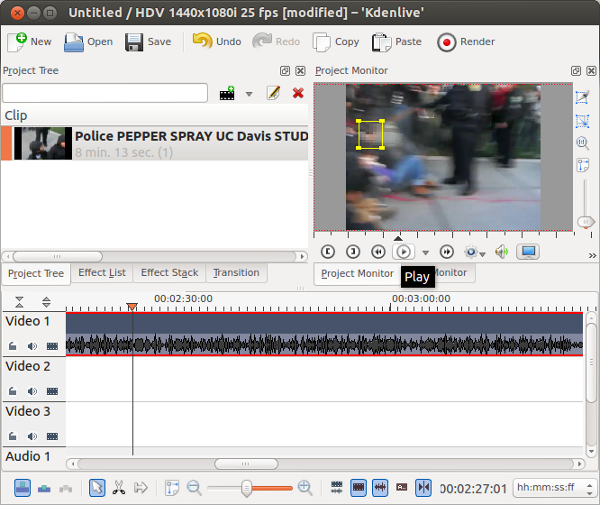
First, put your clip in the timeline as usual, and then search for "mask" in your Effect List. Drag and drop the effect onto your clip.
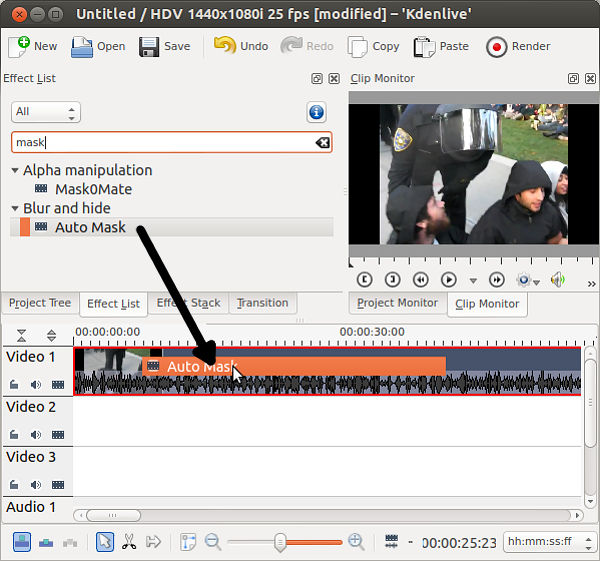
You will now see the effect in your Effects Stack and you can also see a yellow box in your Project Monitor :

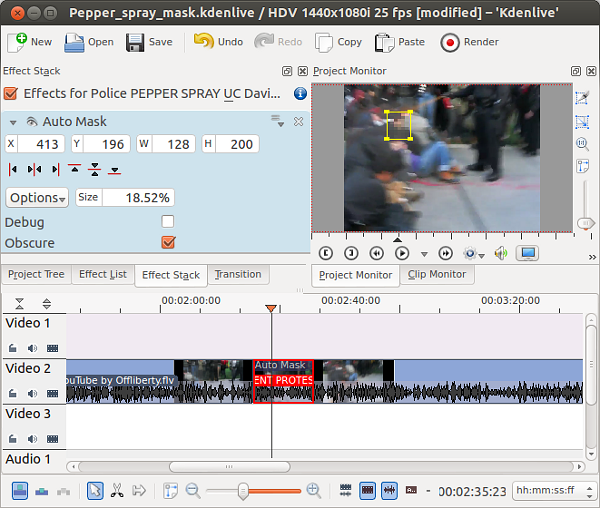
You can use the width (W), hight (H) and X/Y axis dialogues in your Effects Stack to position the mask, however, it is simpler to drag the yellow square and resize/move the mask manually.
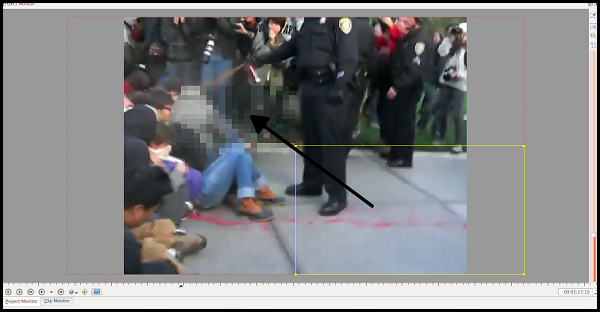
Firstly, move the mask by clicking in the centre of the yellow square and dragging and dropping it onto the area you would like to mask.

To resize the mask, drag the sides of the yellow box in towards the object you are masking, until only the desired area is covered.
 Continue to reposition and resize the mask until you are happy.
 Play your video and check the mask in the Project Monitor. Make further adjustments if needed.
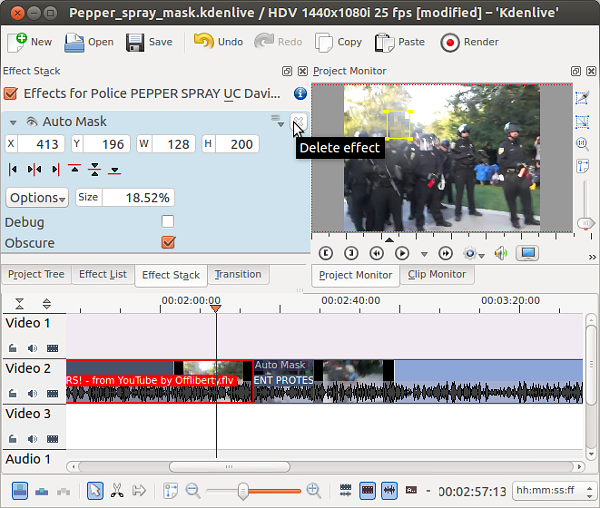
You may only wish to apply the mask to one part of your video: in this case, you can use your razor tool to snip out the desired section and then delete the mask from the rest of the video.
Once you have isolated the area you wish to mask, select the remaining clips one at a time, and click the X button in your Effects Stack, leaving the mask effect applied to the desired clip only.
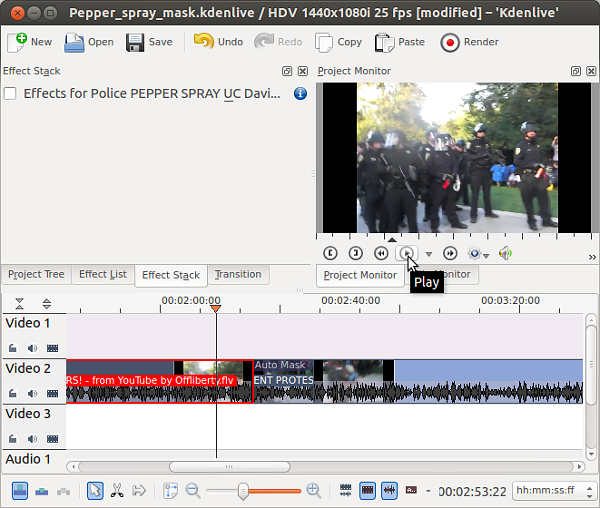
Now preview your video. While the cuts you have made should be invisible, the mask effect will only be applied to the appropriate section.
Remember, the more that you hide, the harder it will be for your viewer to understand what they are watching: at the same time, you must make sure all the required details are covered.
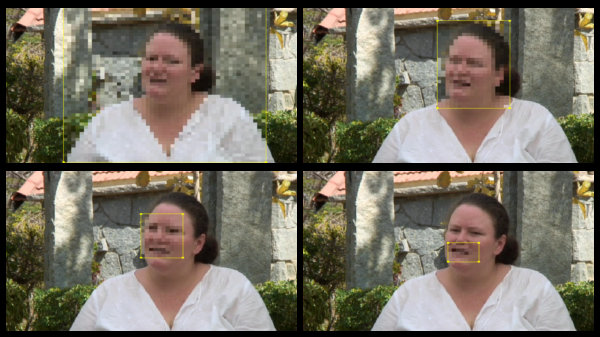
In the example above, the first clip has a oversized mask. The second clip strikes a good balance between revealing to much or to little. The third image, however, masks too little - the woman could be recognised by face-shape or hair. The final image masks only her mouth: you could use this if you simply wish to hide a word or sentence, for example, a name. By using a "beep" sound and a small mask, the word/sentence can neither be heard nor lip-read.
Transferring your skills: The Auto-mask effect demonstrated here has limits because it does not move around with the video. In other video editing software you could use motion key framing to achieve the same goal. Motion key framing is covered in the chapter concerning the Ken Burns effect.
Beyond masking
If you are planing to interview someone who wishes to remain anonymous, consider using lighting effects to hide their identity (see below for an example). Masking is useful for "on the go" footage, however, more attractive/effective techniques can be used when there is time.

Sharing and Archiving your Work
The process of archiving your video projects is a subject which merits its own guide. The group
Witness have great resources in this area and are working to create more.
1
"Archiving means collecting, organising, describing, preserving, and providing access to materials of evidential, historical, cultural, or other value". WITNESS lists some of the uses of archiving as follows:
- To create alternate or updated versions of your video
- In your future video advocacy campaigns
- As evidence in legal proceedings
- By other human rights defenders
- By news organizations reporting on your issue
- As an educational or research resource; part of our historical memory
Balance authenticity and organisation
We can divide the uses of archiving above into two main areas, evidence archiving and technical archiving, as we need to take different approaches to both. Archiving for legal reasons aims to leave the original footage from cameras and phones as untouched as possible to make authenticity easier to verify. When archiving for re-editing check that your archiving solution will be create files that are easy to reuse and migrate.
Think about your archiving medium and redundancy
If possible, don't archive to only one place. If your optical disks (DVD, CD, Blue-Ray) decay or the the hard drive fails it is good to have 'redundancy', which means a back up in another locations. Archiving onto good quality hard drives with in-built redundancy is a great option. If you are unable to afford this, archiving to more than one DVD is a cheaper, if slower, solution.
Video metadata and archives
Metadata can be stored as part of most files (avis are poor at this). Your archiving system is likely to create lots of metadata - which is text data about your video file. This may include where it was shot, contents, subtitles, publisher, camera person, editor, where to find out more information. Presenting this data along with your video is key to helping people to take action as it acts as vital evidence.
Other tips on archiving
Archiving can seem like a big responsibility to take on. Don't be intimidated. It is better to do some archiving than none at all. Here are some tips:
- If you rename video file names, keep the original camera generated file name in the title
- Try to find a partner organisation with resources to help you archive your work
- Try to make archiving part of your publishing process and you can make your rendering methods create multi-purpose videos: for example create a high quality video for upload to a video sharing site that you then also use as an archive file.
Hands On: Moving your project to another computer
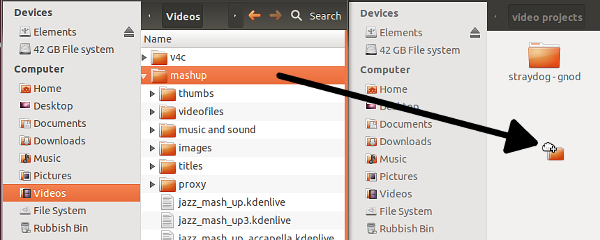
The easiest way to move all files to another computer is to use an external hard drive. To do this plug in an external hard drive to your computer and copy all files in your project directory into a folder on the external hard drive. It is very important that all files in your project are inside your Project folder.
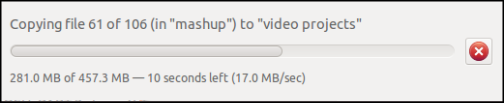
Video files can be big so the transfer may take some time.
Plug in your hard drive to another computer with the same version of the same video editing software. Copy across the project folder to the new computer or leave it on the hard drive if you want to.
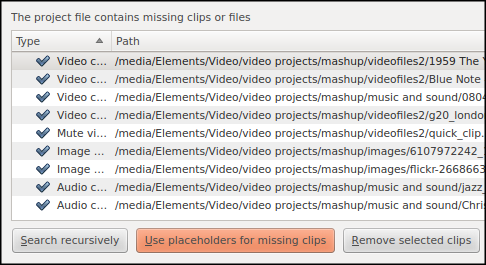
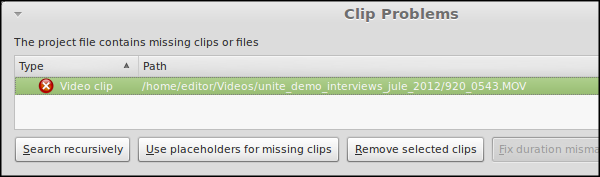
Open up your video project on another computer. If you have copied the project folder so that it is in a similar location on the new computer as on the older one - say in the Videos directory - the project may open up ok with no errors. If not there may be a Clip Problems pop up window.
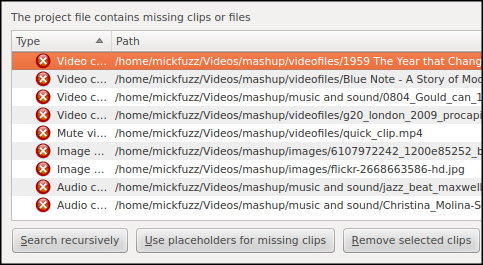
If this occurs, don't panic, click on Search Recursively.
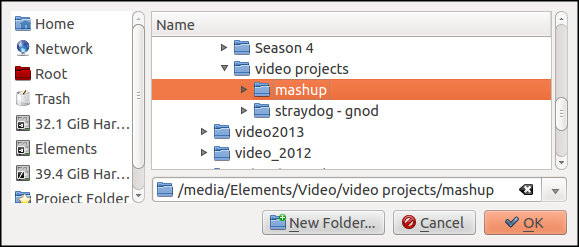
Browse to the new location for your Project Folder and click on Ok.
The error icons on your window should turn to ticks.
Click on the OK button option.
You may now see some messages asking where the if you want to create a new Project folder / directory. Click yes to this. But then remember to re-set this correctly in Project > Project Settings > Project folder option in the menu.
Transferring your skills: The same technique and knowledge should allow you to transfer projects using any video editing software. In many the process should be slightly easier as you will not have to reset the Project folder option.
Hands On: Compressing and archiving to disk
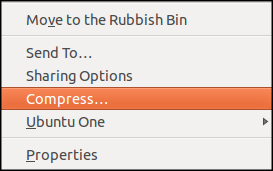
If you need to use DVD disks or similar there are some additional steps to take. We will compress your project folder to a single file, this process makes it easier for us to know that we have transferred all the project files when we are archiving or migrating the project.
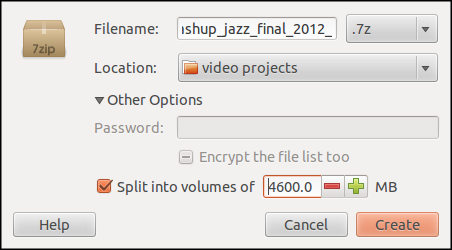
If the compressed file is too big to fit onto one disk will will need to split the compressed file. In this example in Ubuntu follow these steps.
Browse to the folder in your file manager. Right click the folder and select Compress from the options.
Give the compressed file a recognisable name and select .7z from the list of file types.
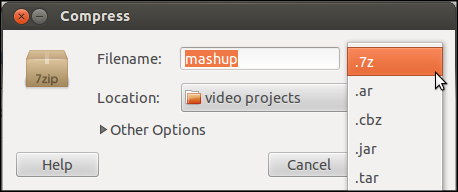
If you don't have the option 7z available then you may need to install the p7zip application from the Software Centre or by using the following command.
sudo apt-get install p7zip-full
 The capacity of a DVD disk is 4.7 Gig so to be save let's split our file in to chunks of 4.5 gigs or roughtly 4600 Mbs.
You should then have a list of files which you can archive to different DVDs. Be careful to store these securely together as you will need all of them to uncompress the project again.
Transferring your skills: The same effect of splitting your archived project into different files suitable for burning on to disks is available using different software on different operating systems try 7zip in Windows or Keka for Mac.
Hands On: Export your project to a compatible file type
There are many options for archiving your project files. In other parts of the guide we have looked as using mp4 files with the H.264 profile. To archive our project as a file we can repeat the process but use a higher video and audio Bitrate to make sure that there is little quality loss.

The above settings should be fine for archiving your work. If you want to be extra careful not to lose detail in your video you can double the settings to;
Video: 50000
Audio: 500
Transferring your skills: DV AVI files were the default file type for capturing DV tape footage onto PCs. it is still supported as a format by nearly all video editing applications. As such, it may be a good option to share your work. There is help to create DV AVI files in the section on video file types.
- http://www.witness.org/how-to/curriculum/documenting-and-archiving-file-based-video^
What Next?
Thanks go out to the V4C (Video for Change) network for inspiring this guide. We hope we have written the guide that we wished we had when we were learning to make videos ourselves.
We are aware that there are areas that could well be expanded. If you would like to contribute to the next update of this manual. Then please join the FLOSS Manuals community mailing list and introduce yourself. 1
Using this guide a course curriculum
If you are interested in teaching video editing as a curriculum we hope that this guide can be a valuable resource to help that happen. We have some tips that we hope may help you.
Each chapter can be a lesson: As you teach the contents of this guide you can use each chapter as a basis for a lesson plan. We aim to explain the concepts and terminology at the beginning of the chapter.
You can use the contents as a base for a short 60-90 minute workshop. 10-20 minutes should be enough to explain the ideas and demo the task. In the remaining time students work through the hands on task and the students who finish first can extend their learning by experimenting. The chapter can be printed as a hand out to support learning.
Preparing your materials: While it is tempting to work with real footage that has just been shot by the students, this can create a lot of complications. Why not teach first with clips and stills that are pre-prepared to allow students to concentrate on learning the techniques.
Due to time constraints on this first edition of the guide we have not created video materials and sample project files which you can download and use for the Hands On parts of the guide. If you are teaching, prepare materials which are suitable to demonstrate the different techniques and to save time troubleshooting. Perhaps you could share these with FLOSS manuals to help other teachers too.
Preparing your equipment: Teaching with Free Software involves a certain amount of troubleshooting. It is a idea to invest some time getting a working set up of your software. It is possible to get a working version of linux install ready with the software you need to copy on to lots of computers at once in, say, a learning centre or on some borrowed laptops for a one-off conference.
Transferring your skills to other video editing software
We hope that the sections on Transferring your skills will help you to map the knowledge learned onto other video editing software. We are aware that it is not always suitable to be install a Linux-based system on the computers you use especially if you are working with partner organisations that are using the computer you are working on for other things.
Taking your learning on video making further
There are other open guides that we would would like to let you know about that may be useful to you or to your students in deepening your knowledge about video making and using video as a tool for change.
Recent guides of V4C
There are other guides online from the network. The recent guides are on Secure My Video and Video Making on Android Devices.
Witness video-making guides
Witness have produces a series of guides and videos covering many areas of using video for change and evidence recording. These include the Video For Change book2, the chapters of which are available as a free downloads on the Witness website, and the Video Advocacy Toolkit which is an online learning resources with 32 videos and lots of supporting documents. 3
All of these resources are available on the How To page of Witness - http://www.witness.org/how-to
Insight Share - Participatory Video & rights-based approaches
Insight share have fantastic guides on participatory video making. Their original guide is called the Participatory Video Handbook.4 They have also published a follow up called A Rights-Based Approach to Participatory Video.5 The guides give a complete look at both the theory of change and practical examples of PV exercises. Both guides are available for download on their website.
Tactical Tech - Tactics for Information Activism
Tactical Tech have several guides on Information Activism and using technology for advocacy, of which the use of video is an important aspect. The guides are visually striking and can be used as a great source of information and inspiration.6
- http://lists.flossmanuals.net/listinfo.cgi/discuss-flossmanuals.net^
- http://www.witness.org/how-to/video-for-change^
- http://toolkit.witness.org/^
- http://insightshare.org/resources/pv-handbook^
- http://insightshare.org/resources/right-based-approach-to-pv-toolkit^
- http://informationactivism.org/en^
Create a Video Mash Up
A mash up is a way of taking multiple video, audio and often stills files and mixing them up. It often takes 'found footage' obtained from the Internet and mixes up the contents to create something altogether new . Mash Ups are usually short and can be a way of giving a quick overview of a subject inviting people to find out more from other sources.
A mash up videos may also use a lot of special effects to bring normal video footage to life. Guerrilla News Network's, Stephan Marshal says:
We use the “video scratch technique” which comes from the hip-hop style of moving the record back and forth... We also use a lot of compositing effects, we shrink footage (often footage that may be poorly shot, or looks worn out) and we frame it with an animated template around it.
By adapting media to make it unusual, reverent and 'street level' it is possible to target audiences that are traditionally hard to reach.
Gathering Footage and Legal Issues
Getting copyright clearance on all footage used can be time consuming and expensive. You may be able to distribute your film anonymously, youcan benefit from 'fair use' or 'fair dealing' provisions of copyright law.1 If your organisation would find it difficult to officially produce a mash up video, it may suit a partnership with a smaller media production group.
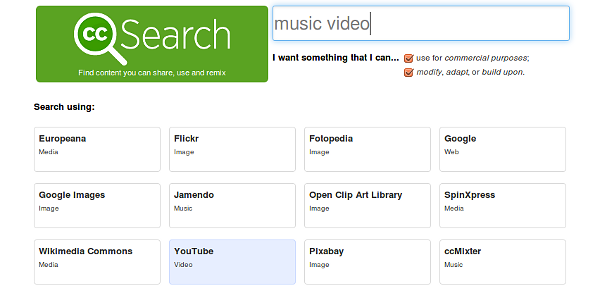
Also, Creative Commons video and audio encourage this kind of re-use. There is a search engine to allow you search for CC work here - http://search.creativecommons.org
 You may also find useful archive footage at http://archive.org.
Structuring a Mash Up
Because of the nature of a mash up, any rules that exist are there to be broken. Playing around with existing conventions and alter them to make your work compelling. You can use this structure as a simple base from which to deviate from.
Choosing your content
Here are some quick tips on choosing your content.
- Use an instrumental audio track as an audio base with a flavour of track which suits your message.
- Instrumental Hip Hop, down-tempo jazz or acoustic music can work well if you are using spoken soundbites over the top
- Choose a series of interviews which illustrate the point you are trying to make and match the tone of your interviews to overall feel of the project
- Grab popular clips: bloopers, news reports, behind the scenes stuff to act as a contrast to more serious clips.
- Find attractive background video which could be related in subject or a creative contrast. Remove its audio and intersperse this with other video.
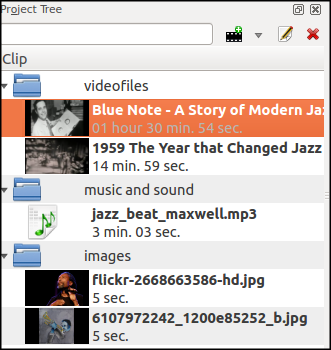
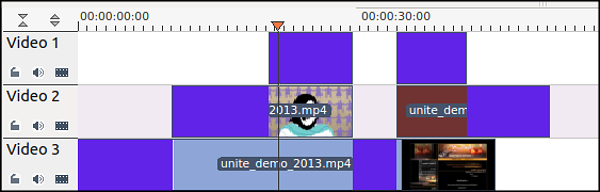
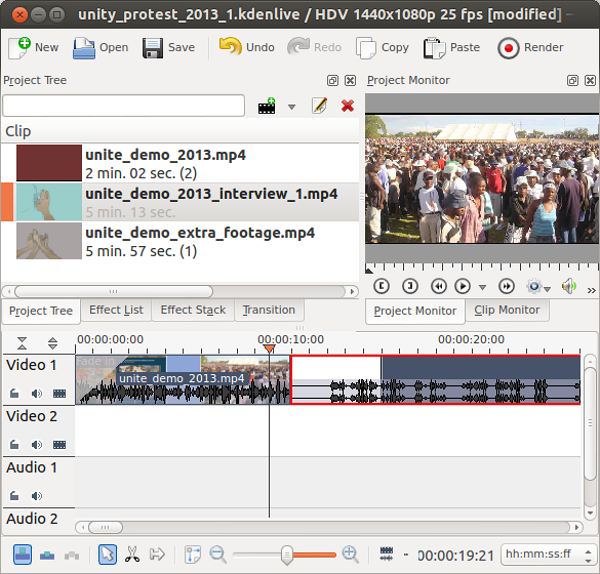
A mash up project will contain many many files. Here is a screen shot of a simplified project that we can use to explain some of the structure of a mash up.
Assemble your music and soundbites in order
In the example below we use our main narrative of soundbites on Video 1 and Audio 1, and a musical instrumental track on Audio 2. All other audio and video, will revolve around this main structure.
Get the timing of your main elements in place first and then start adding more mash up techniques.
Add Video Mash Up Techniques
The following techniques are often used in mash-ups to achieve various effects. Try them out with your footage.
Matching audio to visuals
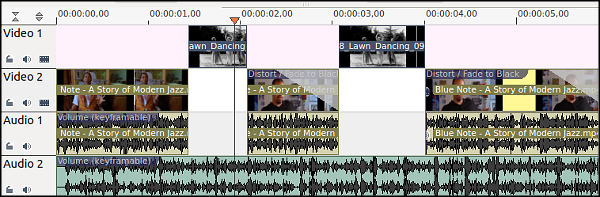
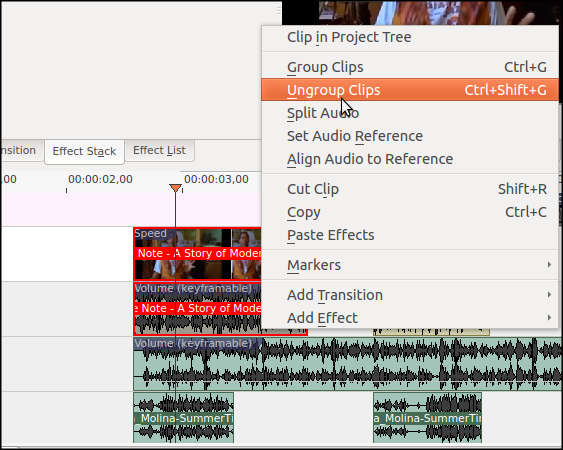
With visuals you may be able to to find audio which matches up to your project. Musical mash ups often use acapella vocals to add to the mix. Use your skills to edit, speed up and slow down footage manipulating it to make people appear to be singing. Remove the audio of the original video by selecting the audio and video clip and clicking Ungroup Clips.
You are now able to select just the audio of the clip and press delete to clear it. In the screenshot below we can see a Video track of someone talking in Video 2, an instrumental track in Audio 1 and an accapella track in Audio 2.
Zoom in very closely to your timeline and to go forward and backwards to see when your character is opening and closing their mouth. Match the vocals to that movement. You can see that the accapella vocal here is broken up into two, in order to match it better to when the subject opens and closes his mouth.
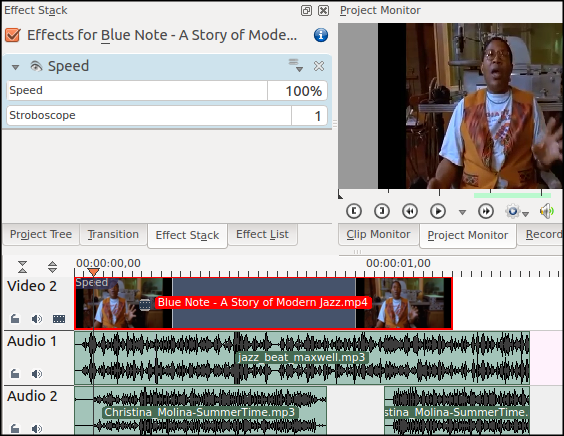
We can match up the audio and video more accurately if we alter the speed of the video. In the screen shot below we slow down the video clip to stretch it to match the singing track.
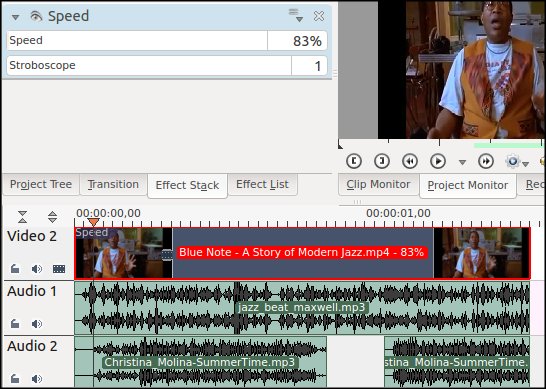
Changing the speed of video clips
Speeding up and slowing down footage can also dramatically effect how the footage is perceived by your audience. Slowing down footage can give a thoughtful quality to footage and speeding up footage can make it seem comical or frantic.
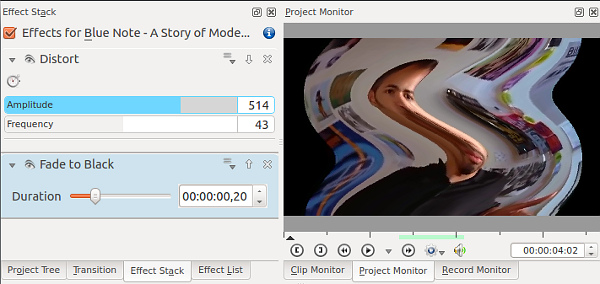
Frame-in-frame compositing
To revitalize interview footage you can use frame in frame techniques, laying talking head footage over different backgrounds and effects. Use the Pan and Zoom effect to reduce the size of your original footage.
In the example we can see a video track of moving clouds on the Video 2 Track and an interview on Video 1 Track. The key technology in use here is called compositing.
We can make the frame look better by adding a colour border which can be done by adding a colour clip or a video layer as a border.

This gives a flavour of what is possible when using compositing and many different layers of video, images and other tricks.
Zooming and Moving Footage
Changing the frame size of footage and moving it around the screen is a common technique. It also uses the technique of compositing but adds movement. In Kdenlive you would use the Pan and Zoom effect and keyframes to move video and still around.
Quick Cutting of Soundbites and Jump Cuts
In a mash up you will often have very short sound bites rapidly assembled one after the other. Often this will have some kind of comic effect. Maybe all the people speaking are saying nearly exactly the same thing. Or they could be finishing off each others sentences, giving the illusion of a narrative even if it has been pieced together by the editor. There are some examples here. 2
Recreating known Media Conventions
You can draw on the associations of your audience by recreating the some of the 'looks' of mainstream media.

Take for example a still from news channel. You can create similar looking titles by importing images that you create in GIMP or similar programmes.
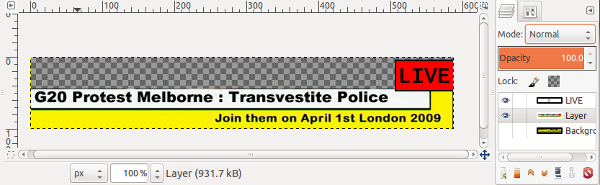
This process can be time consuming, however, you can also achieve a reasonably good effect quite quickly with blocks of colour and titles instead. Add gradients to the blocks to make them look more professional.
Effects, transitions and more effects
While in documentaries less is more when it comes to effects, in Mash Ups more is more! Effects, effects and more effects! The intention is to keep the viewer interested.
- http://en.wikipedia.org/wiki/Fair_use^
- For examples of rapid cuttings and completing other people's sentences - see http://www.youtube.com/watch?v=3HhP23M53Yc^
Saving and Exporting your Work
If we have created a project that we want to share or to save to be revised at a later time, there are two things that we need to do. The first is to save our project and the second is to export the project to a video file for previewing or sharing. These are two similar but separate processes.
The difference between saving your project and exporting a file
When we talk about saving a video project we are talking about saving the work in a way that will allow us to come back and change it later. In other chapters we talked about multi-track editing and applying effects. In order to save our project together with the tracks and effects we have we have made in a way that allows us to change it at a later date, we will need to save a
video project file.
If we want to share the our video, for example, put it on the Internet, then we should export our work to a single video file that can be played on a video playing application. Video playing applications include programmes like VLC player, mplayer and window movie player. These applications can often play many different kinds of video files but they are not not able to play video project files. This process is called exporting or rendering.
While different video editing programmes have different formats for saving and exporting your work in project form, the same principles apply. In this example we will learn to save our file to a Kdenlive video project file. It has the file extension
.kdenlive. We can compare this to programmes like Premiere which uses a file extensions
.prj, or with Final Cut Pro which use
.fcp
We will learn more about projects, file types and the difference between video files and projects in other sections of this guide. In this section we will save our project as a
.kdenlive file for re -use later, as an low-quality mp4 for sharing via the Internet and finally as a high quality mp4 file for a use at a film screening.
Hands On: Saving a project file
Saving your project files is something that you should do as soon as you create it. In this way if you save your work regularly then you are unlikely to lose work if you computer crashes or loses power.
To save the project file for the first time, select File > Save As from your menu.
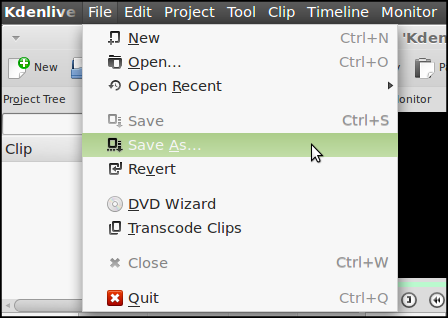
Save the file in the default, Project Folder suggested to us.
It is a good idea to find out more about projects to make sure you don't lose your work by accident. To do this find out more about understanding video projects in the relevant chapter of this guide.
About exporting video projects to video files
When you have a project ready to share, first save the project file, then click on the Render button at the top of your editor.

After clicking the Render button you will be presented with many options for the kind of files you can make. The way these options are displayed is different between different video applications. Some restrict your choices to make it simpler and others give you a lot of flexibility.
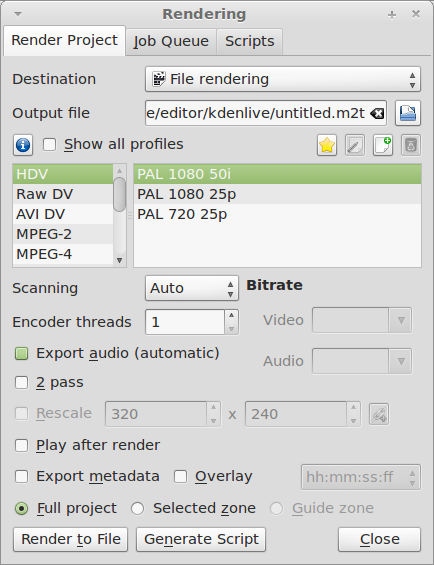
Often the export options give you recommended presets (also called profiles) which you are able to change if needed. This is the case with Kdenlive. We should be able to do everything we need with the available profiles. However sometimes the presets do not work or give us the results we need so it is good to know how to alter them.
To choose different options and presets we can use the Destination option to choose one of the following:
File Rendering: The most complete set of options for exporting.
Favorites: It is possible to save your preferred export settings so they appear here.
DVD: Save as a DVD compatible format.
Audio Only: Save only the audio of the project.
Web sites: Save as a format optimised for some video sharing websites.
Media Players: To be optimised in Windows Movie Player or Quicktime Player.
Lossless / HQ: High quality files suitable for archiving.
Mobile Devices: Smaller files suitable for mobile phones and tablets.
Hands on: Exporting a small video file
We will create a small file for sharing on the Internet and learn how to export part of the project to test our outputted file. When you are happy with the project in your Timeline click on the Render button.
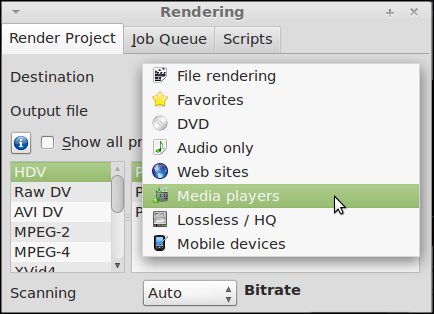
To create a small file for quick sharing, we will use a preset for a mobile device. Select Mobile Device from the Destination drop down menu.
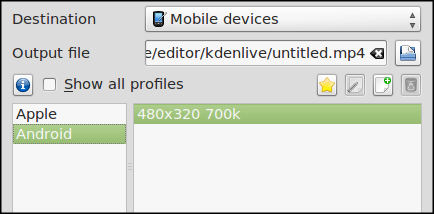
Select Android in the left profile window and select 480 x 320 700k in the right profile window.

Give your target output file a suitable name, make a note of where it is being saved in the Output File box and click on Render to File without changing any other settings.
Now browse to the folder where the file was saved and open it up in a Media player like VLC. In this case it should be a relatively small file of about 1Mb per 10 seconds of video which is very suitable for sharing on the Internet or in other ways where a smaller file size is an advantage.
Troubleshooting / Alternative method
If for some reason you cannot play the file using the method just described. Then we need to adapt. Try the process with the settings below. We will not choose a preset profile to create a small file but instead alter the settings for the MPEG-4 profile default.
Select the following settings in the Render Project Tab after clicking on the Render button.
In the list of profiles in the left. Select MPEG-4 and fill in the values of the form to match the settings and the screenshot shown below.
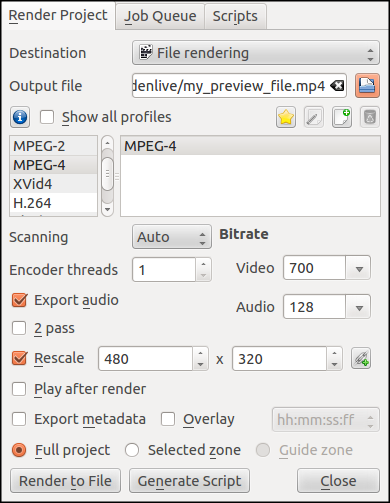
Destination: File rendering
Output file: a suitable file name
Bitrate Video: 700
Bitrate Audio: 128
Export Audio: ticked
Rescale: ticked [values 480 x 320]
Full project: selected
Click on Render to File. Check your output video file in a media player. By filling out the values above we are mirroring the settings needed to create a small file suitable for storing on a phone or sharing quickly via an Internet connection with low bandwidth.
Mapping your knowledge: If you are using different video editing software, you should be able to use similar settings to the above to export a file for this purpose.
Hands On: Exporting a test section of your project file
If we have a long project then the process of rendering the video can take a long time. In order to check if the profile and export settings we are using are suitable we can render just part of the project as a test.
To do this we need to select a zone of the project Timeline. A suitable area for a test would be an area where there is a lot of movement. Select 10 seconds or 30 seconds by clicking on the green zone just above the timeline and below the time in minutes and seconds.
When you hover over the edge of the green area a time shift icon should appear.

 Click and hold down your mouse and move it to the left or right to adjust the size of the zone that you are selecting.
Follow instructions above process above to Render your file but be sure to tick the option for Selected Zone before clicking on Render to File.

Now use your file manager to browse to your video file and and to check how large the file size is. View it with a media player like VLC or your default media player to see if it is high enough quality for our purpose (film screening, previewing on the Internet). 10 seconds or 30 seconds are good lengths to select, as you can then easily calculate how big your final video file will be. If a 30 second zone becomes a 5Mb file, then your three minute project will encode to a 30Mb video file.
Installing Kdenlive
Kdenlive is a video editing system developed for use with Linux based operating systems including Debian, Fedora, Gentoo, OpenSUSE, Slackware and Ubuntu. This guide to installing Kdenlive takes Ubuntu as the chosen operating system as it is by far the most common (and best supported by the Kdenlive community).
Hands On: Installing Kdenlive on Ubuntu
Rather than installing the version in Software Centre the creators of Kdenlive tell us that 'Versions of Kdenlive in official repositories are deprecated'. Which means that the default version of Kdenlive that you see in Ubuntu's Software Centre is no longer maintained and it will be difficult to get help for it. It is therefore worth the extra couple of steps to install Kdenlive from an alternative source.
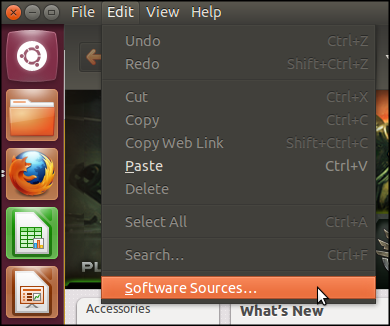
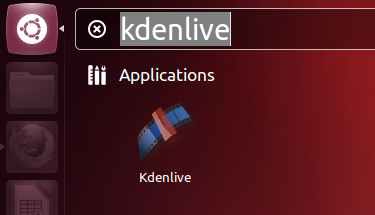
To install Kdenlive, first click on the Dash Home icon at the top left of your screen and type Software Centre.
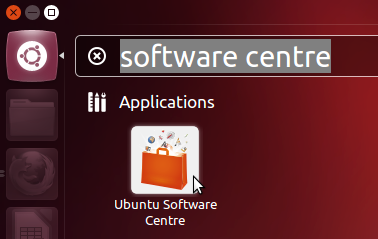
Click on the Ubuntu Software Centre icon. And Select Edit > Software Sources.
Click on the Other Software Tab
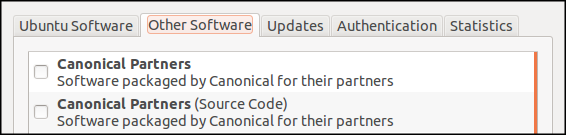
Click on the Add button at the bottom of this window.

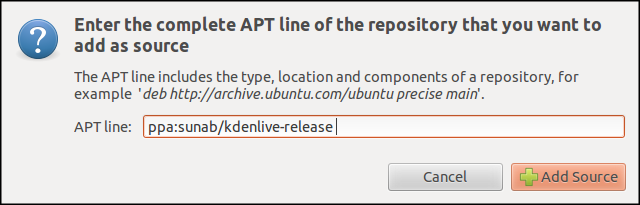
Enter the following in to the APT line prompt - ppa:sunab/kdenlive-release and click Add Source.
 Close software source and click Reload.
Now we can install Kdenlive with the Software centre. Enter Kdenlive in the top left search box.
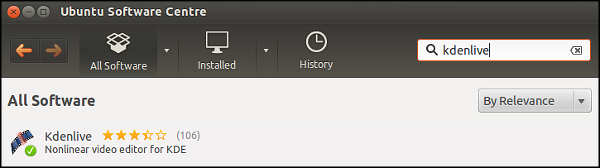 Click on the entry for Kendlive and then click on the Install button. Enter your admin password and you should see the application installing.

Now that Kdenlive is installed we can start it by clicking on the Dash Home icon, typing in Kdenlive and clicking on the Kdenlive icon.
Installing via the Command Line
If the above instructions do not apply to you then you should try installing via the command line.
Open a Terminal and enter the following.
sudo add-apt-repository ppa:sunab/kdenlive-release && sudo apt-get update && sudo apt-get install kdenlive
Enter your admin password and the most well maintained version of Kdenlive should install.
Running Kdenlive for the first time
When you run Kdenlive for the first time you will see the Config Wizard.
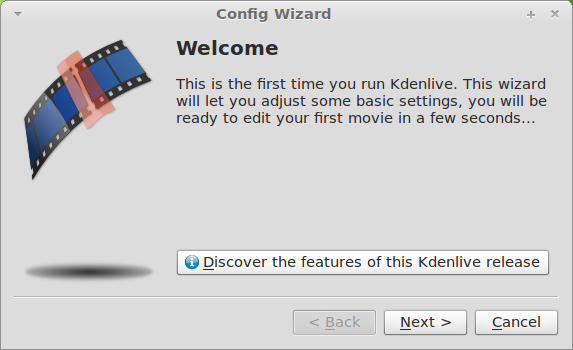
The fist screen tells you details of the MLT engine. Click Next.
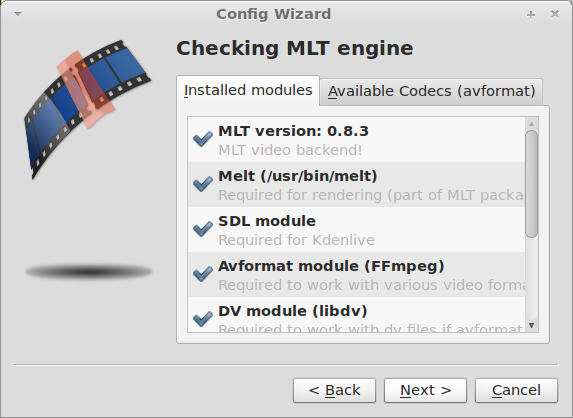
The next screen tells us what audio and video formats and codecs are installed.
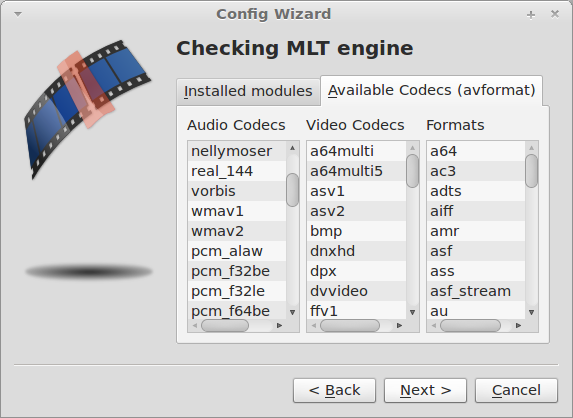
Click Next.
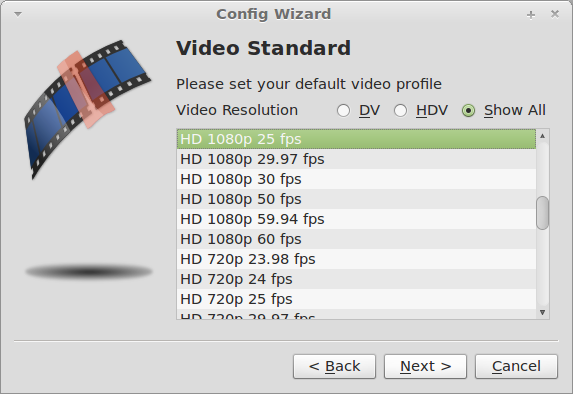
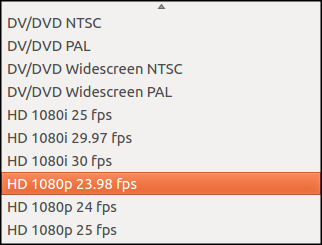
Choose a Video profile standard or select one at random if you don't know what type of video you will be working with. Click Next.
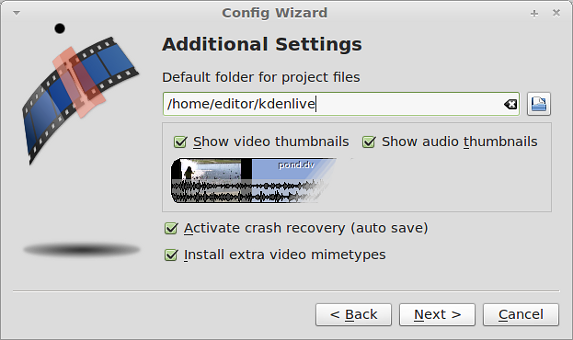
Choose a Default folder for working.
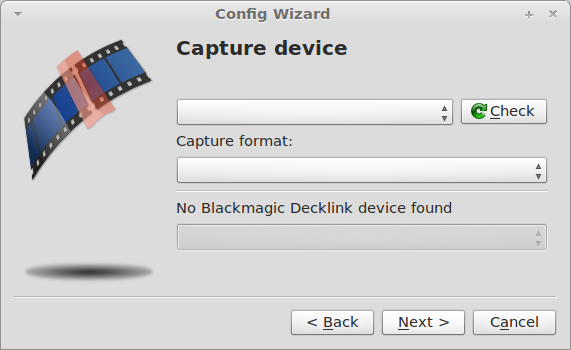
Choose a Capture device if you are going to capture from DV tapes or similar.

The final config screen checks your system for other tools that may be useful.
Installing Support for Different Video Files
Learning about the different types of digital video and audio files is much harder than it should be because of the many different variations, combinations and technology types. When starting a project for the first time in video editing software we are asked about the kind of video and audio we are working with in order to make the default profile in the Project Settings.
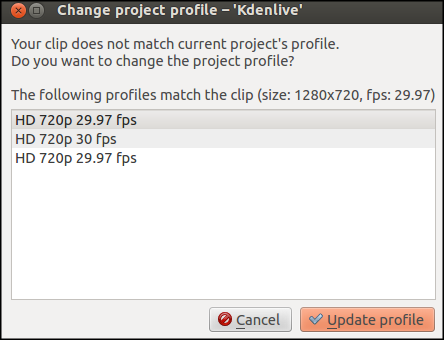
Check the settings on your camera or camcorder or look online to find out what format to choose. In our example video editing software Kdenlive, if we select the wrong setting, when we import our first file it will let us know if the file doesn't match the profile chosen in settings.
If you are working with footage from more than one source and it is in different formats, you should pick highest quality settings of the different videos you have. Kdenlive should convert them to work inside the project.
Here are some of the different terms that you may come across:
DV or HD: DV footage is likely to come from older video cameras with miniDV tapes. Video clips from more modern high definition camcorders are likely to be in a format called AVCHD.
Pal vs NTSC: NTSC is commonly used in the Americas and PAL used just about everywhere else.
Fps: Fps (frames per second) is an import part of your video project too. It defines how many still images are captured second of your video to create the moving image. Most footage is shot at around 25-50fps.
Interlaced or Progressive: The letters I and P are used to indicate the difference of two kinds of video Interlaced and Progressive. Progressive, which captures more data less frequently, is better than interlaced, which captures less data more frequently.
Codecs: If we look at the properties of the files that we import by right clicking them in Project Tree and selecting Properties.
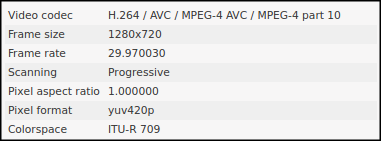
We can see there are many different codecs used inside container files. To give an example H.264 codec is often used in mp4, 3gp or AVCHD containers.
Generally, Kdenlive is good at accepting most kinds of video files. If you do have problems have a look at the hands on for installing different codecs and the troubleshooting chapter.
Transferring your skills: . Recent versions of commercial video editing software usually do a good job of keeping up with new video formats. However, if you have an unusual video type or if you are using older versions of software then you may need to use an external programme to convert your video files to more common formats. This is called transcoding.
Hands On: Installing support for video and audio file types
You can install support for additional file types in Kdenlive. This process normally involves the following steps.
- encounter an error when trying to work with a video file
- researching the error message to find out what is missing / wrong
- following steps to install support for new codecs or to change configuration
As an example we will install support various codecs including h264, xvid, mp3 and pcm_s16le audio which are sometimes not installed by default. And as a specific example we we try to export to a DVAVI file (useful for archiving and transporting to other systems.
If we try to Render to a DV AVI we may get the following error.
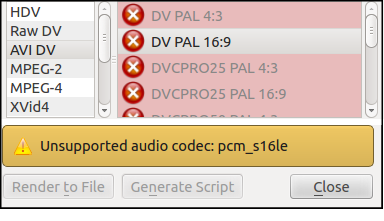
Enter this error into a search engine to find out what you need to do to install the codecs you are missing. In this case, we enter the error message "Unsupported audio codec: pcm_s16le".
We are likely to find a post which asks us to check if we have the relevant codecs installed on our system. It may ask us to run the config wizard in Kdenlive to check if the codecs are listed.
It may suggest we install livbavcodec-extra-53 from the command line. This contains some very useful codecs needed to export files to different formats.
We would then run the Config Wizard again, to pick up the new codecs. You should see the following codecs listed on the available codecs screen.
- libmp3lame
- libxvid4
- libx264
Extra Troubleshooting: For some codecs this doesn't work. In the case of there is an extra error and we need to edit a configuration file. As a workaround you can edit manually the kdenliverc file in your home directory (in a hidden folder)
.kde/share/config/kdenliverc
At the end of the file there is a section called [unmanaged], add pcm_s16le to the audiocodecs line. Then launch kdenlive, the error about pcm_16le should disappear.
If you later run the config wizard again, it will erase the changes to the kdevliverc file.
Introduction to Video Effects
Once you have imported your raw materials and started creating new clips, you might want to use some Effects. Effects are subtle for the most-part, yet without them a video can be confusing, ugly or ineffective.
Effects can be used to control the pace of your video, structure your narrative and create the desired mood. These are important functions but the audience wont notice well placed effects at all. Effects should never distract the viewer from the content of a video.
Here is a quick guide to using a basic effect Fade to Black.
Hands On: Add a Fade to Black
Fade to Black. This is where the video image slowly darkens until the screen is totally black.
 You will have seen it used many times, though often without actively noticing it. This effect can be used for technical or narrative reasons. For example:
- by slowing down the pace of a video
- by indicating the passing of time
- in conjunction with a fade out of audio to end a video piece
- slow fade outs can add drama and suspense
- to hide jump cuts
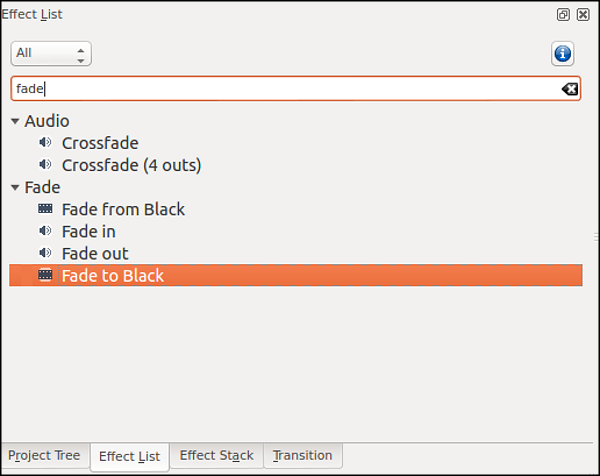
To add a Fade to Black to a video clip, search for “fade” in the Effects List and select Fade to Black.
Drag the effect from your Effect List and drop it on top of the clip in your timeline.
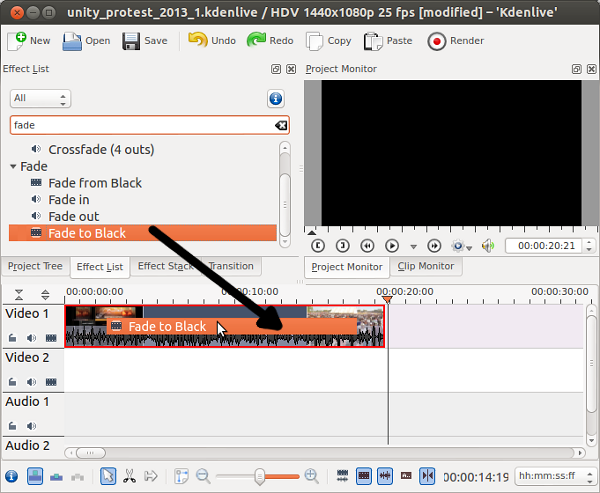
You will now see that your Effect Stack window shows the Fade to Black effect
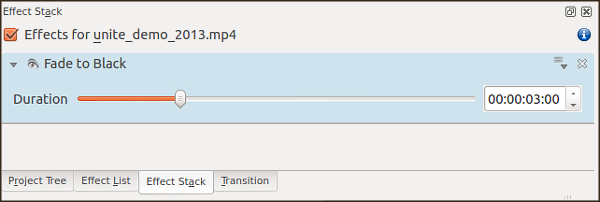
You can adjust the length of the fade (how many seconds before the end of the clip the fade starts) by moving the Duration slider in your Effect Stack.
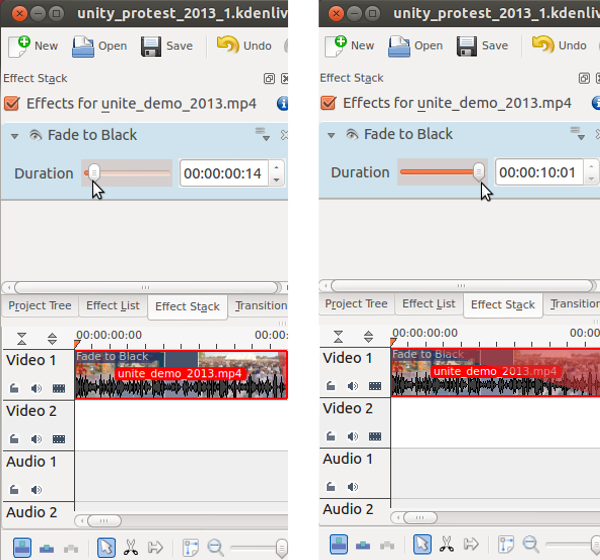
Adjust the duration of your fade and review in the Project Monitor until you feel it looks right.
If your fade is too long, it will become very obvious, but if it's too short, it may look like a strange flash.
Fade From Black:
You can also create a fade from black at the start of your clip. To do this, the steps are the same as above, except you choose Fade from Black from the effects list rather than Fade to Black.
Introduction to Video Editing
Video editing is the process and technique of working with video images to create a finished piece of video work. Understanding basic video making theory will help you know which technical elements of video editing to use.
When films were first shown there were no editing techniques. People marveled at simple scenes of workers in a factory with no cuts in the filming or music playing. Now cutting and sound editing are key to the language of modern films.
If you have been brought up as a child in an environment where you watched television or films then you already know some of the language of video. You will be amazed at the number of storytelling and visual storytelling techniques that you know intuitively.
Storytelling
To tell a story in your video, be it a news report, documentary or fictional work, it is advised to include answers to the following questions;
- Who is it about?
- What happened?
- When did it take place?
- Where did it take place?
- Why did it happen?
These are know as the Five Ws. You may also want to include How it happened as well.
Stories normally start by establishing where and when events are happening and who is involved. They then introduce the key reasons behind the story. Once interest is sparked, there is usually some kind of conflict, confrontation or drama which the storyteller (presenter or editor) will somehow try to resolve by the end of the story. The structure is shown in this diagram.1
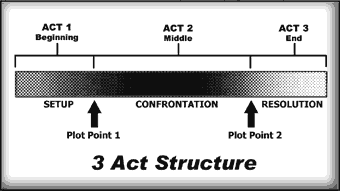
While these beginning, middle and end sections are more obviously present in a feature film or longer documentary, they are usually present in all stories no matter how short they are. Part of the technique of editing is to squeeze all of these elements into a short report.
Resources for Storytelling
The Video for Change Curriculum from WITNESS and their Video Advocacy Toolkit both have excellent resources on Storytelling.2
The Our Video Toolkit looks at creating video as a group process and has some very effective and interesting resources and exercises to do this.3 It asks the following questions chapter by chapter; including
- What Do You Want to Communicate and Why?
- How Will Video Communicate Your Idea?
- How Will You Work as a Group?
There are also insights on how to structure your story, be it a documentary or a feature film.
Insight Share, have some fantastic exercises exploring the process of storytelling as a participatory process lead by the group rather than being dictated by a teacher. One of their key exercises is the Participatory Video Storyboard Technique.4
Visual Storytelling
To tell a story using video footage and video editing software we need to recreate the way that humans experience reality, but by using artificial techniques. Because our eyes and ears are so sensitive we can pick up many details of the scene in front of us and our mind can concentrate on the details it feels are most relevant. The same is true to a certain extent with spoken information, while we may receive information out of order, our brains work quickly to arrange them into a story that makes sense for us.
Visual Storytelling has techniques which allow video makers to recreate the process of assembling a story. This is done mainly through the use of different kinds of video shots, the choice of what is contained in them, and the order they are in.
Get your audience to read your film
Understanding modern techniques is essential for communicating with your audience. Watch lots of movies and examine how cuts are made. How do scenes end? What does a fade to black signify or a slow dissolve?
Create atmosphere
Editing styles can alter the feel of your film. Short snappy cuts give the film a tense, fast pace. Long clips and slow traditions between cuts allow time for the audience to relax into the scenes.
Use editing illusions
Clever editing can create illusions. Just the sound of a helicopter creates the illusion that there really is a helicopter just out of shot. Editing can also help smooth over problems. You can edit around a difficult interview by cutting out bits.
Use multiple camera angles
If you need to show more than one aspect of a scene, you can film the scene several times from different angles and cut between those angles during the editing process.
Explore the "montage" technique
Montage is the principle underlying all editing. The audience are trying to interpret your film as they watch and create meanings from the images and sounds as you play them. If, for example, you put together a politician’s speech without sound, followed by images of war, then the politician is assumed to be talking about war. Montage creates a new meaning from two independent images. You can lead the audience this way, for example, if you show separate images of two people walking down a street, the audience will assume the two will eventually meet.5
Resources on Visual Storytelling
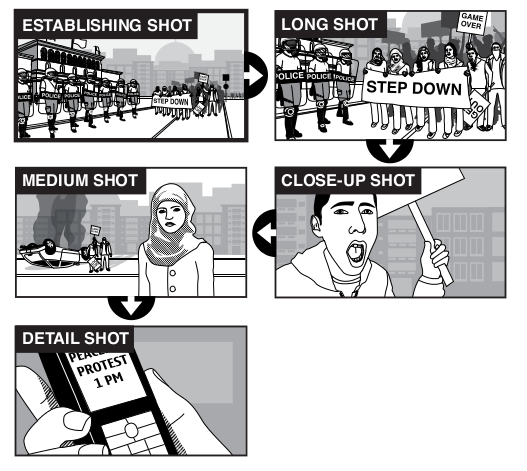
In this guide we do not have the time to cover these issues fully but there are many great resources online about the story telling elements and techniques of video making. The following illustration shows different types of video shots is from Small World TV's guide to Safely and Securely Producing Media.6
Visual Storytelling builds on the technique of montage described above. At its best this kind of storytelling can use shared language and convention to effectively communicate a message. The down side is that it can create a very prescriptive, inflexible approach to making video.
Hands On: Logging Shot Types
Storytelling conventions are often most visible in humorous pastiches of genres. The over-used conventions of documentaries, adverts, entertainment shows and news reports have all been imitated for comic effect. These works can be very useful resources when learning or teaching the language of television and film. Search the Internet for "Charlie Brooker How to Report the News" to watch an example of different shot types used in a news report.
Now watch some news reports and documentaries. Make a list of what types of shots are used and in what order. How often are they used? What else is happening in the report? Is there a voice-over of a news reporter or narrator being used to accompany the video footage? Are graphics used to explain abstract ideas? When are close up shots used? Asking yourself questions like these and making notes to de-construct video reports will really help you when you start to construct these reports yourself with video editing software.
- http://en.flossmanuals.net/video-production/how-are-fictional-films-structured/^
- http://www.witness.org/how-to/curriculum/introduction-storytelling http://toolkit.witness.org/^
- http://en.flossmanuals.net/video-production^
- http://insightshare.org/resources/pv-handbook^
- Materials from Our Video Toolkit - Michael Wray http://en.flossmanuals.net/video-production/authour-credits/^
- http://smallworldnews.tv/guide/^
An Introduction to Audio Editing
Audio is the most important factor which decides if you can hold the attention of your viewer or not. Viewers will tolerate poor quality video in order to find our what happens next. However, poor quality audio can be so intrusive that it makes your video unwatchable, especially at film screenings with poor quality amplifiers, speakers or room acoustics
Audio in your videos can be beautiful, stirring and communicate moods, emotions and group feelings that are not possible using video alone. Here are some tips to help you get good audio.
Blindfold Test
Ask someone to close their eyes and play them the video so that they concentrate only on the audio. Check their understanding afterwards. If they miss vital parts of the story consider re-editing to include some dialogue or include a voice over to make the story clearer.
Check for Harsh Audio
If you want to cut out and use only one part of a long interview, and there is there is no clear break in their speech or their last words end very abruptly, a 'harsh' cut out in the audio occurs. This can really effect the flow of you film and should be avoided. You may be able to make the transition better with a fade out or careful editing of volume using keyframes. The other solution is to make a hard decision to not include that particular clip.
Avoiding Harsh Audio
It is useful to ask interviewees to speak slowly and to pause between sentences. This may help them avoid rolling their sentences together and make editing much easier. Try to make sure that the interviewer leaves a pause before asking a new question, and that he/she avoids speaking at the same time as the interviewee. It is actually quite easy to slip up and make noises of agreement or sympathy when interviewing. However, it is almost impossible to fix this kind of problem during the edit.
Use the right amount of Voice Overs and use them well
Voice overs are a common technique for informational and educational films. You hear only the voice of a narrator while the screen shows footage of actions, graphics illustrating information. This is a very direct form of telling the story and can be useful for introducing the context of footage shot and comments in interviews.
Voice-overs are the main technique used by news reporters working to a tight deadline and documentary makers who need to form narrative connections between the comments of different interviewees and quickly gathered video footage.
We need to be aware of other issues about voice-overs. If we don't see the person giving the voice over it can give them the power of an all knowing 'Voice of God'. This can be used to give 'authority' to your video but it can also interfere with your message.
About Audio Tracks
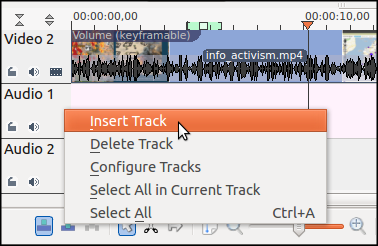
It is likely your editing software will give you a few audio tracks for each project as standard. You can always add more by using Project > Tracks > Insert Tracks or by right clicking on an existing track, near to the track name, and selecting Insert Track.
While it is normal to only see the top-most video track, the same is not true of audio. By default we can hear all audio tracks equally unless we mute the track or alter the volume.
Hands On: Adding Music to a Project
Adding music can help set the tone of your video and also can keep your viewers focused. Music with a creative commons licence is easy to source. There are many great audio search engines and music labelled by genre and mood on the Creative Commons website.1
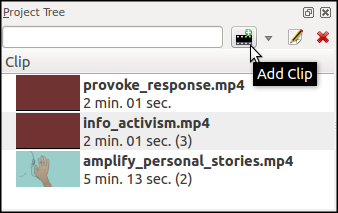
Download a song you like and add it your Project Folder. Next, put it in your Project Tree by clicking on the Add Clip icon.
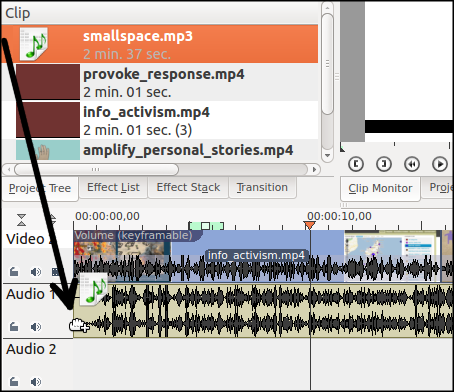
If you want to use nearly all of the piece of music, simply drag it from the project tree into your audio track.
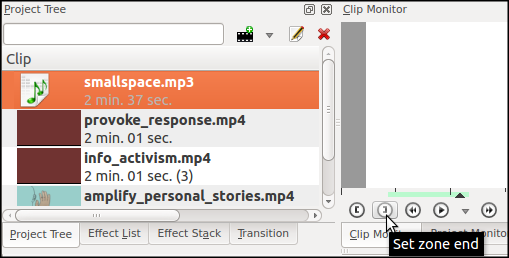
If you only want to use a small part of the music track, then firstly click on the song you want to use and the preview it in the Clip Monitor. When you have found the part to want to use, select an in-point and out-point using the square-bracket buttons Set Zone start and Set Zone end.
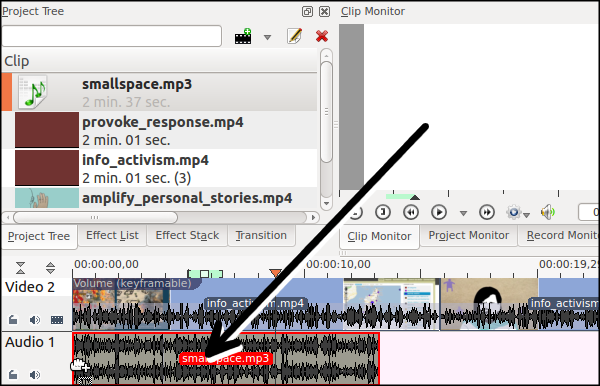
You will see the region you have selected is now highlighted in green. Click on the clip monitor screen in the white area and drag your new audio clip into your audio track.
Adjusting the volume
You may need to adjust the volume of the music, also known as gain. A common mistake is to have background music too high over voices talking. Here are some tips for setting the correct levels for audio from different sources.
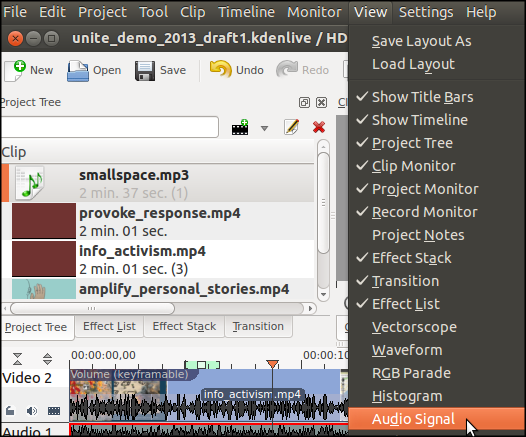
Enable the Audio Signal monitor by selecting it in the View menu.
As you play your Timeline in the Project Monitor, you will notice that the audio signal goes up and down.
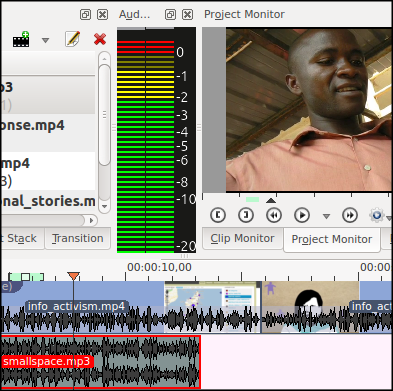
As the volume goes up and down it should not enter the red, above the 0db figure or it will distort and sound bad. You can decide your own audio level, but if you are unsure then try to make the audio go no louder than between -12db and -6 db as an average. This is called peaking between -12db and -6db. This allows you what is called 'headroom' for especially noisy parts of the video where the audio can be louder with out going over 0db and distorting.
To adjust audio level of the music clip we will apply a volume effect. It is located in the audio correction category.
Click on the Effects List tab in the project area. Type in 'Volume' in the box at the top to search for the Volume (keyframeable) effect.
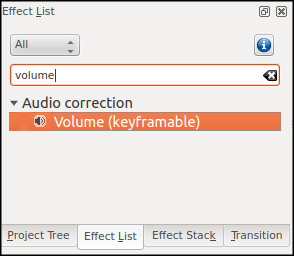
Drag the effect from the Effects List onto the clip in your music track.
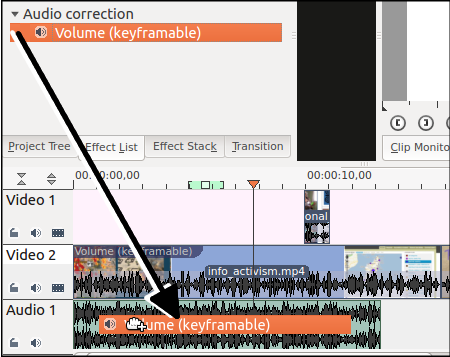
You will see the effect appear in your Effect Stack.

You can simply adjust the volume of the whole music track, by moving the slider left or right, or by typing a number into the box.
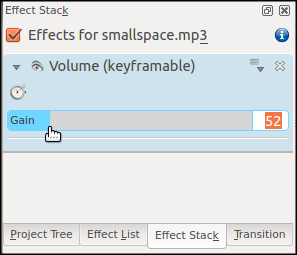
You can readjust the level of the volume of a clip after you have reviewed it until you are happy with the level.
- http://creativecommons.org/music-communities http://creativecommons.org/record-labels^
Introduction to Multi-track editing
In this chapter we look at arranging clips across several tracks. This is called Multi-track editing. Further chapters on audio and video effects also use multi-track editing.
Understanding multiple tracks
Multi-track editing is used primarily for technical reasons. It is not possible to put two clips in the same place on the same track. If you want to add music along side your video you need to use more than one tracks. Multi-track editing is also used for organisational reasons. When working with many different types of media, for example, music, voice-overs and videos from different sources, it is easier to use a different track for each type of media.
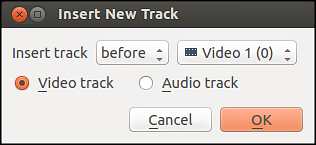
Adding new tracks
It is likely that your editing software will give you several video tracks automatically. You can add more by using Project > Tracks > Insert Tracks or by right clicking on an existing track, near to the track name, and selecting Insert track.
Normally Video Tracks are positioned above Audio tracks.
Which track is visible?
Normally, you will only see content from the top video track. If you have clips in track 1 and 2, you will only see the content of tack one. If track 1 is empty, however, then the content of track 2 has priority and will be visible instead. In the diagram below, the purple areas indicate which video clip will be visible during playback.
There are times when this is not true, for example, if you use certain Transitions. Also, this rule does not apply to sound: unless muted by using Audio Effects all sound will play together.
Transitions
Transitions allow us make the joins between clips:
- less-confusing - for example, when cutting between clips showing a similar location
- more subtle - where the change between clips could look jumpy
- narrational - for example. where you want to indicate the passing of time
While the method of applying transitions varies between different applications, the transitions themselves very standard. For example, the Dissolve Effect is widely used at all levels of video production, from home video to Hollywood.
Cutaways
If you have, for example, an interview with an activist about a recent demonstration and some footage of the demonstration too, you could intermix the interview video with footage of the demonstration. This will make your video more interesting to watch and help your audience empathise with the interviewee. It will also lend credibility to your narrative.
You can achieve this effect by preforming a series of Cutaways and Cutbacks. You would start with the interview footage and then cut away to the footage of the demonstration, then you would cut back to the interviewer again a little later.
Because you are using multiple tracks, the voice of the interviewee can continue along side/over the demonstration footage like a narration.
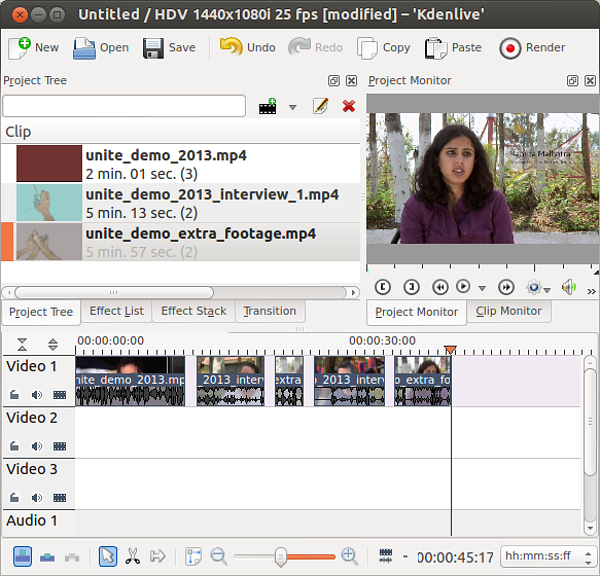
Hands On Task: Creating a cutaway and cutback
Start by dragging your interview clip into the second track in your Timeline. This clip will be visible for most of the video.
View the footage of your second clip, the demonstration, using the Clip Monitor. Identify a section to use for the cut away. This is the part that will be visible for only a short time.
Select an in and out point for your cut away clip using the bracket shaped Set zone start/end buttons (or the i and o short-cut keys).
Drag your new clip from the Clip Monitor window into the track in your Timeline above the track used for the interview, in this case Video 1. Use your mouse to move the clip into position above the part of the interview that you want to cut away from.
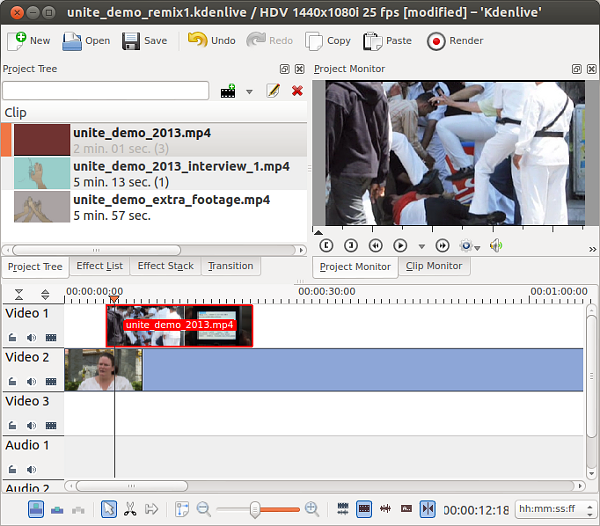
Watch the Timeline in your Project Monitor to see how it looks. Reposition the cut away with your mouse if necessary.
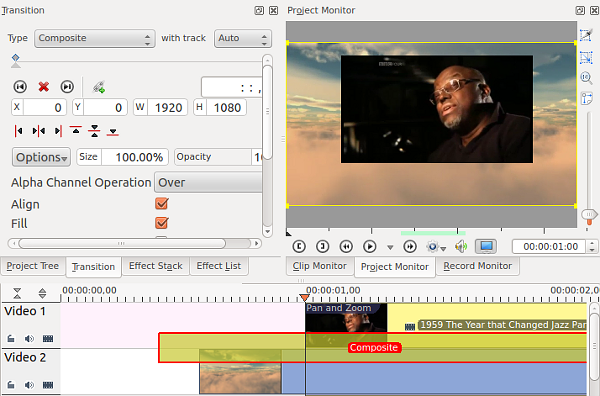
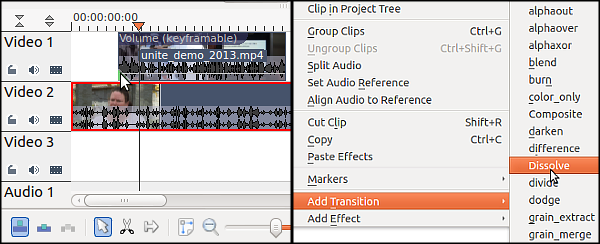
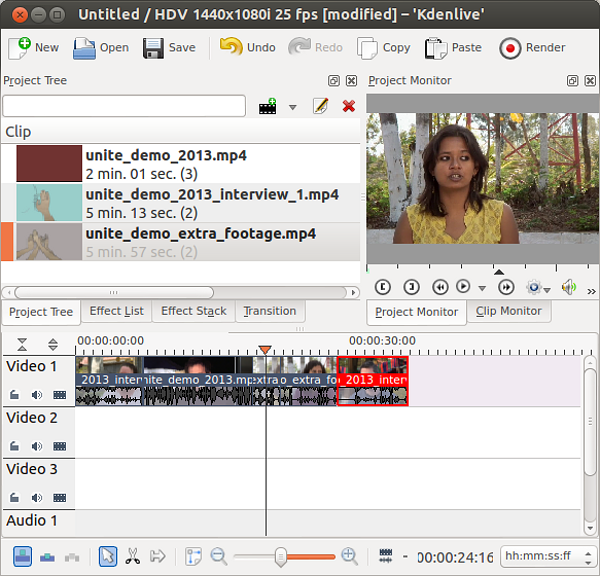
Hands On: Adding a transition to a cutaway
Try adding a Dissolve transition to the cutaway that you made in the first task. To do this in Kdenlive, either click the green arrow that appears when you hover over the bottom left hand corner of the top-most clip, or right click on top-most clip and select Add Transition > Dissolve
You will see a yellow box has now appeared at the edge of your clip. This box specifies the length of time that the dissolve will take, from the start, where you will see hardly any of your demonstration footage, to the finish, where you will no longer see the interview footage (only the demonstration).
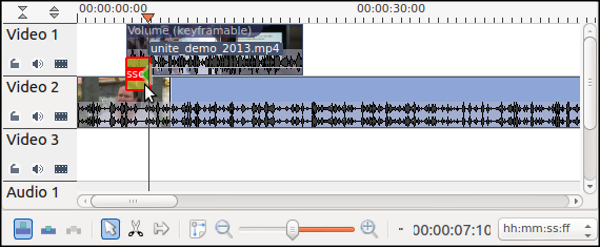
Preview your footage in your Project Monitor. If you need to adjust the length of the transition, do so by dragging the ends of yellow box to make it longer or shorter.

Next, add a second Dissolve, this time the end of the cut away in the same manner.

Notice that the reverse box is ticked in the Transitions Menu this time.
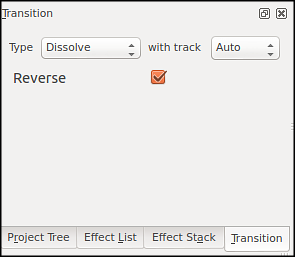
This means that the clip in track 1 is dissolving into the clip in track 2 - the opposite of the first dissolve. This usually works automatically, but not always: if your dissolve looks a little strange, try changing this option.
In this transition dialogue you can also change the type of transition and/or the track that you wish to transition into. You may need to change the target track if the clips are not positioned in adjacent layers.
Understanding Video Projects
Here are some quick tips to working with video projects and understanding how video editing projects work.1
Know how to manage your files: The most common question asked by beginners is "now where did we save that clip again?!" Avoid hours of frustration by learning how and where your computer stores files!
Understand "non destructive" editing: Any changes you make to the video clips in the timeline do not affect the original clip. This remains the same on the hard drive, project tree and in the clip monitor window. So don’t worry about not being able to undo anything, you can always start again with the original clip.
Know how to find your files through the root folders: Because of non destructive editing (see above) your original video file remains on the hard drive untouched even if you delete it from your edit software. If you reimport it as you would a picture or audio file you will find the file untouched!
Save your work: Remember to save your work regularly or risk losing it! Go to the file menu (top left) and scroll down to "save". You can then create several versions of your edit as you progress. This is handy if you want to try an edit style out which will mean doing so many moves the "undo" function will not be enough, you can always revert to the older version.
Know the difference between project files and footage clips: The video footage you capture is stored individually on the hard drive. In the software, the footage clips are held together on the timeline by the project file. This points to all the clips and tells the computer how to play them. You need both to complete your movie. (Important if you transfer your files onto another computer.)
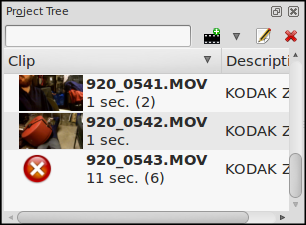
You may also see icons indicating that you are missing files in your project files area.
Misplacing even a few files could cause havoc to the process of creating your video. It is useful to create sub-folders to organise all your media.
Hands-on: Setting up your project and managing your video files
Select
File > New to start your project.
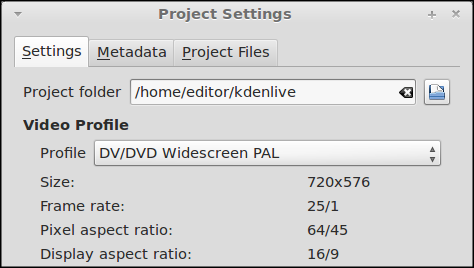
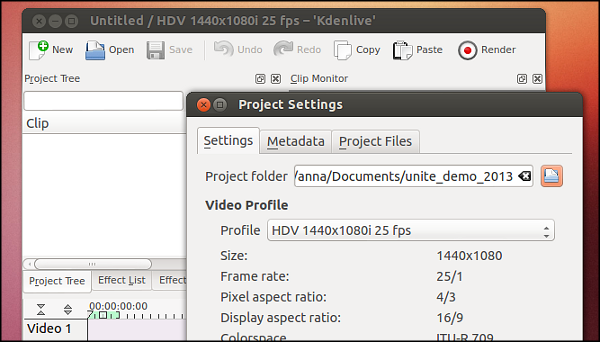
Now change the Project Folder setting in the Project Settings. Create a new folder for this project.
To do this click on the New Folder icon to the right of the Project Folder text box. Give the folder a name which is linked to the topic and includes the following; subject, date and location. The more information you put in the name of your folder the easier it will be to find later.

Select the type of video you are working with in Video Profile.
If you are not sure then read the section video types later in this chapter or select any profile. Kdenlive can update your profile to the correct type when you add your video files to the project.
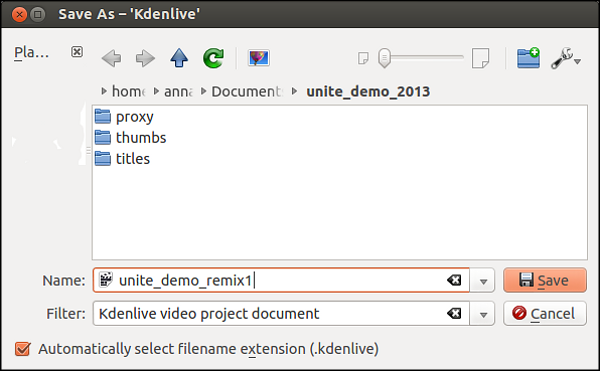
When your project opens up it is Untitled. We should save it and give it a name.
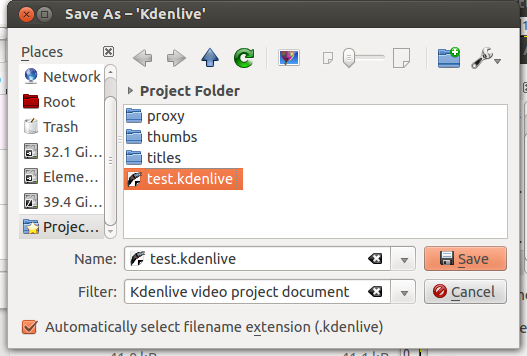
Select File > Save As

The default setting is to save your project in the suggested Project Folder that you just set when creating. Type in the chosen name for your project into the Name box. Make the project name similar to the project folder name you have chosen.
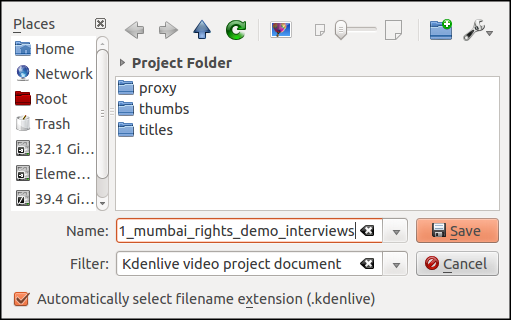
Then click on the Save button. The name of the project should now appear in the bar at the top of the application. You can easily save the changes as you work on the project by selecting File > Save from the menu, clicking on the save button at the top of the application, or by using the Cntl + s keyboard short cut.
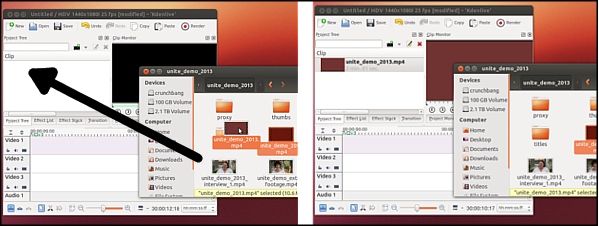
Adding Video Clips to your Video Project File
Place all the different kinds of files we use in the video project inside the Project Folder using a File Managing programme. In this example we will use Nautilus in Ubuntu.
Transferring your Skills: In Windows the chosen File Manager programme this would probably be the File Explorer that comes as part of the operating system, in Mac the application is Finder.
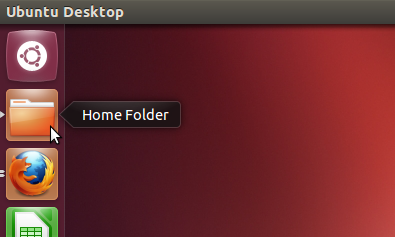
Click on the Home folder application in the Unity Dash.
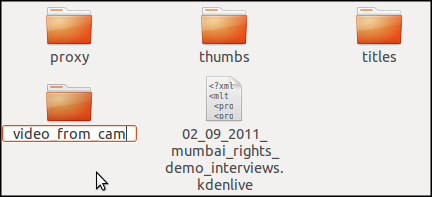
You may notice that there are already some folders in your Project Folder.

Our video editing programme creates these folders and files within them for some automated processes like showing thumbnails of our video files. These are shown as proxy, thumbs and titles.
If the footage may be needed for evidence, keep as much of the original data and file structure as you can. Create a folder just for those video clips.
Copy over the video files you want to use from your camera, phone or from where ever else they are to this new folder.
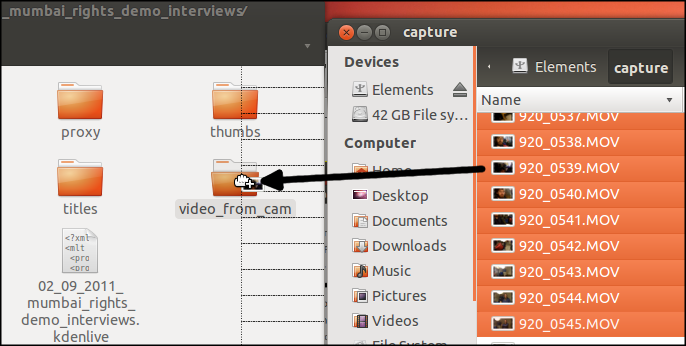
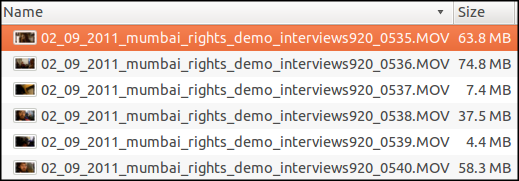
Hard drive camcorders, phones and digital cameras automatically create files names which are series of numbers and letters. It may be important to rename video files when you import them to your project to avoid duplication, giving each video file a unique name.
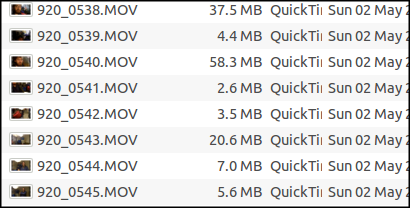
When you have copied the files into the new folder within the Project Folder, re-name them but make sure to keep the original file name as part of new name. The name of the original file name may be important for the legal use of you footage as evidence. Add the details of date, location, activity and, if appropriate, camera person.
Repeat the process above to copy any still images and all audio files/music you want to use for your project inside another new folder in the
Project Folder.
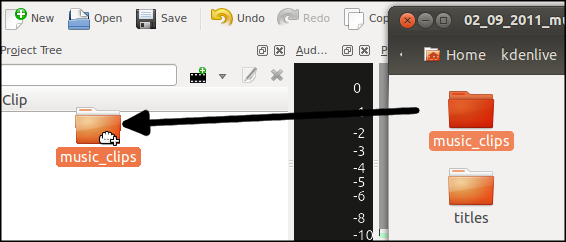
To keep the folder structure we will drag in the folders of clips you want to add from Nautilus file manager to the
Project Tree area of your video project.
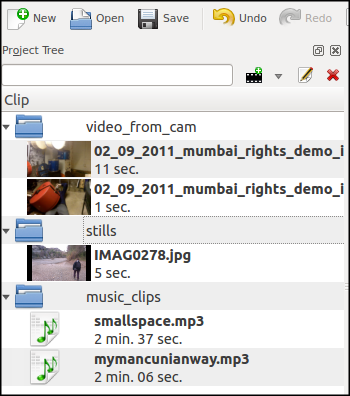
When you have imported all needed folders and files in this way or project should look something like the screenshot shown below.
- Edited from http://en.flossmanuals.net/video-production/working-with-video-clips/ Credits http://en.flossmanuals.net/video-production/authour-credits/^
Single Track Editing
This chapter gives you an introduction to the core areas, tools and processes of video editing software.
Overview of the Work Areas
The three basic areas of a video editor are;
-
Resources Area
- Monitor Area
- Timeline
Resources Area & Project Tree
This primary display in this area is called Project Tree. It lists all the files that are in your project. The other tabs in this section, Effects List, Effects Stack and Transition, are dealt with in other chapters.
Monitor Area: Clip Monitor and Project Monitor
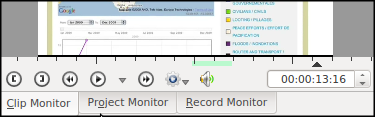
Clip Monitor: Once you have added your clips to the Project Tree you can review them in your Clip Monitor. This is the primary place to chose which parts of your original footage you wish to put into your new video.
Project monitor: The project monitor is where you review the clips in your Timeline. This sequence will eventually constitute your new video. It is near the clip monitor and has similar controls, for example, Play, Pause, Rewind and Forward.
Timeline: Audio and Video Tracks
The Timeline is the where you arrange your clips to create your new video. The numbers along the top show how long your video is in seconds. The far left left shows 00:00:00:00. This is the very start of your video.
The Timeline is divided into Video tracks and Audio tracks organised one on top of another. In this chapter we will only be using the top track - Video 1.
Transferring your Skills: Other video editing software, for example, WMM, Premiere / FCP use slightly different terminology for these areas and tools, however, their functions are similar. Project Bin is often used instead of Project Tree.
Useful tools for editing
There are some useful tools to help you edit quickly. In Kdenlive, you can find these tools along the tool-bar at the bottom of the editor window.

The Selection tool (the cursor arrow) allows you to select and move individual clips about on your Timeline. This is the default tool.
The Razor tool (shaped like scissors) allows you to quickly cut a clip: for example, you could remove an area or to divide the clip into several parts. You can also achieve this by right clicking on the clip and selecting Cut Clip.
The Spacer tool (the right facing arrow) allows you to move groups of clips together along the Timeline. This may be useful if you want move to make space for a new clip or to remove a space in your Timeline.
Transferring your Skills: While the tools differ by application, they do have similarities. The selection tool, razor tool, and spacer tool are particularly common.
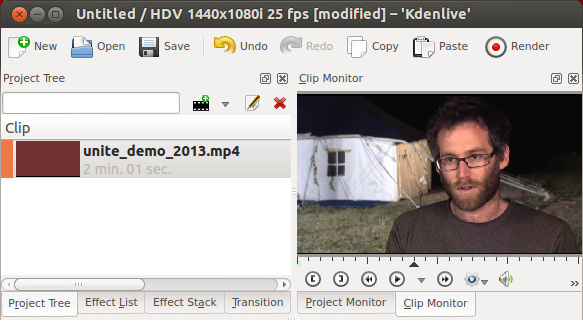
Hands On: Create a Single Track Video
In this task you will create a single track video from three video interviews. You need to use at least two sound bites from each interview. You will also see how the video flows from one part of your editor to the next during an edit. Clips move from the Project Tree to the Clip Monitor, then to the Timeline and the Project Monitor.
Setting up
Firstly, make sure all original video files are in the same folder.
 Now open your video editor, and click File > New to make a new Project: make sure you set your Project folder to be the same as where your video files are.
Now you need to import your clips into your project. You can do this by dragging them from your Project File and dropping them into the Project Tree.
Next, save your project file: click File > Save As and choose a suitable name. This is different to setting the Project Folder: you can have many Project files, many different edits, in the same Project folder.
Make a new clip
You are now ready to edit. First, you need to make a new clip from your source material. Click on the first clip in your Project Tree and it will appear in the Clip Monitor.
Review the footage using the Play / Pause button, or by pressing the space-bar.
Use the Forward and Rewind buttons too, or l and j on your keyboard to the same effect.
Underneath the video is a small black triangle: this is the Playing Head which shows us which part of the clip we are watching. You can skip ahead/seek, by dragging the Playing Head left or right.
To select a zone from your clip to use in your new video, you must choose an in point and an out point (start and finish). To do this, click the bracket buttons to Set zone start or Set zone end.

You can also use keyboard short-cuts to the same effect: i for in point and o for out-point. The zone you have selected should now be highlighted in green.

To add this selection into the Timeline (which makes a new clip) click on the video in your Clip Monitor and drag it onto your Timeline. You can also use the keyboard short-cut v.
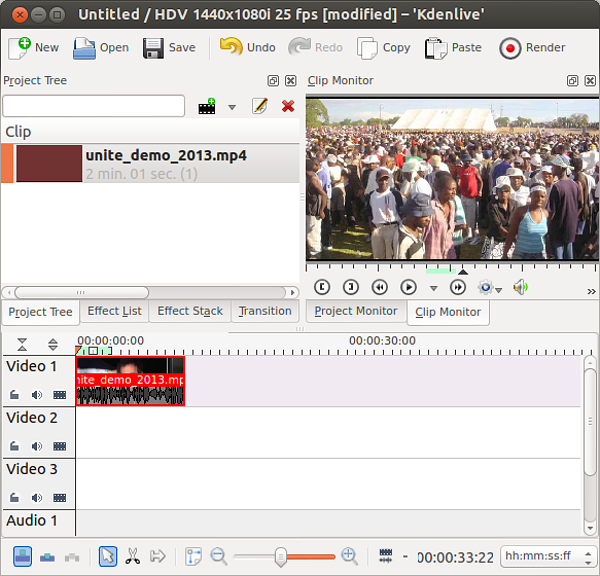
Drag your clip to far left of your Timeline (the beginning) and look for the playing head, a vertical line with an arrow at the top: this shows you which part of the Timeline you are watching. If the playing head is not already at the beginning of your Timeline, click on the triangle and drag it to the far left till it is at 00:00:00:00.
Preview your new clip
You view the Timeline in the Project Monitor: this is in the Monitor area with the Clip Monitor: click on the Project Monitor Tab if it is not already selected.

Click the play button: you will see the playing head moving from left to right. As your Timeline plays you will see your new clip playing in the Project Monitor.
Adjust your clip
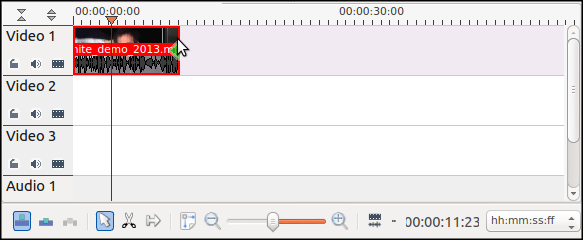
If your new clip is not quite the right length, you can change it by dragging the edge of the clip left or right.
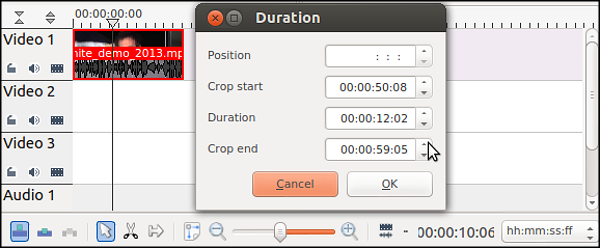
 For very fine adjustments, double click on the clip and adjust the clip more precisely.
Repeat
Add at least 5 more new clips to your Timeline by repeating the create, review and adjust process. Try to select brief, high-impact sentences ("sound-bites"). This will help you to practice precise timings.
Rearrange
Now you have created several new clips, rearrange them by dragging them into a different order. Use your mouse, and the selection/spacer tools. Make sure you remove gaps by pushing the clips together.
 Preview different arrangements in the Project Monitor until you are happy with your video.
Tip: Try editing using only keyboard shortcuts: this can also be a good exercise for teaching simple editing techniques.
Troubleshooting & Support
PC based video editing is a new and evolving art, so things don't always work perfectly. Locating the cause of a problem or "bug" can be difficult, especially when you are a beginner.
With a problem where you computer keeps crashing, for example, the cause could be any number of things - lack of ram or disk space, poorly organized files, a fault with the video clip or a fault with the editor itself. It's important to understand that the video editing software is only one part of the process and may not be at fault. If you need help, the best place to start is the online community.
Some notes on Free Software help communities
The great thing about video editing, especially free software video editing, is that there are many dedicated and talented people who just love to talk about what they do - and perhaps show off a little too! There are many places to get help - in forums, by internet relay chat (IRC) or on email lists. There may even be local user groups for face to face help.
Common problems for newbies
The downside of this fast moving creative environment is that people can be very focused on their own specific interests and so may be less inclined to help someone who:
- has a problem (probably) caused by inexpedience
- has an uncommon problem that will not affect many other people
- does not sound technically competent
- is not an active part of the community
- does not give enough useful information about the problem right away
The last two points are the most important.
Can you replicate the problem?
Sometimes problems occur when something you have changed or added during your edit has caused instability: this is very likely to happen when the project is disorganised. When you encounter a problem it's a good idea to save your project, close your editor and reboot your PC. If the problem still persists then see if you can reproduce it in a different situation: make a new and very simple project, using for example just one clip, to see if you can replicate the problem in this instance. You can write down the results of this experiment in a forum post: this will help to narrow down the problem and find the solution more quickly.
Getting involved
It is a good idea to get involved in the community right away: people are much more likely to help someone who "gives back" as well as takes. You could start by saying hello on the "newbie" section of the forum, and keep an eye out for other new people so you can welcome them in turn. Even in the early days of your learning, you may find people who have a problem that you have also experienced, in this case, offer them help or say "I have this problem too!"

You will notice that your name and "statistics" are at the top of each post you make. Even if another user doesn’t know you personally, they can see how invested you are in the community.
Learning the lingo
The single biggest barrier to problem solving is not knowing how to explain a problem in a meaningful way to the people who are technically skilled enough to solve it. If you learn to present your problem well, with enough of the right kind of information to get your readers thinking, you can get very good quality help. Here are some points to consider:
Use the correct terms where you can
When asking for help, try and use the correct key terms. For example, if your problem is that when you render a video, you get audio but no video, you would need to say "when I render" and not "when I save" - which is a different issue. If you are unsure of a word, try describing your issue into a search engine and see if you can refine your terms a little.
Using screenshots
If you are finding your problem hard to describe or define, try taking a screenshot. You could upload it onto the Internet using social media or a photo hosting service and then link to it in your forum post.

The screenshot above was generated by pressing Ctrl+PrintScreen which takes a photo of the active window. It shows a problem with the rendering dialogue - some codecs seem to be missing.
Talk about specifics: cause and effect
What seems like detailed information to a novice may be dull and irrelevant to a more advanced user. It's useful to try and talk in terms of cause and effect, and to be as specific as possible.
For example, rather than saying "sometimes when I use effects, my computer gets really show for about ten minutes and then, my editor crashes and nothing else will work either so I have to reboot" you could say "when I try use the key-frames menu of the pan and zoom effect, my editor crashes."
Machine Specifications
Sometimes problems occur when because you don't have enough ram or disk space, or because of an interaction with your operating system. It is important to include basic information about your computer in your posts. Try looking in your System Monitor to find out this information. Other people will use this data to check if they can reproduce the problem in the the same system or check if it occurs on other systems too.

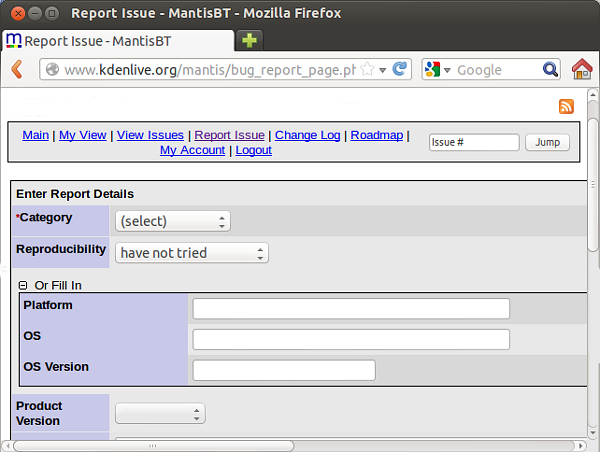
Below you can see a bug report form, which you can use once you are sure the problem is caused by the editing software. You can see that operating system (OS and OS version) and reproducibility are important details for the software developers to know, even at this late stage in the problem solving process.
Pasting errors
If you get an error message, select it, copy it and then paste it into a search engine. You may find the solution to your problem very quickly this way, perhaps in a manual, a wiki or in a form post by someone else.
If you don't find what you need, then paste the error into your own new forum post. You may put this area in to a quote format in the forum, if it is offered. Remember, If it is a very long message, see the section below about pasting code.
Comandline and the Terminal
You will probably find that people ask you to paste command line code from your terminal or command line interface into the forum/chat. This code, while very complex looking at first, is a very simple way of telling you/the people on the forum
If you have never used the terminal before, speak up. Remember, the terminal is second nature to many people - explaining what to do can be as hard for them as it is for you. It's a bit like trying to explain how to ride a bike. Make sure to ask to be walked through the instructions step by step - you will soon get the hang of it.
Pasting code - tags or pastebin systems
When pasting code in the forum you may use <code> </code> tags (or a code button that will put in the tags automatically).
This means that when you submit your post, the code will appear in a way that will be easier for readers to examine, for example in a scrollable box.
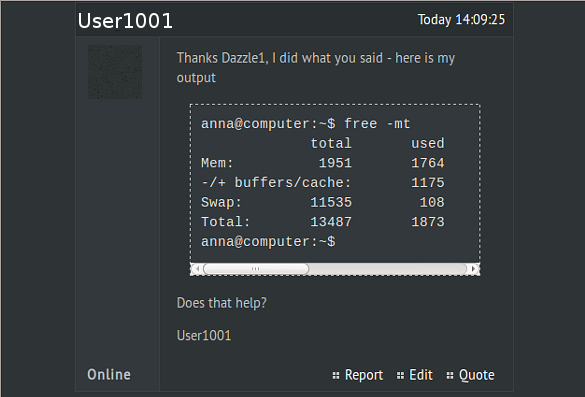 If you are using internet chat, such as IRC, you must paste your code into a Paste Bin service, and then link to it in the chat window (rather than paste all the code into the chat window directly). This is because code will "flood" the chat and fill up peoples screens (which is very annoying)
Using Images and Titles
Once you have understood the basics of multi-track editing, you can start to use title sequences, image sequences and can overlay information, such as locations and names on-top of your video clips. These skills provide quick and simple ways of communicating information to your audience and will make your video look more professional.
Although they look different on screen, images and titles are similar in that they:
- are added to projects in similar ways
- often contain transparency elements
- introduce ideas and information that may not be included in the video clips
Licensing and adding slate images
If you make a lot of films and documentaries, it is a good idea to have a "slate", a standard image which you place (generally) at the end of your film to say who made it. You may also use the names/logos of any other organisations who have helped you.
It is also at this stage that you would state the licence under which you are publishing your video. If you want your video to travel far and wide, the best thing to do is use a Creative Commons licence. There is a lot of information about these licences on-line.
Hands on - The Ken Burns effect
The Ken Burns effect is a panning and zooming effect used on still images (stills). It breathes life into them so that they can be used like video clips. To create this effect:
Choose a photo relevant to the interview you are working with. Make sure it is bigger than the screen size of your video/project. For this 720 pixel wide video, the picture must be around 1000 pixels wide.
Add the picture to your project, and then to the timeline. Search for the Pan and Zoom effect in your Effects List. Drag the effect onto the image clip in the timeline.
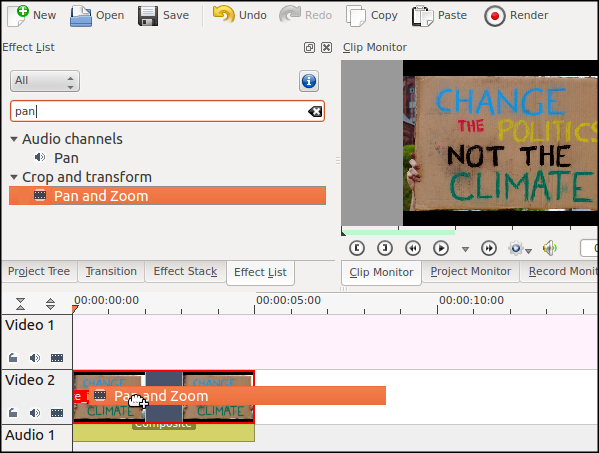 Under the Project Monitor click on Show / Hide edit mode button to show edit mode.
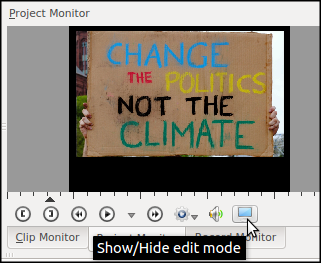
The screen should now show a yellow frame around the image in the Project Monitor and there should be some options in the Effects Stack.
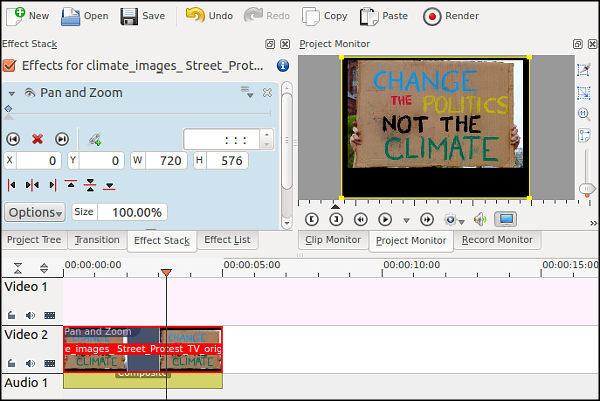
Move the zoom slider (to the right of the Project Monitor) down until you can see space around the video.
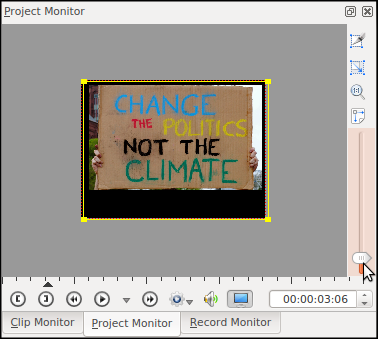
Make sure that the keyframe in your Effects Stack is set to 00:00 and change the Size of the image to be 130%. You will see that the yellow frame in the edit mode of the Project Monitor has expanded:
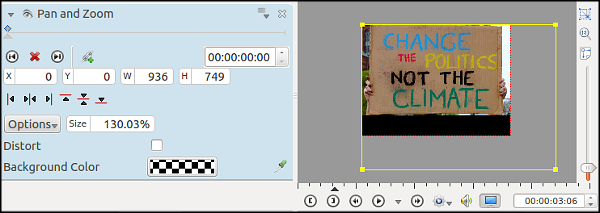
Drag the yellow frame so you can only see the top right of the image.
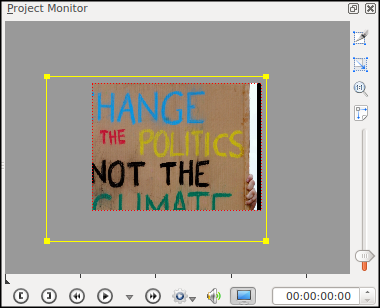
Now move the keyframe slider in the Effects Stack all the way to the right.
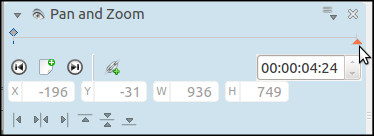
Click the Add keyframe button.
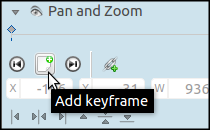
Next, change the Size, the X & Y settings, to match those in the screenshot below (In short centring the still image).
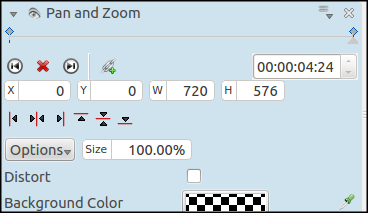
If you play the still back on the Project Monitor from start to finish you should see the image move. It zooms out and moves up to the right, revealing more of the image as the video plays.
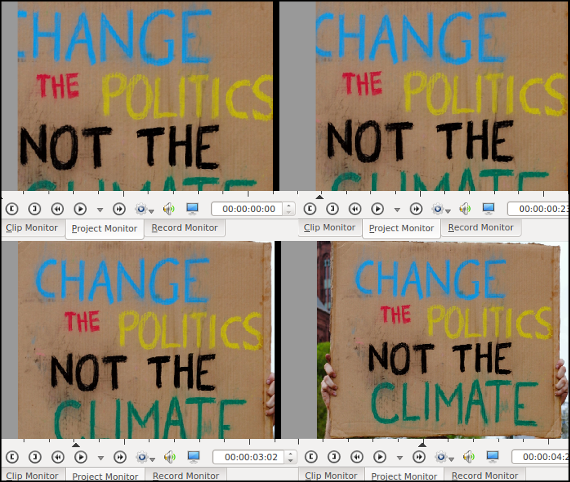
You can use the same technique to zoom in and out and move images in many ways, creating beautiful video sequences from otherwise dull still images. Pan and Zoom is also useful for creating stylish opening sequences or credits.
Extra Step
Try using your image as an cutaway and combining the ken burns effect with a Dissolve Transition. In your timeline it will look like this:

And in your Project Monitor it will look like this:
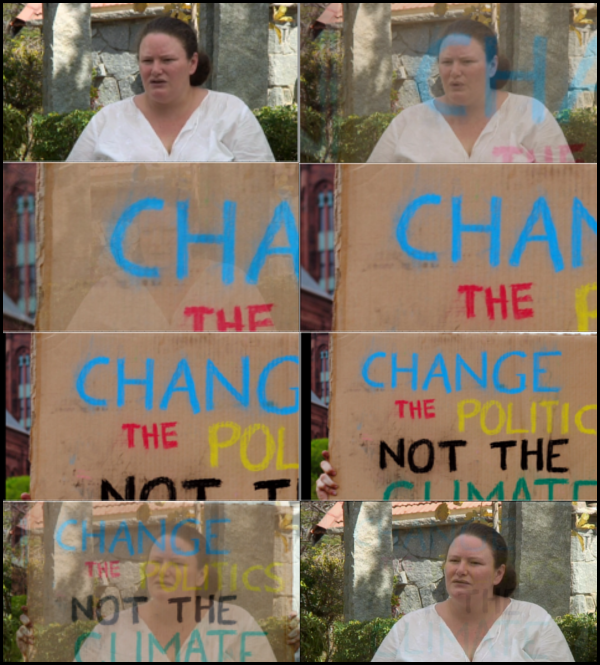
Hands on: identifying a speaker
In this task, you will simply identify an interviewee using a title, showing their name and position/organisation for a few seconds as they start speaking. It is quick and simple, and so focus remains on their message.
First, right click in your Project Tree and select Add Title Clip
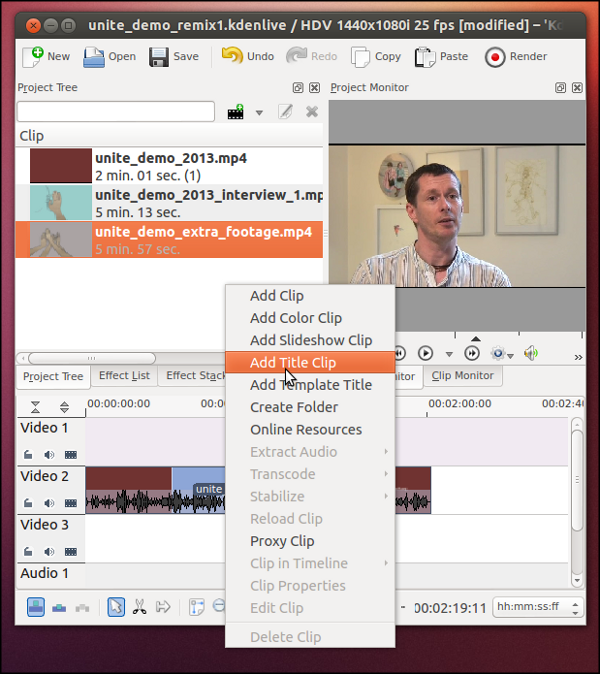
You will now see the Title Clip editor window.
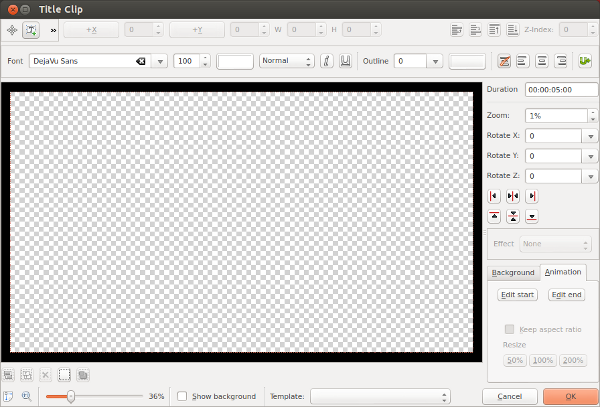
If you see a grey and white squares, this means that the background of the slide is transparent, which is correct for this task because we will need to see the video footage beneath the title. If you do not see transparency, you need to change the opacity of the Background to zero.
Next, create your text by clicking on the T button. If you do not see all the buttons displayed in the image below, try expanding the title editor window to full screen.
Click somewhere on the transparent are and type the name of your interviewee - there may not be a spell checker so proof read things carefully.

You can adjust the size and colour of the text using the menus, and move it by drag and drop. Use a new text box (by clicking T again) for each new line or phrase.
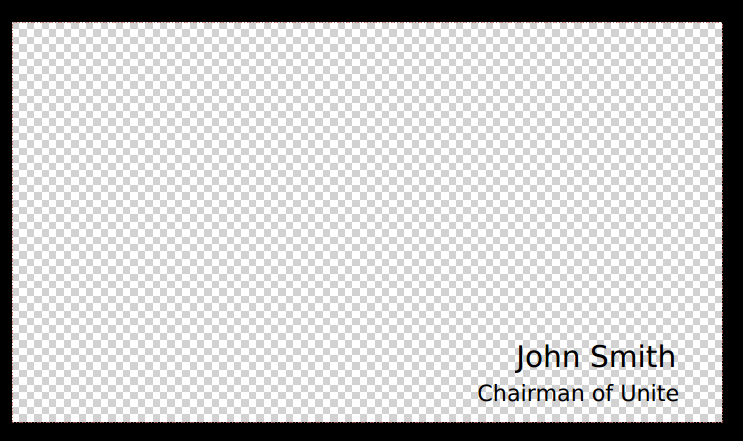
Next, to improve the visibility and style, add a shadow to sit behind the text.
You can do this by clicking the Add Rectangle tool.
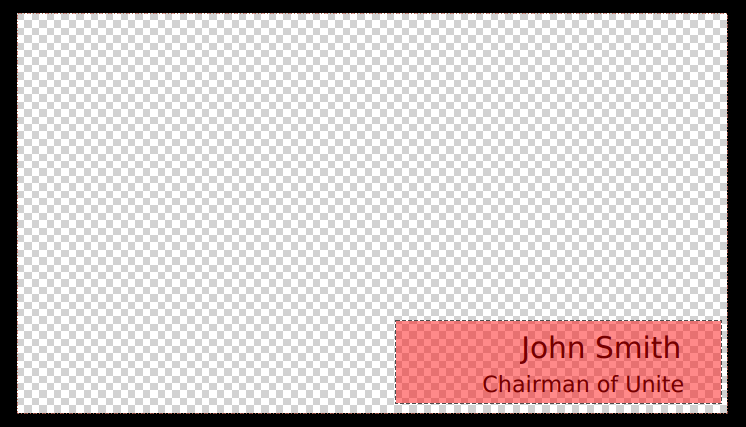
The shadow will be added in whichever colour was used previously. You can change this to something more appropriate and adjust the opacity, by using the Select Colour dialogue.
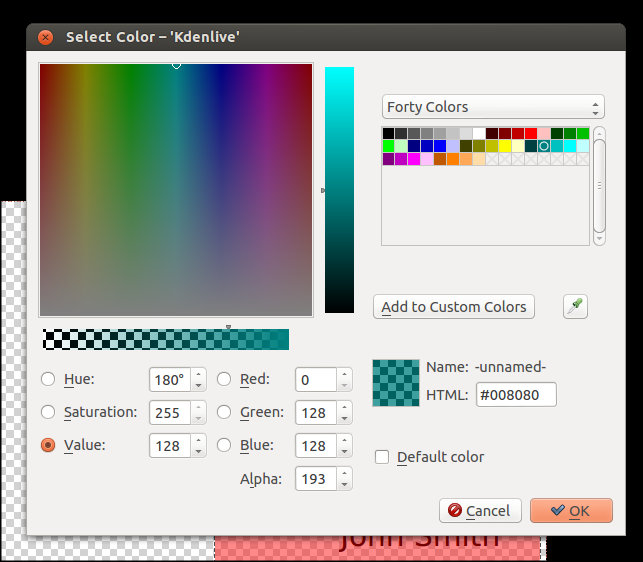
You may also need to set the shadow to sit below your text, rather than above it. You can click the Lower object to bottom button to do this.

Play around with the size of your shadow to find a style that you like. You should use the same layout for all similar titles in your video
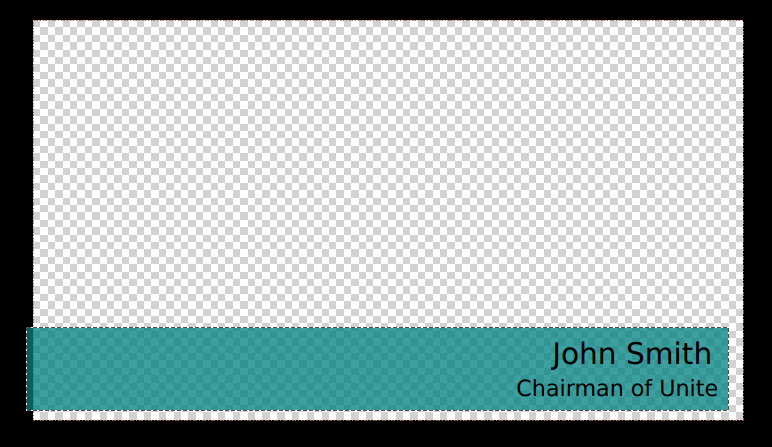
Once you are happy, click save. You may need to re-open the Title Clip editor window to adjust and save several times. When you are happy with your title clip, add it to your video by dragging it from the Project Tree into a track above your video clip (not below).
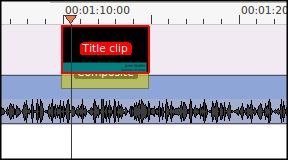
A Composite transition should appear automatically. The composite transition means that all transparent areas (for example, your title clip background) will allow footage from the adjoining/specified level to show through. In the diagram below, all the purple areas are visible. The composite transition is tied to track two, so both track one and two are visible.

You can set the composite effect to apply transparency down through many layers. For example here, where the composite effect is tied to track three.

If your composite transition does not work, try re-specifying which track you wish to target in your
Transition menu.
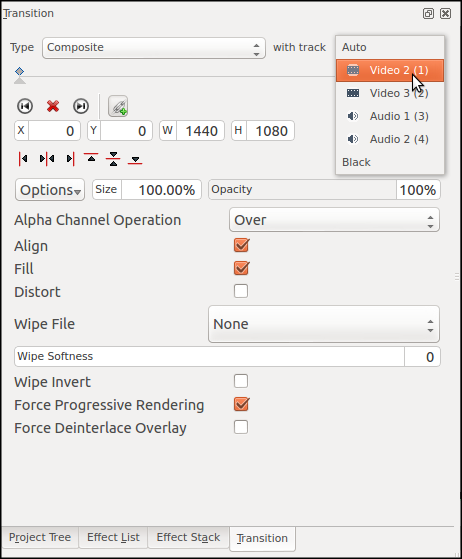
Lastly, view the title in the project monitor and adjust the timing as needed. The text should stay on the screen long enough for you to read it through, out-loud, twice. It should look something like this:
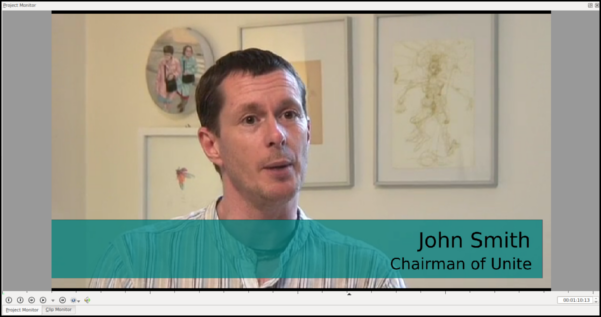 For the finishing tough, add a dissolve in and dissolve out to your title slide. This adds a subtlety and smoothness.
Working with a Single Video File
The most essential things you can do with video editing software are to: open a video file, extract part of it and render it into a new video file. This may be useful to share vital video evidence or an inspiring piece of footage where the original footage needs to be changed. Perhaps you only want to share a short part of it, and discard the rest, or perhaps you need to remove part of the video that could put your colleagues at risk. This chapter will explain how to achieve this and summarise the basics of working with a video file.
This chapter is designed to be fast and basic, so we will skip steps of preparation and good practice and avoid specialist video editing language. However, all steps described are explained in greater detail in other chapters, so if you get stuck try reading ahead.
Hands On: a high speed edit.
This task assumes you have already transferred your video file onto your computer and have installed a video editing programme (in this case we are using Kdenlive).
Start Kdenlive in the normal way. Import your video file by clicking Project > Add Clip in the top menu.

Your video clip will then appear in the Project Tree section on the top left of the screen.
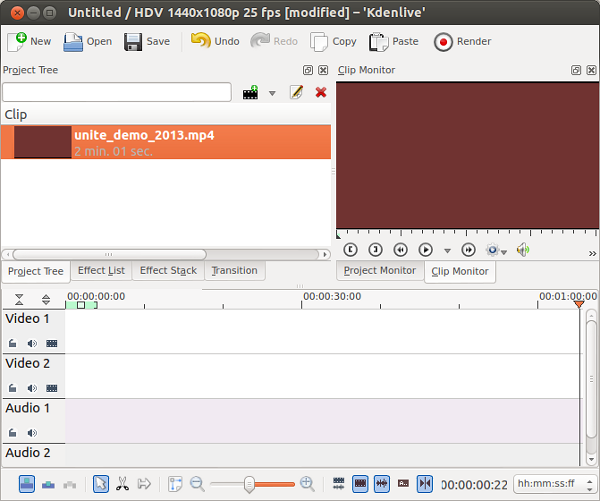
Once your clip is imported (long clips can take a while!) you need to drag it into the Timeline in the lower half of the editor window - use the first Track (Video 1).
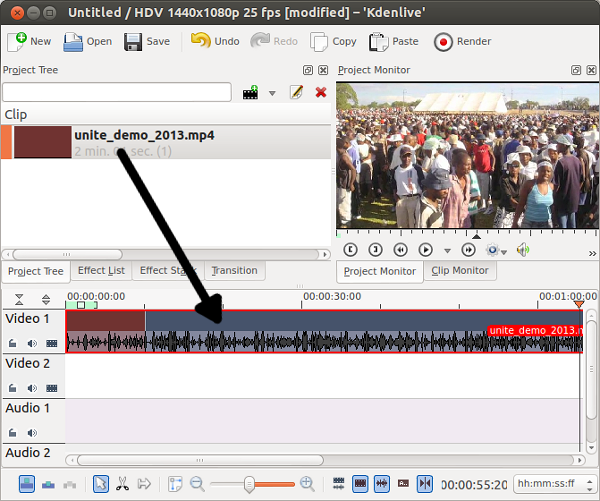
Once you have done this, use the Project Monitor window to play, forward and rewind your video. See that the position indicator on the Timeline moves along as your video plays: it can be helpful to use the position indicator to guide you when you cut or change a clip.
Shorten the clip
To simply remove the start (or end) of the clip, you can drag the clip to the desired length. Move your mouse to the start (or end) of the clip, see the green arrow appear, click and hold as you pull the clip edge towards the centre. Note that if you play your video then pause where you wish to make your change, you can use your position indicator to mark the point to which you need to drag the clip edge.
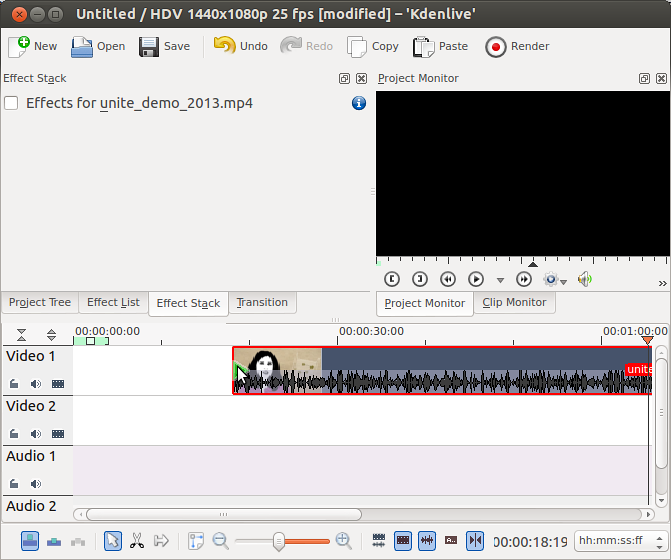
Remove a section from the middle
To remove a section from within the clip you need to cut it out using the Razor tool, which is located in the tools rack at the bottom of the editor window.

Select your razor tool from the tool rack and click on the place you want to cut, using your position indicator as a guide if you wish.

Next you need to mark the end of the area to remove. Press play till you have found the end point of the section that you wish to cut out, and use your Razor Tool to make another cut.
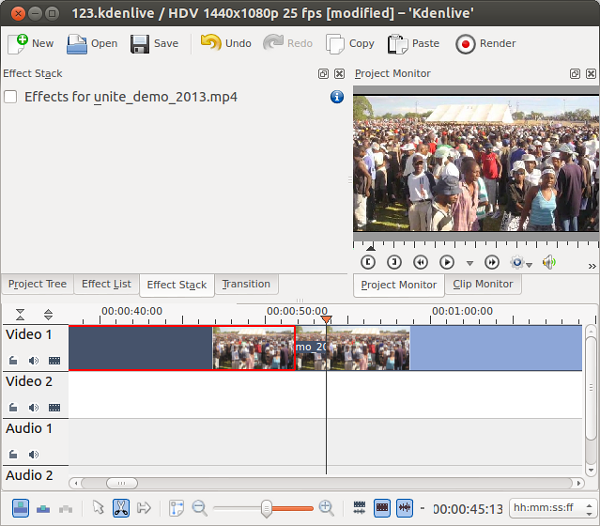 You have now isolated a section of the video and you can delete it. First, switch back to your selection tool in the toolbar:
 Then select the area of your clip that you wish to remove and hit delete on your keyboard. You will now see a blank space in your timeline.
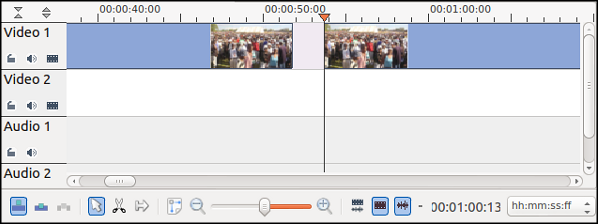
Line them up
Next, drag and drop your shorter clip(s) so that they line up like one long clip. Make sure the first clip touches the very beginning of the timeline. You can watch the sequence in your Project Monitor to double check. The final step is rendering.
Export / Render your project
Now you are ready to make a video that can be played by a video player or uploaded to the Internet. First, click the large Render button.

Choose an Output file name and make a note of where it will be saved. Select the MPEG-4 Profile, and leave the other settings unchanged.
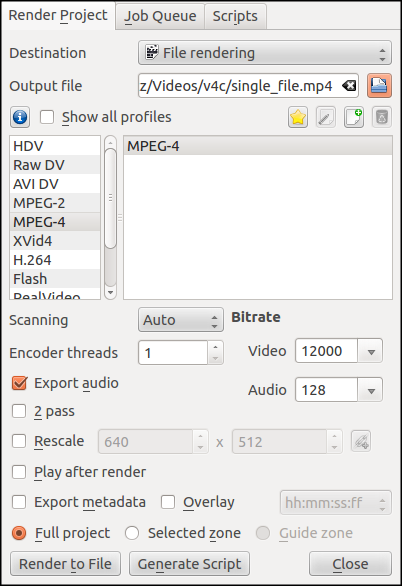
Click Render to File
Check and distribute
You have now made a new video! Take a look to make sure its okay. To do this, find the new file based on where you rendered it too, and play it using your media player.
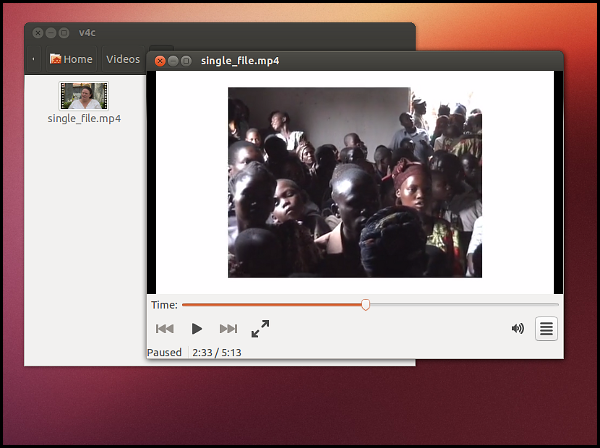
Once you have checked it, you can upload it or share it as desired.
Summary
This hands on task demonstrated a fast and simple edit. Once you have achieved this, however, you might want to slow things down a little and edit a more complex piece. You could add in interviews, additional footage and use tools which help you tell a story or create a certain mood. The rest of this book will tell you how.
Advanced Audio Editing
You can use separate tracks for different kinds audio. There are many reasons for doing this. Different video clips may be have different volume levels. By organising them on different tracks it can help you to adjust them effectively. You can also arrange soundbites, voice-overs, or different kinds of clips on different tracks as a way of organizing your video project.
Our goal is to make the video seem as natural as possible. The process is especially tricky when it comes to working with many audio clips. We can use fades and keyframes with audio levels to help make the listening experience as smooth as we can.
The secret to getting good audio for your project is to get down into the details. Here are two hands on exercises to help you do that.
Hands On: Using different tracks for different audio sources
This hands on exercise gives an overview of arranging audio in a way that makes it easier to work with. It uses the following structure of tracks.
Audio 1: Clips at a correct volume
Audio 2: Quieter clips that need boosting
Audio 3: Music Track
Audio 4: Clips used for cutaways that need to be muted
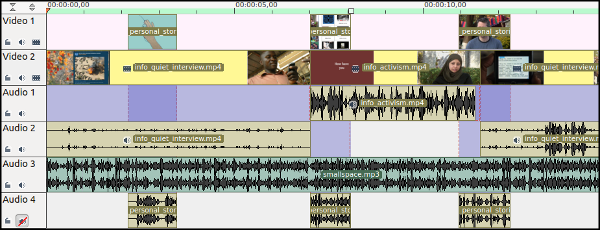 To achieve a layout like the one above follow these steps. Create four audio tracks in your Timeline. Right click on the track header section on the left of your Timeline and select Insert Track.

Select the option to add an audio track after the last existing audio track. In this case after Audio 2.
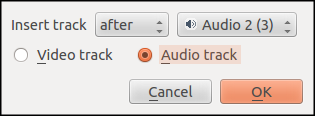
Repeat the process until you have enough audio tracks. We need four.
Click on the option on the bottom tool bar to automatically split the audio of clips. This will helps us to arrange the tracks in the way we want.
Add a clip with the correct audio level to the bottom video track of the timeline in the normal way.
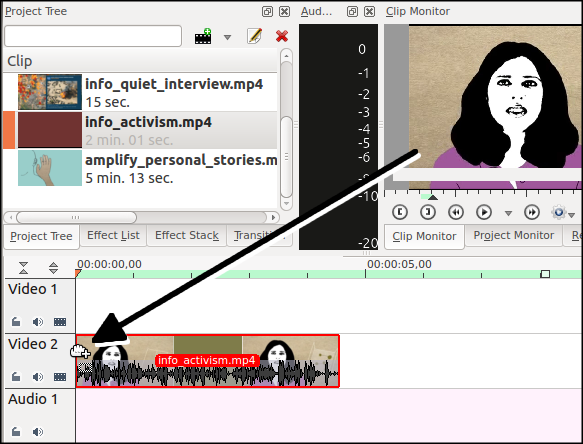 The audio part of the clip should separate automatically and now be viewable in Audio 1.
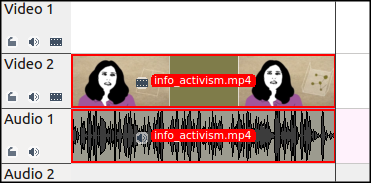
Next, add a music clip to Audio 3 by dragging it directly into the track.
Then add a section of a quieter clip to the timeline. You may find that the audio is automatically added to Audio 1 as in the screenshot below.

To avoid this, click on the Lock Track icon in the bottom left of the Track header for Audio 1. This stops anything on that track from moving or anything from being added to the track.
The icon should now show a lock image.
Now drag the quiet clip to bottom video track again. This time the audio clip should now appear on Audio 2.
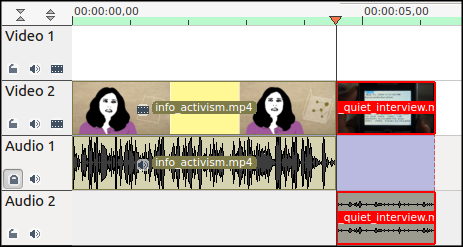
Transferring your skills: It is worth knowing that other video editing software uses different ways of controlling which tracks are used when adding clips. However, the concept of locking a track to prevent changes to it is used by most software.
Finally, we want to use one audio track, Audio 4, for cutaway clips. We don't want to use the audio for cutway clips at all: to achive this we will mute this track. Before adding your cutaway clips to the timeline, we need to lock the audio tracks above Audio 4. Follow the settings in the header shown in the screenshot below to do this.
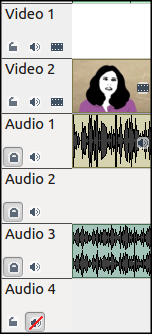
As you can see Audio Tracks 1-3 are locked and Audio 4 is muted. As we add video clips to the timeline their audio should appear in muted Audio 4 and so we won't hear them during play back.
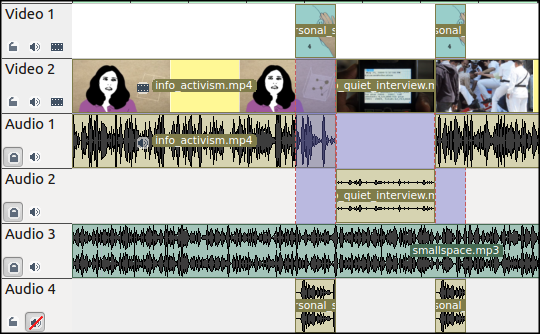
It is now clear which audio tracks need to have the volume signal boosted. Once you have applied an effect to one clip, you can copy it and apply it to others. To do this select the clip with the effect and use the Ctrl + C keyboard short cut to copy it. Select all clips that should have that same effect. Right click your mouse and and choose Paste >Paste Effects.
Transferring your skills: For some video editing software there is the ability to do apply volume changes to all clips in a track using a volume slider for the whole track, or an 'audio mixer'.
Hand on: Fine tuning volume using key-frames
To get complete control of the volume level of our music track we will use key-frames, to control the volume effect. We will alternate interview sound bites (Video 2) and images together with music (Video 1 and Audio 1). We start the music loud, go quiet and then alternate loud and quiet.
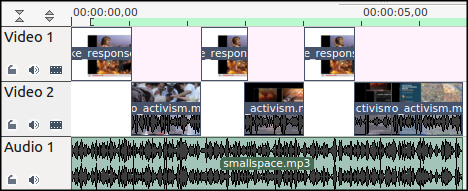
To start, add the Volume Keyframable effect to the music track in the usual way.
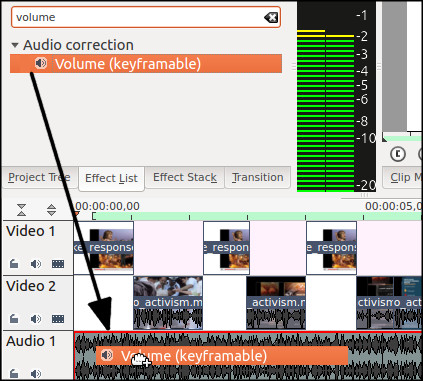
Make sure your playing head is right at the the start of your timeline. Click on the little clock symbol on in the Effect Stack.
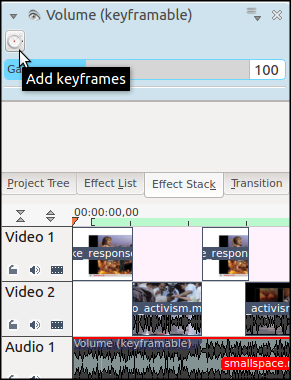
You will see in your
Effects Stack that two key-frames are already present.
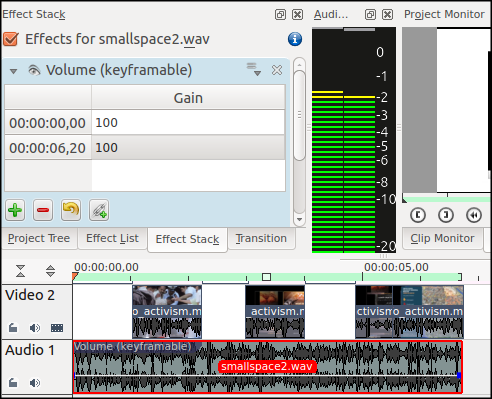
There is one key frame at position 00:00:00:00, the start of your clip, and the other at the end of your clip. Both have the Gain (volume) set to 100 as a default. A thin white line, which represents the volume, and little blue square boxes represent the key-frames.
Add a new key-frame by double clicking on the white volume line around between half a second to a second into your video. You will see in the effect stack that a new key frame has been created.
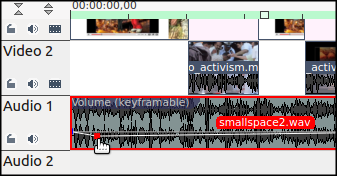
You can also create a new keyframe by clicking on the green plus button in the Volume (keyframable) part of the Effects Stack. This will place the keyframe halfway between the current keyframes.
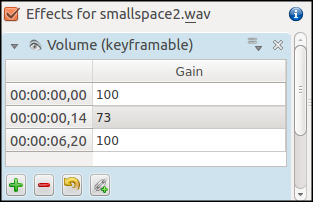
Adjusting the volume of the first two keyframes. Input the following numbers box in the Effect Stack.
First Keyframe : 0
Second Keyframe: 100
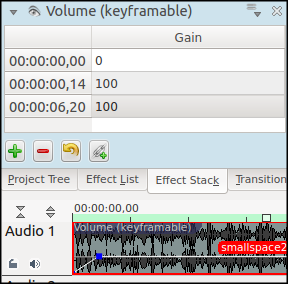
The volume of the track transitions slowly and smoothly between the old key-frames and the new one. You can adjusting the potion of your new key-frame in two ways by changing the the corresponding numbers box or clicking and dragging it in the timeline.
Add more keyframes to follow the pattern shown below.

Try adding the keyframes using your mouse and then do fine adjusting in the Effects Stack. Listen back to the volume changes as they alternate between loud music and footage, then interviews with quiet music. Alter the settings until the transitions sound smooth and the speech sounds clear over the music.
Transferring your skills: Keyframing can also be applied to other effects including
pan and zoom in Kdenlive. Also Keyframes are used in all advanced video editing software, however, the exact process differs so check for online help to work out the specifics for each application.