


Creating Links
To switch back to the normal view (get out of the source view), click on the Normal tab at the bottom of the NvU window.
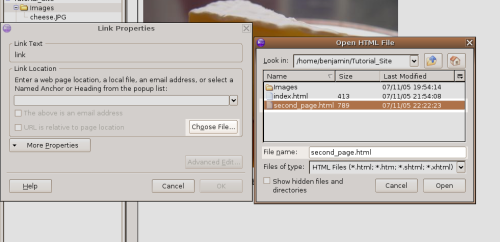
First, there needs to be another page to link to. To make another page in your site, just click the New button in the upper left corner of the NvU window. A new blank page will appear in a new tab. For now just enter some new text in the page, Click the Save button, give the page a title, and save the page in the Tutorial_Site directory. These are the same steps that were used to save the first page. This time when it comes time to name the HTML file, you need to name it something other than index.html. In order for the browser to follow a URL correctly no files in the same directory are allowed to share the same file name. Remember to avoid spaces in the file name. In the example, the file for the second page is called second_page.html (Note the underscore). If all is well, you should see the second page in the Site Manger pane. If it's not there, you guessed it, the refresh button should do the trick.
Note that the first page is still there in its own tab. Clicking on the tab will allow you to edit the page the tab belongs to. Click on the tab for the first page, and select some text that will server as a link to the second page. (Text is selected by clicking and dragging the mouse, in much the same way you would in a word processor.) Links can be associated with words, sentences, paragraphs, individual letters or even spaces. This example will just use one word as a link. Highlight (select) the word that will contain the link, then click on the "Link" button near the top centre of the NvU window.

The Link Properties dialogue box will appear. To link to the second page, click the "Choose File..." button and choose the html file of the second page.
The way that the the path of the link is written tells the browser if the link is relative or absolute. When creating websites, it's a very good idea to understand how this works.
When using a graphical computer interface, files and directories are represented with icons which represent files and directories on your computer. HTML needs to represent this using text only and uses the slash (/), full stop (.) and the colon (:) in conjunction with directory and file names to describe where any given file lives. The order that the text is written describes the order of directories that the browser should go through to find the file. The URL /ben/web/tutorial/index.html is pointing to a file, (index.html) which is inside a directory, (tutorial) which is inside another directory, (web), which is inside another directory, (ben). If you were to look at this URL in a graphical interface, it might look like this
If a image file named foo.png was added to the web directory, its path would be /ben/web/foo.png and would look like this:
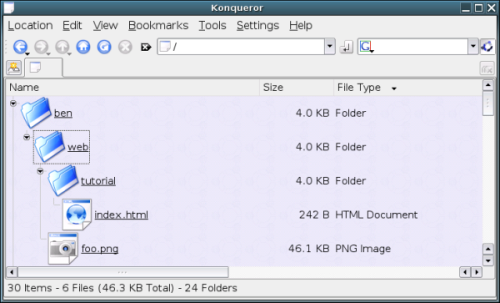
As you may have figured out, directories are separated by (/)'s and files are usually indicated by having a suffix (like '.png') placed at the end.
The topmost directory is called the root directory and is indicated by a / all to itself. /ben is the URL for the ben directory which is inside the root directory. If a URL starts with a /, it is an absolute URL. URL's to external sites are also absolute, such as http://www.google.com. In this case the http is telling the browser what language (called a protocol) it should use to ask for the file. Web pages use the http protocol. The //www.google.com part is the address of where the root directory lives on the web. Everything after http://www.google.com is the root directory for the google site. The URL http://www.google.com/mac points to the mac directory in the root directory of Google's website.
Absolute URL's contain all the information needed to find a file, and contain the following parts:
- The protocol
- The address
- The path to the file being requested
A common example of a web pages URL is 'http:// www.google.com': http: is the protocol, and: //www.google.com is the address of the server.
anything after is the path to the file being requested. In this case, there is no path specified, and Google's server must decide what to send to the browser.
Another example of an absolute URL is http://www.dembroski.net/Desktops/photos.html
In this case the URL is asking for the file photos.html which is found in the Desktops directory in the root directory of the site.
It is possible to make all the links in your site absolute in this way when adding making your site. There is a serious drawback to doing this, however. If at a later time you decide to move the location of site to a different web address or change the location of a directory within a site, you would have go back and change all the links in the site to point to the new location. Web pages can easily have tens to hundreds of links, so having to change all of them each time a directory is moved would make managing a web site almost impossible.
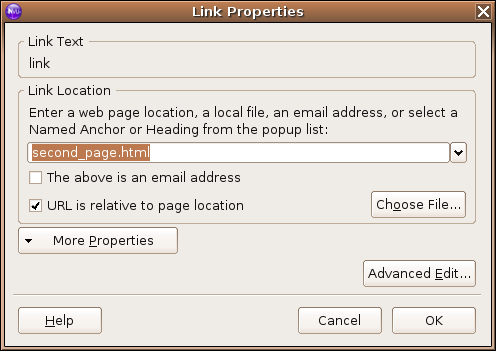
Relative URL s help solve this problem. Instead of starting with a protocol and an address, the path of relative URL s start wherever the document is located. They are indicated by starting without a protocol indicator in the URL name. In the example of the Tutorial site we are building, entering second_page.html without http://www.tutorial_site.com/ in front of it tells the browser that the URL is relative and it should look for the file second_page.html URL in the same directory as the file that contains index.html (this is the file that contains the link).
Let's add a link to an absolute URL to see the difference. In general, absolute URL s should only be used when linking to an external website.
Add some text describing the link, and select the text that you want to contain the link, and click on the link button at the top of the NvU window. When presented with the Link Properties window enter the absolute URL for the link.
You can also add links to images. To make the image of the cheese link to the site with the desktop images, single click on the image. It will become highlighted by little white squares (called "handles").
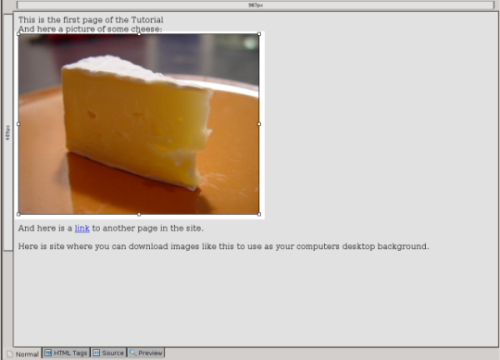
With the image selected, adding a link to an image is the same as adding it to text. Click the link button, and follow the same steps outlined above. Just to keep things simple, give the link the same URL (http://www.dembroski.net/Desktops/photos.html).
Now would be a good time to take a look at the site in a web browser and see how it looks and make sure that all the links work.
Depending on which operating system you are using, and how it is set up, there are a number of ways this can be done. Near the top of the NvU window there is a browse button. Pressing this should open your default web browser with the the page loaded. However, it may not for a number of reasons. Fortunately, there is a way that will work regardless of the browser and operating system you are using.
Open your favourite web browser. This tutorial is using Firefox, which can be downloaded for free at www.mozilla.org and is easily installed on Linux, OS X, and Windows XP. Once the browser is running, it is simply a matter of opening the index.html file as you would any other file in an application. From the application's menu bar click on File > Open File. A dialogue box will appear. Navigate to the Tutorial_Site folder and select the index.html file. You should see something like this:
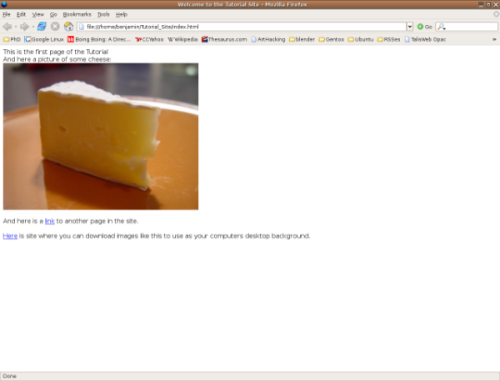
If you've set up all the links correctly, they should work when you click them in the browser. Clicking on the image should open the same page as the last link (the one contained in the word "Here").
That's it! You have now made a functional (but not very exciting) website.
Let's see if we can't dress it up a little.