


Cascading Style Sheets
Using in line styles is a quick way to get your web page to look the way that you want it to. However, once your site contains more than a few pages, if you want to uniformly change the appearance of your site, you will have to go back and change the style attributed to each element one by one. Not much fun.
There are a couple of ways around this problem in. Both involve centralizing all the style instructions in one location. Doing this makes changing styles easier. These central instruction sets are called Cascading Style Sheets, and if used properly, they will make designing web page much easier.
The first way to centralize this information is to put it all in the head of the document. This is done in the HTML code of the page. NvU does this for you, but it's a good idea to look at the HTML code to see what NvU is doing.
For this section of the tutorial, I am going to concentrate on the second page of the Tutorial_site.
When using this method of assigning styles to elements of a page, two things need to happen. First, you need to "name" all the elements of the page that you want to share a particular style. This name can be anything that you want. Just keep in mind that depending on the style you assign, the element can look totally different. Therefore, it's generally considered good practice to use a name that describes the elements function or content rather than what it is supposed to look like. NvU calls these names classes.
There are elements in every HTML document which are already named which you can also assign styles to. These are called tags and are best looked at in the HTML code itself.
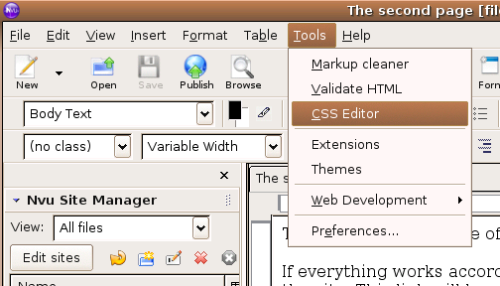
Time to make some classes for the second page of the Tutorial_Site. This is done in the CSS editor of NvU, which is found by clicking on Tools > CSS Editor in the main menu bar.
A pop-up window will appear. Click on the "Style elt." button. To the left, a dialogue will appear. Leave the Media list section blank, but it is a good idea to give the style sheet a name. In this example, I used My_style sheet (notice the underscore). After entering the title, click on the "Create Stylesheet button".

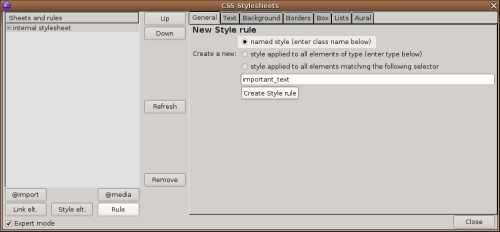
Now it's time to add some rules to the style sheet. There are two ways that you can do this. You can create your own classes, or you can use the tags which already exist in the HTML code. You can aslo mix and match these methods as you see fit. There is no right or wrong answer to this, and the best thing to do is experiment a bit. We'll start by making a class, later on, I'll show you the other option. Making a rule in NvU is just a matter of clicking on the rule button, naming the class that the rule will apply to and then making some choices about how things will look. It might seem complicated at first, but it's really not that hard.
Go ahead and Click on the rule button. Under the General Tab, you'll see a section called "New Style Sheet" with three options. Select the first option, named style and give the style a name. It's a good idea to name the style something which describes the class' content rather than what it will look like. For now, just give the class a simple name, "important_text".
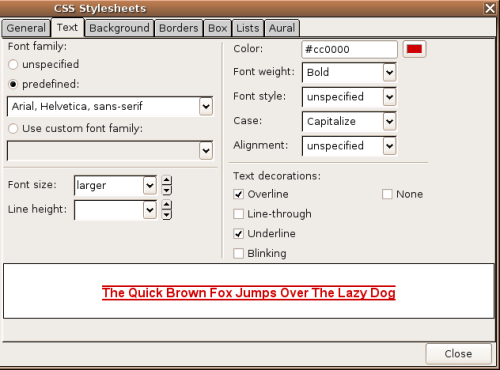
You will now see the named rule appear under the internal style sheet in the left panel of the CSS Stylesheet window. All that's left to do is tell NvU what we want all the elements assigned to this class to look like. There are a great deal of options here, many more than can be covered in this tutorial. I'll cover just the basics here. All the options are located in the tabs at the top of the CSS Editor window. Since this style is called important_text, it would make sense to start with the "Text" tag. Select the tag by clicking it. You'll be presented with a large number of possible ways to modify your text.

Most of this is similar to what you would see in a word processing or page layout application, but there are a few differences that you need to be aware of. The final display of any HTML web page is the result of a negotiation between the HTML and CSS code of the web page and the browser displaying the page. Generally speaking, in order for a certain font to be displayed, it needs to be available to the browser. If the font is not there, then the text will be displayed using the browsers default setting. (Which might be something that would make your page look terrible.) To get around this, web designers use font families instead naming specific fonts.
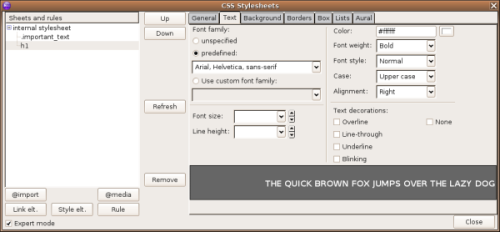
Nvu has three of the most common font families included, which is what we will use here. Font sizes also are a little different in web design. Because webpages are seen on a computer monitor, the basic measurement unit is the pixel. However, in the case of CSS there are also tons of other options (this is because you can use CSS to do formatting for more than just web pages.) There are other issues with using absolute units of measure in web design. This also has to do with the fact that the browser the web pages is being viewed in has the last word as to how the page will be displayed. You can set a font to be exactly 23 pixels, but if the rest of the page is being rendered with 50 pixel fonts as the default, all the text assigned the important_text class is going to look not so important in comparison. This is a common problem, and there is a simple solution, use relative measurements instead. This can be done with descriptors like "larger" or "smaller". In all cases, when you are using the CSS editior, any values that you don't provide (like the Font style in the example here) will simply use the browsers default when it is rendered. Go ahead and enter the values so that they match the image below.
Then click on the "Close" button on the CSS editor.
Make sure that you have the second_page.html of the tutorial open in the main window. Below is all the text used in the example, if you don't feel like typing it all out, you can copy and paste it in:
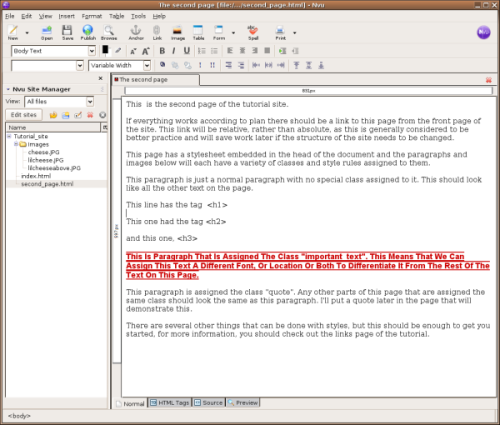
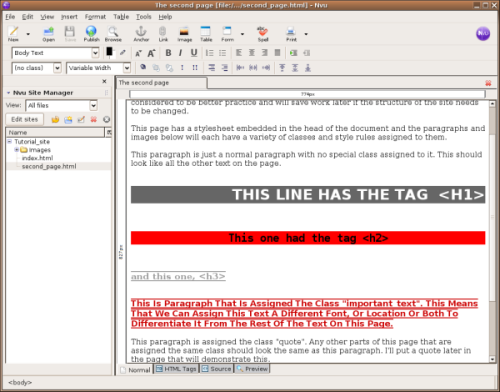
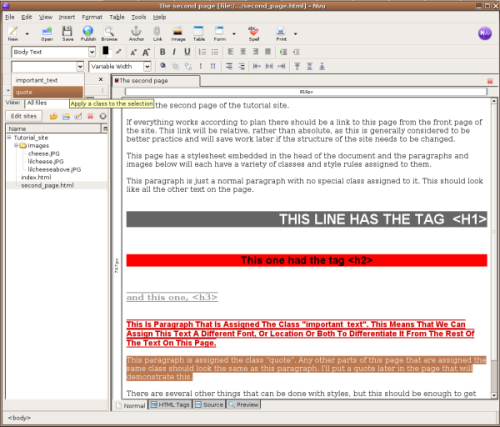
This is the second page of the tutorial site.

If everything works according to plan there should be a link to this page from the front page of the site. This link will be relative, rather than absolute, as this is generally considered to be better practice and will save work later if the structure of the site needs to be changed.

This page has a style sheet embedded in the head of the document and the paragraphs and images below will each have a variety of classes and style rules assigned to them.

This paragraph is just a normal paragraph with no special class assigned to it. This should look like all the other text on the page.

This line has the tag <h1>

This one had the tag <h2>

and this one, <h3>

This is paragraph that is assigned the class "important_text". This means that we can assign this text a different font, or location or both to differentiate it from the rest of the text on this page.

This paragraph is assigned the class "quote". Any other parts of this page that are assigned the same class should look the same as this paragraph. I'll put a quote later in the page that will demonstrate this.

There are several other things that can be done with styles, but this should be enough to get you started, for more information, you should check out the links page of the tutorial.
Replace anything you might have on second_page.html with this text. (Don't forget to save the page.)
Select the paragraph that says that it is assigned the important_text class. Near the upper left corner of the main NvU window is a pull-down menu which says "(no class)". Click on it, an you should see important_text listed.
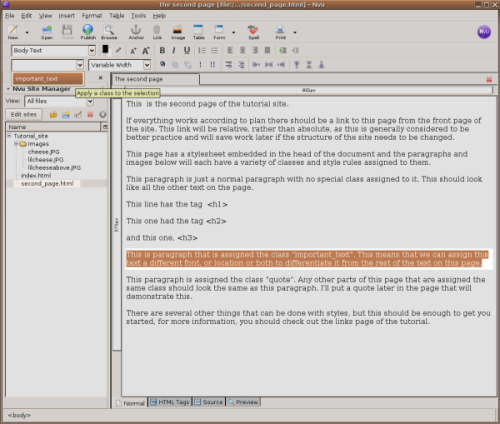
The text should now look something like this:
Now would be a good time to take a look at the HTML code just to see how all this looks. Click on the source tab at the bottom of the page. First, take a look at the top of the page. You should see something that looks like this:
<head>
    <meta content="text/html; charset=ISO-8859-1" http-equiv="content-type">

    <title>The second page</title>
    <style title="My_style sheet" type="text/css">
        .important_text { font-family: Arial,Helvetica,sans-serif;
            color: rgb(204, 0, 0);
            font-weight: bold;
            text-transform: capitalize;
            text-decoration: underline overline;
            font-size: larger;
        }     </style>
</head>
This is the Style sheet which is nested in the head of the document. Notice the bit with the .important_text, all the options you entered in the CSS editing dialogue is contained in inside the curly brackets. When we add another class, it will have its own set of attributes inside its own set of curly brackets. When we move on to using an external style sheet, we'll come back to this part of the code.
Now take a look a little further down the page, around line 39. You should the following:
<span class="important_text">This is paragraph that is assigned the class "important_text". This means that we can assign this text a different font, or location or both to differentiate it from the rest of the text on this page.</span>
This is the code that tells the browser what bit of text should use the important_text class. Notice the bits with <> symbols around them. These are called "tags" every part of HTML belongs to a tag, and any tag can be assigned a style rule. In the example above example, NvU used a special set of tags called 'span', which is just HTML speak for "between these two points". This is used when NvU needs to identify a specific section of code to assign a style to. You don't need to assign a class to use style rules. You can assign these rules to any tag. Using tags to assign styles means that any code that falls in between those tags will be affected by the style rule automatically. In particular, the heading tags are pretty useful in this respect, so that what this example uses. Just keep in mind that you can use this technique for pretty much any tag you would like.
OK, you can stop looking at all that code now. Click on the "Normal" tag at the bottom of the page.
Let's make a couple of styles for headings.
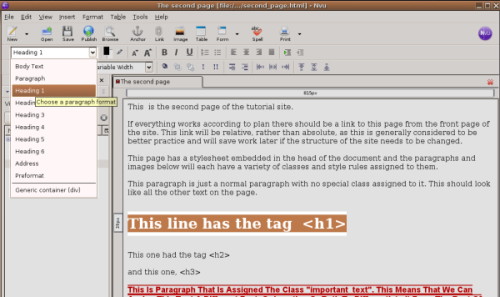
First, we need to assign some text with heading tags. Select this line:
This line has the tag <h1>
We're going to assign this the the <h1> tag. Near the upper left corner of the NvU window is a pull-down menu that currently has " Body Text" in it. Click on it and change it to "Heading 1". You'll notice the font becomes larger and the line spacing changes.
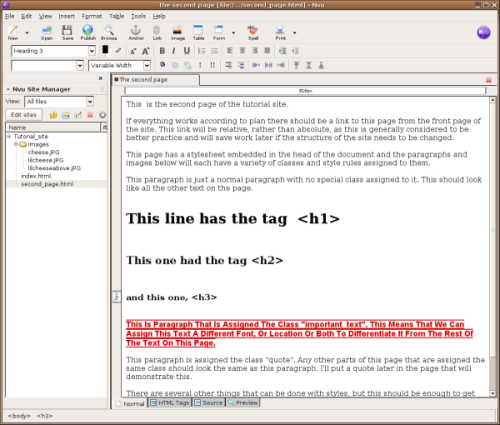
Even though we have not established a style rule for the heading yet, the appearance of the text changed. This happened because NvU is using the settings used by most web browsers, and most web browsers have a setting for rendering headings. In a little bit, we'll get things to look how we want. Before we do, go ahead and assign the two lines with their corresponding tags. When you are done, it should look something like this:
Just to make sure that we have the names of the tags correct, let's take another look at the HTML code, as it doesn't lie. Click on the Source tab at the bottom of the window, and look for something like this:
!!!! FIX !!! <h1>This line has the tag <h1></h1> <br> <h2>This one had the tag <h2></h2> <br> <h3>and this one, <h3></h3>
Don't worry about all the weird "<" stuff. All we need to do is make sure that the tags are indeed <h1>, <h2>, and <h3> respectively. Good. Time to assign some rules to these tags. Click on the Normal tab at the bottom of the window, and we'll get to business. Open the CSS editor by clicking on Tools > CSS Editor. Make sure that internal style sheet is selected to the left.
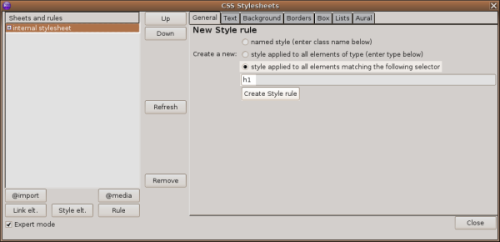
Follow the same steps as before. Click on the Rule button to bring up the New Style Rule dialogue. Instead of selecting the "named style" option, as you did before, select "style applied to all elements matching the following selector". Enter h1 into the entry field and click on the Create New Style button. You can now assign all the style attributes that you would like to apply to any part of the page that falls within <h1> tags, (heading 1 in the pull down menus). Notice that you should enter h1 and not <h1> in the entry field.
Go ahead and click on the tabs running along the top of the CSS window. You will be presented with a number of style options in each category that you can assign to each style. The best way to see what all these do is just to try them out and see what happens. In this example, I used to following settings.
Which results in text that looks like this:

Go ahead and assign the other two headings with your own style rules and see if you can get close to the image below.
If you get stuck, the image below might give you a hint.
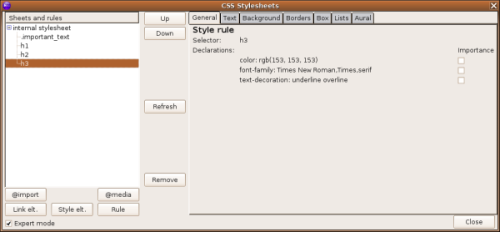
There is one important detail to note in the above image. The window "Sheets and rules" lists all the style sheets and rules associated with this page. You'll notice that all the rules assigned to the heading elements do not begin with a dot, but the important_text entry does. That little dot indicates that the rule is to be applied to a named class (The first example on this page). The absence of the dot is saying that rule is applied to elements which are contained in HTML tags. If you are having trouble getting the results you think you should, this would be a good place to look for answers.
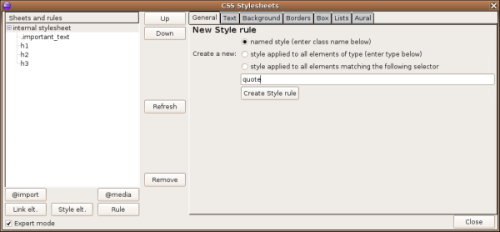
Just to drive home the difference between these two ways to assign style rules to a page, let's make a class and a rule for text which is a quote. I won't describe all the steps in detail again. Instead just follow the images below in order if you need a little reminder.
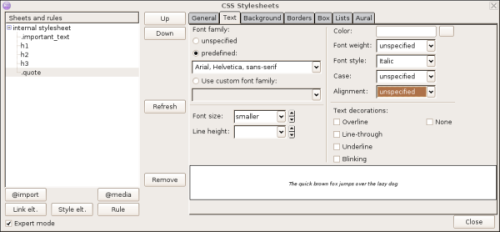
In the end, it should look like this:

You can also apply styles to images as well as text. While styles are not typically used to change the appearance of images, they are effective at controlling the layout of the images. While you can do this image by image as you did earlier in the tutorial, if your site contains a number of images that you want to layout similarly, Styles are a great time saver.
First, you need to add some images to the page. To do this, follow the steps you used earlier in the tutorial. In this case the images are going to be displayed with text wrapping around them, either to the left, or to the right, with an area of padding around them. This means the images need to be a little smaller. I'd suggest you use images with pixel dimensions of about 320 x 240. There are two images you can use already in the image directory of the Tutorial_site.
To better demonstrate how this wrapping works, you need more text to see the effect. Below is copy of the paragraph that you can copy and paste into the page.
This is a longer paragraph that is only here to show how text can be wrapped around an image using style sheets. Other than this, there is no reason for this text to be here at all (much like the rest of this page). If you are still reading this, I strongly suggest that you stop. You are doing nothing but wasting your time. Still, you continue. If nothing else, you should be admired for your commitment in reading every last detail of this page. If you are really interested in reading something, the actual NvU tutorial might be a little more helpful. Just a few more lines of text are all that will be needed to effectively show how different settings in the CSS editor used in NvU can affect the positioning of images. In actuality, you can assign the same layout parameters to any "box" element, including text. If you want to see this in action, just give this text a named style and see what happens as you select different settings in the box tab of the CSS editor. This information is also in the actual tutorial, so there was really no need to for you to read it here.
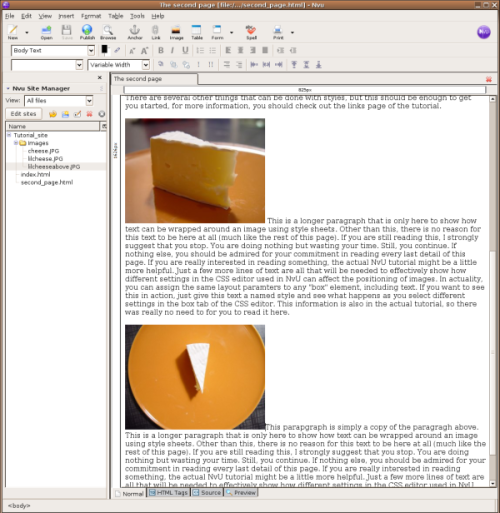
Inserting the text above at least twice should be enough. Next, insert the images so page looks like this:
To get these images to behave how we want them to, two classes are needed; one for images which will be displayed on the left, one for the right. This is done the same way as making any other class in the CSS editor. Start with naming a class for images that should be positioned to the left of the page, with text "wrapping" around it.
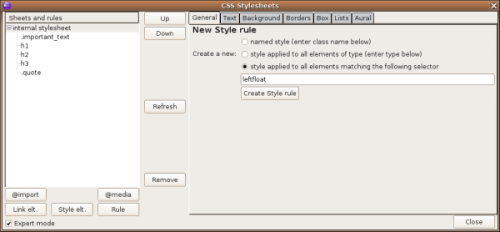
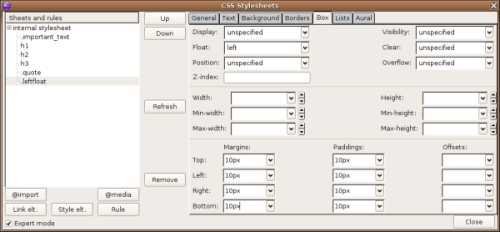
In the image above, you see the the box tab being used. Boxes are how CSS describes the separation of each element on the page. Generally, all items named with a style are contained in it's own box. The box tab allows you to manipulate how boxes are displayed, and how they relate to each other. Boxes are powerful and complex layout tools, but they can be used effectively for simple layout as well. For now the important thing is to understand what the different parts of boxes do in CSS. Take a look at the Diagram below:
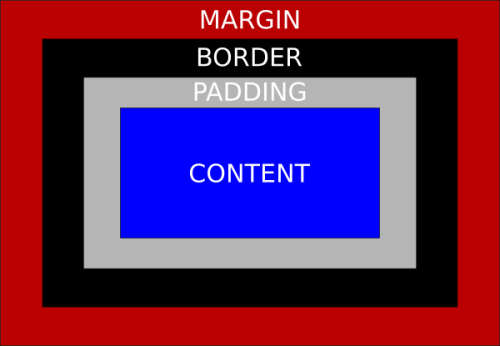
This describes how the different elements of a box are arranged. CSS allows you to control each of the elements separately; top, bottom. left and right. In the example above, I have set the box to have a 10 pixel space of padding and a 10 pixel space of margin around the image. I did this because if I later decide that I want a border around the image, there will still be a 10 pixel margin surrounding the border (no other element will touch the border). Also notice that I set the "Float" option to "left". This will put the image on the left side of the page and allow other elements to wrap around it.
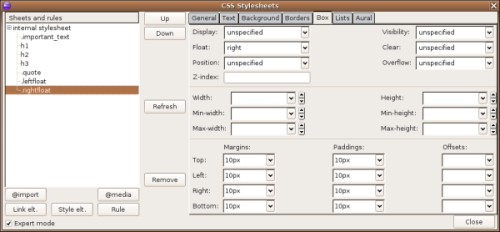
Now do create another named class, called rightfloat. Use the same settings, except set the float option in the Box tag to right.
Now all that is left to do is assign the class to each image. Click on the image once. You will see a bounding box with small white squares appear. With the image selected, select leftfloat from the list of named classed in the upper right area of the NvU window.
This is the result.
Apply the rightfloat text to the next image using the same method. If done correctly, you should see something like this:
That is the basics of using an embedded style sheet to layout a web page. While more efficient than setting the style of each element individually, it's still a bit of work if you want to apply the same style sheet to more than one page. To do this you would either have to re-enter all the settings for each page using the CSS editor, or copy and paste the style sheet code manually into the HTML code of each page. There is a better way. It is possible to separate the style sheet into it's own document and link to it in any page that you want that style applied to. This method has a number of advantages. The biggest one is that you only need to set up a style sheet once, regardless of how many pages are on your site. Also, if you decide that you want to change any of the style elements, all you need to do is make the changes in one central document, and they will be automatically applied to any page that uses that style. Setting this up is straightforward, however the current version of NvU has a bug that needs to be addressed when using stylesheets in this manner.