


Creating Graphics for UpStage
Avatars, backdrops and props for UpStage can be created using standard graphics applications such as Gimp, Photoshop, Fireworks, Flash etc. However, before you go ahead and upload something you prepared earlier, please read this chapter as there are many important points to ensure that your graphics appear the way you want them once uploaded to UpStage.
Format and size
The recommended formats for your original graphics files are .swf or .png. Vector-based images will appear much cleaner than pixel images (such as .gif and .jpeg), as they resize in UpStage to match the dimensions of individual screens and browsers. You can use .gif and .jpg but your images will lose quality (note – as the exception to the rule, backdrops are fine as jpegs).
Avatars and props will appear on stage approximately two to three times larger than the original file. This is because the stage is not in a fixed-size window: it allows for different screen resolutions and sizes, and different sizes of browser window. The aspect ratio is 7:3 (see the backdrop diagram below).
The recommended size for the original file for a "standard" size avatar is approximately 100x100 pixels – obviously you will want bigger and smaller ones, but this gives you somewhere to start. In order to test the size of your avatar, you must upload it, assign it to a stage, then look at it on that stage (the same applies to props, and also for backdrops if you are working out what is going to be obscured by the chat window).
It can be a time-consuming process getting your graphics to the size you want, so it’s a good idea to make a couple of samples first and then base the rest of your graphics on those once you have got them the size you want. If you upload graphics that are not the right size, please remember to delete your unwanted files, to keep the server tidy.
Creating .pngs
The .png file format is good for avatars and props, as it allows for transparency (unlike .gif or .jpg) and gives a good quality image. Most graphics applications will allow you to save your files as .png. In the File menu, choose Save As and look for the .png option.
Do NOT interlace the file when you save it.
Creating .swfs
Although UpStage itself is open source and we've done everything we can to make it cross-everything, everything is ultimately delivered to the browser with the help of the Flash Player plug-in; because of this, the most successful graphics format is .swf.
To create .swf files, you need the Flash application (note: open source applications that convert other formats to .swf are available - if you know of something that works well, please let us know!).
Please note that the following information is by no means a comprehensive Flash tutorial. If you do not know how to use Flash at all, or if the following steps are not clear to you, we recommend that you look on the web for a Flash tutorial.
At the time of writing, UpStage only supports Actionscript 2; please make sure that you save your files correctly, as files saved with Actionscript 3 will not work.
The basic steps for producing a single frame avatar or prop using Flash is as follows:
- Start with a .png file in which you have clear-cut your image and given it a transparent background. Keep the .png image at a large size – around 500px square for a standard-sized avatar is a good guide, as much larger will result in an unnecessarily large .swf file but a smaller file will start to lose quality.
- Open Flash and from the File menu, choose Import; navigate to your .png file and import it into Flash.
- Click on the image to select it – a grey border appears around it.
- In the Insert menu, choose Convert to symbol – the border will change to a thin blue line.
- Resize it (Modify > Transform), remembering that avatars and props will increase in size by about 2-3 times when uploaded into UpStage. Around 100 pixels is a good size to begin with if you don’t know what size you want.
- Once you have reduced it to the required size, adjust the document size to match.
- From the File menu, choose Export Image. Put the jpeg quality up to 100% and save the .swf file.
Animated avatars and backdrops
UpStage supports both animated sequences and Flash movie clips.
You can create an animated sequence either in Flash (an .swf with a series of frames) or by creating a series of .pngs (or .jpgs or .gifs) and uploading them with the multiframe option in UpStage. When you put sequenced (frame-by-frame, or motion or shape tweened) animation onto the stage it will appear static with the image in the first frame. To change to other frames of the animation, type /a 2, /a 3, etc. To make the avatar animate, type /a 0 and to return to the first frame type /a 1.
If you have saved your .swf as a movie clip animation it does not need any commands, it will automatically loop and can be used on stage either as a continuously looping animation or as a series of still avatars that are swapped using the /a command, as above.
Props and backdrops can also be animated using Flash. But bear in mind that Flash animations can end up as larger files, which will increase the time it takes to load your stage.
Animated sequence
To create an animated sequence, follow these steps:
- Create a series of .png files and give them numbered filenames.
- Open Flash and from the File menu, choose Import and navigate to the first .png file; Flash will ask if you want to import the series, say "yes". This will create a frame for each image.
- On each frame in turn, click on the image to select it (a border appears around it); from the Insert menu, choose Convert to symbol (the border will change to a thin blue line)
- Resize (Modify > Transform), remembering that avatars and props will increase in size by about 2-3 times when uploaded into UpStage.
- Once the images are all reduced to the required size, adjust the document size to match; if your images are not all exactly the same size make sure you have made the document size as big as the largest image.
- From the first frame, and with the image selected (the blue line should appear around it), go to the Insert menu and select Create motion tween.
- To check that the tweening has happened, go to the Control menu and select play – your sequence of images should play.
- From the File menu, choose Export Movie; put the jpeg quality up to 100% and save the file.
Sounds can be embedded into Flash movie clips, but it takes a bit of trickery to be able to control the sound.
When using Flash to create animated avatars and props, be sure to check the the frame rate and whether it is set up to loop. If the frame rate is, for example, 24 fps and it is set to loop, the image will reload 24 times a second, regardless whether anything else is changing on the screen. Making your still flash pictures run at, for example, 1 fps and/or switching off looping will ease the load on everyone’s browser. Very slow animation, for example tweened over 40 or so frames and looping, will cause the least strain and can create some very effective movement.
UpStage doesn't cope with movie clips nested within the frames of a Flash animation, but it is possible to import Quicktime movies into Flash and then export as a .swf. You will need to experiment with file sizes and perhaps remove some of the frames from the Quicktime movie in order to keep the file size down.
Once again, this manual does not pretend to provide a comprehensive Flash tutorial. Please look on the web for more detailed information on using Flash.
Backdrops
As long as the original image is 380x240px or larger, a backdrop will fill the UpStage screen, including going behind the text chat window. You may wish to create a backdrop that has a blank area on the right where the text chat window is to ensure that important parts of your backdrop are not hidden behind the chat window.
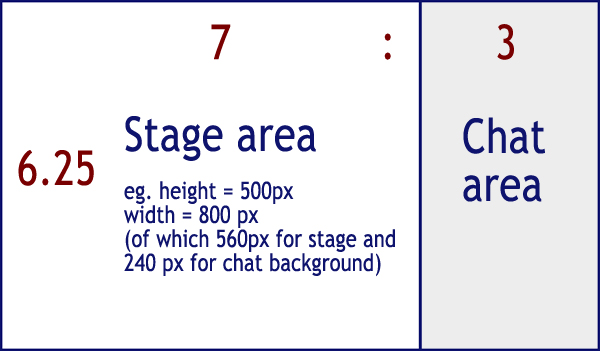
The proportions of the whole image are:
total width : total height - 800 : 500 (or multiples of these proportions)
width of stage area : width of chat area - 5 : 3.5 (if your image is 800 wide, the chat will begin at 550).
minimum width : height – 380 : 240 pixels
Bear in mind that everyone’s screen size and browser window size can be different – your backdrop will stretch to fill the space.
Note that in the Player view of the stage, an strip along the bottom of the backdrop will be obscured by the Backdrop and Prop Image Galleries – but as these tools are not seen by the audience, it is recommended that your backdrop extend below that strip.
TIP: it's a good idea to look at your stage in audience view as well as player view; you can do this while you're working by having it open in two browsers, one where you are logged in and one not.
Backdrops can be created as .png, .swf, .gif or .jpeg; as with avatars and props, .png or .swf will give the best quality results, however generally a .jpg backdrop will also be fine. If you are using .gif or .jpeg, upload a test backdrop to see if it’s going to be good enough, and remember to delete unwanted images.
Note that .png files should NOT be interlaced when saving.
File Sizes
UpStage has a default file size limit of 1MB for each media item uploaded. This can be over-ridden by giving a player unlimited upload permission, but in general it's a good idea to keep your files as small as possible. The larger the files you upload, and the more media assigned to your stage, the slower the stage will load.
What is a "reasonable" file size for your original graphic? This is very hard to say, as it’s completely different for a small static flat graphic prop which may be only 1K, and an animated flash backdrop or multiframe avatar, which could be over 500K. And a stage with a single large graphic may load faster than one with many medium sized graphics.
If your original files are larger than 500K, check whether you can resize them and save them again to a smaller file size. Remember that screen resolution is only 72ppi so there is no need for your originals to be at a higher resolution.
Deleting Graphics
It is good practice to delete unwanted graphics in order to keep the server tidy and minimise digital storage requirements.
- From Edit/View Media, browse to find the item you wish to delete and select it.
- If the item is a assigned to one or more stages, tick the checkbox at the bottom of the screen Delete even if in use.
- Click Delete media.
If you are working on a server that is used by many players, such as the Open UpStage (http://upstage.org.nz:8084) please do not delete anything that has been uploaded by someone else. But also be aware that we operate a Creative Commons policy, so your media may be "borrowed" by others, for learning and playing; no-one should use someone else's media in a performance without the original creator's permission.
Embedding links in graphics
Active hyperlinks can be created by typing a URL into the text chat window (use right-click or ctrl+click to open or copy the link); however sometimes it’s useful to have a graphic onstage that provides a hyperlink to another stage or a different web site.
The way to do this is to create a .swf image with an ActionScript button containing the following code:
on (release) {
getURL("http://desired.url", "_self");
}
This could be an avatar or a prop that is placed on the stage at the time that you want the audience to follow the link.
More Flash tricks
If you are experienced in using Flash and Actionscript, you can do a lot more with it in UpStage; most (but not all!) interactivity that can be achieved in a web page using Flash, can be achieved in UpStage. Performances that have enhanced audience interactivity through sophisticated Flash programming include Virtual Theatre's Lines (090909 Festival) and Murder 2.0 (101010 Festival), and The Best Air-Guitar Album in the World Vol II by Anaesthesia Associates (070707 Festival).
The purpose of this manual is not to teach you how to use Flash, but there are some relevant tutorials on the UpStage web site which you may find helpful.