


Installing a WordPress Network
A WordPress Network is an installation of WordPress with many sites hosted in one place. The same code is used for all the different sites hosted on the network, thus reducing the time it takes to keep the code updated. This used to be called a Multi User set up, so you may still see references to WordPress MU when researching this subject.
This chapter is partly adapted from the the official WordPress documentation on creating a WordPress multi-user network. There are two ways to install a network: one is to use sub-directories, the other is to use sub-domains.
Sub-directory: http://wpnetwork.org/examplesite/
Sub-domain: http://examplesite.wpnetwork.org
In this chapter we are only going to look at sub-directories. For information on how to set up a network with sub-domains and more in depth information about WordPress networks, have a look at the Create a Network page on the Wordpress Codex site. 1
Summary of how to install a network
Back up your system before starting this process. There is information on how to do this in the Securing Your Installation chapter.
Then alter the wp-config.php file in the root directory of your set up. Add this line above the part where it says /* That's all, stop editing! Happy blogging. */:
define('WP_ALLOW_MULTISITE', true);
This will bring up some new settings in your Dashboard. Point your browser to Settings > Network Setup.

This page presents you with the correct settings to complete the configuration of your network.

The text in the boxes that you see may be different to the screenshot above, depending on your set-up.
- Now, back up your existing
wp-config.phpand.htaccessfiles.
- Create a
blogs.dirdirectory under/wp-content/
This directory is used to stored uploaded media for your additional sites and must be writable by the web server. 2
- Add the extra lines your WordPress installation generates into your
wp-config.phpfile. 3
These lines are dynamically generated for you based on your configuration. Edit thewp-config.phpfile while you are logged in to your sites admin panel. Then paste the generated lines immediately above/* That's all, stop editing! Happy blogging. */.
- Add the generated mod_rewrite rules to your
.htaccessfile, replacing other WordPress rules. (If there isn't an.htaccessfile, then create it.) These lines are dynamically generated for you based on your configuration.
- Log in again. Once the above steps are completed and the new wp-config.php & .htaccess files are saved, your network is enabled and configured. You will have to log in again. Click Log In to refresh your Adminstration Panel. If you have problems logging back in, clear your browser's cache and cookies first, then try again.
More information on .htaccess and mod_rewrite
Unlike Single Site WordPress, which can work with "ugly" Permalinks4 and thus do not need mod_rewrite, MultiSite requires its use to format URLs for your subsites. This necessitates the use of an .htaccess file, the format of which will be slightly different if you're using sub-directories or sub-domains.To enable mod_rewrite to work within an Apache Virtual host you may need to set some options on the DocumentRoot. The code below is an example which you can alter to suit your system.
<VirtualHost *:80>
  DocumentRoot /var/www/vhosts/wordpress
  <Directory /var/www/vhosts/wordpress>
    AllowOverride Fileinfo Options
  </Directory>
Altering your Network Settings
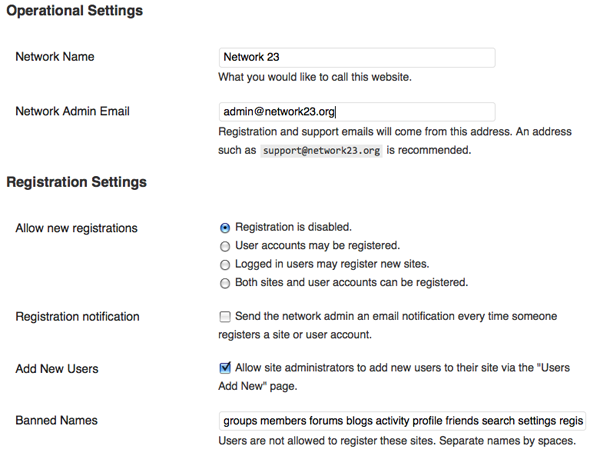
To change settings to the whole network, navigate to Settings > Network Settings.
At the Network Settings page you can change the name of the network, the admin email, how people can register, whether or not site administrators can add users to their sites themselves, and other settings. Have a look at these settings and fill them out as you see fit.
Upload Settings
You can also determine which file types users of the network are allowed to upload at Settings > Network Settings.
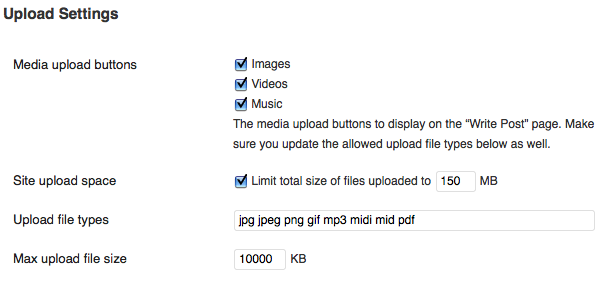
The Media upload buttons refer to the buttons above the WYSIWYG editor which are used to add text to posts and pages.
It may be a good idea to enable the Video button even if you are not allowing your users to add Video files. This is because it will enable different options for embedding video files from external websites.
You can decide how much space and what kinds of files your users may upload. Make sure you provide help for your network's users to find other solutions (such as Vimeo, Soundcloud, Flickr, etc) if you want to run a minimal file hosting service.
Menu Settings
There is a check box on the Network Settings page which allows you to decide if users of the network get to see the Plugins menu settings or not.

This allows you to create a more generic and potentially easier to user service, but with a bit less flexibility for its users.
More help and information
There is more help and information on the Codex pages and the WordPress.org Support forums.5