


Menu Bar
Software name : Audacity
Software version : 1.2
Lets look at the basic elements of the Audacity Menu Bar :
![]()
The Menu Bar is a typical element in many applications. It will look slightly different to this if you are not using Linux, most notably in Mac OSX this Menu Bar is not located on the application window itself but at the top of the screen in the "Apple Menu". Lets go through the Menu Bar one item at a time.
File
By clicking on "File" in the Menu Bar you get a drop down menu with several options to choose from. Some options maybe "greyed out" meaning you can't select them, you will only be able to choose the options that appear in solid black. The options available depend on the state of Audacity at the time. For example the following image was taken from Audacity with when the program had just been opened and no recording or editing had been started:
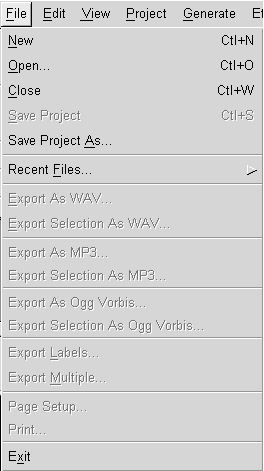
The File Menu is where you can process all the things related to the audio and project (.aup) files.
| option | action |
| New | creates a new empty project window. |
| Open... | selecting "Open" presents you with a dialog where you can choose a file to open. |
| Close | closes the current project window. |
| Save Project | saves the current Audacity project (AUP) file. |
| Save Project As... | allows you to save the current Audacity project (AUP) file with a different name or in a new location. |
| Recent Files... | gives a list of recent files you ahve been working on. |
| Export As WAV... | exports the current Audacity project as a standard audio file format such as WAV or AIFF. |
| Export Selection As WAV... | this is the same as Export, but it only exports the part of the project that is selected. |
| Export As MP3... | exports the current Audacity project as an MP3 file. |
| Export Selection As MP3... | this is the same as Export MP3, but it only exports the part of the project that is selected. |
| Export As OGG... | exports the current Audacity project as an Ogg Vorbis file. |
| Export Selection As OGG... | this is the same as Export As OGG, but it only exports the part of the project that is selected. |
| Export Labels... | if you have any Label Tracks, this command will export them as a text file. This feature is commonly used in Speech Recognition. |
| Export Multiple... | this allows you to do multiple exports from Audacity. |
| Exit/Quit | closes all project windows and exits Audacity. It will ask you if you want to save changes. |
Edit Menu
The Edit Menu is only accessible when you are editing an audio file.
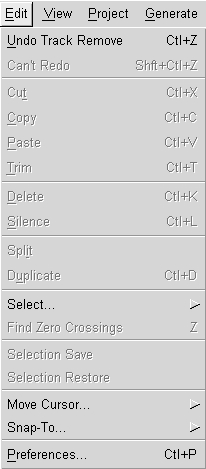
| option | action |
| Undo | this will undo the last editing operation you performed to your project. |
| Redo | this will redo any editing operations that were just undone. |
| Cut | removes the selected audio data and places it on the clipboard. |
| Copy | copies the selected audio data to the clipboard without removing it from the project. |
| Paste | inserts whatever is on the clipboard at the position of the selection cursor in the project. |
| Trim | deletes everything but the selection. |
| Delete | removes the audio data that is currently selected without copying it to the clipboard. |
| Silence | erases the audio data currently selected, replacing it with silence. |
| Split | moves the selected region into its own track or tracks. |
| Duplicate | makes a copy of all or part of a track or set of tracks into new tracks. |
| Select... |
selects part of the audio depending on the option chosen. |
| Find Zero Crossings | moves the cursor or the edges of the selection to the nearest point where the audio waveform passes though zero. |
| Selection Save | saves the current selection and position. |
| Selection Restore | restores the selection to the project. |
| Move Cursor... | these commands provide quick and accurate ways to manoeuvre the cursor around the project to the start and end of tracks and selections. |
| Snap-To... | turns snapping of the cursor to a grid of time values on or off. |
| Preferences | opens a dialog window that lets you configure Audacity. |
View
The View Menu is used to manage the display of the tracks ("channels") and various options to show and hide some interface elements :
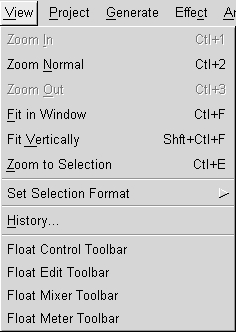
| name | action |
| Zoom In | zooms in on the horizontal axis of the audio displaying less time. |
| Zoom Normal | zooms to the default view, which displays about one inch per second. |
| Zoom Out | zooms out displaying more time. |
| Fit in Window | Zooms out until the entire project just fits in the window. |
| Fit Vertically | adjusts the height of all the tracks until they fit in the project window. |
| Zoom to Selection | zooms in until the selected audio fills the width of the screen to show the selection in more detail. |
| Set Selection Format | sets the format in which selections are measured in at the bottom of the application window. |
| History | brings up the history window. It shows all the actions you have performed during the current session. |
| Float or Dock Control Toolbar | toggles between displaying the Tool Bar docked at the top of each project window, or in a separate floating window. |
| Float or Dock EditToolbar | toggles between displaying the Edit Tool Bar docked at the top of each project window, or in a separate floating window. |
| Float or Dock Mixer Toolbar | toggles between displaying the Mixer Tool Bar docked at the top of each project window, or in a separate floating window. |
| Float or Dock Meter Toolbar | toggles between displaying the Dock Meter Bar docked at the top of each project window, or in a separate floating window. |
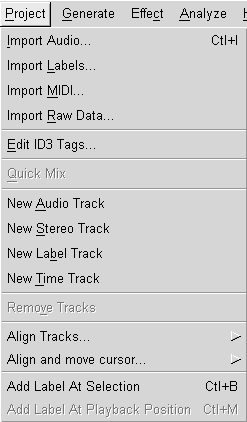
Project
The Project Menu is used to add / remove / align tracks in the existing project :
Generate
The Generate Menu allows you to insert various generated audio elements into a track :
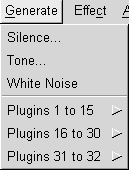
The length of the generated audio is determined by the length of your selection and the position by the left boundary of your selection. If no selection is made, the default length inserted at the cursor position is 30 seconds.
| name | action |
| Silence |
inserts silence. |
| Tone | inserts a wave of chosen type, frequency and amplitude. |
| White Noise | inserts white noise. |
| Plugins |
there are too many plugins to describe here, experiment! |
Effect
The Effect Menu allows you to apply effects to audio. Note : this menu cannot be accessed while any tracks are in Playback or Record mode.

| name | action |
| Amplify | this effect increases or decreases the volume of a track or set of tracks. |
| Bass Boost | this is a smooth filter which can amplify the lower frequencies while leaving most of the other frequencies alone. |
| Change Pitch | changes the pitch/frequency of the selected audio without changing the tempo. |
| Change Speed | changes the speed of the audio by resampling. Making the speed higher will also increase the pitch. |
| Change Tempo | changes the tempo (speed) of the audio without changing the pitch. |
| Click Removal | this effect is designed to remove the annoying clicks on recordings from vinyl records without damaging the rest of the audio. |
| Compressor | compresses the dynamic range of the selection so that the loud parts are softer while keeping the volume of the soft parts the same. |
| Echo | this effect repeats the audio you have selected again and again, softer each time. There is a fixed time delay between each repeat. |
| Equalization | boost or reduce frequencies. |
| Fade In | applies a linear fade-in to the selected audio. |
| Fade Out | applies a linear fade-out to the selected audio. |
| FFT Filter |
you define a curve that shows how much louder or quieter each frequency in the signal should be made. |
| Invert | this effect flips the audio samples upside-down. This normally does not affect the sound of the audio at all. |
| Noise Removal | this effect is ideal for removing constant background noise such as fans, tape noise, or hums. It will not work very well for removing talking or music in the background. |
| Normalize | allows you to amplify such that the maximum amplitude is a fixed amount, -3 dB. |
| Nyquist Prompt | allows you to express arbitrary transormations using a powerful functional programming language (for advanced users). |
| Phaser |
the name "Phaser" comes from "Phase Shifter", because it works by combining phase-shifted signals with the original signal. |
| Repeat | repeats the selection a certain number of times. |
| Reverse |
this effect reverses the selected audio. |
| Wahwah |
just like that guitar sound so popular in the 1970's. |
| Plugins |
there are too many plugins to describe here. Experiment! |
Analyze
The Analyze Menu gives you many options for measuring your audio :
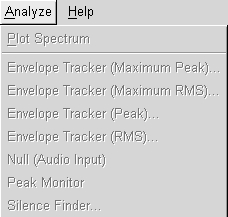
| name | action |
| Plot Spectrum |
displays the Power Spectrum of the audio over a selected region. |
| Envelope Tracker (Maximum Peak) |
|
| Envelope Tracker (Maximum RMS) |
|
| Envelope Tracker (Peak) | |
| Envelope Tracker (RMS) | |
| Null |
|
| Peak Monitor |
|
| Silence Finder |
Marks periods of silence within a selection. |