About Mallard
What Mallard is
Mallard is a markup language used to write topic-oriented documentation that can easily be integrated into a Linux application. You can write and edit Mallard documents with a text editor, but raw Mallard documents can only be displayed instantaneously in Yelp, the GNOME help viewer. However, Mallard documents can be manually transformed to HTML, XHTML and ePUB using Yelp developer tools.
Mallard uses the topic as the basic building block of a help document instead of imposing a top-down order from a table of contents. This focus on topics allows many contributors to help with documenting their modules for users without needing to understand the entire documentation structure. Using Mallard also makes your documentation highly extensible. When an application is updated, new topic pages can be added without changing the structure of the existing documentation. This also allows plugin help to be dropped into place when a plugin is installed.
Topic-oriented documentation is inherently modular, so topics can be re-used in different documents. Each topic is independent and requires little to no background information to write. To make the documentation cohesive, stand-alone topic pages can be associated with background information that a user may want to understand, with a sub-topic, or with further topics that may interest them.
What Mallard is not
Mallard is not designed for reference documentation, and it is not the best tool for writing a novel. It is custom-designed for making topic-based user help attached to GUI software and currently has tools that have been tested and work well under Linux platforms.
Mallard is also not a layout tool for making printed or print-like manuals or books. Although the HTML it produces is clean and effective, Mallard does not handle large amounts of conceptual data well.
About this book
This book is a basic introduction to key Mallard concepts that is intended for user documentation writers, who may or may not also be software developers. When you finish this book, you will be able to build a fully-linked Mallard document and integrate it with your Linux application or transform it to HTML.
To use this book, you should have some familiarity with the following:
- markup languages such as HTML and XML,
- the command line, and
- a Linux operating system.
It would also help (but is not essential) to be acquainted with the GNOME desktop environment for Linux.
This book is not:
- a comprehensive reference for Mallard vocabulary,
- a detailed technical specification of the Mallard language,
- a guide to the GNOME desktop environment for Linux,
- a guide to better technical writing.
This book is designed to be small and accessible, and there are other references for each the above topics, many of which can be found in the Appendix on further resources.
You can help make this book better by suggesting revisions or reporting errors on the Mallard mailing list. See http://projectmallard.org/about/contact to join the list.
Further resources
The Project Mallard website - http://projectmallard.org
The Project Mallard website contains tutorials, schemas, specifications, early drafts of the language, and candidates for adoption as well as information about the project's history and contributors.
The Mallard mailing list - http://projectmallard.org/mailman/listinfo/mallard-list
Join the Mallard mailing list to get help with authoring documentation in Mallard or to become a contributor to the project. See also the mailing list archives at http://projectmallard.org/pipermail/mallard-list/
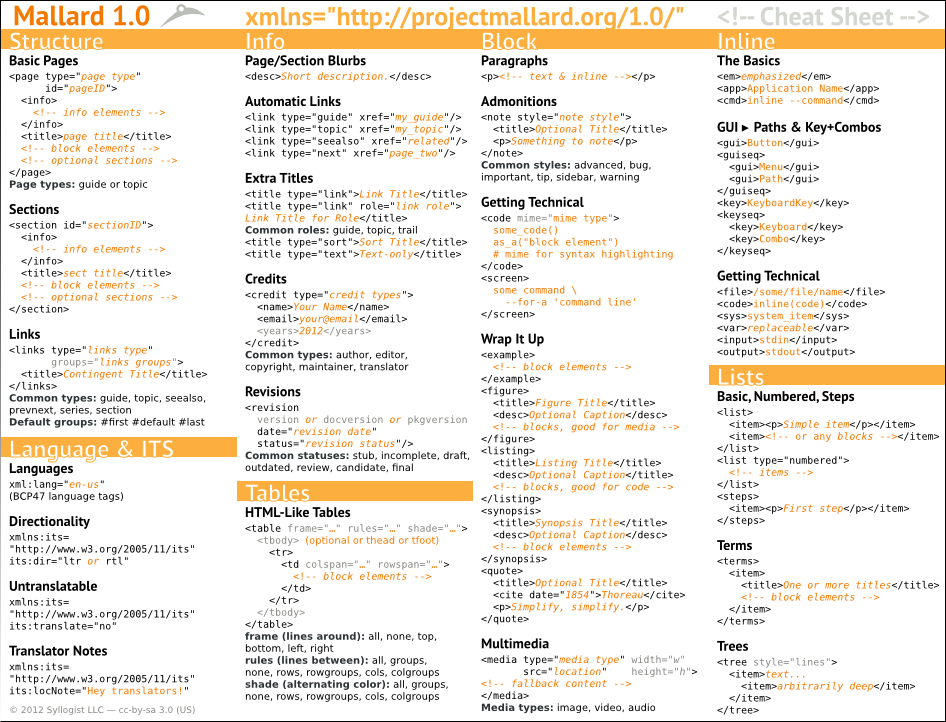
Mallard Cheat Sheet - http://blogs.gnome.org/shaunm/files/2012/01/mallardcheatsheet.png
The Mallard Cheat Sheet lists the key elements of Mallard. It shows you how to create pages, sections, links, and automatic links; how to create paragraphs, lists, and tables; how to include multimedia, code, GUI paths, and key combinations; how to specify languages, language directionality, and translator notes; and how to include meta-information such as page credits, page blurbs, and page revision notes. Plus more: all in one handy page.
GNOME - http://www.gnome.org/
GNOME is a desktop environment and graphical user interface that runs on top of UNIX-based operating systems such as Linux. GNOME is part of the GNU project and is free open source software; Mallard is the preferred system of help documentation for GNOME and for several GNOME applications.
The Gist - http://blogs.gnome.org/shaunm
The Gist: Thoughts on Open Source, Tech Comm, and XML is the blog of primary Mallard developer Shaun McCance. There are several useful posts, including the following:
Freedesktop.org help system specification - http://www.freedesktop.org/wiki/Specifications/help-system/
Yelp, the principal Mallard viewer, uses the freedesktop.org help system specification as the basis for its link URI scheme. The specification describes a link URi scheme for help (Mallard and HTML pages), info and man pages, as well as an override mechanism using the environment variable XDG_DATA_DIRS.
itstool - http://itstool.org/
Translate your Mallard documentation using PO files with itstool. The build system integration of yelp-tools uses itstool to extract translatable strings from Mallard documentation. Use ITS features for finer control over translation of Mallard content.
Basic tutorial
In this tutorial, you will create a simple multiple-page Mallard document for the fictitious Beanstalk application.
Create the first page
Begin making a Mallard document by writing the index.page page in any text editor.
index.page
<page xmlns="http://projectmallard.org/1.0/"
      type="guide"
      id="index">

  <title>Beanstalk Help</title>

</page>
This simple example is a valid Mallard guide page. Taken alone, it is also a valid Mallard document.
The entire contents of the page are between the opening <page> and closing </page> tags. As with all XML formats, every element must either have opening and closing tags or use the special empty tag syntax. We'll see the empty tag below with link elements.
There are three attributes on the page element. The xmlns attribute specifies that the XML tags in this file are from the Mallard 1.0 namespace available at http://projectmallard.org/1.0/index. This must be set on all Mallard pages. The ID attribute provides a unique identifier that other pages can use to link to this page. You should match the ID attribute to the name of the file without the .page extension: so, for instance, the ID of the file index.page is "index". The type attribute specifies that this is a guide page.
View your document
You now have a simple document, but you can only view the raw markup in a text editor. Mallard is just the markup language and a specification of how documents should be processed. To view formatted output, you need to process your document with a Mallard processing tool.
For the purpose of this tutorial, we'll assume you have the GNOME help viewer Yelp installed. You can view this document by calling yelp from the command line and passing it the full path to the directory containing the page files. For example, if you have placed index.page in /home/drake/mydocument/, enter this at the command line:
$ yelp /home/drake/mydocument/
Add a topic page
Unless you are creating a simple set of instructions for a friend or colleague, you probably want to have multiple pages in your document. Add another page to the document by creating a new page file:
planting.page
<page xmlns="http://projectmallard.org/1.0/"
      type="topic"
      id="planting">

  <title>Planting Beans</title>

</page>
Notice that the type attribute is "guide" in index.page and "topic" in planting.page. Since index.page is a guide page, it can have links inserted automatically to other pages. In Mallard, guides don't have to specify which pages they link to. Instead, pages can specify that guides should link to them. Do this by adding a link element to planting.page:
planting.page
<page xmlns="http://projectmallard.org/1.0/"
      type="topic"
      id="planting">

  <info>
    <link type="guide" xref="index"/>
  </info>

  <title>Planting Beans</title>

</page>
The <link> element specifies that this page should be linked to from the guide page <index>, which we created above. This element has no content, so we use the XML empty element syntax, ending the tag with />. The <link> element is inside an <info> element. The <info> element contains various information about a page, including links to other pages.
If you view your document again in Yelp, you will see that the front page now has a link to this page. This is one of the unique features of Mallard. Rather than requiring pages to specify everything they link to, Mallard allows pages to insert themselves into other guide pages. This makes it possible to add pages for plugins and additional functionality without modifying the original source pages.
Add another guide page
You can add additional guide pages to your document. This allows you to organize content to match what your readers are looking for. Add a guide page to link to ways you can use magic beans.
uses.page
<page xmlns="http://projectmallard.org/1.0/"
      type="guide"
      id="uses">

  <info>
    <link type="guide" xref="index"/>
    <link type="topic" xref="planting"/>
  </info>

  <title>Bean Uses</title>

</page>
Like planting.page, this page has a guide link to index. If you view your document in Yelp again, you will see that the front page now has two links.
This page adds a new type of link in the <info> element. Topic links are the inverse of guide links. When a guide page has a topic link to another page, it's as if the other page has a guide link to the guide page. Despite the name, topic links can link to topic pages or guide pages.
If you view “Planting Beans” in Yelp, you'll see it has links at the top and bottom to both “Beanstalk Help” and “Bean Uses”. Adding a page to a guide is like adding it to a section in a traditional linear document, except that pages can be linked to from multiple guides. This allows you to provide multiple ways to navigate to a page to better match how your readers are thinking.
Add content to the topic page
Currently, there's no real content in planting.page. Add content to explain to the user how to plant magic beans. The following example shows a basic paragraph and a step list. See the Core section of this document or http://projectmallard.org/1.0/ for more about paragraphs and step lists.
planting.page
<page xmlns="http://projectmallard.org/1.0/"
      type="topic"
      id="planting">

  <info>
    <link type="guide" xref="index"/>
  </info>

  <title>Planting Beans</title>

  <p>By the end of this page, you will be able to plant your magic
  beans and nurture them into a bean sprout.</p>

  <steps>
    <item>
      <p>Dig a hole 5cm deep.</p>
    </item>
    <item>
      <p>Place your magic beans in the hole.</p>
    </item>
    <item>
      <p>Fill the hole with clean dirt and pat it level.</p>
    </item>
    <item>
      <p>Water daily.</p>
    </item>
  </steps>

</page>
The <p> element is similar to HTML. It creates a simple paragraph. The <steps> element creates a list of steps to follow. Each <item> element is one step in the list, and must contain one or more paragraphs or other block content.
View your documentation in Yelp
To view a Mallard index page in Yelp, type $ yelp index.page at the command line in the directory where your Mallard index page is stored.

Find more tutorials
Find more Mallard tutorials at http://projectmallard.org/about/learn/index.
Build system integration
Autotools integration with yelp.m4
yelp‑tools provides comprehensive integration with Autotools build systems. To integrate with an existing project using Autotools, add the following line to configure.ac:
YELP_HELP_INIT
This adds several checks for tools that are used to build and transform Mallard documentation. Verify that the checks succeeded by looking for the following lines in the output from configure:
checking whether ln -s works... yes
checking for itstool... itstool
checking for xmllint... xmllint
Add build rules for Mallard documentation
To use the integration once the configure checks are in place and have succeeded, you need to add some build rules to a Makefile.am in your project, traditionally help/Makefile.am. A simple Makefile.am for a project with one page called index.page is shown below:
@YELP_HELP_RULES@
HELP_ID = myproject
HELP_FILES = index.page
HELP_MEDIA = media/logo.png
The HELP_ID should match the tarball name of the project, which is usually set in configure.ac. It controls the installation directory, which by default is /usr/share/help/LOCALE/HELP_ID. In this case, the index.page file should be placed in a subdirectory called C, which has a special meaning of having no associated localization. Conventionally, the C locale is understood to be English language.
If you are using images in your documentation, listed after HELP_MEDIA, they must also be inside the C subdirectory and are normally inside a dedicated media directory.
Remember that when adding a new Makefile.am to a project, it must also be added to AC_CONFIG_FILES in configure.ac:
AC_CONFIG_FILES([Makefile.am help/Makefile.am])
Finally, the help directory should be added to the toplevel Makefile.am:
SUBDIRS = help
This simple example already has some quite useful automation. The files listed in HELP_FILES and HELP_MEDIA are installed to the installation directory during make install. Be careful that any files which are transcluded with XInclude are also listed in HELP_FILES, as otherwise those files will not be installed! During make check, the files listed in HELP_FILES are validated against the Mallard schema with yelp‑check validate, so that any tarball release created with make distcheck will have valid documentation included.
Verify the Makefile.am changes by running make install and make check, and checking the output to see if Mallard pages were installed and validated:
$ make install
install -m 644 C/index.page /usr/share/help/C/myproject/index.page
$ make check
xmllint --noout --noent --path C --xinclude C/index.page
Translations
Mallard documents are translated with itstool and portable object (PO) files, which are a standard way of translating messages on Unix-like systems. Fortunately, integration with yelp.m4 hides much of the underlying complexity of the tools. For a project already using the build rules from yelp‑tools, change the directory to where the Makefile.am containing @YELP_HELP_RULES@ is located and run make pot:
$ cd help
$ make pot
This takes the list of Mallard pages in HELP_FILES, extracts the translatable strings and merges them into a PO template (POT) file which will be named HELP_ID.pot, where HELP_ID is the name of the installation directory set with HELP_ID. The POT file contains a list of translatable strings combined with information about the location of the string in files and any comments which the help author may have added.
Integrating translations to the build system
Once a PO file has been created for a particular locale from the template, the PO file can be added to the build system so that the translated documentation can be installed and validated just like other Mallard pages.
The PO file should be named after the locale, formed by combining the two-letter ISO 639 language code with the two-letter ISO 3166 country code and an underscore, for example en_GB for English spoken in Great Britain. Create a directory for the locale, and move the POT file into that directory:
$ mkdir help/en_GB
$ mv myproject.pot help/en_GB/en_GB.po
Once the PO file is in the correct location, add the following line to help/Makefile.am:
HELP_LINGUAS = en_GB
This integrates the British English language translation with the yelp.m4 build process, so that the translations from the PO file are used to create translated Mallard pages during the make process. As with the basic integration, the translated pages are validated during make check and installed in the install directory during make install.
Verify the Makefile.am changes by running make install and make check, and checking the output to see if Mallard pages were installed and validated:
$ make install
install -m 644 C/index.page /usr/share/help/C/myproject/index.page
install -m 644 C/index.page /usr/share/help/en_GB/myproject/index.page
$ make check
xmllint --noout --noent --path C --xinclude C/index.page
xmllint --noout --noent --path en_GB --xinclude en_GB/index.page
An important concern when translating Mallard documentation is that a translation can fail to validate, and this will cause make check to fail with an error.
Comparing Mallard to other tools
There is no perfect tool for everything. Selecting a tool mindfully is a process of understanding your needs and strengths and choosing one that supports your goals. Although it can be used to do other things, Mallard is specifically designed for writing structured, topic-oriented user help.
This table will help you compare Mallard's features with other documentation tools available for Linux systems.
Mallard Feature Comparison
| |
Mallard |
DocBook |
reStructuredText |
LateX |
Lout |
Build system integration
|
yes (autotools) |
no |
yes |
no |
no |
| HTML output |
yes |
yes |
yes |
yes (latex2html) |
no |
| PDF output |
no |
yes (fop) |
yes (rst2pdf) |
yes |
yes (experimental) |
| XML output |
yes |
yes |
yes |
yes (LaTeXML) |
no |
| Automatic back-linking |
yes |
no |
no |
no |
no |
| Page status tracking |
yes |
yes |
no |
no |
no |
| Auto-updating |
yes (in Yelp) |
no |
no |
no |
no |
Context-sensitive help
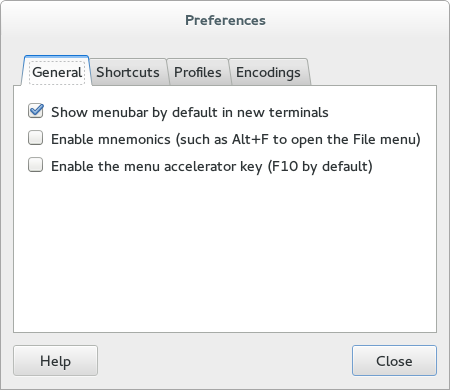
For the most complete integration of Mallard with an application, context-sensitive links can be added to the application that link to pages or sections in documentation. For example, a preferences dialog might have a help button which, when clicked, would open a guide page that links to topics about changing the application preferences.
Implementing context-sensitive help implies certain requirements, such as being able to address specific sections in Mallard documentation and a documentation viewer that is able to understand the addressing scheme.
Help URIs
A linking scheme is required in order to reference specific sections or pages of documentation from an external resource. Mallard does not prescribe a linking scheme, so it is a feature that is dependent on the documentation viewer. Yelp is the principal Mallard documentation viewer, and conforms to the draft freedesktop.org help system specification. An example of a link to the index for the hypothetical myproject project looks as follows:
Link URIs assume that the documentation is installed to the system-wide help directory. While it is possible to override this directory locally, it is not recommended. Refer to the help system specification for more information.
To link to a specific page, add a Unix path separator '/' and the page ID to the URI:
No file extensions are required, as Yelp identifies the extension automatically. Additionally, sections on a page can be linked to by adding the section ID to the end of the URI, prefixed with a '#':
help:myproject/mypage#mysection
You can test the URI by running Yelp with the URI as an argument. For example:
$ yelp help:myproject/mypage
The above command would run Yelp and show the mypage page in the myproject documentation.
Modifying applications to launch help
Given a linking scheme, applications can link from a specific context to the corresponding part of the documentation. An obvious example is linking from a help button in a hypothetical export dialog to documentation about exporting. Assuming an application myproject, with a Mallard page export, the URI might look as follows:
Application support for the linking scheme depends on the underlying toolkit. For applications using GTK+, the gtk_show_uri() function accepts a URI as an argument, and opens Yelp with the given URI. For example, the following line of code launches the default help viewer, generally Yelp, with the URI given above:
gtk_show_uri (gdk_screen_get_default (), "help:myproject/export", GDK_CURRENT_TIME, NULL);
Other toolkits should have a similar function for opening URIs, but the details are outside of the scope of this document. Consult the reference documentation of your toolkit for details.
Example preferences dialog, with help button
Basic concepts
A Mallard help document is composed of several independent pages. Each page is kept in a separate XML file with the file extension .page, or .page.stub for draft files which are not ready to be included in the released documentation.
These pages can be one of two possible types: a guide page or a topic page. The type of page is specified using the type attribute, either type="guide" or type="topic". Every Mallard document requires a front page to serve as an overarching index: this front index page must be a guide page whose filename is index.page.
All pages require a unique ID. For ease of use, the ID should match the page name. For example, planting.page would have the id="planting" attribute on the page. The IDs are used primarily for linking one page to another. You can link two pages to each other or include links to topic pages from a guide page, but you should usually link from inside a topic page.
By default, Mallard will order all topic pages alphabetically on the index page. Guide pages can be nested within other guide pages to create organization on the index page.
Editorial comments
About
You can leave editorial comments for other writers and for later reference, including information about the note. Editorial comments can be printed to a terminal using yelp‑tools or viewed in Yelp using editor mode.
Example
<comment>
  <title>Mallards are dabbling ducks</title>
  <cite date="2009-05-07" href="mailto:drake@example.com">Drake</cite>
  <p>The information in this section is wrong. Mallards are dabbling
  ducks, not diving ducks.</p>
</comment>
Learn more
For more on comments, see the Mallard specification at http://projectmallard.org/1.0/mal_block_comment
Namespaces
About
Namespaces contain a list of elements and their specifications. They serve as disambiguation in a file that might have similar names for elements. You can also use a namespace to identify an element that is not present in the default namespace.
For example, if you want to use the <table> element to describe a physical table as well as the table metadata, you would define each <table> specification in a different namespace. While using the <table> element in your XML page you would use the element along with a reference to the namespace that contains it.
The default namespace
The default namespace for Mallard is at http://projectmallard.org/1.0. It contains all basic elements and their specifications. This namespace alone is probably sufficient for basic and intermediate usage of Mallard.
External namespaces
External namespaces contain specifications for elements that are not present in the default namespace. They may also contain additional specifications for an element that is already present in the default namespace. Commonly-used external namespaces in Mallard include http://projectmallard.org/experimental and http://www.w3.org/2005/11/its.
Each external namespace can be given a short alias which can then be used with the elements it contains.
Example
<page xmlns="http://projectmallard.org/1.0/"
      xmlns:its="http://www.w3.org/2005/11/its"
      type="topic"
      id="external-namespaces">

  <info>
    <credit type="author">
      <name>Wanda</name>
      <email its:translate="no">wandawanda@gnome.org</email>
    </credit>
  </info>
Experimental namespace
The experimental namespace contains new Mallard features that are currently being tested. Not all of these features can currently be viewed in Yelp. You should not use these features unless they are absolutely necessary and only after comprehensive testing, as they may cause display problems in Yelp.
Experimental features include options to:
- highlight sections of the text in another color,
- display images and pages as thumbnails,
- add dynamic glossaries,
- introduce a variety of style elements in the documentation.
Learn more
For more information on experimental features, check out https://wiki.gnome.org/Yelp/Mallard.
Guide pages
Guide pages are navigational guides to topic pages. They are like indexes in books. There is very little actual content on a guide page, since it is merely a container for links to topic pages. A guide page is usually separated into topic-based sections and unordered links that may lead to a topic page or a sub-guide page. Each guide page should be specified with the type="guide" attribute and should (like all pages) be assigned a unique identifier in the id="" attribute that ideally matches the filename of the page. Guide pages list all topic pages in a smaller project or other guide pages and topics in larger projects.
A guide page is the starting point for the reader. It lists all topic pages in a smaller project or other guide pages and topics in larger projects.
Every project must have a special guide page named index.page to generate HTML documentation and to allow the Mallard document to be integrated into your application:
<page xmlns="http://projectmallard.org/1.0/"
      type="guide"
      id="index">

  <title>Beanstalk Help</title>

</page>
Unlike other web or book indexes, Mallard guide pages are always up-to-date. Mallard guide pages normally do not themselves list all relevant topic pages. Instead, Mallard guide pages are informed of relevant topic pages or sub-guide pages by links placed directly in the topic or sub-guide page. This means that there is usually no need to revise a guide page. It also means that if a topic page has yet to be written, the guide page will contain no link rather than a broken link.
You can use several sub-guide pages, that act as landing pages, to help keep the index.page well organized. This is especially useful if you are working with many topic pages.
Mallard in action
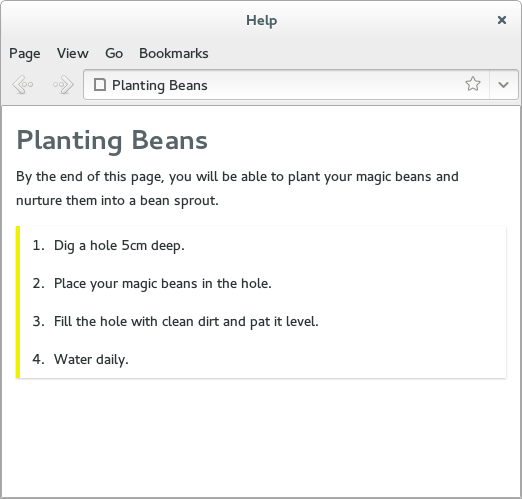
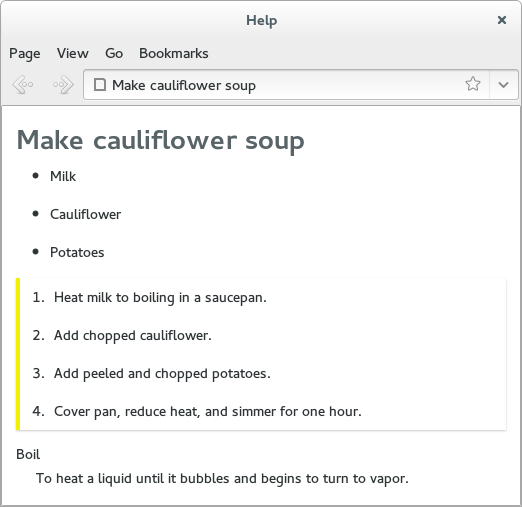
Here is a basic example of Mallard in action. Provided below is the raw Mallard markup for a topic page on planting beans and a screenshot of what that page looks like when displayed with Yelp on a Linux system.
Topic page XML
<page xmlns="http://projectmallard.org/1.0/"
      type="topic"
      id="planting">

  <title>Planting Beans</title>

  <p>By the end of this page, you will be able to plant your magic
  beans and nurture them into a bean sprout.</p>

  <steps>
    <item>
      <p>Dig a hole 5cm deep.</p>
    </item>
    <item>
      <p>Place your magic beans in the hole.</p>
    </item>
    <item>
      <p>Fill the hole with clean dirt and pat it level.</p>
    </item>
    <item>
      <p>Water daily.</p>
    </item>
  </steps>

</page>
Topic page in Yelp help viewer
Information element
About
The <info> element contains metadata about a page or section such as the names of authors and editors of the page, the version number of the package you are documenting, links to any guide pages if necessary, alternative titles and a short description of the page.
The <info> element is the right place to link your topic back to your index. You may then want to add an alternative title, for example a different title to be shown for links to the page.
Use the <revision> element to keep track of which version of the software the documentation was written and when it was last updated.
This is also the right place to license the page and add a short description which will show up in the guide pages which contain the topic.
<info> can be only at the start of a page or section.
Example
<info>
  <link type="guide" xref="index" group="info"/>
  <credit type="author">
    <name>Jack Giant</name>
    <email>jackgiant@gnome.org</email>
  </credit>

  <license href="http://creativecommons.org/licenses/by-sa/3.0/us/">
    <p>This work is licensed under a
    <link href="http://creativecommons.org/licenses/by-sa/3.0/us/">Creative
    Commons Attribution-Share Alike 3.0 United States License</link>.</p>
    <p>As a special exception, the copyright holders give you permission to
    copy, modify, and distribute the example code contained in this document
    under the terms of your choosing, without restriction.</p>
  </license>

  <desc>Include metadata and automatic links for pages and sections.</desc>
</info>
Learn more
For more on the Mallard info element see http://projectmallard.org/1.0/mal_info.
Inline elements
About
You can use inline elements within block elements (such as paragraphs) or within other inline elements to identify names of applications, file names, code snippets, commands, output, GUI labels, GUI sequences, keyboard strokes and sequences, system items, variables, graphics, multimedia objects, and other commonly occurring types of content in software help documentation. You can also use inline elements to create links and spans or to add simple emphasis.
Wrapping this kind of content within an inline element means that the content can be given a distinct style that will give the user a useful visual clue. Even if the content remains un-styled, however, this kind of semantic markup is often very useful for other documentation content producers.
Example
<p>To open a file in <app>Beanstalk</app>, select <guiseq><gui>File</gui><gui>Open</gui></guiseq> from the menu and choose the file you would like to open. If you prefer to use the <app>Beanstalk CLI</app>, you can enter <cmd>beanstalk <var>file</var></cmd> at the command line, replacing <var>file</var> with the name of the file.</p>
Inline links
One of the most commonly used inline elements is <link>. The <link> element takes an xref or href attribute depending on whether you are linking to an internal or external page. For example, you may want to link a <gui> command sequence to a page where it has been described in greater detail. The value of the xref attribute would be the ID of the linked page, while the value of the href attribute would be the URI of the external page. Inline links can also take an action attribute that will perform a particular action when a link is clicked. Links can also be created by putting an xref or href attribute within any inline element.
In the example below, a one-way link is created to the section whose id="open" in the topic page whose id="file_menu".
Inline link example
<p>To open a file in <app href="www.example.com">Beanstalk</app>, <link  xref="file_menu#open">select
<guiseq><gui>File</gui><gui>Open</gui></guiseq></link> from the menu and choose the file you would like to open.</p>
Learn more
For more on Mallard inline elements, see http://projectmallard.org/1.0/mal_inline
Block elements
About
There are two types of block elements in Mallard: basic and formal. Basic block elements include paragraphs, code and interactive shell blocks, media, and examples.
Formal block elements, such as quotes, comments, figures, listings, and notes, can include a title element before the block element content. Some of the formal block elements may also contain descriptions and citations.
Some basic block elements can be inside a formal block element. For example, you can make media elements more prominent by putting them inside a <figure> block. In the example below, the basic block element <code> is inside the formal block element <listing>. Note that the <listing> block includes a title and a description before the <code> block. The <title> element contains a <file> inline element specifying a file name: inline elements will be covered in the next part of this book.
Example
<listing>
  <title><file>index.page</file></title>
  <desc>A first Mallard page</desc>
  <code><![CDATA[
<page xmlns="http://projectmallard.org/1.0/"
      type="guide"
      id="index">
  <!-- Content goes here -->
</page>]]></code>
</listing>
Learn more
For more on block elements, see the Mallard specification on block elements at http://projectmallard.org/1.0/mal_block
Linking pages
About
One of the greatest benefits of Mallard is automatic linking. Pages and sections are able to declare links to and from other pages and sections. Links are added to the <info> element.
Example
<page xmlns="http://projectmallard.org/1.0/"
type="topic"
id="page-create">
<info>
<link type="guide" xref="index"/>
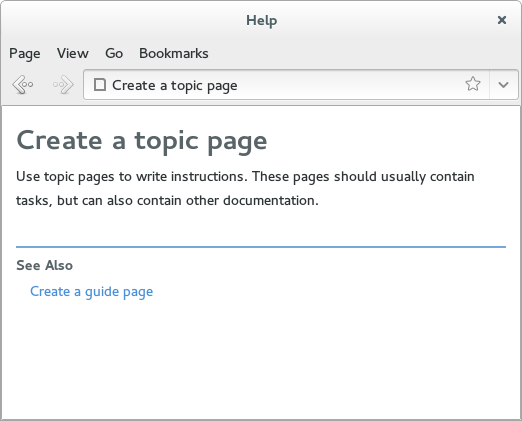
<link type="seealso" xref="guide-create"/>
</info>
<title>Create a topic page</title>
<p>Use topic pages to write instructions. These pages should usually contain tasks, but can also contain other documentation.</p>
</page>
Link a topic to a guide
The most basic type of linking is a topic page linked to a guide page. This is done using a <link> element inside the <info> element of the topic page, which is a type="guide".
Use the guide type when the link is going to point to a guide page. In other words, if you want your page to be listed in a guide page you can include a link to the guide page in it.
This type of linking is very useful as it allows you to add and delete pages without needing to worry about updating links.
If you want to link to a section in the page, you just need to specify the section in the xref. For example, to link to a section in the index which has an ID topics:
<info>
  <link type="guide" xref="index#topics"/>
</info>
Link a guide to a topic
If you prefer a more traditional style linking system, you can add the link to the page on which it appears. These links are still automatic, and will not be shown if the target of the link cannot be found. This is especially useful when creating a pool of reusable content, as any broken links will automatically disappear when the documentation is viewed.
<page xmlns="http://projectmallard.org/1.0/"
      type="guide"
      id="index">

  <info>
    <link type="topic" xref="page-create"/>
  </info>

  <title>Welcome to your application help</title>

</page>
Reference another page
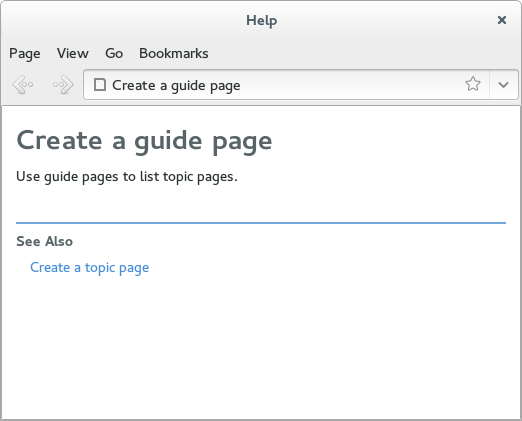
Use seealso type links to link related topic and guide pages. When you use a seealso link on a certain page, it is automatically duplicated on the page to which it is linked. This means that if you use a seealso link to page B on page A, a seealso link to page A is automatically included on page B.
A topic page with a seealso link to a guide page
<page xmlns="http://projectmallard.org/1.0/"
      type="topic"
      id="topic-create">

  <info>
    <link type="seealso" xref="guide-create"/>
  </info>

  <title>Create a topic page</title>

  <p>Use topic pages to write instructions. These pages should usually contain tasks, but can also contain other documentation.</p>

</page>
A guide page with a seealso backlink from a topic page
<page xmlns="http://projectmallard.org/1.0/"
      type="topic"
      id="guide-create">

  <title>Create a guide page</title>

  <p>Use guide pages to list topic pages.</p>

</page>
Learn more
For more about Mallard links, including specifying link groups, setting link order, and creating other kinds of links, see http://projectmallard.org/1.0/mal_links#section
Lists
About
A list is a block element. It can have a title. It contains a number of item elements. List elements allow for nesting of formal block elements such as paragraphs, notes, and other lists.
Basic lists
Lists can be created with the <list> element. The default list is unordered, with list items marked with bullets or other glyphs. Each item in the list should be enclosed in <item> tags, and the content of each item must be enclosed in <p> tags or other block element tags.
Basic list example
<list>
  <item>
    <p>Milk</p>
  </item>
  <item>
    <p>Cauliflower</p>
  </item>
  <item>
    <p>Potatoes</p>
  </item>
</list>
Step lists
The <steps> element will create an ordered list that describes a set of tasks in sequence. Each item in the list should be enclosed in <item> tags, and the content of each item must be enclosed in <p> tags or other block element tags.
Step list example
<steps>
  <item>
    <p>Heat milk to boiling in a saucepan.</p>
  </item>
  <item>
    <p>Add chopped cauliflower.</p>
  </item>
  <item>
    <p>Add peeled and chopped potatoes.</p>
  </item>
  <item>
    <p>Cover pan, reduce heat, and simmer for one hour.</p>
  </item>
</steps>
Terms lists
Use the <terms> tag to create a list of terms along with the corresponding definition of each term. This is useful when you are trying to create a glossary of related technical terms.
Terms list example
<terms>
  <item>
    <title>Boil</title>
    <p>To heat a liquid until it bubbles and begins to turn to vapor.</p>
  </item>
</terms>
Learn more
For more on Mallard lists, see http://projectmallard.org/about/learn/list.
Page descriptions
About
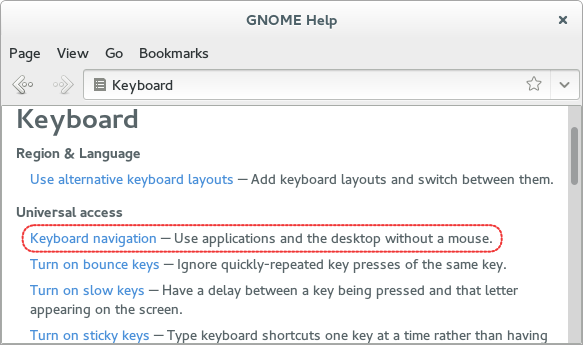
Use the <desc> element to provide a short description for a page or section. This description is generally not shown on the page itself, but is used in automatic links to the page or section.
Examples
Use the <desc> element to show a short description of the topic on guide pages:
<info>
  <desc>Use applications and the desktop without a mouse.</desc>
</info>

<title>Keyboard navigation</title>
Short description of the Keyboard navigation page
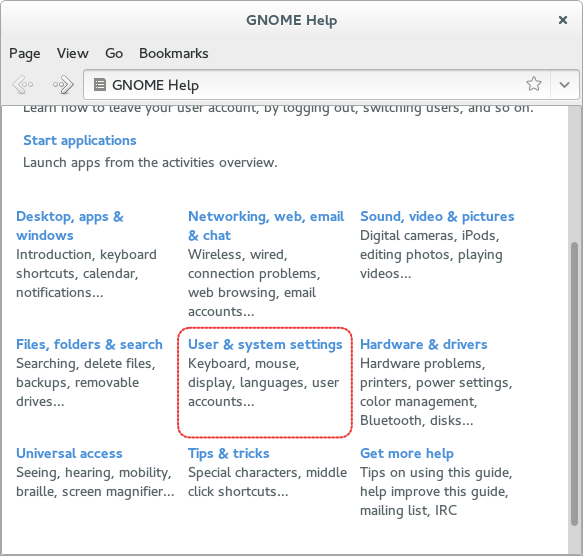
Using <desc> to create links to sub-topics in a guide page:
<info>
<desc>
<link xref="keyboard">Keyboard</link>,
<link xref="mouse">mouse</link>,
<link xref="prefs-display">display</link>,
<link xref="prefs-language">languages</link>,
<link xref="user-accounts">user accounts…</link>
</desc>
</info>
<title>User & system settings</title>
Sub-topics on a guide page
Pages and sections
About
The <page> element is the root or top-level element of a Mallard page file. Every page has to contain it and it cannot occur in any other element. The <page> element must contain an id attribute with a unique argument. It should also contain a type attribute which should specify whether the page is a guide or topic.
Both guide and topic pages can contain sections, defined by the <section> element. These are a prominent logical part of a page or another section. Sections also have unique IDs, which can be linked to directly.
Example
<page xmlns="http://projectmallard.org/1.0/"
      type="guide"
      id="index">

  <title>My application</title>

  <section id="main">
    <title>Main features</title>
  </section>

  <section id="preferences">
    <title>Preferences</title>
  </section>

  <section id="problems">
    <title>Common problems and questions</title>
  </section>

</page>
Learn more
For more on Mallard pages see http://projectmallard.org/1.0/mal_page and for more on Mallard sections see http://projectmallard.org/1.0/mal_section.
Pre-requisites
Tools
You will need the following tools to write effectively in Mallard and integrate the results into your software:
Skills
The following skills will help you write documentation in Mallard. You do not need to be an expert at any of these, but you should have basic understanding of these concepts.
- Familiarity with markup languages, such as HTML and XML. The organization and presentation of HTML content is determined by tags around the text, such as using <p> to identify a paragraph of text. You should know and understand the terms element, tag, and attribute.
- Knowledge of basic command line operation. You should understand what the command line is and be willing to enter commands in it.
Integration requirements
The authoring tools for Mallard are as simple as a text editor, but the build tools depend on other software to make Mallard help easier to maintain. There are three tools required to integrate a Mallard document into your Linux software: the Yelp viewer, the yelp‑tools developer tools for Yelp, and Autotools.
Yelp
Yelp, a GTK+ help viewer, is the most flexible viewer for Mallard documents. It natively views Mallard, DocBook, HTML, man and info documents. It also supports the freedesktop.org help system specification, so that applications which use context‑sensitive help will open their documentation in Yelp. It depends on yelp-xsl at runtime, and currently works only on Linux systems.
yelp-tools
yelp‑tools contains the build tools for Mallard documents, and depends on yelp‑xsl and itstool. yelp‑xsl depends on libxml2 and libxslt. If you do not have the dependencies installed, install the yelp‑tools package using the package manager of your Linux distribution, and the dependencies will also be included. Currently, the yelp‑tools package is not available for OS X or Windows operating systems.
Autotools
An M4 macro is supplied with yelp‑tools and helps with the management of Mallard documentation, translations and validation. To take full advantage of yelp‑tools in your build system, your project must have an Autotools build system.
Projects that use Mallard
A number of projects use Mallard. As Mallard gains users, we hope to add more projects to this page. If you have a project written with Mallard, please notify the Mallard mailing list. You can join the Mallard list at http://projectmallard.org/about/contact.
GNOME
The documentation for the GNOME desktop is written in Mallard and displayed in Yelp. See GNOME user help at https://help.gnome.org/users/gnome‑help/stable/ for an example of the static help. GNOME applications such as Web, Eye of GNOME, Evince and others are documented in Mallard.
Ubuntu
Ubuntu also uses Mallard for documentation. Clicking a help link in Ubuntu brings up contextual help generated with Mallard, and the HTML documentation is created from the same Mallard source. See the Ubuntu HTML documentation at https://help.ubuntu.com/13.04/ubuntu‑help/index.html.
Shotwell
Shotwell is a photograph organization application that uses Mallard to generate its contextual help and user guide. See Shotwell user help at http://www.yorba.org/shotwell/help/ for an example.
Tables
About
Tables in Mallard documents are created using similar syntax to HTML. You can create tables with frames, shading, and rules between rows and columns. You can also have cells that span several columns or rows in a table. A basic table, which is created without using any <table> attributes, will not have table borders, shading or rules that divide rows and columns.
Example
<table frame="all" rules="all">
  <tr>
    <td><p>One</p></td>
    <td><p>Two</p></td>
    <td><p>Three</p></td>
    <td><p>Four</p></td>
  </tr>
  <tr>
    <td rowspan="2"><p>Rows</p></td>
    <td><p>Two</p></td>
    <td colspan="2"><p>Columns</p></td>
  </tr>
  <tr>
    <td><p>Two</p></td>
    <td><p>Three</p></td>
    <td><p>Four</p></td>
  </tr>
</table>

Learn more
Learn more about Mallard tables at http://projectmallard.org/1.0/mal_table.
Topic pages
Topic pages contain actual help content that will address tasks the user is trying to finish and problems the user is likely to encounter. Each topic page should contain only one task, concept or reference item. Topic pages should be the absolute smallest amount of information required to accomplish something. Each topic page should be specified with the type="topic" attribute and should (like all pages) be assigned a unique identifier in the id="" attribute that ideally matches the filename of the page.
A topic page also contains a link back to a guide page. If there is no link back to the guide page, the guide page will not list the topic page. This can be useful, because you can spend some time writing the topic page before you add a link to the guide page. Once the topic page is finished, you can add the link to the guide page and the finished topic page will be listed on the guide page.
A topic page could, for instance, contain an introductory paragraph and a list of steps:
<page xmlns="http://projectmallard.org/1.0/"
      type="topic"
      id="planting">

  <info>
    <link type="guide" xref="index"/>
  </info>

  <title>Planting Beans</title>
    <p>By the end of this page, you will be able to plant your magic beans and nurture them into a bean sprout.</p>

  <steps>
    <item>
      <p>Dig a hole 5cm deep.</p>
    </item>
    <item>
      <p>Place your magic beans in the hole.</p>
    </item>
    <item>
      <p>Fill the hole with clean dirt and pat it level.</p>
    </item>
    <item>
      <p>Water daily.</p>
    </item>
  </steps>

</page>
Topic pages should fit on your computer screen. If your topic is very long, you may wish to create a guide page for it and split the long topic page into a number of shorter topic pages. If you find yourself having to use more than two heading depths in a topic page, consider that you may have more than one topic.
style attribute
About
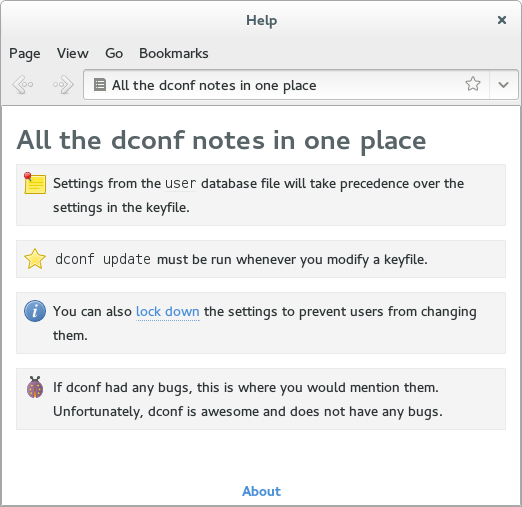
The style attribute takes a space-separated list of styling hints. The display tool parses those hints to style the text as it is presented to the reader. Any displayable Mallard element can have a style attribute.
Examples
  <note style="info">
    <p>Settings from the <code>user</code> database file
    will take precedence over the settings in the keyfile.</p>
  </note>

  <note style="important">
    <p><cmd>dconf update</cmd> must be run whenever you modify a keyfile.</p>
  </note>

  <note style="tip">
    <p>You can also <link xref="dconf-lockdown">lock down</link> the
    settings to prevent users from changing them.</p>
  </note>

  <note style="bug">
    <p>If dconf had any bugs, this is where you would mention them.
    Unfortunately, dconf is awesome and does not have any bugs.</p>
  </note>
Note styles as displayed in Yelp
Titles
The <title> element is used to mark up the title for a <page>, <section>, <list>, <table> or formal block element.
Primary title
The primary title of a page or section is the one specified in the block context and used for display purposes. While this title is not an informational title, it is used as fallback for all informational titles.
<page xmlns="http://projectmallard.org/1.0/"
      type="guide"
      id="index">

  <title>User help for my application</title>

</page>
Informational titles
Informational titles are used to specify alternative titles for pages or sections, and appear inside the <info> element of each. The type attribute specifies the purpose of the informational title, and can be link, sort or text.
link
Link titles are used as alternate title text for automatic links. Pages and sections can have multiple link titles, up to one for each type of backlink. When automatic text must be generated for a <link> element, it is taken first from the link titles, falling back to the primary title if no suitable link title is found.
If you do not specify a role for the link title, it will be used for all link types.
<page xmlns="http://projectmallard.org/1.0/"
      type="guide"
      id="index">

  <info>
    <title type="link">My application help</title>
  </info>

  <title>User help for my application</title>

</page>
If you want a specific link title to be used only for a guide, topic, seealso, series or trail, you can specify it in the role:
<page xmlns="http://projectmallard.org/1.0/"
      type="guide"
      id="index">

  <info>
    <title type="link" role="seealso">Application help</title>
  </info>

  <title>User help for my application</title>

</page>
sort
Sort titles allow you to specify an alternate title to be used when sorting the page or section. This is useful for excluding leading articles such as “an” and “the”.
<page xmlns="http://projectmallard.org/1.0/"
      type="guide"
      id="index">

  <info>
    <title type="sort">Application help</title>
  </info>

  <title>User help for my application</title>

</page>
text
Text titles are used wherever a plain text string without formatting is required. This is useful for window titles or labels in user interfaces where formatting and inline images are difficult or impossible. This is particularly useful when a title contains an image with fallback text, but you do not want the fallback text to appear in places such as window titles.
<page xmlns="http://projectmallard.org/1.0/"
      type="guide"
      id="index">

  <info>
    <title type="text">Application Help</title>
  </info>

  <title>This is the primary title</title>

</page>
Learn more
For more on Mallard titles, see http://projectmallard.org/1.0/mal_block_title and http://projectmallard.org/1.0/mal_info_title.
XInclude
About
XInclude is a mechanism for merging one XML document into another, which is particularly useful if you reuse the same text in a number of pages. Mallard offers full XInclude support.
You must have a complete and validated file to be included. In the container file, use the include tag to add the file name of the included file and the namespace XInclude, from the URL http://www.w3.org/2001/XInclude.
For build integration, you must add the included file to the Makefile.am.
For example, you can place your license in a separate document and include that file in all of your pages.
Examples
index.page
<page xmlns="http://projectmallard.org/1.0/"
      type="guide"
      id="index">

  <info>
    <include href="legal.xml" xmlns="http://www.w3.org/2001/XInclude"/>
  </info>

  <title>Write Mallard help</title>

</page>
legal.xml
<license xmlns="http://projectmallard.org/1.0/"
         href="http://creativecommons.org/licenses/by-sa/3.0/">

  <p>This work is licensed under a
  <link href="http://creativecommons.org/licenses/by-sa/3.0/">Creative Commons
  Attribution-ShareAlike 3.0 Unported License</link>.</p>

</license>
Yelp tools
yelp‑tools is a software package of tools which can be used to build the Mallard document and run validity checks. Even though it is named yelp‑tools, this package is not dependent on Yelp, the viewer.
All the commands which are a part of yelp‑tools can take either a single file, a list of files or a directory as an argument.
yelp‑build
yelp‑build is a tool which transforms Mallard pages into other formats. Currently supported formats are:
The generated output can be used in your project or distributed in some other way. For example, the HTML output can be hosted as a static website.
yelp‑build html and yelp‑build xhtml
yelp‑build can output Mallard documents to HTML or XHTML. The filenames for the exported files are taken from the page IDs of the corresponding Mallard files regardless of the actual names of the Mallard files. For the following examples, yelp‑build html will be used. yelp‑build xhtml works in exactly the same way.
You can pass yelp‑build html a list of page files or a directory that contains all the page files.
$ yelp-build html index.page foo.page bar.page
$ yelp-build html .
The generated output will be self contained, meaning that only the pages that you pass to yelp‑build will be included and linked to. If you want to include links to pages which you are not building, you need to generate a cache which includes them and pass it to yelp‑build.
By default, the exported HTML files are stored in the current working directory, but you can also use the ‑o option to specify an output directory of your choice. The ‑o argument also exports any image and video files enclosed within media elements in the help pages.
$ mkdir html_out
$ yelp-build html -o html_out .
yelp-build epub
yelp‑build can output Mallard documents to the Electronic Publication (ePUB) format. The output file is named index.epub by default but you can use the ‑o option and specify a different output filename.
$ yelp-build epub help/ -o book.epub
yelp‑build cache
A cache file of the whole document or some of the help pages can be used by other tools. For example, if you want to generate HTML only for a guide page, but you want it to show the links to all the topics which are on it, you will need to create a cache of the topics and pass it to yelp‑build when you generate the HTML.
A cache file is necessary to build other formats from Mallard documents. Cache files are generated automatically when you build Mallard documents in other formats, but yelp‑build can also explicitly generate cache files.
$ yelp-build cache *.page
yelp-check
yelp‑check is a tool that helps validate Mallard documentation. It can find broken external and internal links, files that have unmatched page IDs and filenames, orphaned pages and it can validate the XML in the pages against a Relax‑NG schema. It can also display any editorial comments the revision status status of a page.
All of the yelp‑check tools can take individual pages or a directory of pages as an argument.
yelp‑check comments
The <comment> element in Mallard allows you to embed editorial notes in the XML. Mallard comments are printed with the page name and section ID that contains them, the author of the comment and the date on which the comment was made, which are taken from the <cite> element.
yelp‑check links and yelp‑check hrefs
yelp‑check links verifies that all internal (xref) links are valid. If the value does not correspond to an actual ID in the document, yelp‑check links prints the source and target of the link. If you pass only a set of pages, yelp‑check links will only know about those pages, and will report links as broken if they point to pages which you are not validating. You can also supply a Mallard cache file that contains all the pages in the document and pass this to yelp‑check orphans with the ‑c argument when validating individual pages.
yelp‑check hrefs checks for the validity of external links. You will need to be connected to the internet for external links to be verified.
yelp‑check ids
yelp‑check ids is useful to check if the Mallard file names match their corresponding page IDs. It is not mandatory for these to match, but it's generally considered a best practice.
yelp‑check orphans
Topic pages should be accessible from other Mallard pages. yelp‑check orphans finds pages which are not linked to from other help pages.
As with other yelp‑check tools, if you pass only a set of pages, it will only know about those pages, and will probably report many false positives. You can also supply a Mallard cache file that contains all the pages in the document and pass this to yelp‑check orphans with the ‑c argument when validating individual pages.
yelp‑check status
yelp‑check status outputs the current progress status of different Mallard page files, taken from the status attribute of the <revision> element.
When a page has more than one <revision> element, the one with the latest date attribute is chosen. If the latest revision element has no status attribute, or if there is no revision element, the status is "none".
yelp-new
You can generate Mallard pages with basic structure using yelp‑new. To generates pages from default templates you need to specify the type of page and the page ID. You can also generate Mallard pages by supplying your own custom templates. This is useful when many of your pages have a common layout. Template files can be installed with yelp‑new or you can keep them in your working directory. To create your own template, create your .page template, then append .tmpl to the filename.
Yelp
Yelp is the GNOME help viewer. It is the default Mallard viewer, but it can also display DocBook, info, man, and HTML documentation. Yelp is a good viewer for documentation with external links because complies with the freedesktop.org help system specification. It can be used easily across many Linux distributions, but may not work on other platforms, such as OS X or Windows.
Editor mode
Yelp has a mode for assisting authors who edit Mallard documentation. To start Yelp in editor mode, run it with the ‑‑editor‑mode argument:
In editor mode, Yelp shows information relevant to editors alongside elements. For instance, information from the <revision> element is shown at the top of pages and alongside any links to those pages. Another useful addition is that editorial comments, added with the <comment> element, are shown inline and formatted with a background that makes them highly visible.
Yelp in editor mode

An important difference when Yelp is in editor mode is that stub pages, specifically those with a file extension of .page.stub, are included and shown in the document. When Yelp is not in editor mode, stub pages are not shown, so you should turn editor mode off for final testing of your documentation.
Automatic updating
Yelp has no refresh button, but the view is automatically refreshed when a document, or any other file in the document directory, changes. This generally works very well, but occasionally can cause Yelp to crash if the document being edited is not valid Mallard. Be sure to use yelp‑check validate frequently!