


Get Set Up
Now that we know all of the background and support information, let's set up a basic install of OpenMRS on your system!
Java Version Check
Before we get started, check that you have the Java Development Kit (JDK) installed. Open up a console/terminal and enter:
|
You should see output like this:
javac 1.7.0_45
Note: Java 1.6 or above is required to run OpenMRS. If you plan to use the OpenMRS Software Development Kit (SDK) installation, Java 1.7 or higher is required. (See below for more information on install options.)
If you do not have similar output to what is shown above, it means that you are missing the JDK, so go ahead and install it. Below is a list of external tutorials for installation, based on your platform.
| Windows | http://www3.ntu.edu.sg/home/ehchua/programming/howto/JDK_Howto.html#zz-1. |
| OS X | http://www3.ntu.edu.sg/home/ehchua/programming/howto/JDK_Howto.html#zz-2. |
| Linux | http://www.webupd8.org/2011/09/how-to-install-oracle-java-7-jdk-in.html |
Choosing an approach
There are several options for installation, so reach through each one and decide which is best for you.
If you're getting started, we recommend trying the OpenMRS SDK, which comes with a complete environment for using OpenMRS. This means that you won't need to have much else on your system installed other than Java. This is the easiest and quickest path to getting OpenMRS running so that you can start developing modules.
The OpenMRS Standalone Application bundles OpenMRS with Tomcat and MySQL which will be ready to run by simply running the standalone JAR file. The Standalone does not bundle Maven, so you'll need to run and install the Maven Module Archetype yourself to begin creating new modules. If you're planning to work on a pre-existing module, rather than creating a new module, then the Standalone may be a good option for you.
If you want to develop code for the OpenMRS core application, you should use a manual install. The SDK and Standalone only include binary versions of the code, so getting your own development environment set up is necessary if you want to be a core developer.
OpenMRS SDK installation
Download and install
It's time to download your operating system's compatible version of the OpenMRS SDK installer:
NOTE: Unlike the manual setup which requires Java 1.6 and above, if you decide to use the OpenMRS SDK, Java 1.7 or above is required. Java 1.7 is required only for running the SDK installer, but not for OpenMRS itself.
You will require administrative privileges on your operating system to install the SDK, so make sure that you have those privileges associated with your user account. Consult your operating system documentation if necessary.
The SDK installation itself has very few steps. Once you've downloaded and run the installer, wait for the installation to finish then check to see if the SDK is working. To do so, open up a terminal window or command line console and type the following:
omrs-version
|
The output it gives, should be similar of that below:
OMRS Version:    1.0.7
OMRS Home:       /Applications/omrssdk-1.0.7
ORMS Scripts:    /Applications/omrssdk-1.0.7/bin
OMRS Maven Home: /Applications/omrssdk-1.0.7/apache-maven
--------
Apache Maven 3.1.0 (893ca28a1da9d5f51ac03827af98bb730128f9f2; 2013-06-27 19:15:32-0700)
Maven home: /Applications/omrssdk-1.0.7/apache-maven
Java version: 1.7.0_45, vendor: Oracle Corporation
Java home: /Library/Java/JavaVirtualMachines/jdk1.7.0_45.jdk/Contents/Home/jre
Default locale: en_US, platform encoding: UTF-8
OS name: "mac os x", version: "10.8.5", arch: "x86_64", family: "mac"
If that is the case, you have successfully installed the OpenMRS SDK!
If you're having trouble, take a look at the SDK documenation on the OpenMRS Wiki at https://wiki.openmrs.org/display/docs/OpenMRS+SDK for more assistance, or join the #OpenMRS IRC channel for help.
Run OpenMRS locally
Within the module that you just created, you can choose to run OpenMRS with an Embedded Database to test the module you are working on. This command will create an openmrs-project directory in your current directory, and then launch the web server.
omrs-run
OpenMRS is now fully running on your computer at http://localhost:8080/openmrs and can be tested. Log in with the following credentials:
- User: admin
- Password: Admin123
Troubleshooting
If you have issues on the run phase, please make sure you are using Java 1.7. If you have Java 1.7, but the omrs-version output is showing your Java version as 1.6, you should do type the following to update your JAVA_HOME directory:
export JAVA_HOME=$(/usr/libexec/java_home)
To verify, type:
echo $JAVA_HOME
You should see a response including feedback like jdk1.7.0_45.jdk. Setting the JAVA_HOME environment variable should tell omrs-version which version of Java to use.
More detailed documentation and troubleshooting help can be found on the OpenMRS Wiki at https://wiki.openmrs.org/display/docs/OpenMRS+SDK or try IRC for a great place to ask for help!
Standalone Setup
OpenMRS Standalone is a great way to evaluate and explore OpenMRS capabilities. It may also be useful for small-scale production environments. The best place to learn about the standalone in full is on the OpenMRS Wiki at https://wiki.openmrs.org/display/docs/OpenMRS+Standalone but we'll go through the set up here too.
Step 1: Download OpenMRS Standalone from http://openmrs.org/download/ and unzip the downloaded file.
Step 2: Execute the JAR file in that folder. You can do this by typing the following in the terminal/command line:
java -jar openmrs-standalone.jar
You can add the -commandline switch to make it run in full command-line mode:
java -jar openmrs-standalone.jar -commandline
Be careful not to delete or rename folders after decompressing the standalone package! They are used by the standalone JAR file and need to be in their exact locations for things to work correctly.
Step 3: OpenMRS will configure itself the first time it is run. The initial setup installer will offer an option to install a demo concept dictionary, the demo concepts plus demo patient data, or no demo data.
Step 4: After running the standalone jar, it will take you to the OpenMRS log in web page where you can log in with the following default username and password:
- Username: admin
- Password: Admin123 or test
The MySQL database has these credentials by default:
- MySQL username: openmrs
- MySQL password: Randomly generated during initial startup. Look in the
openmrs-runtime.propertiesfile for the value ofconnection.password.
You now have a local copy of OpenMRS running with both an embedded database and a web server! At any time, you can upgrade the standalone version. Check out the wiki for details on how to do this: https://wiki.openmrs.org/display/docs/Upgrading+OpenMRS
Manual Installation
Set up MySQL
You must have a MySQL database set up for OpenMRS to be installed successfully. To point your OpenMRS project to the database, should either know your MySQL root password, or have a database schema pre-configured and ready with a username and password to provide during the OpenMRS setup. More information about installing and setting up MySQL is available at: http://dev.mysql.com/usingmysql/get_started.html
Set up Maven
Ensure that you have Maven installed and configured to support building OpenMRS software. You can use the instructions at: http://maven.apache.org/guides/getting-started/maven-in-five-minutes.html
Set up Git
Ensure that you have installed and configured Git for source code management. You can use one of the following relevant instruction pages:
- http://help.github.com/mac-set-up-git/
- http://help.github.com/win-set-up-git/
- http://help.github.com/linux-set-up-git/
- http://git-scm.com/book/en/Getting-Started-Installing-Git
Get the core source code
You must clone the openmrs-core repository on GitHub using your Git client in order to start working on the project. In a directory that you keep your code in, run the following:
git clone https://github.com/openmrs/openmrs-core.git

cd openmrs-core
You are now in the main working source code directory for OpenMRS.
More detailed steps are necessary if you are checking out OpenMRS code to fix a particular ticket. Please refer to Git instructions listed under the Development process on how to check out the required source code.
Compiling your code
Compile the source code to be able to run it. First make sure that you are in the top-level openmrs-core directory, then run:
mvn clean install
This will take a few minutes, while it downloads dependencies and builds OpenMRS. Make sure you are connected to the Internet so Maven can download the necessary dependencies from our repositories.
Start the OpenMRS Webapp
To run the code, you have to start the webapp. The OpenMRS source code contains a dependency to the Jetty server, so you can start the application by running a simple command. to do so, complete the following steps:
cd webapp

mvn jetty:run
Now you may access OpenMRS using the url http://localhost:8080/openmrs. This should let you run a wizard which will guide you through setting up your database. The Wizard will allow you to configure you instance in a number of ways, and offers multiple options to help you point to what datbase you want to use, and what data you wish to include by default.
NOTE: If you run into issues with Out of Memory exceptions from Java, try running:
export MAVEN_OPTS="-Xmx1024m -Xms1024m -XX:PermSize=256m -XX:MaxPermSize=512m"
Then run Jetty again using the command above. This should increase the effective memory of the running Java Virtual Machine, thereby preventing the re-occurrence of this error.
Conclusion
You've now installed OpenMRS on your computer. You're ready to learn about developing.
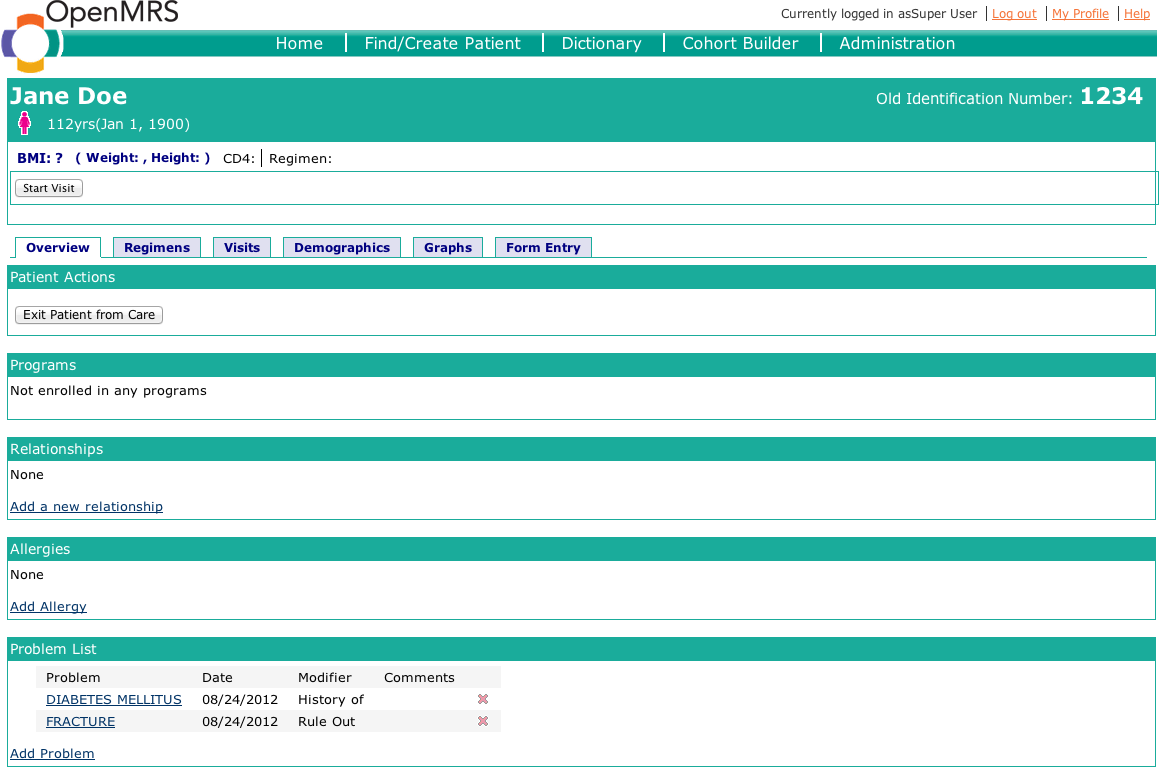
A patient dashboard in v 1.x