


Sharing and Archiving your Work
The process of archiving your video projects is a subject which merits its own guide. The group Witness have great resources in this area and are working to create more.1"Archiving means collecting, organising, describing, preserving, and providing access to materials of evidential, historical, cultural, or other value". WITNESS lists some of the uses of archiving as follows:
- To create alternate or updated versions of your video
- In your future video advocacy campaigns
- As evidence in legal proceedings
- By other human rights defenders
- By news organizations reporting on your issue
- As an educational or research resource; part of our historical memory
Balance authenticity and organisation
We can divide the uses of archiving above into two main areas, evidence archiving and technical archiving, as we need to take different approaches to both. Archiving for legal reasons aims to leave the original footage from cameras and phones as untouched as possible to make authenticity easier to verify. When archiving for re-editing check that your archiving solution will be create files that are easy to reuse and migrate.
Think about your archiving medium and redundancy
If possible, don't archive to only one place. If your optical disks (DVD, CD, Blue-Ray) decay or the the hard drive fails it is good to have 'redundancy', which means a back up in another locations. Archiving onto good quality hard drives with in-built redundancy is a great option. If you are unable to afford this, archiving to more than one DVD is a cheaper, if slower, solution.
Video metadata and archives
Metadata can be stored as part of most files (avis are poor at this). Your archiving system is likely to create lots of metadata - which is text data about your video file. This may include where it was shot, contents, subtitles, publisher, camera person, editor, where to find out more information. Presenting this data along with your video is key to helping people to take action as it acts as vital evidence.
Other tips on archiving
Archiving can seem like a big responsibility to take on. Don't be intimidated. It is better to do some archiving than none at all. Here are some tips:
- If you rename video file names, keep the original camera generated file name in the title
- Try to find a partner organisation with resources to help you archive your work
- Try to make archiving part of your publishing process and you can make your rendering methods create multi-purpose videos: for example create a high quality video for upload to a video sharing site that you then also use as an archive file.
Hands On: Moving your project to another computer
The easiest way to move all files to another computer is to use an external hard drive. To do this plug in an external hard drive to your computer and copy all files in your project directory into a folder on the external hard drive. It is very important that all files in your project are inside your Project folder.
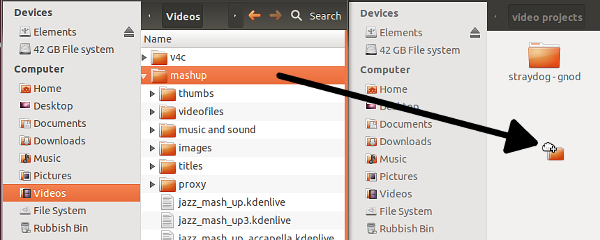
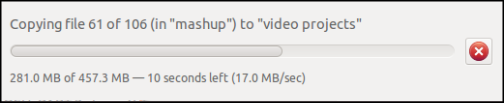
Video files can be big so the transfer may take some time.
Plug in your hard drive to another computer with the same version of the same video editing software. Copy across the project folder to the new computer or leave it on the hard drive if you want to.
Open up your video project on another computer. If you have copied the project folder so that it is in a similar location on the new computer as on the older one - say in the Videos directory - the project may open up ok with no errors. If not there may be a Clip Problems pop up window.
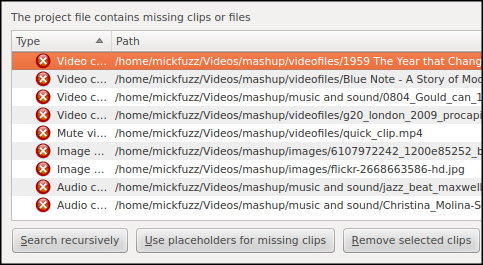
If this occurs, don't panic, click on Search Recursively.
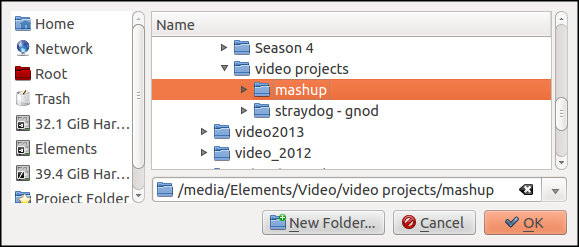
Browse to the new location for your Project Folder and click on Ok.
The error icons on your window should turn to ticks.
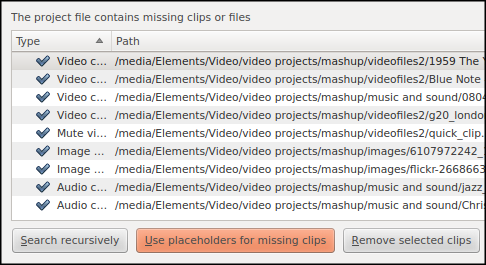
Click on the OK button option.
You may now see some messages asking where the if you want to create a new Project folder / directory. Click yes to this. But then remember to re-set this correctly in Project > Project Settings > Project folder option in the menu.
Transferring your skills: The same technique and knowledge should allow you to transfer projects using any video editing software. In many the process should be slightly easier as you will not have to reset the Project folder option.
Hands On: Compressing and archiving to disk
If you need to use DVD disks or similar there are some additional steps to take. We will compress your project folder to a single file, this process makes it easier for us to know that we have transferred all the project files when we are archiving or migrating the project.
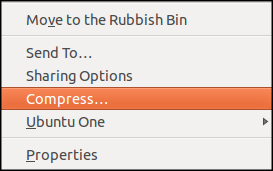
Browse to the folder in your file manager. Right click the folder and select Compress from the options.
Give the compressed file a recognisable name and select .7z from the list of file types.
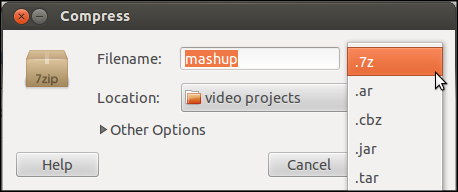
If you don't have the option 7z available then you may need to install the p7zip application from the Software Centre or by using the following command.
sudo apt-get install p7zip-full
 The capacity of a DVD disk is 4.7 Gig so to be save let's split our file in to chunks of 4.5 gigs or roughtly 4600 Mbs.
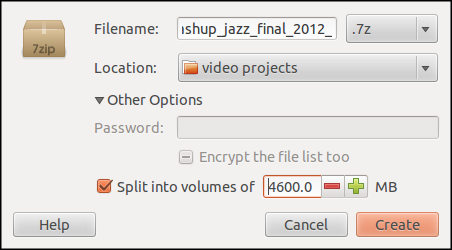
You should then have a list of files which you can archive to different DVDs. Be careful to store these securely together as you will need all of them to uncompress the project again.
Transferring your skills: The same effect of splitting your archived project into different files suitable for burning on to disks is available using different software on different operating systems try 7zip in Windows or Keka for Mac.
Hands On: Export your project to a compatible file type
There are many options for archiving your project files. In other parts of the guide we have looked as using mp4 files with the H.264 profile. To archive our project as a file we can repeat the process but use a higher video and audio Bitrate to make sure that there is little quality loss.

The above settings should be fine for archiving your work. If you want to be extra careful not to lose detail in your video you can double the settings to;
Video: 50000
Audio: 500
Transferring your skills: DV AVI files were the default file type for capturing DV tape footage onto PCs. it is still supported as a format by nearly all video editing applications. As such, it may be a good option to share your work. There is help to create DV AVI files in the section on video file types.
- http://www.witness.org/how-to/curriculum/documenting-and-archiving-file-based-video^