


Saving and Exporting your Work
If we have created a project that we want to share or to save to be revised at a later time, there are two things that we need to do. The first is to save our project and the second is to export the project to a video file for previewing or sharing. These are two similar but separate processes.The difference between saving your project and exporting a file
When we talk about saving a video project we are talking about saving the work in a way that will allow us to come back and change it later. In other chapters we talked about multi-track editing and applying effects. In order to save our project together with the tracks and effects we have we have made in a way that allows us to change it at a later date, we will need to save a video project file.If we want to share the our video, for example, put it on the Internet, then we should export our work to a single video file that can be played on a video playing application. Video playing applications include programmes like VLC player, mplayer and window movie player. These applications can often play many different kinds of video files but they are not not able to play video project files. This process is called exporting or rendering.
While different video editing programmes have different formats for saving and exporting your work in project form, the same principles apply. In this example we will learn to save our file to a Kdenlive video project file. It has the file extension .kdenlive. We can compare this to programmes like Premiere which uses a file extensions .prj, or with Final Cut Pro which use .fcp
We will learn more about projects, file types and the difference between video files and projects in other sections of this guide. In this section we will save our project as a .kdenlive file for re -use later, as an low-quality mp4 for sharing via the Internet and finally as a high quality mp4 file for a use at a film screening.
Hands On: Saving a project file
Saving your project files is something that you should do as soon as you create it. In this way if you save your work regularly then you are unlikely to lose work if you computer crashes or loses power.
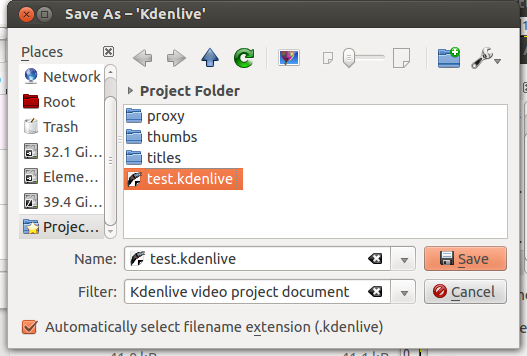
To save the project file for the first time, select File > Save As from your menu.
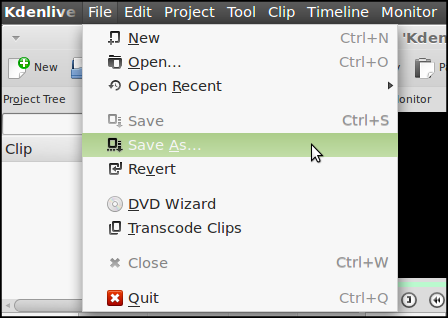
Save the file in the default, Project Folder suggested to us.
It is a good idea to find out more about projects to make sure you don't lose your work by accident. To do this find out more about understanding video projects in the relevant chapter of this guide.
About exporting video projects to video files
When you have a project ready to share, first save the project file, then click on the Render button at the top of your editor.

After clicking the Render button you will be presented with many options for the kind of files you can make. The way these options are displayed is different between different video applications. Some restrict your choices to make it simpler and others give you a lot of flexibility.
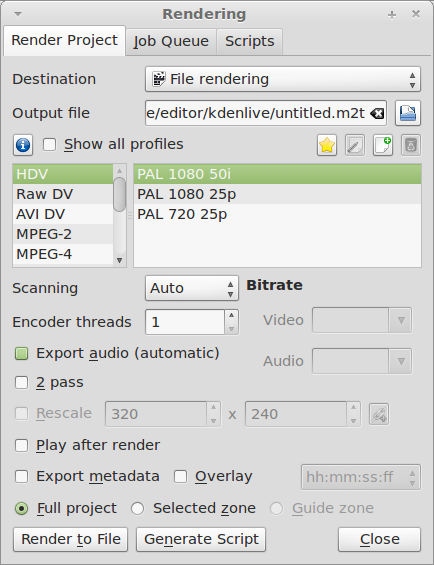
Often the export options give you recommended presets (also called profiles) which you are able to change if needed. This is the case with Kdenlive. We should be able to do everything we need with the available profiles. However sometimes the presets do not work or give us the results we need so it is good to know how to alter them.
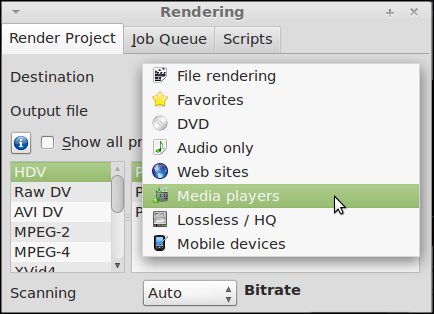
To choose different options and presets we can use the Destination option to choose one of the following:
File Rendering: The most complete set of options for exporting.
Favorites: It is possible to save your preferred export settings so they appear here.
DVD: Save as a DVD compatible format.
Audio Only: Save only the audio of the project.
Web sites: Save as a format optimised for some video sharing websites.
Media Players: To be optimised in Windows Movie Player or Quicktime Player.
Lossless / HQ: High quality files suitable for archiving.
Mobile Devices: Smaller files suitable for mobile phones and tablets.
Hands on: Exporting a small video file
We will create a small file for sharing on the Internet and learn how to export part of the project to test our outputted file. When you are happy with the project in your Timeline click on the Render button.
To create a small file for quick sharing, we will use a preset for a mobile device. Select Mobile Device from the Destination drop down menu.
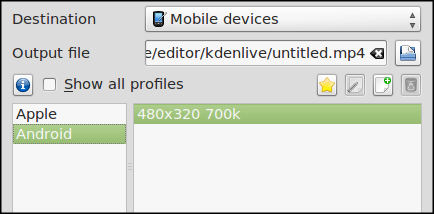
Select Android in the left profile window and select 480 x 320 700k in the right profile window.

Give your target output file a suitable name, make a note of where it is being saved in the Output File box and click on Render to File without changing any other settings.
Now browse to the folder where the file was saved and open it up in a Media player like VLC. In this case it should be a relatively small file of about 1Mb per 10 seconds of video which is very suitable for sharing on the Internet or in other ways where a smaller file size is an advantage.
Troubleshooting / Alternative method
If for some reason you cannot play the file using the method just described. Then we need to adapt. Try the process with the settings below. We will not choose a preset profile to create a small file but instead alter the settings for the MPEG-4 profile default.
Select the following settings in the Render Project Tab after clicking on the Render button.
In the list of profiles in the left. Select MPEG-4 and fill in the values of the form to match the settings and the screenshot shown below.
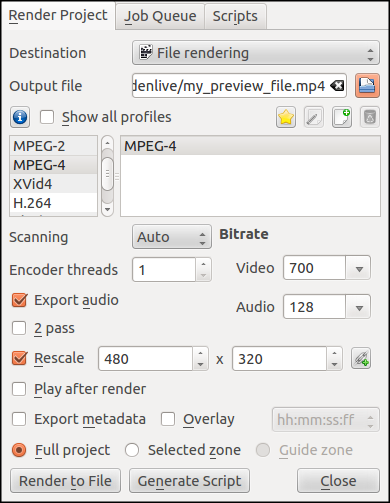
Destination: File rendering
Output file: a suitable file name
Bitrate Video: 700
Bitrate Audio: 128
Export Audio: ticked
Rescale: ticked [values 480 x 320]
Full project: selected
Click on Render to File. Check your output video file in a media player. By filling out the values above we are mirroring the settings needed to create a small file suitable for storing on a phone or sharing quickly via an Internet connection with low bandwidth.
Mapping your knowledge: If you are using different video editing software, you should be able to use similar settings to the above to export a file for this purpose.
Hands On: Exporting a test section of your project file
If we have a long project then the process of rendering the video can take a long time. In order to check if the profile and export settings we are using are suitable we can render just part of the project as a test.
To do this we need to select a zone of the project Timeline. A suitable area for a test would be an area where there is a lot of movement. Select 10 seconds or 30 seconds by clicking on the green zone just above the timeline and below the time in minutes and seconds.
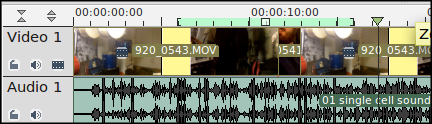
When you hover over the edge of the green area a time shift icon should appear.

 Click and hold down your mouse and move it to the left or right to adjust the size of the zone that you are selecting.
Follow instructions above process above to Render your file but be sure to tick the option for Selected Zone before clicking on Render to File.

Now use your file manager to browse to your video file and and to check how large the file size is. View it with a media player like VLC or your default media player to see if it is high enough quality for our purpose (film screening, previewing on the Internet). 10 seconds or 30 seconds are good lengths to select, as you can then easily calculate how big your final video file will be. If a 30 second zone becomes a 5Mb file, then your three minute project will encode to a 30Mb video file.