


Data Entry
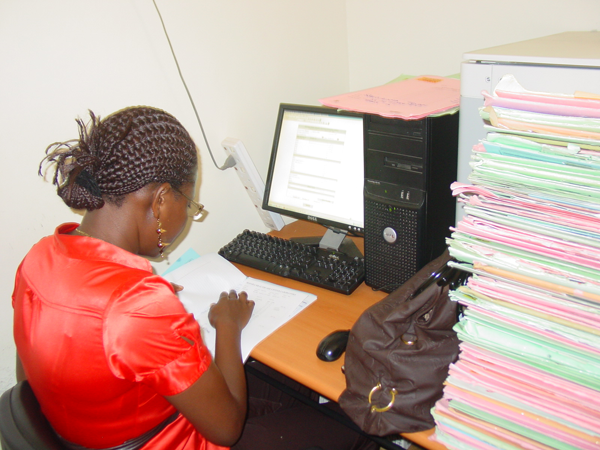
An electronic medical records system has many advantages compared to a traditional paper-based system. Data is collected using electronic forms, and a standard template means that each user sees the same structure, simplifying the representation of the underlying information structure and complexity. Electronic forms also allow for basic data validation.
There are three technologies for entering form data in OpenMRS. They are compared below.
| Form Type | Advantages | Disadvantages |
| HTML Forms |
|
|
| XForms |
|
|
| InfoPath |
|
|
This chapter will discuss only the HTML Form entry method. This is the simplest and most straightforward approach to data entry. It is supported by the HTML Form Entry module which is included with the default distribution of OpenMRS.
Basic HTML form structure
Every HTML Form must have the following minimal elements:
<htmlform>
    <p>Date of encounter: <encounterDate  /> </p>
    <p>Health center: <encounterLocation /> </p>
    <p>Clinician's name: <encounterProvider role="Provider" /> </p>
...
    <p>Name of observation: <obs conceptId="x" /> </p>
    <p><submit /></p>
</htmlform>
Form header
It is easiest to leave these essential elements in a form header section that you re-use at the top of each form. The mandatory observation element is included below.

Case study: Amani Clinic
 The clinicians at the Amani Clinic needed a way to capture patient history as part of their maternal and child health (MCH) program. They had been in contact with the Millenium Villages Project (MVP) via the OpenMRS implementers mailing List. MVP staff shared their Antenatal Visit form. The implementation team decided to use the History section from the MVP form as a basis for their MCH History form.
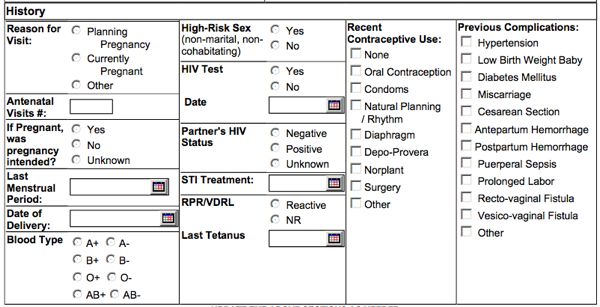
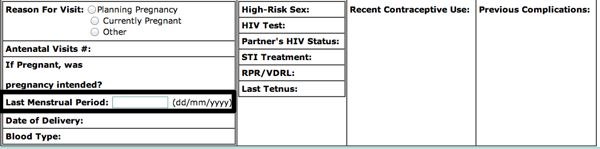
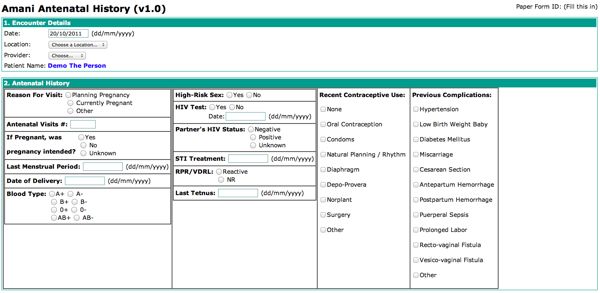
The MVP Antenatal History section looked like this:
Step 1: Identify and create concepts
Before you create a form, you must ensure that all reference Concepts are present in the Concept Dictionary. Because the MVP team already had a Concept Dictionary, the Amani Clinic were able to import the Concepts they needed. If you don't have access to an appropriate Concept Dictionary, you can also create new Concepts directly, following the steps outlined in the chapter "Managing Concepts and Metadata".
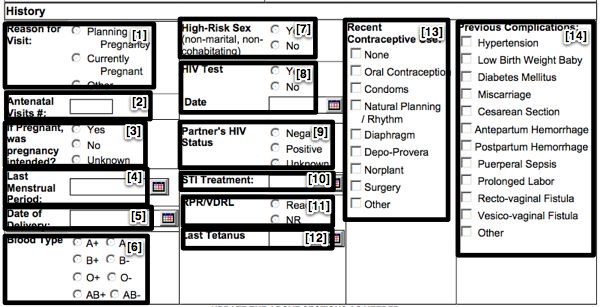
The MVP form included fourteen different Question Concepts, as well as Answer Concepts for [1], [3], [6], [9], [11], [13], and [14].
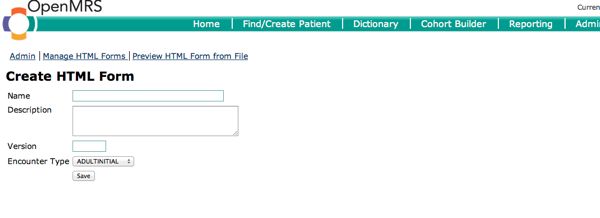
Step 2: Create the form
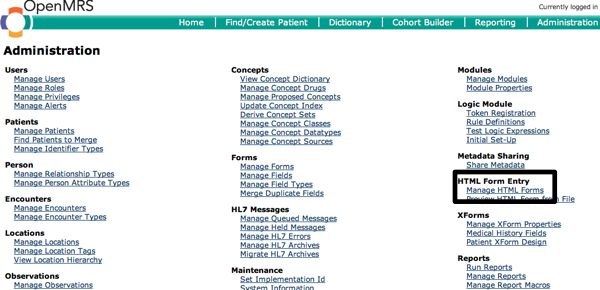
To create a form, click on the Manage HTML Forms link on the Administration page.
Click New Form.

Enter the basic form information and click Save.
Step 3: Create visual form structure with HTML
HTML forms allow you to create a structure that closely resembles your paper forms, although it may not be precisely the same.
The degree to which your form resembles the paper form depends on your HTML layout skills--all HTML tags are supported. Table layout is beyond the scope of this book, but there are many resources available online.
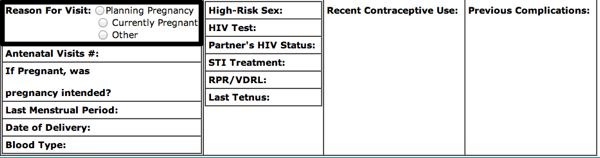
This is the basic structure of the example HTML form, with a placeholder label inserted for each observation:

Step 4: Insert observation elements
Next, insert a form tag for each observation in your forms. These obs tags are not HTML tags, but are required by OpenMRS. The following sections provide examples of each Concept Datatype used on the example form. The HTML Form Entry module provides a wide variety of other tags. Please consult the HTML Form Reference on the wiki for full documentation along with other examples.
http://go.openmrs.org/book-htmlref
Note: The Concept Identifier numbers used in this example will not match the Concept Identifiers in your local OpenMRS instance.
Example 1: Date observation
To insert a Date Observation, include the Question Concept ID of any date-based Concept. The formatting label behind the Date Box cannot be removed.
<table>
    <tr>
        <td>
            <b>Last Menstrual Period:</b>
        </td>
        <td>
            <obs conceptId="1427"/>
        </td>
    </tr>
</table>
Example 2: Boolean observation
To insert a Boolean Observation, include the Question Concept ID of any boolean Concept. There are several different styles available for Boolean types.
...
<table>
    <tr>
        <td>
            <b>High-Risk Sex:</b>
        </td>
        <td>
            <obs conceptId="1355" style="yes_no"/>
        </td>
    </tr>
</table>
....
Example 3: Coded observation with radio buttons
This obs element is inserted with the radio button style. You must specify each Answer Concept ID even though they are already recorded in the system as Answers for the Question Concept. If you want to use a name other than the Concept Name for an Answer Concept, you must include the Answer Concept Label.
To render the radio buttons vertically, insert <br \/> at the end of each label for the previous button.
...
<table>
<tr>
<td>
<b>Reason For Visit:</b>
</td>
<td>
<obs conceptId="1433" style="radio" answerConceptIds="1435,1434,5622" answerLabels="Planning Pregnancy<br \/ >, Currently Pregnant<br \/ >, Other"/>
</td>
</tr>
</table>
...
Example 4: Coded observation with multi-select checkboxes

This obs element is inserted with the checkbox button style. You must specify each Answer Concept ID even though they are already recorded in the system as Answers for the Question Concept. If you want to use a name other than the Concept Name for an Answer Concept, you must include the Answer Concept Label.
Each checkbox selected actually represents an individual Observation; the Question Concept is common but each Answer Concept is unique.
...
<table>
    <tr>
        <td>
            <b>Recent Contraceptive Use:</b>
            <br/>
            <obs conceptId="1635" answerConceptId="1107" answerLabel="None" style="checkbox"/>
            <br/>
            <obs conceptId="1635" answerConceptId="780" answerLabel="Oral Contraception" style="checkbox"/>
            <br/>
            <obs conceptId="1635" answerConceptId="190" answerLabel="Condoms" style="checkbox"/>
            <br/>
            <obs conceptId="1635" answerConceptId="5277" answerLabel="Natural Planning / Rhythm" style="checkbox"/>
            <br/>
            <obs conceptId="1635" answerConceptId="5278" answerLabel="Diaphragm" style="checkbox"/>
            <br/>
            <obs conceptId="1635" answerConceptId="1378" answerLabel="Depo-Provera" style="checkbox"/>
            <br/>
            <obs conceptId="1635" answerConceptId="1359" answerLabel="Norplant" style="checkbox"/>
            <br/>
            <obs conceptId="1635" answerConceptId="1388" answerLabel="Surgery" style="checkbox"/>
            <br/>
            <obs conceptId="1635" answerConceptId="5622" answerLabel="Other" style="checkbox"/>
            <br/>
        </td>
    </tr>
</table>
...
Complete form
See Appendix B for Full HTML source.
Enter patient data using an HTML form
Click on Find/Create Patient from anywhere within OpenMRS.

Begin typing the patient's ID number or name, then select the patient for whom you are entering data.

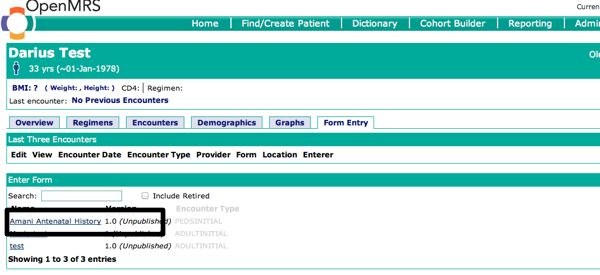
Click the Form Entry tab.

Select the appropriate form as shown below, then fill in the patient data and click the Enter Form button on the page that appears.
You can now see the completed form under the Form Entry tab of the patient's chart.
