The second part of our course leaves behind some of the end-user technologies on open video to take a deeper look at video frameworks, command line approaches, and web implementations of video. It aims to be of use to software developers who are new to this area.
It also maps some of the key issues, advantages and shortcomings of the use of open video technologies in a developer context.
Navigating this part of the course is not as straightforward as part one. It is not as directed and the task are more more open ended. You may want to do a lot of additional reading to really get to the bottom of the challenges and technologies that we are here only beginning to explore.
As such we invite you to take an active role in adding to, correcting, and guiding the contents you see in the following tasks. If you are a developer or have a role in the documentation of a particular video framework, tool or approach we invite you to contact us to contribute a task for course participants.
Going Deeper
While we have created a badge for this part of the course the guidelines for awarding the badge are flexible. We feel we can be generous in awarding this badge as an incentive for involvement. As such if it will be awarded for "Making a significant contribution to (or correction of) 'A Look at Open Video', or for showing commitment in demonstrating your learning outcomes from the course".
So let's go deeper into open video. Come on in - the code is waiting for you!
Our next chapter about open video looks at subtitles. Subtitles can open up your video to new audiences. One of the reasons for approaching subtitles in an open way is that it allows your community to get involved in the task of subtitling videos.
Subtitles are textual versions of the dialogue or commentary in films, television programs, video games, and the like, usually displayed at the bottom of the screen. They can be a written translation of the video dialogue in a foreign language or a rendering of the dialogue in the original language often targeting viewers who are deaf, hard-of-hearing or have accent recognition problems.
Understanding different kinds of subtitles involves learning a bit of terminology. Let's get to grips with some of the language used.
Different types of subtitles
Burned-in subtitles (or "hard subs" or "open captions" ): These are subtitles that are built-in to the image and cannot be removed as they totally become part of the image.
Internal Soft subtitles (Closed Captions): They are hidden within the video file and not built-in to the image thus can be removed temporarily, if not required, using the video player menu. You may find different languages for these soft subtitles (for example up to 8 different languages in the same file!) Those soft subtitles will appear in the subtitle menu of your player and the viewer can select which ever suits their needs.
External Soft subtitles (Closed Captions): These are external individual files: most common are .srt files which contain only 1 language, but you may also find sub + .idx files that may contain many different languages. Most often, if you want those external subtitles files to be opened automatically when the video file is opened in a player, then the subtitles file should have the same name as the movie file. For example:
 Open_Video_Tutorial.avi <= the movie file
 Open_Video_Tutorial.srt <= the external subtitle file
Playing Video Captions Online
Many video sharing systems allow you to play captions and subtitles on top of your video files. The used of closed captions allow you to choose different language possibilities rather than having only the subtitles of only one language burned into your video. Below we can see a video with English subtitles selected.
The same video shown on the Papuan Voices website has been translated into many languages. These can be selected in the online video player.
The system for displaying and creating subtitles used by the Papuan Voices website is Amara which is hosted on universalsubtitles.org
We can see that this page allows you to download the video file and the subtitle files separately. We will do this in our mission to understand more about how these kinds of subtitles work.
Click on the Download Subtitle link. We will be given the option to open or save a subtitle file of the type .srt.
If we open up the file that we download we will see that it is really pretty simple listing times and the text to be displayed over the video.
About SubRip Files (srt)
SubRip is the most used format for subtitling and it may have the file format .srt
To create your own SubRip subtitling file, we will need a text editor. Open your text editor and save your file with a .srt extension. Note that encoding must be UTF-8 so that special characters can be used
SRT files have been widely adopted. They are a very simple standard and they do the job well.
Format: n
h1:m1:s1,d1 --> h2:m2:s2,d2
Some text to display beneath this scene
n = sequential number. This may also appear on the same line as start/stop times.
h1:m1:s1,d1 = start time of this frame, in hours minutes and seconds to three decimal places.
h2:m2:s2,d2 = stop time. i.e time when this subtitle text should disappear from the screen
Extensions : Some subtitles feature html tags inside the SubRip text:
Now that we have downloaded our video file and subtitle file we can also download them on our desktop computer.
To do this, open your video file in VLC player. If you subtitle file is in the same directory and called a very similar name to your video file, it may be automatically recognised and played by VLC. If not then you can select Video >
Creating Subtiles Online
At univeralsubtitles.org you can create subtitles online. The process is quite easy and intuitive, and there are step by step instructions on the website.
The work area is shown below.
The workflow has 4 stages.
Typing
Synching
Edit Title and Description
Checking Work
Other Ways of Creating SRT Files
There are many tools on the desktop which we can use to create these files. This can be handy if we want to subtitle our files off line.
The Open Video Forum aimed to bring together participants interested in open video in the context of a project called Mokolo Video being developed by the Mokolo Labs team. There is a project archive here - ovf.xmlab.org.
(en) For Mokolo.Labs, the development challenge for innovative video distribution is not low-bandwith, but bandwidth diversity and resource efficiency. A generalized user experience can only be achieved when reliable bandwidth data is available to developers. Often network carriers market their connection plans with “max bandwidth xyz”. We aim to assist developers through the creation of an African Video Bandwidth Observatory and invite partnerships with the MolokoLabs project in this effort.
Areas of interest: social viewing experience; crowd-sourced metadata & content curation; progressive download & adaptive bitrate streaming; test frameworks & user feedback strategies; accessible open source solutions for African video producers; low-cost server side solutions for video distribution; semantic search based on increased availability of metadata; connection of audiovisual work with cultural metadata.
The course sprint is a step towards the creation of a Open Video Handbook which we aim to create to address some of the needs addressed by the project.
The course aimed to introduce the subject of Open Video to quite a wide range of students. Where possible there is an assessment task so that you can test and demonstrate your learning as you work through the course.
The course sprint is a step towards the creation of a Open Video Handbook which we aim to create to address some of the needs addressed by the Moloko Lab project by xm:lab, the conveners of this 'course sprint'. There is a project archive here – ovf.xmlab.org.
About the Process of this Course Sprint
This course was created as part of the Open Video Forum event. It took place on the Saturday 15th and Sunday 16th of December 2012. Many thanks to the people involved and to Soenke Zehele for pulling together the sprint and the Creative Commons School of Open for encouragement.
The process of starting the sprint was lead by Mick Fuzz from FLOSS Manuals. There are some comments from him below on the process.
I wanted to try and experiment of using some of the elements of the BookSprint process. BookSprint create full books in 3-5 days with 6-10 participants in a very intensive process. It was not the aim fully replicate this for this event. However, while the outcome, commitment levels and timescale were different but the planning and structuring activities were similar. The process of agreeing the scope, subject matter, chapter structure and allocating the chapters to writers was accelerated into a 2 hour process on the first day of the course sprint and we started writing after lunch.
After that process was completed, it's all easy going. We write individually but as we share the same space, discussions, suggestions, feedback and revisions happen naturally. As a facilitator, I know that the expertise in the room all I have to do is to encourage that interaction happen.
One of the observation by Jan Gerber who came in later on the first day was that the structure of the contents had a lot of similarity with Dive in to HTML5 video section. This guide which embraced the possibilities of HTML5 to use open video. He also pointed out that the licence was compatible and could be used directly in the coures. This plugged a couple of chapters that were tricky to write and speeded up the process nicely.
There were also some placeholder chapters as the participants that suggested them were unable to complete them as they had to travel away from the course sprint and wanted to continue them later. These include What Next for Open Video and the section on Open Video and Mobiles, so watch this space.
Many thanks to Jane Park for her constructive comments on the course. These have been integrated into the first version in time for the launch of the School of Open.
We think the following overview of nuts and bolts of video files is very well explained and it really drills down into the details. However if the level of detail is too much for you, skip ahead to the next task, and come back to this later. The text is adapted from Mark Pilgrim's work released under a by-sa-3.0 licence and is online here - http://diveintohtml5.info/video.html
By the end of this task you should be able to:
Know more about the components of video files and difference between a container and codec
Understand some issues of openness in regards to video codecs
Have an overview of what formats work well on the web
Tools you will need for this task:
A pen and paper to make notes
Curiosity and a reasonable attention span
Open Video and HTML5
Anyone who has visited YouTube.com in the past four years knows that you can embed video in a web page. But prior to the adoption of HTML5, there was no standards-based way to do this. Virtually all the video you’ve ever watched “on the web” has been funneled through a third-party plugin — maybe QuickTime, maybe RealPlayer, maybe Flash. (YouTube uses Flash.) These plugins integrate with your browser well enough that you may not even be aware that you’re using them. That is, until you try to watch a video on a platform that doesn’t support that plugin.
HTML5 defines a standard way to embed video in a web page, using a <video> element. Support for the <video> element is still evolving, which is a polite way of saying it doesn’t work yet. At least, it doesn’t work everywhere. But don’t despair! There are alternatives and fallbacks and options galore.
But support for the <video> element itself is really only a small part of the story. Before we can talk about HTML5 video, you first need to understand a little about video itself.
Video Containers
You may think of video files as “AVI files” or “MP4 files.” In reality, “AVI” and “MP4” are just container formats. Just like a ZIP file can contain any sort of file within it, video container formats only define how to store things within them, not what kinds of data are stored. (It’s a little more complicated than that, because not all video streams are compatible with all container formats, but never mind that for now.)
A video file usually contains multiple tracks — a video track (without audio), one or more audio tracks (without video) and some containers even contains one or more subtitletracks or picture tracks. Tracks are usually interrelated. An audio track contains markers within it to help synchronize the audio with the video. Individual tracks can have metadata, such as the aspect ratio of a video track, or the language of an audio track. Containers can also have metadata, such as the title of the video itself, cover art for the video, episode numbers (for television shows), and so on.
There are lots of video container formats. Some of the most popular include
Flash Video, usually with an .flv extension. Flash Video is, unsurprisingly, used by Adobe Flash. Prior to Flash 9.0.60.184 (a.k.a. Flash Player 9 Update 3), this was the only container format that Flash supported. More recent versions of Flash also support the MPEG 4 container.
Ogg, usually with an .ogv extension. Ogg is an open standard, open source–friendly, and unencumbered by any known patents. Firefox 3.5, Chrome 4, and Opera 10.5 support — natively, without platform-specific plugins — the Ogg container format, Ogg video (called “Theora”), and Ogg audio (called “Vorbis”). On the desktop, Ogg is supported out-of-the-box by all major Linux distributions, and you can use it on Mac and Windows by installing the QuickTime components or DirectShow filters, respectively. It is also playable with the excellent VLC on all platforms.
WebM is a new container format. It is technically similar to another format, called Matroska. WebM was announced in May, 2010. It is designed to be used exclusively with the VP8 video codec and Vorbis audio codec. (More on these in a minute.) It is supported natively, without platform-specific plugins, in the latest versions of Chromium, Google Chrome, Mozilla Firefox, and Opera. Adobe has also announced that a future version of Flash will support WebM video.
Audio Video Interleave, usually with an .avi extension. The AVI container format was invented by Microsoft in a simpler time, when the fact that computers could play video at all was considered pretty amazing. It does not officially support features of more recent container formats like embedded metadata. It does not even officially support most of the modern video and audio codecs in use today. Over time, companies have tried to extend it in generally incompatible ways to support this or that, and it is still the default container format for popular encoders such as MEncoder.
Video Codecs
When you talk about “watching a video,” you’re probably talking about a combination of one video stream and one audio stream. But you don’t have two different files; you just have “the video.” Maybe it’s an AVI file, or an MP4 file. These are just container formats, like a ZIP file that contains multiple kinds of files within it. The container format defines how to store the video and audio streams in a single file.
When you “watch a video,” your video player is doing at least three things at once:
Interpreting the container format to find out which video and audio tracks are available, and how they are stored within the file so that it can find the data it needs to decode next
Decoding the video stream and displaying a series of images on the screen
Decoding the audio stream and sending the sound to your speakers
A video codec is an algorithm by which a video stream is encoded, i.e. it specifies how to do #2 above. (The word “codec” is a portmanteau, a combination of the words “coder” and “decoder.”) Your video player decodes the video stream according to the video codec, then displays a series of images, or “frames,” on the screen. Most modern video codecs use all sorts of tricks to minimize the amount of information required to display one frame after the next. For example, instead of storing each individual frame (like a screenshot), they will only store the differences between frames. Most videos don’t actually change all that much from one frame to the next, so this allows for high compression rates, which results in smaller file sizes.
There are lossy and lossless video codecs. Lossless video is much too big to be useful on the web, so I’ll concentrate on lossy codecs. A lossy video codec means that information is being irretrievably lost during encoding. Like copying an audio cassette tape, you’re losing information about the source video, and degrading the quality, every time you encode. Instead of the “hiss” of an audio cassette, a re-re-re-encoded video may look blocky, especially during scenes with a lot of motion. (Actually, this can happen even if you encode straight from the original source, if you choose a poor video codec or pass it the wrong set of parameters.) On the bright side, lossy video codecs can offer amazing compression rates by smoothing over blockiness during playback, to make the loss less noticeable to the human eye.
H.264 is also known as “MPEG-4 part 10,” a.k.a. “MPEG-4 AVC,” a.k.a. “MPEG-4 Advanced Video Coding.” H.264 was also developed by the MPEG group and standardized in 2003. It aims to provide a single codec for low-bandwidth, low-CPU devices (cell phones); high-bandwidth, high-CPU devices (modern desktop computers); and everything in between. To accomplish this, the H.264 standard is split into “profiles,” which each define a set of optional features that trade complexity for file size. Higher profiles use more optional features, offer better visual quality at smaller file sizes, take longer to encode, and require more CPU power to decode in real-time.
Most non-PC devices that play H.264 video (including iPhones and standalone Blu-Ray players) actually do the decoding on a dedicated chip, since their main CPUs are nowhere near powerful enough to decode the video in real-time. These days, even low-end desktop graphics cards support decoding H.264 in hardware. There are competing H.264 encoders, including the open source x264 library. The H.264 standard is patent-encumbered; licensing is brokered through the MPEG LA group. H.264 video can be embedded in most popular container formats, including MP4 (used primarily by Apple’s iTunes Store) and MKV (used primarily by non-commercial video enthusiasts).
Theora
Theora evolved from the VP3 codec and has subsequently been developed by the Xiph.org Foundation. Theora is a royalty-free codec and is not encumbered by any known patents other than the original VP3 patents, which have been licensed royalty-free. Although the standard has been “frozen” since 2004, the Theora project (which includes an open source reference encoder and decoder) only released version 1.0 in November 2008 and version 1.1 in September 2009.
Theora video can be embedded in any container format, although it is most often seen in an Ogg container. All major Linux distributions support Theora out-of-the-box, and Mozilla Firefox 3.5 includes native support for Theora video in an Ogg container. And by “native”, I mean “available on all platforms without platform-specific plugins.” You can also play Theora video on Windows or on Mac OS X after installing Xiph.org’s open source decoder software.
VP8
VP8 is another video codec from On2, the same company that originally developed VP3 (later Theora). Technically, it produces output on par with H.264 High Profile, while maintaining a low decoding complexity on par with H.264 Baseline.
VP8 is a royalty-free, modern codec and is not encumbered by any known patents.
Audio Codecs
Unless you’re going to stick to films made before 1927 or so, you’re going to want an audio track in your video. Like video codecs, audio codecs are algorithms by which an audio stream is encoded. Like video codecs, there are lossy and lossless audio codecs. And like lossless video, lossless audio is really too big to put on the web. So I’ll concentrate on lossy audio codecs.
As I mentioned earlier, when you “watch a video,” your computer is doing at least three things at once:
Interpreting the container format
Decoding the video stream
Decoding the audio stream and sending the sound to your speakers
The audio codec specifies how to do #3 — decoding the audio stream and turning it into digital waveforms that your speakers then turn into sound. As with video codecs, there are all sorts of tricks to minimize the amount of information stored in the audio stream. And since we’re talking about lossy audio codecs, information is being lost during the recording → encoding → decoding → listening lifecycle. Different audio codecs throw away different things, but they all have the same purpose: to trick your ears into not noticing the parts that are missing.
One concept that audio has that video does not is channels. We’re sending sound to your speakers, right? Well, how many speakers do you have? If you’re sitting at your computer, you may only have two: one on the left and one on the right. My desktop has three: left, right, and one more on the floor. So-called “surround sound” systems can have six or more speakers, strategically placed around the room. Each speaker is fed a particular channel of the original recording. The theory is that you can sit in the middle of the six speakers, literally surrounded by six separate channels of sound, and your brain synthesizes them and feels like you’re in the middle of the action. Does it work? A multi-billion-dollar industry seems to think so.
Most general-purpose audio codecs can handle two channels of sound. During recording, the sound is split into left and right channels; during encoding, both channels are stored in the same audio stream; during decoding, both channels are decoded and each is sent to the appropriate speaker. Some audio codecs can handle more than two channels, and they keep track of which channel is which and so your player can send the right sound to the right speaker.
There are lots of audio codecs. Did I say there were lots of video codecs? Forget that. There are gobs and gobs of audio codecs, but on the web, there are really only three you need to know about: MP3, AAC, and Vorbis.
MP3s can contain up to 2 channels of sound. They can be encoded at different bitrates: 64 kbps, 128 kbps, 192 kbps, and a variety of others from 32 to 320. Higher bitrates mean larger file sizes and better quality audio, although the ratio of audio quality to bitrate is not linear. (128 kbps sounds more than twice as good as 64 kbps, but 256 kbps doesn’t sound twice as good as 128 kbps.) Furthermore, the MP3 format allows for variable bitrate encoding, which means that some parts of the encoded stream are compressed more than others. For example, silence between notes can be encoded at a low bitrate, then the bitrate can spike up a moment later when multiple instruments start playing a complex chord. MP3s can also be encoded with a constant bitrate, which, unsurprisingly, is called constant bitrate encoding.
The MP3 standard doesn’t define exactly how to encode MP3s (although it does define exactly how to decode them); different encoders use different psychoacoustic models that produce wildly different results, but are all decodable by the same players. The open source LAME project is the best free encoder, and arguably the best encoder period for all but the lowest bitrates.
The MP3 format (standardized in 1991) is patent-encumbered, which explains why Linux can’t play MP3 files out of the box. Pretty much every portable music player supports standalone MP3 files, and MP3 audio streams can be embedded in any video container. Adobe Flash can play both standalone MP3 files and MP3 audio streams within an MP4 video container.
Advanced Audio Coding
Advanced Audio Coding is affectionately known as “AAC.” Standardized in 1997, it lurched into prominence when Apple chose it as their default format for the iTunes Store. Originally, all AAC files “bought” from the iTunes Store were encrypted with Apple’s proprietary DRM scheme, called FairPlay. Selected songs in the iTunes Store are now available as unprotected AAC files, which Apple calls “iTunes Plus” because it sounds so much better than calling everything else “iTunes Minus.” The AAC format is patent-encumbered; licensing rates are available online.
AAC was designed to provide better sound quality than MP3 at the same bitrate, and it can encode audio at any bitrate. (MP3 is limited to a fixed number of bitrates, with an upper bound of 320 kbps.) AAC can encode up to 48 channels of sound, although in practice no one does that. The AAC format also differs from MP3 in defining multiple profiles, in much the same way as H.264, and for the same reasons. The “low-complexity” profile is designed to be playable in real-time on devices with limited CPU power, while higher profiles offer better sound quality at the same bitrate at the expense of slower encoding and decoding.
All current Apple products, including iPods, AppleTV, and QuickTime support certain profiles of AAC in standalone audio files and in audio streams in an MP4 video container. Adobe Flash supports all profiles of AAC in MP4, as do the open source MPlayer and VLC video players. For encoding, the FAAC library is the open source option; support for it is a compile-time option in mencoder and ffmpeg.
Vorbis
Vorbis is often called “Ogg Vorbis,” although this is technically incorrect. (“Ogg” is just a container format, and Vorbis audio streams can be embedded in other containers.) Vorbis is not encumbered by any known patents and is therefore supported out-of-the-box by all major Linux distributions and by portable devices running the open source Rockbox firmware. Mozilla Firefox 3.5 supports Vorbis audio files in an Ogg container, or Ogg videos with a Vorbis audio track. Android mobile phones can also play standalone Vorbis audio files. Vorbis audio streams are usually embedded in an Ogg or WebM container, but they can also be embedded in an MP4 or MKV container (or, with some hacking, in AVI). Vorbis supports an arbitrary number of sound channels.
If your eyes haven’t glazed over yet, you’re doing better than most. As you can tell, video (and audio) is a complicated subject — and this was the abridged version! In case you’re wondering how all of this relates to HTML5 - well, HTML5 includes a <video> element for embedding video into a web page. There are no restrictions on the video codec, audio codec, or container format you can use for your video. One <video> element can link to multiple video files, and the browser will choose the first video file it can actually play. It is up to you to know which browsers support which containers and codecs.
There is no single combination of containers and codecs that works in all HTML5 browsers.
This is not likely to change in the near future.
To make your video watchable across all of these devices and platforms, you’re going to need to encode your video more than once.
For maximum compatibility, here’s what your video workflow will look like:
Make one version that uses WebM (VP8 + Vorbis).
Make another version that uses H.264 baseline video and AAC “low complexity” audio in an MP4 container.
Make another version that uses Theora video and Vorbis audio in an Ogg container.
Link to all three video files from a single <video> element, and fall back to a Flash-based video player
Task: Go to the park!
There is no assessment task for this section. Go to the next task. Or even better go play in the park, or have a nice cup of tea. You have earned it. It would be great if you could share your thoughts about how we could better present this information in the comments.
Or FireFogg - Many platforms (available as a plug in for Firefox)
Encoding Ogg Video with Firefogg
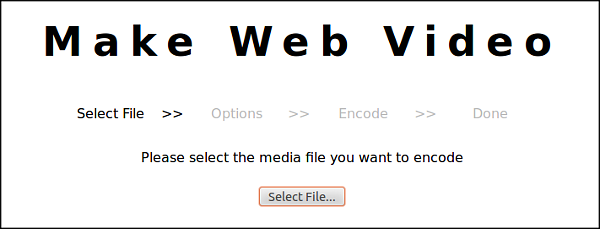
Firefogg is an open source, GPL-licensed Firefox extension for encoding Ogg video. To use it, you’ll need to install Mozilla Firefox, then visit firefogg.org.
To use click on Make Web Video and follow the simple on screen instructions.
Select the file on your computer's hard drive to encode.
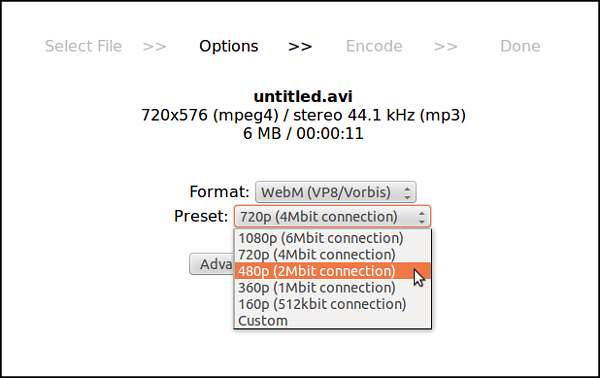
Select either Ogg or WebM video and then select the quality you want your target file to be.
Click on Encode and choose a location to save your target file.
When the encoding is completed your new video file should ready for your to test in the location you chose in the previous step.
Encoding Video with Miro Video Converter
There are many tools for encoding video, and there are many video encoding options that affect video quality. If you do not wish to take the time to understand anything about video encoding, this section is for you.
Miro Video Converter is an open source, GPL-licensed program for encoding video in multiple formats. Download it for Mac OS X or Windows. It supports all the output formats mentioned in this chapter. It offers no options beyond choosing a video file and choosing an output format. It can take virtually any video file as input, including DV video produced by consumer-level camcorders. It produces reasonable quality output from most videos. Due to its lack of options, if you are unhappy with the output, you have no recourse but to try another program.
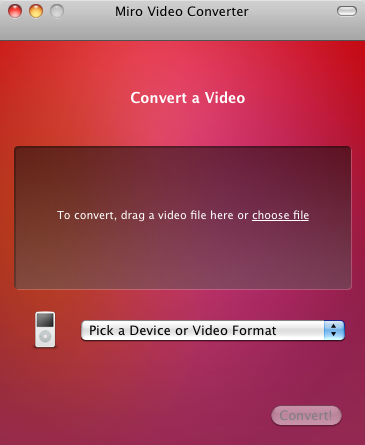
To start, just launch the Miro Video Converter application.
Miro Video Converter main screen
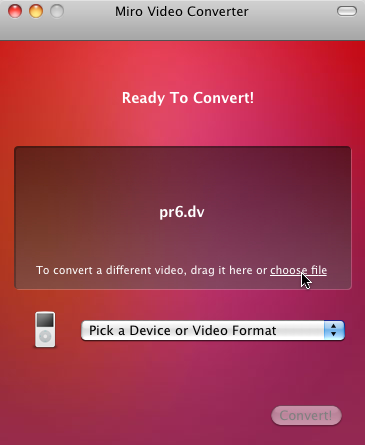
Click “Choose file” and select the source video you want to encode.
“Choose file”
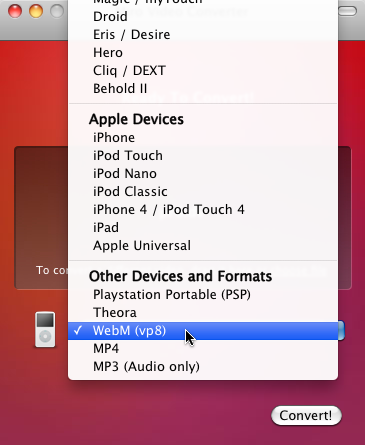
The “Pick a Device or Video Format” dropdown menu lists a variety of devices and formats. For the purposes of this chapter, we are only interested in three of them.
Click the “Convert” button and Miro Video Converter will immediately start encoding your video. The output file will be named SOURCEFILE.webm and will be saved in the same directory as the source video.
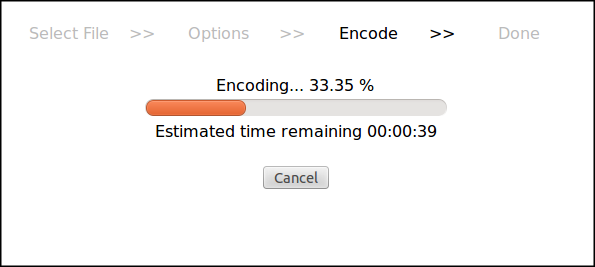
You’ll be staring at this screen
for a long time
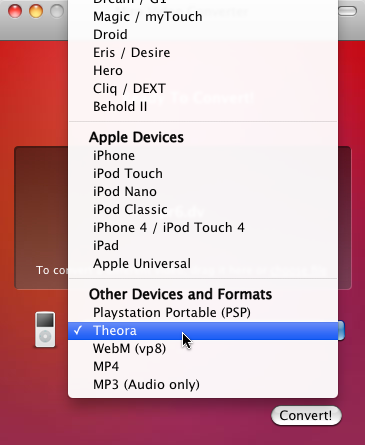
Once the encoding is complete, you’ll be dumped back to the main screen. This time, select “Theora” from the Devices and Formats list.
Time for Theora
That’s it; press the “Convert” button again to encode your Theora video. The video will be named SOURCEFILE.theora.ogv and will be saved in the same directory as the source video.
Time for a cup of coffee
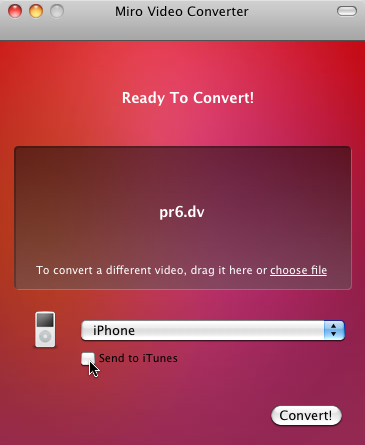
Finally, encode your iPhone-compatible H.264 video by selecting “iPhone” from the Devices and Formats list.
iPhone, not iPhone 4
For iPhone-compatible video, Miro Video Converter will give you an option to send the encoded file to your iTunes library. I have no opinion on whether you would want to do that, but it’s not necessary for publishing video on the web.
Don’t send to iTunes
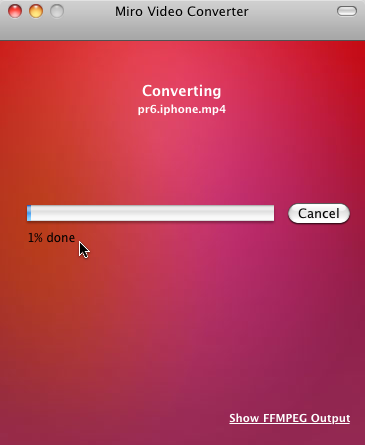
Press the magical “Convert” button and wait. The encoded file will be named SOURCENAME.iphone.mp4 and will be saved in the same directory as the source video.
Do some yoga or something
You should now have three video files alongside your original source video.
Task - Encode a video file to Ogg Theora or WebM
Download a video file from Engagemedia.org or Archive.org.
Re-encode it to an Ogg or WebM video using Firefog.
If your system supports it, install Miro Video Converter and follow the instructions above to encode to three kinds of files.
Post your questions or results in the comments.
Video Metadata can move in mysterious ways. Here are some of the ways it can move and be collected.
as a part of the video files
as external files
as part of a repository system
Metadata in external files: As we saw in one of the introductory sections, there are a number of standard metadata fields that can be included in most video containers. And Matroska files can contain str files as subtitle streams.
Metadata in external files: Subtitles are often included in .srt files. This is common with video containers that don't support subtitle streams or for additional supporting information about video files. Possibly most commonly seen with avi files in with torrents.
Metadata as part of a repository system: Rather than storting the metadata in a file it can be in a database of a content management systems.
Video sharing sites
Archiving sites using Pandora like 0xdb and pad.ma collect metadata about videos, and also make it available to query based on video identifier. They aim to have a more complete and flexible approach to how text and video interact. You can find out more by watching this Screen cast for Pad.ma
Moving Media Metadata
There are a great number of ways of moving the metadata from one repository to another. Sometimes it involves using the site specific API, sometimes they will make the the data available in an easily machine readable format. The most common machine formats are: MRSS and schema.org microdata. Microdata video object is partly read by Google.
Older and more common is MRSS also embedded in RDFa it is most commonly part of an RSS feed. Here's a hands on example of Media RSS as a transporter mechanism for media metadata in use.
Case Study - Drupal + Feeds for MRSS
As part of the Open Video Forum, there was a presentation of the aims of the transmission.cc website. Part of the aim of that website was to act as an aggregator and searchable archive of video metadata coming in from various types of RSS, Media RSS (MRSS) feeds. MRSS adds additional useful infomation to RSS feeds about video and audio files, including filesize, bitrate, width, heigth etc.
Developer/installer overview for transmission aggregator
Transmission used the Drupal content management system as base to build on and extended the functionality already present in existing Drupal modules. All the code is standard Drupal and contrib with a couple of important additions.
The feeds are pulled with the http://drupal.org/project/feeds module. Feeds makes use of the simplepie parser to interperate the incoming feeds. Simplepie parses MRSS out of the box but feeds doesn't know what to do with this data.
To solve this you can use an extention module to read the MRSS output coming from the simplepie parser. This module is checked out as a submodule but is also now in a sandbox on drupal.org https://drupal.org/sandbox/ekes/1867408
In the transmission.cc site there are two content types for feeds: 'MRSS feed' and 'Video'. Posting a new 'MRSS feed' with the URL of the RSS feed adds that to the list of feeds that are pulled. Items in the feed are created as 'Video' nodes.
The node types, and the feeds settings to use them, and to map which parts of a feed item to which parts of the node can be set up in the Drupal interface of the feeds module.
This screen shot shows you a 'mapping' of a feed to the content pieces of your Drupal website.
To make the site itself output MRSS in the RSS feed there is another module, again included but now also in a sandbox. https://drupal.org/node/1867416
The complete transmission.cc code can be found at:
"> git://git.iskra.net/drupal/projects/tx
The repository uses git submodules to pull external code.
If you're on the command line to get the rest of the code you then type (in the git repository you just pulled):
$ git submodule init
$ git submodule update
If you're using your favourite gui there should be a way of getting all the submodules.
Replicating the transmission.cc configuration
If you want to replicate the settings for mapping the MRSS feeds, they are stored in a 'feature' [this is a way of storing settings in Drupal, the main module is http://drupal.org/project/features ].
The relevant feature for this is the one found in 'tx/modules/features/mrss_feeds'
Linking to files instead of pulling them
Transmission.cc pulls the actual files rather than linking to them. If you want to link to them or embed them externally, you can change the field mappings (see the image above) to use emfield. Then you need not worry about the cron and transcoding sections of the tutorial.
Making thumbnails of remote files, ones you have not pulled, is much more involved than local files. So sometimes you will be missing an image if there was no thumbnail specified in the MRSS feed. Emfield will also not embed all formats or sources of video properly, so if this works will depend on your source video.
Downloading files as part of a cron job
As the transmission.cc configuration maps the files to a filefield they get downloaded. This is done as part of the queue-cron job (this is created by the https://drupal.org/project/job_scheduler which is a requirement of the feeds module.
Important note: if you run cron the standard way, by visiting http://site/cron.php you are making huge apache php processes. To avoid this you need at least use Drush to run cron; as well as queue-cron.
Transcoding with media_mover
Transmission.cc transcodes the downloaded video using ffmpeg into files that can be easily embedded. The settings for this should be in the git repository install file. However the version of media_mover used did not export into features.
The configuration of media_mover in transmission.cc is however not the best method. Pulling big files, transcoding big files, even using Drush isn't the optimal solution. Currently the transmission.cc site struggles and occasionally gets stuck on big files.
The alternative is to use an alternative queue scheduler outside Drupal (examples include: rabbitmq, beanstalk, and redis with extra scripts).
Task - Show your understanding
Write a comment outlining a possible use for moving video metadata (and files) between different repositories.
For extra points write a short outline of the technologies you would use to do this.
This chapter aims to take a humorous and unusual approach to explain some fundamentals of how video encoding works. We aim to do this by entering the slightly crazy world of Datamoshing.
By the end of this task you should be able to:
Share the joys of Datamoshing
Understand how I frames and P frames are used for video compression
Start to alter video encoding parameters using advanced tools
Datamoshing refers to a particular way of breaking video files so that they look strange. This is normally done for entertainment in videos like music videos.
The process of creating a datamosh involves some understanding of processes in video encoding including i-frames, p-frames and the concept of motion tracking.
Datamoshing step-by-step
The following videos show you how to do datamoshing and gives you the chance to try hands on manipulation of video files. So here's part two.
and part three.
Tips on finding suitable clips
You can use openly licensed video or as you are using clips and sharing for educational use, you can be a more free about the clips you use.
The how to video is aimed at people using Mac computers. It mentions two main bits of software. Avidemux and FFmpegX.
Avidemux is available for Mac, Linux and Windows. There is a FLOSS Manual on it here. It is easy to install. However, FFmpegX is only available for Mac and it is pretty tricky to install. So we were a bit worried you may get stuck.
Luckily, we can achieve a datamosh using only Avidemux (part 3 of the video) as long as we delete all I frames in the clips (apart from the first one). To do this following these steps.
Open a clip in Avidemux
If needed add another clip using File > Append in Avidemux
Remove parts of the video so you have a short clip which cuts between suitable scenes with the right kind of motion. Try out different ones.
Remove the Iframes from all your video, by manoeuvring to key frames with the double-arrows, setting in and out points one frame part and deleting the selected I-frame.
Save to a new video file using the follow settings
Video: Copy
Audio: Copy
Format: Avi
As you can see from the above example, removing the I frames of a longer video file using Avidemux would be very time consuming. If we were going to create a longer example we would want a tool which removed I frames all at once.
There is a really easy way to achieve this using the command line application ffmpeg. ffmpeg is easy to install on a on a Linux computer. The video tutorial mentions FFmpegX which is a front end for ffmpeg. Unfortunately this tool is for Mac only, and you may find it difficult to install.
So this seems like a good point in the course to give you the option of taking the next step in working with open video. This is step is to start to alter files using a command line application like ffmpeg. Later tasks in part two of this course take the use of ffmpeg much deeper. This is a good task to get you started.
To reduce / remove keyframes use the following command as an example
the -g option specifies keyframes. You will get an error if you set this too high try this with ffmpeg (999 is still very high but gives no fatal error). Your outputted files now have very few i-frames. We also set the audio codec used to be mp3.
After this you will find the process of creating a datamosh in Avidemux much quicker as there will be almost no I frames in your source video files.
Installing ffmpeg
Here are Instructions for installing on Windows and a tip for an easy way to install on Mac and Ubuntu & Debian. If you get stuck we may not be able to help but put your problem in the comments and we'll try to steer you in the right direction.
Task - Get moshing & earn a badge
The fun assessment task for this chapter is to either create a quick datamosh example and post it to a video sharing site to share with us in the comments.
When you have created your mosh you can apply for your "I looked at Open Video" badge.
If you get stuck. We are aware that this is quite a hard task. Hey you do get to earn a badge, after all. If you get stuck post in the comments and we will try to help you with the specifics of your problem. This is what peer learning is all about.
There are 4 major ways of experiencing video on the Internet. If you are interested in new development coming from HTML5 please have a look at the chapter on Video and HTML5 markup.
1. Download
The simplest form of video on the web is a downloadable file on a web server. The consumer can only begin playback when the whole file is downloaded.
Video files on streaming websites can be downloaded as well, even if you cannot access the whole file at once (e.g. Youtube). You can use software to do so, either special download software or media players (i.e. VLC) or a browser plugin. Most of the times downloading these files will take as long as it would take to watch them at normal playback speed. The software uses the data stream to generate a video file.
If you want to offer a video file for download all you really have to do is store it on your server within a publicly accessible path and link to it in an HTML website. The user then can right-click on that link and chose the "download to computer" option in the context menu.
A progressive download is the transfer of digital media files from a server to a client, typically using the HTTPprotocol when initiated from a computer. You can do this either inside your browser if it is enabled to display video files or with a video player software (e.g. VLC).
The consumer may begin playback of the media before the download is complete. The key difference between streaming media and progressive download is in how the digital media data is received and stored by the end user device that is accessing the digital media.
A media player that is capable of progressive download playback relies on metadata located in the header of the file to be intact and a local buffer of the digital media file as it is downloaded from a web server. When a specified amount of data becomes available to the local playback device, the media will begin to play. This specified amount of buffer is embedded into the file by the producer of the content in the encoder settings and is reinforced by additional buffer settings imposed by the media player.
HTTP Progressive Download versus Streaming Media
The end user experience is similar to streaming media, however the digital file is downloaded to a physical drive on the end user's device, the digital file is typically stored in the temp folder of the associated web browser if the digital media was embedded into a web page or is diverted to a storage directory that is set in the preferences of the media player used for playback. The digital media file will stutter or stop play back if the rate of play back exceeds the rate at which the file is downloaded. The file will begin to play again after further download.
Streaming media is multimedia that is constantly received by and presented to an end-user while being delivered by a provider.
A client media player can begin playing the data (such as a movie) before the entire file has been transmitted.
Live streaming, delivering live over the Internet, involves a camera for the media, an encoder to digitize the content, a media publisher, and a content delivery network to distribute and deliver the content.
Adaptive bitrate streaming is a technique used in streamingmultimedia over computer networks. While in the past most video streaming technologies utilized streaming protocols such RTP with RTSP, today's adaptive streaming technologies are almost exclusively based on HTTP and designed to work efficiently over large distributed HTTP networks such as the Internet.
It works by detecting a user's bandwidth and CPU capacity in real time and adjusting the quality of a video stream accordingly. It requires the use of an encoder which can encode a single source video at multiple bit rates. The player client switches between streaming the different encodings depending on available resources. "The result: very little buffering, fast start time and a good experience for both high-end and low-end connections."
More specifically, and as the implementations in use today are, Adaptive bitrate streaming is method of video streaming over HTTP where the source content is encoded at multiple bit rates, then each of the different bit rate streams are segmented into small multi-second parts. The streaming client is made aware of the available streams at differing bit rates, and segments of the streams by a manifest file. When starting the client requests the segments from the lowest bit rate stream. If the client finds the download speed is greater than the bit rate of the segment downloaded, then it will request the next higher bit rate segments. Later, if the client finds the download speed for a segment is lower than the bit rate for the segment, and therefore the network throughput has deteriorated, then it will request a lower bit rate segment. The segment size can vary depending on the particular implementation, but they are typically between two (2) and ten (10) seconds.
Current uses
Post-production houses, content delivery networks and studios use adaptive bit rate technology in order to provide consumers with higher quality video using less manpower and fewer resources. The creation of multiple video outputs, particularly for adaptive bit rate streaming, adds great value to consumers.[3] If the technology is working as designed, the end user or consumer should be completely unaware of it. Therefore, even though media companies have been actively using adaptive bit rate technology for many years now and it has essentially become a standard practice for high-end streaming providers, mainstream consumers are relatively ignorant of its necessity.
Benefits of adaptive bit rate streaming
Consumers of streaming media experience the highest quality material when adaptive bit rate streaming is used because the user's network and playback conditions are automatically adapted to at any given time under changing conditions.
The media and entertainment industry are the main beneficiaries of adaptive bit rate streaming. As the video space grows exponentially, content delivery networks and video providers can provide customers with a superior viewing experience. Adaptive bit rate technology requires less encoding which simplifies overall workflow and creates better results.
A CDN is often used to deliver media streaming to an Internet audience, as it allows scalability. The CDN receives the stream from the source at its Origin server, then replicates it to many or all of its Edge cache servers. The end-user requests the stream and is redirected to the "closest" Edge server. The use of HTTP-based adaptive streaming allows the Edge server to run a simple HTTP server software, whose licence cost is cheap or free, reducing software licencing cost, compared to costly media server licences (e.g. Adobe Flash Media Streaming Server). The CDN cost for HTTP streaming media is then similar to HTTP web caching CDN cost.
Assessment Task
Show your understanding of the different types listed above by posting links to examples of the different kinds in your comments or a blog post.
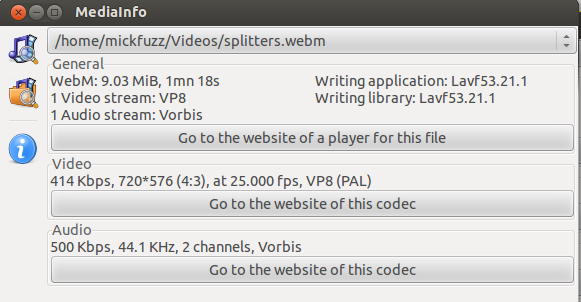
Download a video file in WebM format. If in doubt, you can use the one listed in the last task. Download WebM video clip
We can play this file on our desktop using an video playing application like VLC. However, just playing the file doesn't help us to really understand what is inside it. To find out more we will use another Free Software programme called Media Info. You can download Mediainfo from here.
Using MediaInfo to investigate the anatomy of video files
When you have installed MediaInfo launch it and you should get an interface like the one shown below.
Let's open one of our video files by clicking on the Open File icon or selecting File > Open > Open File(s) from the menu.
When we open the video file MediaInfo reads the file but instead of playing the video it displays information about it.
The General section here gives us the following information
This information will be useful to us later in this course when we start to work with video files. It is also useful right at the start to understand the parts video files are made up of.
WebM here describes the video container. Popular video containers include .mp4, .mov, .avi. Containers themselves don't contain any video or audio content, they are the vehicle in which that content travels.
We can see that the WebM container here has one video stream and one audio stream.
Sometimes we can have files that contain many different video and audio streams, this can be particularly useful if we have a film with different audio streams in different languages. We can see this in the video file listed below.
The information of the video above shows us a video file using the Matroska container (.mkv). This container allows you to add more than one audio stream.
Codecs and Containers
Each stream that we see here has audio or video information that is compressed using codecs. We learn much more about codecs and containers in the following chapters. Right now we just need to understand that they are used to compress media data so that it takes up less space.
Popular video codecs include h264, vp8, mpeg2. Popular audio codecs include ac-2, ogg theora and mp3.
Task - Crack open a video file
Take a video file and examine the different parts of it, streams and metadata using Mediainfo. Post any questions or suggestions in the comments.
A hands on look at command line encoding. While this chapter was always going to be challenging to write and we invite you to help us improve it. We hope we have some good materials here which act as a base to look at the subject.
ffmpeg and avconv (a more updated version of ffmpeg) are the command line applications that are working in the back end of many desktop encoding applications. These include ffmpegX, Handbrake, SUPER encoder. It is also essential for many desktop video editing applications including Kdenlive.
These tools can also be a very handy to work with video on Internet servers. As you will see later in the chapter you will be able to do more than just transcode video from one file type to another.
Installing ffmpeg / avconv
To start playing around with FFmpeg you will need to install it. It is best suited to use of a linux based server or desktop but it is possible on windows and osx. A search engine can help you with the specifics of how to install it. Search for "install ffmpeg + your operating system"
This guide written by RMO is a good introduction to taking your work with ffmpeg to another level on the server.
In the past year and a half, daf and I have undertaken a series of media experiments using python's excellent numpy library. The outcome of these trials are largely encapsulated in our numm project, which is available in the debian and ubuntu repositories as python-numm.
Numm uses gstreamer for a/v decoding and encoding, as well as a minimalist livecoding API, but in the interests of simplicity and portability, I've been reimplementing some of the core functionality as a wrapper around the ffmpeg binary.
Our video_frames function gives us numpy buffers from a video file. Each buffer is a 3-d array -- height, width, color -- with 8-bit intensity values. To save numpy buffers as images, we use the Python Imaging Library to define a np2image function (from image.py):
HTML5 gives you two ways to include video on your web page. Both of them involve the <video> element. If you only have one video file, you can simply link to it in a src attribute. This is remarkably similar to including an image with an <img src="..."> tag.
One video file
<video src="pr6.webm"></video>
Technically, that’s all you need. But just like an <img> tag, you should always include width and height attributes in your <video> tags. The width and height attributes can be the same as the maximum width and height you specified during the encoding process. Don’t worry if one dimension of the video is a little smaller than that. Your browser will center the video inside the box defined by the <video> tag. It won’t ever be smooshed or stretched out of proportion.
By default, the <video> element will not expose any sort of player controls. You can create your own controls with plain old HTML, CSS, and JavaScript. The <video> element has methods like play() and pause() and a read/write property called currentTime. There are also read/write volume and muted properties. So you really have everything you need to build your own interface.
If you don’t want to build your own interface, you can tell the browser to display a built-in set of controls. To do this, just include the controls attribute in your <video> tag.
There are two other optional attributes I want to mention before we go any further: preload and autoplay. Don’t shoot the messenger; let me explain why these are useful. The preload attribute tells the browser that you would like it to start downloading the video file as soon as the page loads. This makes sense if the entire point of the page is to view the video. On the other hand, if it’s just supplementary material that only a few visitors will watch, then you can set preload to none to tell the browser to minimize network traffic.
Here’s an example of a video that will start downloading (but not playing) as soon as the page loads:
The autoplay attribute does exactly what it sounds like: it tells the browser that you would like it to start downloading the video file as soon as the page loads, and you would like it to start playing the video automatically as soon as possible. Some people love this; some people hate it. But let me explain why it’s important to have an attribute like this in HTML5. Some people are going to want their videos to play automatically, even if it annoys their visitors. If HTML5 didn’t define a standard way to auto-play videos, people would resort to JavaScript hacks to do it anyway. (For example, by calling the video’s play() method during the window’s load event.) This would be much harder for visitors to counteract. On the other hand, it’s a simple matter to add an extension to your browser (or write one, if necessary) to say “ignore the autoplay attribute, I don’t ever want videos to play automatically.”
Here’s an example of a video that will start downloading and playing as soon as possible after the page loads:
And here is a Greasemonkey script that you can install in your local copy of Firefox that prevents HTML5 video from playing automatically. It uses the autoplay DOM attribute defined by HTML5, which is the JavaScript equivalent of the autoplay attribute in your HTML markup. [disable_video_autoplay.user.js]
// ==UserScript==
// @name           Disable video autoplay
// @namespace      http://diveintomark.org/projects/greasemonkey/
// @description    Ensures that HTML5 video elements do not autoplay
// @include        *
// ==/UserScript==

var arVideos = document.getElementsByTagName('video');
for (var i = arVideos.length - 1; i >= 0; i--) {
    var elmVideo = arVideos[i];
    elmVideo.autoplay = false;
}
But wait a second… If you’ve been following along this whole course, you don’t have just one video file; you have three. One is an .ogv file that you created with Firefogg or ffmpeg2theora. The second is an .mp4 file that you created with HandBrake. The third is a .webm file that you created with Firefogg. HTML5 provides a way to link to all three of them: the <source> element. Each <video> element can contain more than one <source> element. Your browser will go down the list of video sources, in order, and play the first one it’s able to play.
That raises another question: how does the browser know which video it can play? Well, in the worst case scenario, it loads each of the videos and tries to play them. That’s a big waste of bandwidth, though. You’ll save a lot of network traffic if you tell the browser up-front about each video. You do this with the type attribute on the <source> element.
Let’s break that down. The <video> element specifies the width and height for the video, but it doesn’t actually link to a video file. Inside the <video> element are three <source> elements. Each <source> element links to a single video file (with the src attribute), and it also gives information about the video format (in the type attribute).
The type attribute looks complicated — hell, it is complicated. It’s a combination of three pieces of information: the container format, the video codec, and the audio codec. Let’s start from the bottom. For the .ogv video file, the container format is Ogg, represented here as video/ogg. (Technically speaking, that’s the MIME type for Ogg video files.) The video codec is Theora, and the audio codec is Vorbis. That’s simple enough, except the format of the attribute value is a little screwy. The value itself has to include quotation marks, which means you’ll need to use a different kind of quotation mark to surround the entire value.
WebM is much the same, but with a different MIME type (video/webm instead of video/ogg) and a different video codec (vp8 instead of theora) listed within the codecs parameter.
The H.264 video is even more complicated. Remember when I said that both H.264 video and AAC audio can come in different “profiles”? We encoded with the H.264 “baseline” profile and the AAC “low-complexity” profile, then wrapped it all in an MPEG-4 container. All of that information is included in the type attribute.
The benefit of going to all this trouble is that the browser will check the type attribute first to see if it can play a particular video file. If a browser decides it can’t play a particular video, it won’t download the file. Not even part of the file. You’ll save on bandwidth, and your visitors will see the video they came for, faster.
If you follow the instructions in this chapter for encoding your videos, you can just copy and paste the type attribute values from this example. Otherwise, you’ll need to work out the type parameters for yourself.
Task: Create an HTML page with the <VIDEO> tag
Create an HTML page using the HTML5 Video Tag and videos files you have created
Post a link it to the comments below
This chapter aims to give a very short summary of a working definition of open video we arrived at as part of the Open Video Forum and invites you to comment.
By the end of this task you should be able to:
Understand a bit about why people care about open video
As we started the course sprint, we had a quick discussion of what open video meant for us in the context of our projects. The areas we agreed on were the use of Free Software tools for creating and distributing video and the adoption of freely-licensed formats, or at least formats using open standards.
To promote open video is it important to make material available in free and open formats. However, practically you may have to also provide versions in more restrictive formats like h264 to reach users on closed platforms like iOS. This is because vendors prevent their users from using free formats. There are pragmatic reasons preventing video developers from taking a purist approach to video distribution.
Whenever possible, it is good to pressure vendors to adopt the use of free and open formats. We aim to support free and open standards by the creation of this course and other materials. While h264 may not we free of restrictions we can use free tools to take it apart, create it and deepen our knowledge of the subject in general.
Recent debates about open video
There are many blog posts online which outline a tension between pragmatism and trying to support and promote open video. Many of these are about the continued use of the patented h264 format despite attempts to move video distributors towards more open codecs.
Take a look at of some of these blog posts. Don't get bogged down by the geek babble details but do get a flavour of the debate. It will give you a sense of how contested the issue of open standards is, as commercial interests continue to clash with free software philosophies.
An open specification should allow anyone to implement their own player, encoder or other tools to encode or decode videos in a free codec. It is important that this can be done without requiring a special contract or patent agreement. While H264 is a big step forward compared to proprietary codecs owned by a single vendor like Real or Microsoft, it still requires anyone implementing an encoder or decoder and even anyone distributing a video in h264 to pay license fees for patents covering algorithms used in the format to do so.
For videos distributed on the web for free this has been removed but if you sell or distribute videos on disks or broadcast you need to pay up. Free formats like Ogg Theora or WebM dont have such restrictions. The allow anyone to freely create tools and distribute content as they like.
While licensing and patent issues have a real impact and these things do matter, we want this course to be fun and practical too. When people argue about these kinds of esoteric issues it is easy to be reminded of the 'splitters' featured in Monty Python's Life of Brian.
As an fun activity download and play this short clip from the film provided as a fair use illustration of the point we are making.
The clip is encoded to the WebM open format, so you will need to use a video player which supports open video formats to use it. If you are not sure how to do this then install VLC Player which is available here - http://www.videolan.org
First Impressions?
What are your first impressions of the world of open video? Do you think that people should be pragmatic or purist about open video? Maybe you have questions you want to ask. Please share your thoughts and questions in the comments.
There were some fantastic debates and lines of thinking at the Open Video Forum on this subject. However, we were not able to spend the time needed to finish this chapter. Some of the ideas generated included the following bullet points.
Open video and hybrid distribution
Last mile issues and open video
Open hardware - how much autonomy do we want?
Using SD card distribution
Video editing using Free Software
Film post-production using Free Software tools
Smart phone / feature phones in Africa and the next 5 years
Challenges of implementing open video solutions on mobile devices
Task - Help us add to this course
Write a blog post or comment on this course. What worked well? What can be improved? What is missing? What are the aspects that excite you about open video? We will try to include your interests in the next version of this course.
You have made it. Please claim your "Deeper into Open Video" badge. Be sure to put a link to one of the tasks where you have demonstrated your learning.
 The second part of our course leaves behind some of the end-user technologies on open video to take a deeper look at video frameworks, command line approaches, and web implementations of video. It aims to be of use to software developers who are new to this area.
 While we have created a badge for this part of the course the guidelines for awarding the badge are flexible. We feel we can be generous in awarding this badge as an incentive for involvement. As such if it will be awarded for "Making a significant contribution to (or correction of) 'A Look at Open Video', or for showing commitment in demonstrating your learning outcomes from the course".


 Video Metadata can move in mysterious ways. Here are some of the ways it can move and be collected.

 Task - Get moshing & earn a badge