


Installing Chromium on Ubuntu
There are two procedures for installing Chromium on Ubuntu: using the Ubuntu Software Center or installing Chromium from a Personal Package Archive. We take a look at both below.
Using the Ubuntu Software Center
If you're using Ubuntu 10.04 or newer, the easiest way to install Chromium is through the Ubuntu Software Center.
To install Chromium from the Ubuntu Software Center, do the following:
- Click Ubuntu Software Center under the Applications menu.

- Type "Chromium" in the search box and press Enter on your keyboard. The Ubuntu Software Center finds Chromium in its list of available software.
- Click the Install button. If Chromium needs any additional libraries (software it requires to run), the Ubuntu Software Center alerts you and installs them along with Chromium.
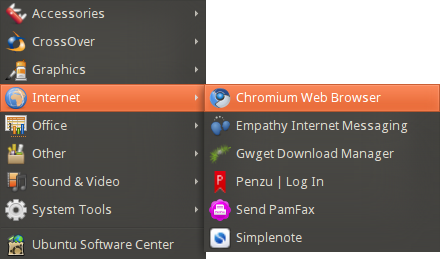
You can find the shortcut to start Chromium in the Internet option under the Applications menu:
Installing from a Personal Package Archive
If you're using an earlier version of Ubuntu, or just want to stay on the cutting edge of Chromium, you can install it from a Personal Package Archive (PPA). A PPA is a special repository for Ubuntu software that's separate from ones you would normally use either with the Ubuntu Software Center or Synaptic Package Manager. A PPA contains more frequent updates to software - updates which are often created nightly.
Remember that the software that you get from a PPA is 'cutting edge.' It may be buggy or unstable. Use it at your own risk.
To install Chromium from a PPA, do the following:
- Go to the Chromium Beta PPA at https://launchpad.net/~chromium-daily/+archive/beta.
- At the Chromium PPA site, select your version of Ubuntu from the Display sources.list entries for: list. Two lines, which look like the following, appear below the list:
deb http://ppa.launchpad.net/chromium-daily/beta/ubuntu maverick main
deb-src http://ppa.launchpad.net/chromium-daily/beta/ubuntu maverick main - In Ubuntu, click Administration under the System Menu and then click Software Sources.
- You are asked to enter your root password. This is the password that you use to log into Ubuntu. The Software Sources window then appears.

- In the Software Sources window, click the Other Software tab and then click Add.

- Copy the first line from the list of sources that you created in step 2, paste it into the APT Line field, and then click Add Source.
- Repeat steps 5 and 6 for the second line from list of sources that you created in step 2.
- In the Software Sources window, click Close. Ubuntu updates the list of software sources that it uses.
- Once that's done, click Administration under the System menu, then click Synaptic Package Manager.

- You are asked to enter your root password. This is the password that you use to log into Ubuntu.
- In the Quick search box, type Chromium and then press Enter on your keyboard.
A list of software that you can install (called packages) appears. - Find Chromium in the list, right click on it, and then click on Mark for installation from the menu that appears.
- If Chromium needs any additional libraries, Synaptic Package Manager alerts you and marks those packages for installation along with Chromium.
- Click the Apply button.