


Editing with JOSM
JOSM is the Java OpenStreetMap editor. It is used for editing the OpenStreetMap data on a desktop computer. This means you don't have to be online to edit data. JOSM requires the Java Runtime Environment--if it is not yet installed on your computer, you can download it from http://www.java.com/en/download/ .
This chapter explains how to download and install JOSM, step by step. We will also cover changing some of the settings in JOSM to make it easier to use! Then we will open a sample map and learn about some of the basic operations of the software.
Downloading JOSM
Go to the JOSM website at: josm.openstreetmap.de. You can also find this website by searching for “JOSM”.
The website looks something like this:
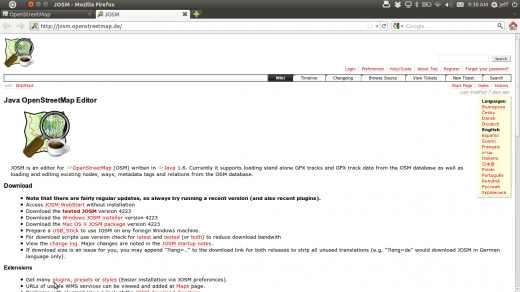
Note that in general, JOSM works the same on all operating systems, except for some installation steps. When required, we will specify the appropriate steps for your system.
Installing JOSM
Find the JOSM install file on your computer. Double-click it to begin setup.
Note: You must have at least version 1.6 of Java installed on your system for JOSM to work.
On Windows the installer first asks you to choose a language. Then you get a welcome screen click 'Next’. Click ‘I Agree’ to accept the license. Then you can choose the components you want (the defaults are usually fine). Finally choose the install location and click ‘Install’. When the installation is complete, click 'Next' and then ‘Finish’ to launch JOSM for the first time. Later, when you want to start JOSM, you can do so by clicking on the Start Menu in the lower left corner of your computer, and clicking the JOSM icon.
On Mac OS X, double-click the compressed file to open it and then double-click the Application file to launch JOSM.
You may see a window pop up that asks if you want to update the software. You don’t need to update it since it is new. Press the button that says “Cancel.” If you don’t ever want to see this message again, check the box at the bottom before pressing “Cancel.”
When JOSM starts, it looks like this:

Learning Basic Drawing with JOSM
Now let’s open up a sample OSM file to learn the basic ways to draw maps with JOSM. Note that this map is not real, in that it is not a real map of a real place, so we will not save it on OpenStreetMap.
Go to addresshttp://www.learnosm.org/files/sample.osm and click “Save File As…” Choose a location on your computer to save the file.
Now open the sample map file in JOSM. Open JOSM. Click the “Open” button in the upper left.

Find the file sample.osm. Click on it, and then click “Open”.
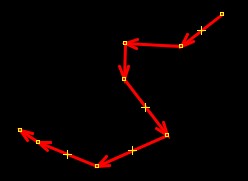
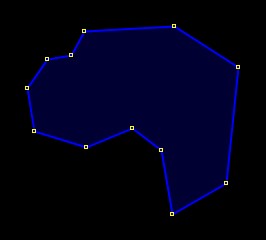
You should now see a sample map, similar to this:

Sample OpenStreetMap File
Basic Operations
To move the map left or right, up or down, hold your right mouse button down, and move your mouse.
There are several ways to zoom in and out of the map. If you have a mouse, you can use your scroll wheel to zoom in and out. If you are using a laptop and don’t have a mouse, you can zoom in and out using the scale bar in the upper left of the map window. Drag the bar left and right by holding your left mouse down and moving the bar left or right with your mouse.

Points, Lines, and Shapes
As you click on different objects on the sample map, notice that there are three different types of object on the map. There are points, lines, and shapes.
Points are a single location, represented by symbols. On this sample map, there are two points, a clothing shop and a market. The clothing shop is represented by a shirt symbol, and the market is represented by a shopping cart.

There are several lines on the map as well, which represent roads. If you look closely you will see that within the lines, there are points as well. These points do not have any symbols or other information associated with them, but they help to define where the line is located.
Lastly, there are numerous shapes on the sample map, representing different places – a forest, a river, and buildings. A shape generally represents an area, like a field or a building. A shape is exactly like a line – the only difference is that the line begins at the same point where it ends.
You may notice that when you select an object, a list appears to the right of the map in a window called “Properties”. The items in this list are known as tags. Tags are information that is tied to a point, line or shape that describes what it is. For now all you need to know is that this information helps describe whether our object is a forest, a river, a building, or something else.
Think about drawing a map by hand, and how you are also drawing points, lines, and shapes. What other places are best represented by points? Lines? Shapes?
Changing Objects
Select the forest on the left side of the map. Be sure to click on the line around the forest, not one of the points on the line. Now hold your left mouse button down and drag your mouse. You should be able to move the forest to a new location on the map.
Click on on of the points on the line around the forest. Hold your left mouse button down and drag your mouse. You should be able to move the point. This is how you can change the shape of an object, or move a point.
Drawing
On the left side of a JOSM is a column of buttons. Many of these button open new windows on the right side that provide more information about the map. However, the most often used buttons are at the top of this column. These buttons change what you can do with your mouse.
The top four buttons in this column are the most important. They allow you to:
- Select
- Draw
- Zoom in
- Delete
Until now, you have been using the Select tool, which looks like this:
![]()
Before you draw, you need to make sure that nothing is selected. Click in the black space on the map, where it is empty, to make sure nothing is selected.
Click on the second button, the Draw tool.
Find an empty area on the map, and double-click with your mouse. This will draw a single point.
To draw a line, single-click with your mouse. Move your mouse and click again. Continue until you are happy with your line. To end the line, double-click your mouse.
Draw a shape the same way that you draw a line, but finish the shape by double-clicking on the point where you started the line.
Add Presets
Now we know how to draw points, lines and shapes, but we still haven’t defined what they represent. We want to be able to say that our points are shops, schools, or something else, and whether our shapes are fields, buildings, or something else.
Click on the Select tool, in the column of buttons on the left.
![]()
Select one of the objects that you drew with the Draw tool. On the top menu, click “Presets”. Move your mouse through the sub-menu to the type of location you would like to define.
When you click on a preset, a form will pop up asking you for more information. You do not have to fill in every field, but you may wish to add some of the important fields, such as the name of the object.
When you are finished entering the information, click “Apply Preset”. If everything went well, your point, line, or shape should change colors or show a symbol. This is because you have defined what it is.
Draw Your Own Map
Drag the map away from the sample map. Hold the right mouse button and drag your mouse, until you have a nice empty area to draw on.
Use the Draw tool to create points, lines, and shapes. Describe what your objects are by selecting from the Presets menu.
When you are finished, you should have your own map, similar to the sample map that we opened in sample.osm.
Editing OpenStreetMap
In this chapter we will learn how to edit the map on OpenStreetMap and add our improvements. We’ll learn the basic cycle of mapping on OSM.
Step 1: Download
Get the current map data from OSM.
Step 2: Edit
Modify the map using GPS, Walking Papers, and notes as a guide.
Step 3: Save
Save changes to OpenStreetMap.
Before you begin: prepare JOSM
To start JOSM on Windows, click on the Start Menu in the lower left corner of your computer, and find the program JOSM. On Mac, double-click the JOSM application to start it.
Next, load your gpx file and your Walking Paper. You don’t need to open both, but you can if you want.

Download OSM Data
Before we can edit the map, we must download the existing OSM data in our area. To download the data, we need to be connected to the internet, because we are in fact downloading the data from OpenStreetMap.
When you open your gpx track or Walking Paper, the map window will show what you have opened, and will automatically move to the correct coordinates. After you open your files, look in the bottom left corner of JOSM. You can see the latitude and longitude (coordinates) of your mouse cursor.

Because our map window is already showing the area that we want to edit, it is easy to download the OpenStreetMap data for this area. Click on “File” in the top left corner of JOSM and click “Download from OSM”. This will open up the download window. You can access this window more simply by clicking on the download button, shown here:
![]()
When the download window opens, you should see a map with a pink box drawn on it. If you don’t see the map, click on the tab marked “Slippy map”.

The pink box represents the area of the map that we would like to download for editing. Unless you have moved the map window since you opened your GPS file or Walking Papers, the box should be drawn around the correct area. However if you would like to download a larger area, you can draw a new box. To draw a new box, click on the map, hold your left mouse button down, and drag your mouse to create a box. Release the mouse button to finish drawing the box.
When you are satisfied with the size and location of the box, click “Download” at the bottom of the window. JOSM will get the data for this area from OpenStreetMap and open it in your map window for editing.
Edit
The next step is to edit the map and add new items. This is not always easy at first, but with practice you will get better and better.
If you want to move a point, line, or shape, use the select tool. Click on an object and drag it where it should be. This can be used to correct the location of items that have been put in the wrong place.
![]()
Use the draw tool to draw new points, lines, and shapes. Describe these objects by selecting from the Presets menu.
Remember that your GPS points and your Walking Papers don’t automatically go into OpenStreetMap. You need to add them to the OSM map digitally, using the draw tool. But your points, tracks, and Walking Papers can be seen in the background as a guide.
Let’s assume that you saved a waypoint on your GPS named 030, and you wrote in your notebook that 030 is a school. To add this point into OpenStreetMap, you should select the draw tool, and double-click on top of point 030 in your map window. This will create a point. Then go to the Presets menu, and find the preset for school. Enter the name of the school and click “Apply Preset”. Do the same to add lines and shapes.

Upload Changes
After you have made a couple of changes to improve the map, let’s save those changes to OpenStreetMap.
Click “File” on the top menu, and then click “Upload Data”. This will open up the upload window. You can access this window more simply by clicking on the upload button, shown here:
![]()

Click “Upload Changes”.
If this is your first time saving changes to OpenStreetMap, you will be asked for the username and password that you created in Chapter 2. Enter them in the window that appears. If you check the box in this window, your username and password will be saved and you won’t need to enter them again in the future. Click “Authenticate”.

You will need to wait a few seconds for your changes to be uploaded, and then you are done! You have made your first edits to OpenStreetMap. You may continue editing to add all your points if you wish. Always be sure to upload your changes before you close JOSM.
See Your Changes on the Map
Open your internet browser and go to openstreetmap.org. Move the map to the area that you edited.You should see your changes now appearing on the map! If you don’t, try pressing CTRL+R to refresh the web page. Sometimes the map doesn’t update properly and needs to be reloaded.
What if you don’t see your changes? Don’t worry – it may take a few minutes for the changes to be shown on the map. Also, check your additions in JOSM to make sure that you added them correctly. A good general rule is, if your point has an icon in JOSM, then it should be seen on the main map at the OpenStreetMap website.
More JOSM
Now you have learned how to draw points, lines, and shapes in JOSM, how to open your GPS waypoints and tracks in JOSM, and how to download, edit, and upload your changes on OpenStreetMap. Now we will describe in more detail some of the features of JOSM, so that you can beyond the simple editing tools and have a better understanding of the software.
Useful Features of JOSM

JOSM has many different features. The main window in JOSM you are already familiar with – this is the map window, and it is where most of the action takes place. Here you view, edit, and add to the OpenStreetMap data.
To the right of the map window are a series of panels, which each do something different. Typically when you first install JOSM several panels are shown by default, such as Layers, Properties, and Selection. When you select a point, line, or shape in the map window, it will be shown in the Selection panel. Information about the object will be shown in the Properties panel, and the username of the author of that object will be shown in the Authors panel.
On the left side of JOSM, there are several toolbars, which consist of many buttons. At the top of this bar are different buttons which change what you can do with your mouse. You are already familiar with the first two, the Select tool and the Draw tool. The other tools make it easier to zoom in, delete an object, draw a shape, or create a line that is parallel to another line.
Below these tools are many more buttons. These buttons control what you see on the right side of JOSM. Using these buttons you can open and close the boxes on the right, such as properties, selection, and author.
JOSM Layers
Open your GPS file and download data from OpenStreetMap, if you haven’t already. You may notice that when you open a file, or add Walking Papers, or download from OpenStreetMap, another item is added to the Layers panel on the right side of JOSM. Your Layers panel may look something like this:
To hide one of these layers you have displayed, select one of them with your mouse and click the Show/Hide button that looks like this:
![]()
You can close a layer by selecting it and using the delete button:
![]()
To make a layer active, select it in the Layers panel, and click on the Activate button:
![]()
Saving OSM files
Sometimes after you download some OSM data, you may wish to save it so that you can edit it offline, and then upload it later when you have internet access again.To save an OSM file, make sure that it is the active layer in the the Layers panel. Click “File” on the top menu, and click “Save”. Choose a location for the file and give it a name. You can also save by clicking this button:
![]()
Additional Drawing Tools
JOSM has some additional tools to make it easier to draw lines and shapes. These tools are found in the “Tools” menu at the top of JOSM.![]()
- Split Way – This allows you to divide a line into two separate lines. This is useful if you want to add different attributes to different parts of a road. To use this function, select a point in the middle of the line that you want to split, Select Split Way from the Tools menu, and your line should be split in two.
- Combine Way – This does the opposite of Split Way. To combine two lines into a single line, they must share a single point. To use this function, select both lines that you want to combine. You can select more than one object by holding the SHIFT key on your keyboard and clicking on each line. When you have selected both lines, select Combine Way from the Tools menu.
- Reverse Way – This will change the direction of the line. If your line represents a road that is one way, you may want to change its direction. In other cases, direction doesn’t matter.
- Simplify Way – If your line has too many points in it and you’d like to make it simpler, this will remove some of the points from a line.
- Align Nodes in Circle – If you are trying to make a circular shape, draw the circle as best you can and then select this function. It will help arrange your points in a circle.
- Align Nodes in Line – This function will align a series of points into a straight line.
- Orthogonalize Shape – This function is very useful for drawing buildings. After you draw a building, this function will reshape it to have square corners.
Tags
When you draw a point, line, or shape, it is create with a location, but no information about what it is. In other words, we know where it is, but not what it is. Before now, we have been using items from the Presets menu to define what it is.
The way OpenStreetMap knows what an object is is by using tags. A tag is like a label that you can put on something. For example, if I draw a square, it’s only a square. But then I add multiple tags to it that describe what it is:
- this square is a building
- the name of the building is “Menara Thamrin”
- the building is 16 levels high
- building = yes
- name = Menara Thamrin
- building:levels = 16

Keyboard Shortcuts
Sometimes it can be annoying to click over and over to select different options and menus in JOSM. Luckily there are shortcut keys on the keyboard that allow you to do many common tasks. Here is a list of some of the most commonly used shortcut keys, along with what they do:- s – Choose the Select tool
- a – Choose the Draw tool
- z – Choose the Zoom tool
- + (plus) – Zoom in
- - (minus) – Zoom out
- p – Split way
- c – Combine way
- o – Align in circle
- l – Align in line
- q – Orthogonalize (make a shape square)