


Importing text and images
As we have said before, Scribus is page layout software, not a word processor or image manipulating software. While it's possible to edit text, draw vector drawings, or do photo processing, your possibilities will be limited compared with software dedicated to these tasks. Optimally, you will want completed text and fully processed images imported into Scribus for the most sensible workflow. By this method, you will still also have the original source files for preservation purposes.
Import text
Much of the time, text will be written by those who have little or know expertise with layout, and perhaps no knowledge of what the specific layout will be. Those who write for periodicals such as magazines or newspapers will have no idea of how their work will be presented in the layout, and probably no desire to know. Their focus is on the content, its accuracy, the prose, and whether a complete piece of work has been created. The editorial team will then make decisions about the relevance of the material and whether their instructions to the author have been carried out, even before the layout process begins.
The designer's role will then be to take this text, partially organized or not, and transform it as part of the layout process.
Scribus has the capability of working stylized text from a word processor (such as MS Word, OpenOffice.org, LibreOffice, KWord, Abiword, and so on), where the author will have the opportunity to simulate to some extent the final appearance of the text. This will facilitate communication between the author and designer where styles may affect the semantic content to some extent, but does complicate the process of incorporating the text into Scribus.
An alternative is to use a plain text editor (such as MS Notepad, GEdit, Kate, vi, and so on) which allows the author to literally focus on the verbal content, and allows the graphic designer complete freedom of decision-making regarding text styles.
How should you proceed?
You must have created a text frame before you can import text into Scribus.
- Create at least one frame. If you have created multiple frames these can be linked before or after importing your text.
- Select the initial frame, then
- File > Import > Get text.
- Scribus now brings up a file dialog, allowing you to navigate to the proper folder to find your text file. You may restrict your search to particular file types if this is useful. You may also search All Files.
Note that when you click OK, your text is imported and at that point you have lost any chance of selecting options at import. If you have made a mistake, repeat the process to replace the text, with correct settings this time.
You may have noticed there is also a choice File > Import > Append text, which works a bit differently.
- Get text will import and replace any text already present in the frame, though you will see a confirmation dialog if text is already present. If you existing text links through several frames, all of that text is replaced.
- Append text will import the text, but append it at the end of the text already contained in the frame or frames.
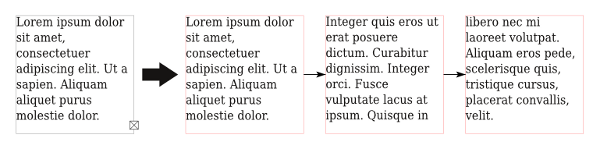
In case there is insufficient space in the frame for all the text, Scribus will not create any new frames or pages automatically. It will show a small square containing an X in the lower right hand corner of the frame (indicating text overflow), but it is up to the user to take care of the problem. Commonly, you will wish to pass the extra text into another frame, either on the same page or another one.
- Create a new text frame.
- Select the frame where text overflows.
- Click the Link Text Frames icon on the toolbar (keyboard shortcut is N), then click the frame to link to.
- To link to a third or later frame, you must click the icon again, then the next frame in the linkage.
- To break the linkage, then select the Unlink Text Frames icon (just to the right of the Link Frames icon), then select the frame where you wish the linkage to be broken.
- It is possible that this unlinking in the middle may produce undesired results. The quickest way to recover would be to Undo the unlinking.
Automatic Text Frames
An exception to the need to manually link frames occurs when you choose Automatic Text Frames when you create your document. In that case, when you create a new page, it will automatically contain a text frame, and this will be linked to the previous page's text frame.
Plain text
When you save plain text from most editors and word processors, you will see that the default extension for the file will be .txt, if this exists as an option. Nonetheless, a plain text file can be saved with any extension of the editor's choice, and in some cases might facilitate recognition and handling of particular files.
An important characteristic of text files is the character encoding. When computers first came about, there were only certain characters available, but with time there has been an expansion to not only include various characters for non-English, non-Latin languages, and thus a great expansion in the need for new characters outside of the original ASCII and Latin characters. Here are some selected examples.
- System – this denotes the character set your computer is using for various tasks, including default saving of text in files.
- UTF8 and UTF16 – these are the most comprehensive character sets available, and will be able to handle almost all written languages, plus many other special characters. It is recommended to use one of these whenever possible.
- ISO-8859-1 – This can be adequate, and is a commonly used encoding on many systems, particularly when you are working only with Latin languages.
- Apple Roman – This is a standard specific to some kinds of software running the Mac OS.
HTML format
HTML has become ubiquitous, of course, due to its use on web pages. The format and its changes are managed by the World Wide Web Consortium (W3C), and we now see than many word processors can import and export this format. The difference from plain text is the ability to specify features of the styles and layout of the text, which can be useful when editors are interacting with page designers.
There are actually several versions of HTML, and Scribus is able to manage to some degree all of them. What Scribus can handle are tags such as <p> (paragraph), <b> (bold), <i> (italics), and various header styles. It will not be able to handle tags which specify particular fonts, or CSS in general. Tags which Scribus cannot handle are ignored. You should adhere to specific HTML standards to get the best results with importing into Scribus.
Scribus works with HTML as follows:
- It will import all textual material on a page. This would include not only the main body of text, but any menus and sidebars on the page. Therefore, you may want to consider editing the HTML before import so that it only contains the text you're interested in.
- For each header style, Scribus creates a style internally, prefixed with html_ (for example, html_h1). This is mostly a place holder so as not to replace any existing styles, so therefore you will likely need to edit this style to get the look you desire.
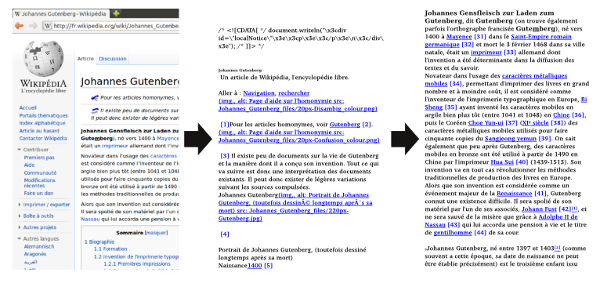
Here you can see something of the work entailed in editing HTML after import to Scribus. Although it may look like you have created links in your Scribus document, all that has happened is that a character style has been created which is blue and underlined.
ODT
OpenDocument Text format was developed as an open and freely usable way to save text along with all of its formatting features, and used by OpenOffice.org, LibreOffice, KOffice, and other word processors. It is a recognized ISO standard, unlike various proprietary formats, such as DOC. You will have the greatest flexibility and results importing this format to Scribus.
When you import an ODT file into Scribus, you will have some options:
- Overwrite Paragraph Styles – in case there is a name conflict with an ODT file and one in Scribus, this will overwrite Scribus's style with that from the imported text. Observe caution in choosing this option if you have already begun to make styles in Scribus.
- Merge Paragraph Styles – if more than one style in the ODT document have the same properties, Scribus will merge these into a single style. Occasionally, it might turn out there is some semantic reason for having two otherwise identical styles with different names, so consider that possibility.
- Use document name as a prefix for paragraph styles – this should be of some help to avoid accidentally overwriting a Scribus style from the ODT file.
- Do not ask again – if you check this, you'll have to remember how to get the default back again, since you won't see this requester until you do. In your .scribus directory, you will find a file named prefs140.xml, and inside that under the plugins, there is a context name OdtIm. You will see that the variable (key) is called AskAgain, and that when this value is 1, you will be asked again.
When the document is imported, paragraph styles are created, added to your list of styles, then applied to the text. For character styles, none are created in Scribus, but the formatting changes corresponding to the style should be applied where needed.
Because of various issues with the implementation of ODT import as it currently exists, it is difficult to make any categorical recommendations, but here are some particular bits of advice which some would make:
- It is not necessary for the author of the text to bother with making styles, and to some extent perhaps counterproductive. You will merely add the additional work of making sure styles have been properly imported and other changes applied where needed. Perhaps better to apply styles in Scribus, as long as you have a draft print of the ODT document to properly create and apply styles where they are needed.
- Some prefer plain text, and then will apply styles as they see fit within Scribus.
DOC format
Doc files are proprietary, which means that you cannot without permission from Microsoft make an application which make use of the internal structure of these files. Scribus cannot itself import files saved in the native Word format. For this task, Scribus uses a small utility called antiword which will allow importation of DOC files. The Windows version of Scribus has antiword automatically installed; for other versions you will need to get this utility yourself.
When you import such a file, all styles and formatting will be lost. In addition, you must check the text carefully after import, since in some cases blank lines or extra digits may appear at various locations.
An alternative and more reliable method would be to import your DOC file into OpenOffice or LibreOffice, then export as something more suitable for Scribus, such as ODT, HTML, or plain text.
Note that DOCX files are not supported, yet this should also be able to be imported by LibreOffice.
Importing images
Importing images is very common in layout. To be sure, some types of publishing, such as novels and to a lesser extent scientific publishing, may have little or no use for images. In most common situations, including photos or bitmapped or vector graphics is essential.
Photos
Scribus can import a number of different photo image formats, even though some of these may not be suitable for high quality layout and printing. The list of useful formats we have already mentioned the list of useful formats in Preparing your sources, but here we will discuss specific features of each to help you choose those appropriate for your work.
Importing is done, just as with text, with the use of a frame, in this case an Image frame, obtained by selecting Insert > Insert Image Frame from the menu, or by converting some other kind of frame, with Item > Convert to > Image Frame. Copying and pasting pictures will absolutely not work – instead, File > Import > Get image, or from the context menu, Get image.
In the Image tab of Properties you can adjust the dimensions of the image in the frame in two ways – either by selecting Scale to Frame Size (and perhaps choosing Proportional so as not to distort the image), or selecting Free Scaling, to manually manage the size and position of the image in the frame.
JPEG
This will be a commonly used format in layout, with a file extension of .jpg or .jpeg. Digital cameras typically save in this format as their default, even though others may be available. The reason this became the case was that the compression of the images allows for efficient use of memory in the camera. Similarly, this is a useful feature for images on websites.
The downside of this image compression is a loss of detail in the image, and furthermore, this is a so-called lossy format, since data is lost forever in the process of saving to JPEG. Generally speaking, the higher the compression (smaller the file), the greater the loss of detail, and the lower the quality of the image. This may not be noticeable on your monitor, but might be when the image is printed.
Importing JPEG to Scribus should occur without any issues. Note that converting a JPEG to some other format will not improve its quality.
PNG
PNG, on the other hand, is a better alternative as a compressed format, since it is a lossless format, so that image data is not lost, even though the size of the files will be somewhat larger than JPEG. An additional feature is that PNG images can have an alpha channel, allowing for partial transparency and some other image effects. Gimp in particular can create transparencies, fading, and many other effects.
All photo editing software can handle PNG images for both opening and saving.
TIFF
TIFF is one of the oldest image file formats, and is used extensively for high quality printed images. Not all TIFF images are high quality – for example, fax machines make TIFF images for their purposes. The high quality comes at the price of sometimes making very large files, perhaps the main drawback of this format.
Because of its long history of use, there is an interesting feature not possible with PNG, clipping paths. These are vector paths used to delimit parts of an image for some special effects and can be done with Gimp and other editing software. The use of clipping will be discussed in the chapter on Text flow and typography.
PSD
PSD is the native file format of Photoshop. This format is proprietary, and owned by Adobe, who have kept some specifications of the format secret since version 7. Scribus can import PSD files, but will fail with newer features introduced after this version. That having been said, Scribus can handle such features as layers and their visibility, transparency, as well as blending modes. This can be useful to alter the intensity of a shadow or even hide certain elements in the image.
Once the image is imported, layers can be accessed by the Extended Image Properties dialog, which you should see available through the context menu or Properties > Image.
SVG, EPS, and AI formats
Programs such as Inkscape and Adobe Illustrator work natively with vector drawings. Vector drawings, in contrast to bitmap drawings which describe an array of colored pixels, consist of mathematical descriptions of lines, whether straight or curved, which therefore will retain sharp contours even under high magnification.
In order to import a vector drawing, you do not have to use a frame.
- Click on a part of the page so that no item is selected – the reason for doing this is that some formats, such as EPS, can be imported into an image frame, but in that case, they will be converted to bitmap.
- From the menu, select File > Import > Get Vector File.
- You will only have the features which your Scribus installation can support. Select a vector file from the choices you have available.
- The mouse cursor transforms to something resembling a page or scroll, with a plus sign (+). Click the place on the page where you wish to place the upper left corner of the vector drawing.
- Often, you will see that the size is too large or too small, and perhaps placement not what you really wanted, but you can easily resize your drawing and adjust its precise placement.
Most likely, your vector drawing actually consists of a Group of individual components, which if desired can be ungrouped (Item > Ungroup once or more times) so that each element can be adjusted or edited as desired.
Any colors in the vector drawing will automatically be imported to your color palette, but of course can be changed according to your needs.
SVG
SVG was originally proposed by Adobe, and is now officially enabled by W3C. Many kinds of software and even some browsers can natively handle SVG files, and the specification continues to expand from the efforts of Illustrator and Inkscape. Although it has been criticized for not including CMYK, Scribus can manage both conversions from and to CMYK, and also process and spot colors, so you should have no concerns about color fidelity.
If some text is included in your SVG, it is good to vectorize your fonts for best results. Alternatively, and perhaps even preferably, leave all text out of (or delete from) the SVG and make your text within Scribus.
EPS
EPS, or Encapsulated PostScript, came some time after PostScript but before PDF format was introduced. The specifications have not changed since 2001, and consequently it is less used than in the past, but there is no reason to avoid or discard such files since Scribus can handle them faithfully. You may find many logos in this format. If possible, you may wish to convert EPS to SVG or AI mainly in the interests of securing the ability to import it to other software.
AI
AI is the native format for Adobe Illustrator. Because of that, it is widely in use, but since it is proprietary, there can be some issues with certain features which may not be supported outside of Illustrator. Scribus has only partial support, but it's usually worth a try to import into Scribus first rather than convert to SVG.
Tables!
As currently implemented in Scribus, tables can be considered a special instance of text frames. They are somewhat literally a matrix of text frames. There is now some ability to import Excel or CSV files, but this is limited. There also is some ability to deal with cell and overall borders, but frankly in a less than optimal way. Because these are individual frames, however, it is possible to convert individual cells to, for example, image frames, which could have some use in your layout.
Because of the various limitations, you may want to consider bypassing tables altogether, and make tables with the following process:
- Create your table in Calc (OpenOffice or LibreOffice). If you have Excel data in a file, open in one of these other programs.
- Select the portion of the table you wish to use, and make a copy.
- Go to File > New > Drawing.
- In the file window, select Edit > Paste Special, then choose the option which begins with Calc in the dialog.
- Now select File > Export.
- From the format choices, select EPS.
- Once you save the file, then import this EPS to Scribus.
The reason for doing this is that you will find that there is much greater ease in making various adjustments and settings in Calc than in the Tables environment in Scribus.