Blender Interface
Note: Make sure you are familiar with Blender keyboard controls, and have configured Blender before going on with this chapter.
Basics
Let's get an overview of the interface itself.
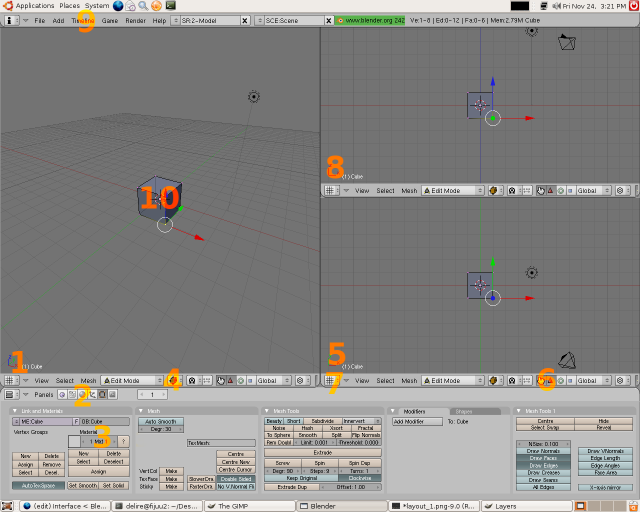
-
Viewport Axes

The above viewport axes represent the viewport is in Perspective View. Note how there are 3 arrow axes and not just two. We can see all 3 dimensions of an object when we're using this view, as opposed to just 2, for instance when looking in the Top, Front or Side views.
Another kind of view in Blender is Orthographic, which is less natural to our eyes (objects don't get small the further away they are in this view) but it's more mathematically representative. The axes represented at the base of every viewport are what are known as global axes, in other words they are applicable for the entire scene and everything in it. They cannot be altered, just in the same way East and West in the real world don't change direction.
-
Panel type.

By clicking on these icons we can change settings relating to different primary functions in Blender.
Blender has several primary functions seen in those buttons. In order they are:
- Game Engine Logic buttons (F4-key)
Here we set up interactivity using buttons and connecting them together to create realtime interactive artworks.
- Script Buttons This is for linking special scripts to Materials, Objects or whole Worlds.
- Shading buttons (F5-key) Materials are created here and their properties manipulated. This panel also contains sub-panels relating to light properties and the overall properties of worlds like atmospheric effects and physics. Of note is that special materials can be assigned here for use in the Game Engine, called Dynamic Materials. These change the way objects perform when in contact with other objects in the Game Engine.
- Object buttons (F7-key) The properties of individual objects themselves are changed here, including settings relating to how objects perform when animated and their relationship to other objects when in motion (constraints). This panel also contains a sub-panel where we can set physical properties for objects used when performing physical simulations.
- Editing buttons (F9-key) When ever we're editing a mesh it's good to have this panel in view. There are many settings here used when editing a form that change the way we edit it and allow us to change the properties of meshes themselves. Here we can also turn off different visual indicators that help us understand detailed properties of our mesh just by looking at it.
- Scene buttons (F10-key) Whenever we want to render out our work to make a picture or a movie, we use this panel. Here are settings related not just to the format of our final creation (eg the size of the image or the filetype of the movie etc) but also how Blender should treat our scene when rendering it. Of note is that there are two rendering plugins for use in Blender when you install it, the Blender Internal Renderer and the YAFRAY raytracing renderer which performs advanced calculations on the path of virtual light and so is often used to create very realistic visual effects.
- Game Engine Logic buttons (F4-key)
-
Object Name

This field, seen here in Edit Mode, allows us to change the currently selected object's name. It's also available to us in Object Mode. The name of any selected object can also be found in the bottom of any viewport. Being able to quickly identify the name of an object, and even rename it becomes important as your scenes grow in complexity.
-
Viewport Shading Type

By clicking on this button a dropdown menu is presented that allows us to change the way the object is drawn in the viewport. Commonly used draw types are Solid and Wireframe. You can quickly switch between these two drawing modes with the Zkey. Note that this doesn't effect how the form is rendered when making a movie or image at all. They are just draw modes for use by you to help you better see your form. Wireframe, for instance, is very helpful because it lets you see 'through' your mesh allowing you to select parts of it not available to you in the opaque Solid mode.
-
Example of axes seen in Top view.

Take note of the two global axes in this view, one is Y and one is Z. Think of those two axes as representing the ground under your feet. Y points in front of you and X to the right of you.
-
Transform Manipulators.

By choosing a Transform Manipulator like Rotation (represented in Blender as a circle) and then selecting an axis, the currently selected object can be rotated around that axis like a wheel on an axel. Similarly by choosing the Translation manipulator we can click on an axis and drag the current selection along it, as though it were on rails. In 3D terminology 'translation' means "moving through space". Often confusing, but translation in this sense has nothing to do with language.
The other manipulator often used is the Scale manipulator. This is useful if you want to quickly (but innacurately) scale a form along one or two axes, in other words, perform a non-uniform scale.
-
Window Type Button.

By clicking this button a list of different 'window types' are displayed. There are many in Blender each of which are responsible for giving us access to core functionality within the program.
When you select an item from that menu the current split window will change type. For instance clicking on Video Sequence Editor will change the window from a 3D Viewport to a window for laying out video tracks in time. As you can see, there are many other window types, including a Sound Sequencer, a Text Editor (also used for writing Python scripts), IPO Curve Editor (used to animate objects with great detail), schematic views (giving you a diagram of your scene) and more.
-
An axis seen in Front view.

Imagine in this case the cube represented is a building. You're standing on the ground looking at it front on.
The global axes represented are Z and X. This means that global Z points up, which it always does in Blender. -
Main operation menu

This menu allows you to save (CTRL+W-key or CTRL+S-key) and open (F1-key) your work, and quickly access basic functions relating to Animation and the Game Engine. -
An object
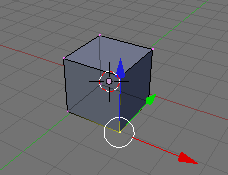
Here is a cube, in Edit Mode, seen in Perspective view, with a Translation 3D Transform manipulator active and with one vertex selected. The important thing to note here is the axes right on top of that vertex. These axes, despite 'mirroring' the directions of the viewport axes in this case, are actually local axes, not global axes. In this case, they show us the orientation of our selected vertex; a single point in 3D space. Put simply, every object - even parts of objects - has its own orientation and these orientations are always in relation to the fixed directions of the world. This understanding of the difference between local and global axes applies right across all of geometry and any 3D software package.
Two core interface modes
One of the best ways of approaching Blender for the first time is in the context of its modes. When you change modes, the interface changes with it, not just what you see (menus and the look of your artwork) but also the key combinations that are available to you.
The menu at the base of every 3D viewport is where we change modes relating to editing. It looks like this:
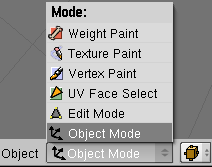
Of these modes there are two you'll be using a lot: Object Mode and Edit Mode. Both of these modes do quite different things.
Edit Mode
Edit Mode is used to modify the form of an object, including properties relating to that form. Examples of this might be cutting an object in half, twisting it like rubber or adding more detail to a part of the overall form. Whenever you want to reshape an object, manipulating its form, use Edit Mode. This is what Edit Mode looks like. You can see how the 3D form in the Viewport (herein called a mesh) looks translucent and has dots on every corner. These dots are called vertices, the lines that join them are called edges and the flat surfaces that 3 or more vertices and edges make together are called faces - commonly also known as polygons or just polys. The currently selected element in this image is a single vertex, but it could just as equally be an edge, face or several of them altogether.
Object Mode
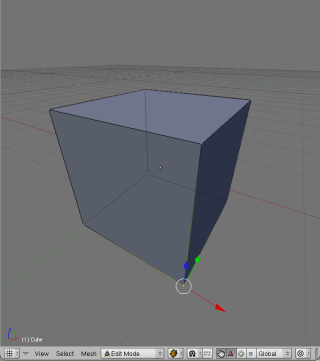
Object Mode deals only with the properties relating to the object itself, like its name, its location, its size and its relationship to other objects (ie. parent and child objects). When ever you want to move an object, add a new object, rename an object or change other aspects relating to its 'objecthood', use Object Mode. This is what a viewport looks like in this mode. Notice how the coloured axes are attached to a dot in the center of the mesh? This is because the whole object is selected, and so they are located at the object center.
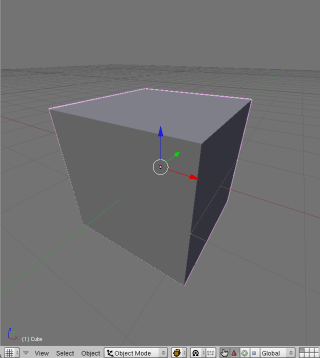
The fastest way of moving between these two modes is with the TAB. Hitting it simply switches between modes, from one to the other and back again. Placing your cursor over a viewport (this is how we tell Blender which viewport to use) try hitting TAB a couple of times. Notice how several other things also change in the interface? The whole Button panel at the base also changes.
Let's not edit anything yet however until we've gotten used to using the mouse in Blender..
Mouse input
As mentioned in the introduction, Blender distributes mouse input over three buttons in a mouse by turning the wheel itself into a button.
Firstly let's learn about the roll, something intrinsic to navigating a 3D scene.
Roll
Place your cursor over a viewport and press the MMB until you feel it click and then drag the mouse around. You'll see the object turning in the viewport. In fact it's not the object that's rotating, but the view itself, like a camera orbiting around the object. It may seem unusual to use the mouse-wheel as a button, but it's effective once you get used to it.
Pan
Panning is when you take whatever view you have of the object and scroll that view, from left to right or up or down. Your orientation in relation to your object doesn't change during the process however. This is really handy for moving around your scene.
To Pan press SHFT+MMB and drag your mouse around. You'll see the object scrolling in the direction you drag the mouse.
Zoom
Zooming is no different to how it would be were you using a camera. The view direction is fixed but you move the viewing point closer to or further away from the object. You can zoom just using the wheel like you would normally, but if you want a really smooth zoom, try CTRL+MMB and dragging up and down on your mouse. Smooth zoom gives you much greater control over the zoom distance and is worth getting used to.
Selecting and Moving
In your scene at the moment is a camera, a light and a cube. The camera is the pyramid shaped object and the light is the line with the circle on the top.
Zoom out so you can see all of your cube in the left most 3D viewport. Make sure there's some room to the left and right of it. Ensure you're in Object Mode. The cube should have a pink outline around it, as seen in the above image. When an object is pink, it's selected.
Hit the A-key once and then once again. Notice how everything becomes pink and then black the second time? A-key is the shortcut for select all and select none. You can also use the Select menu to access this feature, named Select/Deselect All.
Making sure nothing is selected RMB click once on the cube. Then, with your mouse cursor still over that viewport, hit the G-key once and move your mouse around. The object will follow the mouse. 'G' in G-key stands for grab. When you hit this key you're tellling blender to lock the currently selected object to the mouse cursor. Now hit ESC or hit the RMB again, the object will snap back into it's original location.
Let's try this again but this time let's move the object and give it a new location. To do this, repeat the above steps of grabbing the object but instead of clicking RMB at the end, click the LMB. This tells Blender, "put the object there and leave it there".
You can also use the cursor keys in grab mode instead of the mouse. To place the object where you want it, just hit ENTER. Some of you will be familiar with the concept of snapping, which is moving the object to units on a grid, one at a time. This is often used by people that need really accurate results. To move an object and have it snap to grid units, hold CTRL down while you move the object. This also works perfectly well with the cursor keys.
Now place your mouse cursor over the viewport with our Top view. LMB once next to the cube you already have in the scene. Notice the small red circle that follows the mouse click. Click around, it will follow. It looks like this. At any time you can center the 3D cursor by hitting SHFT+C-Key. The 3D cursor defines where new objects are added. Centering it places it at the location x=0, y=0, z=0.

This is an important tool, known as the 3D Cursor. Wherever this cursor is in the scene is where new objects will appear. It's also important for other reasons I'll show you later. OK, let's add an object.
Adding New Objects
Blender provides a variety of basic objects (often called primitives) for us to manipulate in the course of modeling. While it is certainly possible to make a model from scratch (adding three vertices and making a polygon from them) it is often more useful to start with an object that has properties we need in order to most quickly build our model. For instance, if you were modeling a chair you'd start with a cube or plane primitive. If you were modeling a pear or cat head, you'd be better start with a sphere primitive.
Move the 3D cursor to a location just left of the current cube in a Top View.
Checking once again that you're in Object Mode - and with your mouse cursor over the viewport in Top view - hit the space bar and move the mouse to move across the menu entries Add->Mesh->Cube. Now hit ENTER or LMB.
You should now have two cubes in your scene. Notice though that the Cube you've just added is added in Edit Mode. It won't respond like the other cube, and we can't safely move it in its current mode, only edit the mesh itself. To move it safely, go into Object Mode either by using the mode button at the base of the viewport, or hitting the TAB.
Note: you can not edit the meshes of more than one object at the same time. Object mesh data is accessed and managed on a per-object basis.
Selecting individual objects.
Each object contains its own data. An object's data includes its name, its mesh, its editing history, its location, its textures (and more). It is important to remember that an object's mesh is just a part of that object's data. When you are moving the mesh around, you are not moving around the object. Similarly, you can delete all the mesh data from an object and the object will still exist. It merely has no mesh.
Once in Object Mode, RMB to select either of the two objects. Now hit G-key as you did earlier and move it around. As you can see objects must be first selected before they can be manipulated. Notice also that as you move objects around in the Top or Front view, they move around at the same time in the Perspective view.
Have a play with that for a bit and then as a next step consider editing using various techniques.


