


Creating and Managing Stages
"Stages" are web pages on which UpStage performances take place. An UpStage server can have any number of stages, and media uploaded to the server can be assigned to multiple stages. You can also be "in" more than one stage at a time, simply by having different stages open in different browser tabs.
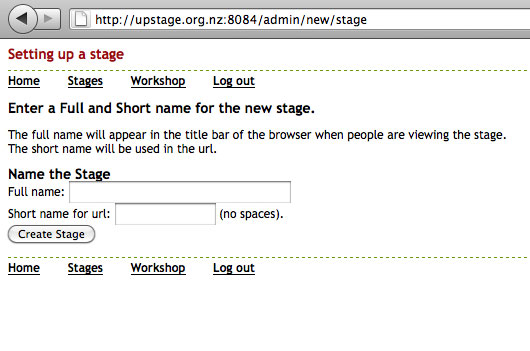
Set up a new Stage
To create a new stage, click on the link “Set up a new stage” and give your stage a name. This name will appear in the list of existing stages. It won’t be accessible to audience members until you make it public in some way (for example, create a link to it from the Foyer, put it on your own web site or email the URL to your target audience), but it will be visible to logged-in players and can be accessed for rehearsals or closed performances.
The URL for a stage is http://yourserverURL/stages/stagename – for example, http://upstage.org.nz:8084/stages/swaray. You can create a link directly to a stage from the Foyer or from another web site by editing the HTML just as you would create a link to a web page.
Manage Stages
From the Workshop, click on the link “Manage an existing stage”; you will see a list of stages, and if any players or audience are on a stage it will be shown here (numbers of players/audience to the right of the stage name).
This is where you can:
- assign and unassign avatars, props and backdrops for an existing stage;
- rename the stage;
- edit the splash screen message for a stage;
- change the background colour for the backdrops and props galleries (useful if you have props or backdrops that are mostly white and difficult to click on with a white background);
- make the debug messages display on the stage (useful for programmers trying to trace bugs!);
- reset the stage;
- delete unwanted stages.
Delete a stage
To delete a stage, select the check box beside the stage name, scroll to the bottom of the list and click the "remove selected stages" button. Note that deleting a stage does not delete the media assigned to that stage.
Manage (edit) an existing stage
To manage (edit) a stage, click on its name. Note that if you edit a stage while there are other people on it, the stage will automatically reload for them. UpStage will try to stop you from doing this with messages warning you that other people are using the stage; you can override these messages. It is courteous to do this only when the people on the stage know that it's going to happen.

Assign media to a stage
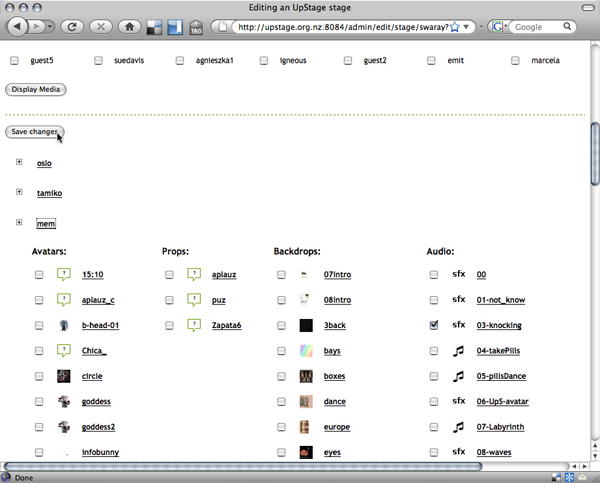
Select the stage you wish to edit then follow these steps:
- select which users' media you want to see by clicking on the check box by the username and clicking the "Display Media" button;
- below the "Display Media" button, click on the username or the + sign to expand the list of media uploaded by that user;
- select the media you want to assign to the stage by clicking in the check boxes beside the thumbnails (note that media uploaded as .swf will not display a thumbnail image, but you can identify it by its name; clicking on the name will take you to that media's information screen, so that you can be sure it is the media that you want); then click "Save changes";
- after clicking "Save changes", the screen will refresh, telling you that the stage has been updated and giving a direct link to the stage near the top of the screen. The avatars, backdrops and props you have assigned to the stage will now appear in the Wardrobe and Image Gallery of that stage (see Section 3.3).
Change name and splash screen message
From the Edit Stage screen you can also edit the name of the stage, and the splash screen message that will appear while the stage is loading, Type the new text in the appropriate places and click "Save changes".
Change background colours
To change the background colour of the backdrops and props galleries, use the colour picker that is below the list of usernames. Click on the colour you want (it will display in the box below the colour picker) and click "Save Background Colour". This change is only visible to players, as the audience do not see these tools, and the main reason for wanting to do it is if your performance has backdrops that go behind the backdrop and prop galleries and make it difficult to see and select the icons.
Note that, in the future, it will be possible to change other background colours here too, including the chat window and the background colour for the entire web page behind the UpStage stage.
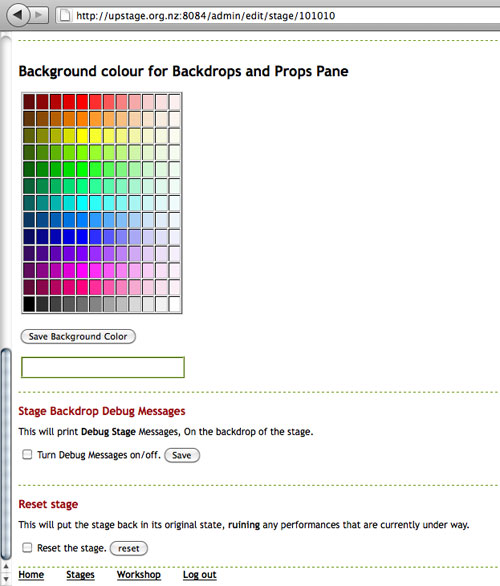
Debug messages
Click the check box "Turn Debug Messages On/Off" and click the "Save" button alongside it. The main reason for doing this is programmers wanting to find bugs, however it has also been used deliberately during performances.
Reset
To reset the stage, click the check box beside "Reset the stage" and click the "reset" button alongside. This clears all the text from the text chat window and returns the stage to its default state; note that it does NOT unassign the media that has been assigned to the stage, but it will restore any changed avatar names to their original name.
If you change the voice of an avatar that is assigned to a stage, it is necessary to reset the stage in order for the changed voice to take effect.
If you need to reset the stage during a rehearsal for some reason, remember to warn everyone that you are doing this, as they will be "thrown off" the stage. The stage will automatically reload, but it can be disconcerting if you aren't expecting it and is definitely not a good idea to do during a performance (unless specifically you want that effect!).