About This Manual
This manual provides a beginner's introduction to installing, configuring and using Ardour for basic sound recording and editing tasks. The main body of the manual was written during a Book Sprint led by Derek Holzer in the moddr_lab (http://moddr.net) at WORM in Rotterdam, the Netherlands, between 23 and 27 November 2009, with input and support from the international community of Ardour users and developers.
This FLOSS manual complements the Ardour reference manual currently under development by the Ardour community, which aims to provide an encyclopedic listing of Ardour's features. That reference manual can be previewed at http://vm-nice.stackingdwarves.net:8888/ardour-en/1-ARDOUR.html.
The Ardour community is invited to contribute content to this manual. The interface to edit or add new chapters is located at http://en.flossmanuals.net/bin/view/Ardour
Conventions Used in This Manual
Below are some basic conventions we have adopted in this manual.
Mouse Clicks
Ardour requires a two-button mouse to run (or the emulation of that on your system in some other way). A Click is assumed to be a left button mouse click. A Right Click refers to the right-hand button on the mouse. A "Control", "Cmd" or "Apple" key pressed with a mouse Click is not the same, and may in fact give a different result.
Key Names & Combinations
The names of keys to be pressed are written in quotation marks and italicised, like this:
"Control", "Return", "Backspace", "R"
Key combinations are written like this:
"Control" + "X"
or
"Apple" + "X"
Menu Navigation
Many functions are accessible in Ardour by clicking on the various menu items. Additionally you may need to access functions through the menus of OS X, Ubuntu, or other Linux distributions. To illustrate this we use two conventions: the first is illustration via screenshots (images), and the second is through a Syntax like this :
System > Administration > Synaptic Package Manager
The above example is shorthand for "first click on the System menu, then choose the Administration item of the list, and then click on Synaptic Package Manager".
Glossary Words
FLOSS Manuals does not assume any previous knowledge of computers or audio editing, so terms which might be unfamiliar to the general reader are capitalized throughout this manual, and are listed in Boldface the first time they are used in a chapter. Glossary words are also defined in-line the first time they occur in the manual, and are included in the Glossary at the end of this manual.
What is Digital Audio?
Since we'll be using Ardour to record and edit sound, it might be useful to review how digital audio works.

A diagram showing how sound travels through your computer. The "Analogue to Digital Conversion" and the "Digital to Analogue Conversion" are done by the sound card or audio interface. The "Digital System" in this case is Ardour.
Source: http://en.wikipedia.org/wiki/Image:Analogue_Digital_Conversion.png
Frequency and Gain
Imagine a loudspeaker. To move the air in front of it and make sound, the membrane of the speaker must vibrate from its centre position (at rest) backwards and forwards. The number of times the membrane vibrates each second determines the Frequency (the note, tone or pitch) of the sound you hear. The distance the membrane travels from its resting point determines the Amplitude (the volume or loudness) of the sound. Normally, we measure Frequency in Hertz (Hz) and Amplitude in Decibels (dB).

A microphone works like a loudspeaker in reverse—vibrations in the air cause its membrane to vibrate. The microphone turns these acoustic vibrations into an electrical current. If you plug this microphone into a computer's sound card and start recording, the sound card makes thousands of measurements of this electric current per second and records them as numbers. The number of Samples (i.e. measurements) made per second is called the Sample Rate, and the number of possible values each Sample can have is called the Bit Depth. The combination of Sample Rate and Bit Depth indicates how closely the digital signal can reproduce the sound it has recorded.
Peaks and Clipping
When Ardour displays the Samples which have been recorded, they appear as the Waveform we see below. The centre horizontal line indicates the membrane of the speaker at rest, and the Peaks of the Waveform indicate the maximum Amplitude.

If we take the same Waveform and increase the Amplitude by 6 Decibels, then some of the Peaks will now be outside the range that the computer can represent digitally. The computer's inability to represent Peaks outside the range of Amplitude is called Clipping, which results in a permanent loss of digital information, as well as a change in the sound quality which is recognizable as Distortion. Ardour marks clipped Peaks with the color red, as can be seen in the image below.

In both images, one can also see the Mixer Strip on the far left, which gives a running measurement of the Peaks, as well as an indication at the top of the Peak Meters showing the maximum Peak so far.
The range of decibels between the region's maximum peak and the clipping point is commonly referred to as Headroom, and common recording practice is to keep approximately three to six Decibels of Headroom between the maximum of your signal and the clipping point, with the clipping point itself being represented as 0 dB (zero Decibels). In other words, an audio region with a comfortable amount of Headroom would have its maximum peaks between −6 dB and −3 dB.
Also, because the Peaks of audio signals add together, care must be taken when Mixing several sources together to keep the combined signals from Clipping.
Sample Rate and Bit Depth
To make audio playable on a compact disc, for example, the computer must generate 44,100 Samples per second. The Sample Rate determines the highest frequency which can be recorded or played back by the computer. A sampling rate of 44.1 kHz means that the highest frequency which can be represented is just under 22.05 kHz. Since normal human hearing lies within the range of approximately 20 Hz to 20 kHz, this is commonly accepted as a reasonable Sample Rate. Other commonly used Sample Rates include 48 kHz (DAT recorders) or 96 kHz (DVD audio).
Each Sample is recorded as a 16-bit number. One Bit is a piece of information which is either 0 or 1. If there are 16 bits together to make one sample, then there are 216 (65,536) possible values for each sample.
Thus, we can say that CD-quality audio has a Sample Rate of 44.1 kHz and a Bit Depth of 16 bits. Professional music recordings are usually mixed using 24 bits to preserve the highest amount of detail before being mixed down to 16 bits for CD. Older computer games have a distinctively rough sound, using only 8 bits. By increasing the Sample Rate, we are able to record higher sonic frequencies, and by increasing the Bit Depth, we are able to use a greater Dynamic Range (the difference between the quietest and the loudest sounds possible to record and play).
Installing Jack OS X on Mac OS X
Ardour runs in conjunction with the JACK Audio Connection Kit ( http://jackosx.com/ ). JACK is an audio system which manages connections between Ardour and the soundcard of your computer, and between Ardour and other JACK-enabled audio programs on your computer. You must install Jack OS X before you can use Ardour.

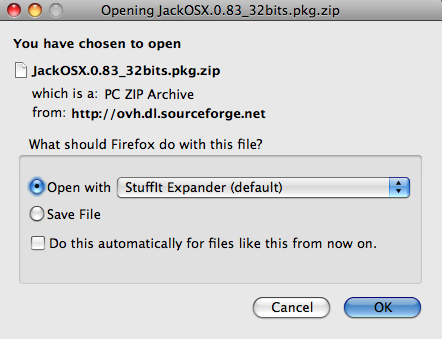
After downloading Jack OS X, you will be automatically prompted to open the installer with a window similar to the one below. If you don't see any window, just find the file you just downloaded and double-click on it.
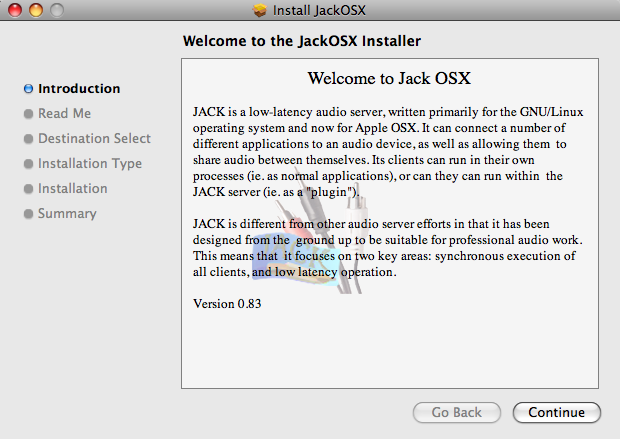
The Jack OS X installer should open automatically. Just follow the instructions from the installer.
Once you are finished with the installation, you should see a newly created Jack folder in your Applications folder.
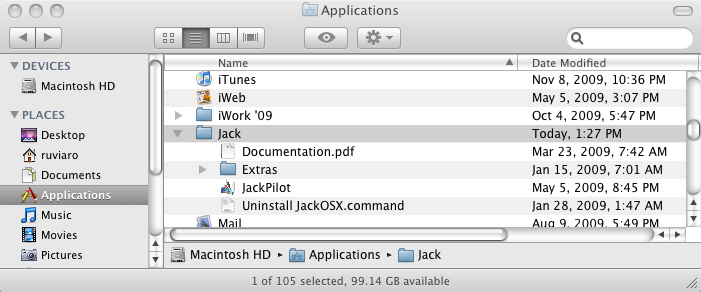
JackPilot is the user interface that allows you to control the Jack server and manage the audio connections between applications and/or Plugins. Double-click on JackPilot to start exploring Jack.
Installing Ardour on OS X
Software name: Ardour
Homepage: http://ardour.org
Software version used for this installation: 2.8.4
Operating system used for this installation: Mac OS X 10.5.7
Recommended Hardware: Any Mac running Mac OS X 10.4 or later
If you're a first-time OS X user, visit the following page for detailed information about configuring your system: http://ardour.org/first_time_osx_native
If any previous version of Ardour is installed on your computer, you must remove any Ardour preferences files before proceeding (remove the .ardour2 folder from your home directory). From the terminal (Applications > Utilities > Terminal), you can safely move this folder out of the way by entering the following command:
$ mv .ardour2 .ardour2.old
You should also make sure your OS X system is up to date. To do this, run Software Update from the Apple menu:

Please note that if you have a new Intel MacBook, you will need to configure your sound card before starting JACK and Ardour. Instructions on how to do so can be found in the Configuring the Soundcard for Post-2007 PowerBooks & MacBooks chapter.
You will also need a three-button mouse to use all of the features of Ardour. If you are using an Apple laptop that appears to have only a single button, later versions of OS X will allow you to use Apple icon -> System Preferences -> Keyboard & Mouse ->Trackpad to set the touchpad into "two-finger tap = right click" mode. Then you can get access to the context menus and more by just tapping with two fingers instead of one.
To run Ardour, Jack OS X ( http://www.jackosx.com/ ) must be installed on your system.
To begin the installation, visit for Ardour download page ( http://ardour.org/download ). A screenshot of it is reproduced below:

It is recommended that you register with the site and also make a donation, but neither is required to use Ardour. However, if you enter a donation of $0 you will not be able to use AudioUnit plugins with Ardour.
Choose the appropriate installation for your computer (Intel or PPC). If you choose to make a donation, you are taken to a PayPal login page.

When this transaction is complete, you are taken to a page where you can download the Ardour OS X installer. If you chose not to make a donation, this page warns that you will be unable to use AudioUnit Plugins. Click the link to download.

Once you've downloaded the .dmg (Disk Image) file, double-click it. The Disk Image mounts and opens the following window, showing the Ardour.app:

Drag the Ardour.app icon to your Applications folder (or to another location of your choice):

This copies Ardour to your hard drive.

You can open Ardour by double-clicking the icon in the Applications folder.
Note: Jack OS X must be running before you open Ardour.
PowerBooks & MacBooks
If you have a PowerBook or MacBook made in 2007 or later, your built in soundcard will not be capable of recording and playing back audio simultaneously without doing some extra configuration. You must use the Audio MIDI Setup application to create an Aggregate Device, which is essentially one virtual soundcard made of of two or more physical soundcards. JACK will then connect to this virtual soundcard and have both input and output channels.
OS X 10.4 and 10.5
Double-click the Audio MIDI Setup icon:

The Audio MIDI Setup window appears:

Open Audio > Aggregate Device Editor:


Add an aggregate device and select Built-In Input and Built-In Output:

Click the Done button.
OS X 10.6
The OS X 10.6 ("Snow Leopard") Audio MIDI Setup utility differs from the one shipped in earlier OS X versions. Audio Devices and MIDI Devices are listed in separate windows.
Double-click the Audio MIDI Setup icon, as depicted in the OS X 10.4/10.5 instructions, above.
If the Audio Devices window does not appear, choose Window > Show Audio Window.

The Audio Devices window lists the audio devices on the left, and the pane on the right shows the properties of the selected device.

To create a new aggregate device, click the small + button in the bottom-left corner.

Next, add the Built-In Input and Built-In Output to the aggregate device by checking their respective boxes in the Use column. Clicking the triangle in front of the Aggregate Device icon lists the aggregate device's component devices.

By double-clicking the words 'Aggregate Device' in the list, you can rename your new Aggregate Device.

If a JACK server is running, a JackRouter device appears in the list of audio devices.

The JackRouter device is an internal virtual audio device. Although it has no physical connection to any input or output, you can use it to route audio to and from Ardour, from and to other applications.
Installing Ardour and JACK on Ubuntu
Software name : Ardour
Homepage : http://ardour.org/
Software version used for this installation: 2.8.4
Operating System used for this installation: Ubuntu 9.10
Minimum System Requirements: 400-MHz Pentium-equivalent CPU, 512 MB RAM, 7200 RPM disk drives.
This section describes installing Ardour and JACK on Ubuntu, using Ubuntu Software Center and Synaptic Package Manager.
Ubuntu Software Center
Log into your desktop environment. Click Applications > Ubuntu Software Center.
Once Ubuntu Software Center is open, search for 'ardour'.
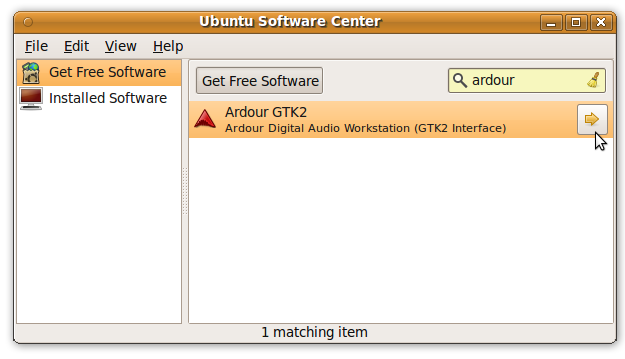
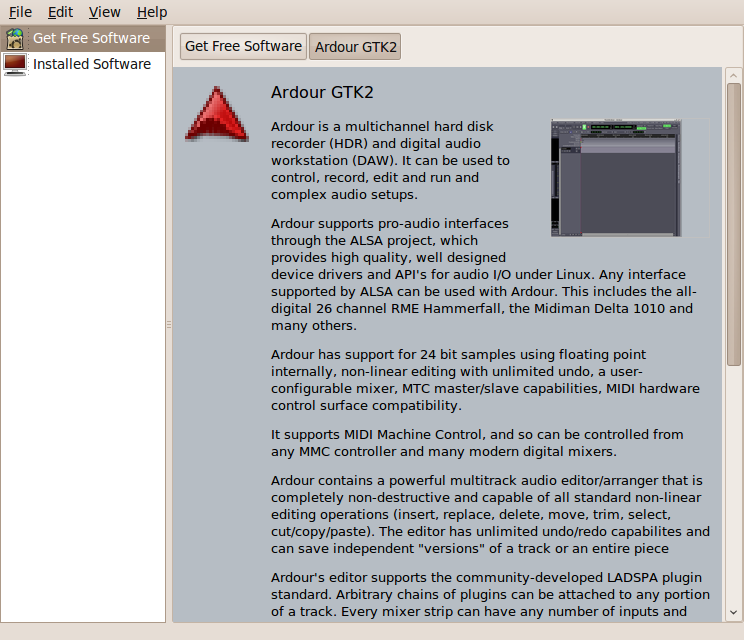
Click the arrow to the right. Ubuntu Software Center displays additional information on Ardour. Scroll to the bottom of the window and click Install.
Wait for the process to complete. Enter your password if necessary.
Repeat the steps above for LADSPA Plugin, LV2 plugins (Calf-plugins) Jamin and QjackCtl (that is, search for 'ladspa-plugin', 'calf-plugins', 'jamin' and 'qjackctl' in Ubuntu Software Center, and then click Install). If you can't see an Install button, but see a Remove button instead, the software is already installed on your computer.
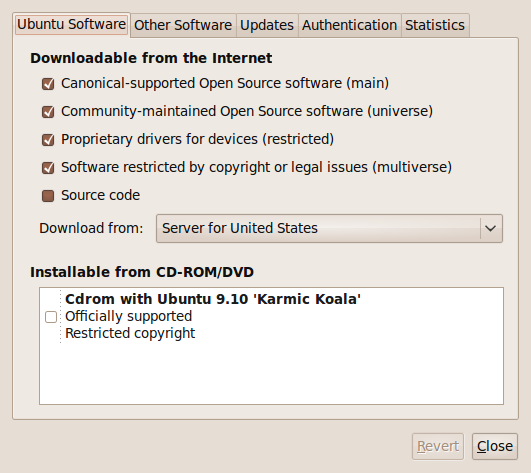
If Ubuntu Software Center cannot find Ardour, LADSPA Plugin, Calf-plugins, Jamin, or QjackCtl, click Edit > Software Sources. You may be required to enter your password. Make sure you have selected the first four check boxes, as shown below:
Close the window, re-open Ubuntu Software Center, and retry the installation procedure described above.
At this point, QjackCtl, Ardour, LADSPA Plugin, Calf-plugins and Jamin should be installed on your machine. You should be able to find these three programs in the Applications > Sound & Video menu. You must always open and start Jack Control before launching Ardour.
Synaptic Package Manager
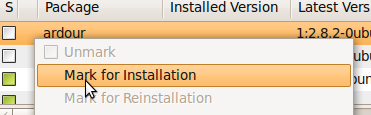
Open Synaptic Package Manager (System > Administration > Synaptic Package Manager). Enter 'ardour' in the search box at the upper right corner of the window, and click 'Search'.
Right-click the Ardour package entry from the results, and select 'Mark for Installation'.
Install QJackCtl, LADSPA Plugin, LV2 Plugins and Jamin
Installing the Ardour package automatically installs the Jack daemon (jackd). You should also install QJackCtl, which provides graphical-user-interface control of the Jack daemon, as well as the LADSPA Plugin and the LV2 Plugins packages which provides a collection of audio Plugins which can be used in Ardour.
To install QJackCtl, open Synaptic Package Manager, enter 'qjackctl' in the search box and press Enter. Unless you've added some very exotic software sources, only one match appears. By right-clicking on it you can select it for installation. Do the same for Jamin, LADSPA Plugin and Calf-plugins (LV2 plugins) by entering 'jamin', 'ladspa-plugin' and 'calf-plugins' in the search box and selecting it for installation.
Repeat the above steps for any additional software you want to install, and then click the Apply button. When the installation process finishes, QjackCtl, Ardour, LADSPA Plugin, Calf-plugins and Jamin are installed on your machine.
If you are having any problems installing with Synaptic Package Manager, or if you want to learn more about software installation on Ubuntu using Synaptic Package Manager, read the section below.
Synaptic Package Manager
The Synaptic Package Manager (SPM) is used for more than just installing software. It can also upgrade your entire operating system, and manage all software installed on your computer. However most people use SPM for just installing new software. Before you embark on this process, there are a few concepts that you may wish to get familiar with. It's not crucial you understand them thoroughly, so just read the explanations and then let it soak in over time. The ideas behind SPM will become clearer with use.
What is a repository?
SPM can automate the installation of software on your computer because it has a direct connection to one or more online software repositories. These repositories are vast archives of programs that have been pre-configured for installation on your operating system. When your computer is online, SPM can connect to these archives, check what software is available for installation, and present you with a list of installable software. All you have to do is select the software from the list that you want. SPM then downloads the software from the repository and takes care of the installation process.
So SPM is actually a repository manager: it manages which repositories (there are many) you wish to access, and which programs to download and install from those repositories.
SPM allows you to choose which repositories it accesses through its settings. The default repositories used by Ubuntu can be extended through the SPM settings so you can access a wider range of programs. Ubuntu calls each repository by a simple name. They are: Main, Universe, Multiverse, Restricted. By default Ubuntu only uses the Main online repository. If you wish to access you the other repositories, you must do this by changing repository settings of SPM.
What is a package?
When SPM downloads a programs for installation, it is in the form known as a 'package'. This means that it is a compressed archive of the program, pre-configured so that it can install nicely on your computer. If the package has been configured nicely (and the Ubuntu project team spends a lot of time making sure this is the case), then many of the headaches that installing software can bring are taken away — it's the aspirin of software installation. One of the biggest issues with installing software on any form of Linux (Ubuntu is one of many types of Linux), is dependencies. Dependencies are all the other packages required by a particular package. If, for example, I want to install an audio editor, that audio editor software may use some functionality of other programs to do its job.
SPM takes the (often) dark art of dependencies away from you, and manages this itself. So if you wish to install a program and it has dependencies (and the list can be long), you don't have to work this out yourself. SPM knows already what is needed, finds it, and installs it along with the software you have chosen.
So, SPM, as well as managing which repositories you access, is also a package management software. Hence the name: Synaptic Package Manager.
apt
You don't really need to know about 'apt', so if you are on the verge of being confused then don't read this short section. If you are a geek wannabe, then read on.
Ubuntu is a form of Linux that has derived from another form of Linux called Debian. This family of Linux has in common (amongst other things) the package/repository management system. Both Ubuntu and Debian use the apt system for managing packages. APT is an acronym for Advanced Package Tool.
SPM is actually a 'front end' (graphical interface) for controlling 'apt'. So SPM is the nice user interface that you see, but the real work is done by 'apt'. There are other ways of managing 'apt', such as the command line interface known as apt-get. In the world of Linux, there are many varieties of Linux users and they have their own ways of doing things. In general it's safe to say most Debian users use apt-get, and most Ubuntu users are happier using SPM.
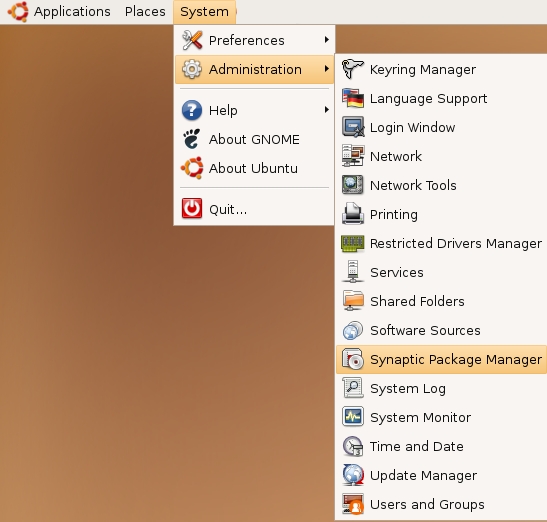
Configuring Synaptic Package Manager
To install most software on Ubuntu, you need to change the default repository settings of SPM, because many programs are not contained in the default repository. To do this, you need to open the Synaptic Package Manager, which you can do via the System menu. If you haven't changed the default Desktop of Ubuntu, then the System menu can be accessed at the top left of your screen:
If all is good, you are prompted for a password.
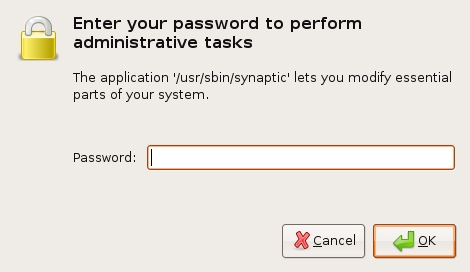
Here you must enter your password (the same one you use to log into the system). If you don't know the password, then you have a problem and it's probably caused by the fact that the computer you are using is not yours. In this case you have to find the computer's owners and ask them for the password (which is usually not polite unless you know them well) or ask them to input the password while you look casually in the other direction.
Assuming the password entered is correct, you now see the SPM open in front of you. It may be that you first see the following 'Quick Introduction' (which appears if you haven't used SPM before).
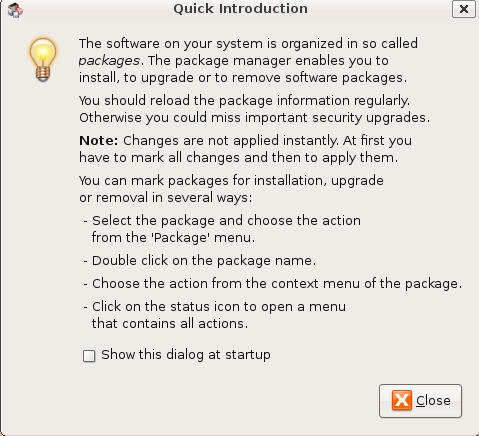
Just click Close and move on.
Let's look at the Synaptic Package Manager interface.

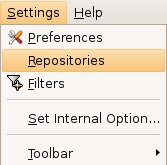
Let's not worry about the details of the interface for now. All we want to do is change the repository settings. To do this, on the Settings menu, click Repositories.
Now we get to where we can do some business. Make sure that all the options are selected:

Now close that window by clicking the big Close button at the bottom right.

Next, you see a warning telling you the repository has changed:
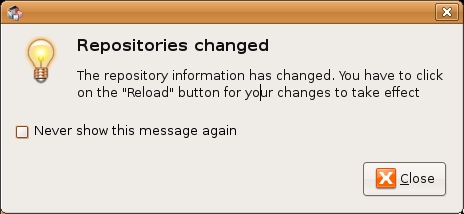
Click the Close button.
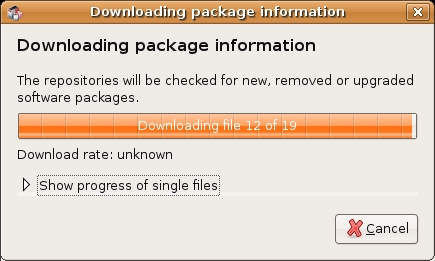
Back in the SPM interface, you need to refresh the repositories as the warning suggests. To do this, click Reload:

You then see a status window saying the repositories are being updated and showing the progress.
Installing Ardour & JACK with Linux Commands
To install Ardour, JACK, Jamin, LADSPA Plugins and LV2 plugins (Calf-plugins) from a command-line interface, enter the following distribution-specific commands.
Ubuntu
sudo apt-get install ardour qjackctl jamin ladspa-plugin calf-plugins
Note: you will need to obtain root privileges to install these packages on the following distributions by using either the 'su' or 'sudo' commands. This can vary from distribution to distribution. If you are unsure how to do this on your system please consult your distribution's documentation.
Please also note that Jamin and some of the LADSPA and LV2 Plugins are not available on every distribution. The command lines here reflect that.
Fedora
yum install ardour qjackctl jamin ladspa-swh-plugins ladspa-cmt-plugins ladspa-fil-plugins ladspa-caps-plugins ladspa-tap-plugins ladspa-rev-plugins
Debian
apt-get install ardour qjackctl jamin ladspa-plugin
Gentoo
emerge ardour qjackctl jamin swh-plugins rev-plugins fil-plugins caps-plugins tap-plugins
ArchLinux
pacman -S ardour qjackctl swh-plugins cmt
Advanced Linux Configuration
JACK and Ardour will run quite a bit better if your Linux operating system is properly configured for Real-time operation. Ardour will function properly without such configuration, but you may suffer 'glitching' or 'stuttering' of the audio under some circumstances. Distributions of Linux that automatically allow Real-time operation can be downloaded for free, including Ubuntu Studio and 64 Studio and this is the simplest method to get Real-time operation for Ardour.
Setting up a Real-time system for other distributions is beyond the scope of this manual, as it involves recompiling your Linux kernel as well as setting up some specific configuration files. The following resources may be useful to the interested reader:
Mailing Lists/Forums
Assistance, help, and enlightenment is often available from other Linux users;
Linux Audio
http://lau.linuxaudio.org
A helpful starting point for those getting started with Linux audio.
Linux Audio Users mail-list
http://lad.linuxaudio.org/subscribe/lau.html
A friendly mail-list with advice/assistance from many veteran users across many variants of Linux.
Linux Musicians forum
http://linuxmusicians.com
A newbie friendly forum for questions about any platform.
General
Linux Musicians WIKI
http://wiki.linuxmusicians.com/doku.php
A WIKI page containing information about Linux Real-time audio configuration, supported audio hardware on Linux etc.
Linux Audio WIKI
http://wiki.linuxaudio.org/apps/start
Lists available Linux distributions for sound production and available audio software on Linux.
Starting Jack on OS X
Now that you have Jack installed on your Mac, start it simply by double-clicking on the JackPilot icon in your Applications folder:

You should see two windows: JackPilot and Preferences. If you don't see either of the windows, you can open them via the menus: Window > JackPilot (for JackPilot) and JackPilot > Preferences (for Preferences). This is how these windows look:

The Preferences window allows you to configure important settings, such as Driver, Interface, Sample Rate, Buffer Size, Input Channels and Output Channels. See below for more information on each of these settings.
Note that the Preferences window has two sections: the Jack Server and the Jack Router. The Jack Server is the actual "engine" of the JACK Audio Connection Kit. Jack Router takes care of the connections between different applications.
Any changes you make to the default settings will take effect after you click on Save.
The JackPilot window is simply a separate user interface that makes it possible to control both the engine (Jack Server) and the routing (Jack Router). You can start the Jack Server by clicking on Start, and you can manage connections between applications by clicking on Routing. Once JACK is running, JackPilot should look like this:

Later on, when you want to quit JACK, the correct procedure is first to click on the Stop button on JackPilot and then to close JackPilot itself (cmd + Q). It is important to note that if you quit JackPilot without having clicked on the Stop button beforehand, you will be closing the user interface called JackPilot, but NOT the Jack Server itself (the "engine"), which in this case will still be running in the background.
Note that the difference between JackPilot and the JACK engine is made explicit in the wording of the Quit option via the menu: you click on JackPilot > Quit JackPilot (Not JACK)
Understanding the Preferences Window
The following section presents a brief explanation of each of the options in the Preferences window. The information below is adapted from the JackPilot Documentation. You can find the complete documentation inside your Jack folder (Applications > Jack > Documentation.pdf).
Driver – the physical audio driver. Choose 'coreaudio', the only option currently available.
Interface – select the physical audio device that you would like the Jack server to communicate with (for example, a FireWire or USB interface or the built-in audio of your computer). Currently, Jack can only communicate with one hardware audio device at a time. This means that if you have a newer Mac computer (2007 and later) and you want to use your built-in audio input and output, you still have a one-time configuration step to do: create an Aggregate Device, using Audio MIDI Setup. See detailed information on the section Audio MIDI Setup on OS X. Once this is done, you should be able to choose your newly created Aggregate Device on JackPilot's Preferences window. This will allow you to use JACK and Ardour with your computer's built-in input and output.

Sample Rate – choose your desired sample rate for the Jack server. Only sample rates supported by the selected Interface will be displayed. If in doubt, leave the default.
Buffer Size – choose your desired audio buffer size (in samples). Only buffer sizes supported by the selected Interface will be displayed. If in doubt, leave the default.
Interface Output/Input Channels – choose your desired number of Output and Input audio channels for Jack to communicate with your physical audio interface. The maximum number of channels is limited by the number of output and input channels supported by your physical audio device.
Virtual Input Channels – the number of virtual input channels Jack will provide for each application. Typically this should be set to 2, for stereo operation.
Virtual Output Channels – the number of virtual output channels Jack will provide for each application.
Auto-Connect with physical ports – check to allow JackPilot to automatically connect the Virtual Input and Output Channels to your physical audio device input and output ports, respectively.
Verbose logging for debug purposes – check to allow Jack OS X to write more complete log messages to the Console, which is useful for debugging in problem cases.
Once you have chosen your settings, click on Save to exit the Preferences window.
Note that the Preferences can only be changed when the JACK server is stopped, not when it is running.
Routing with JackPilot
This section will help familiarize you with JackPilot's routing interface.
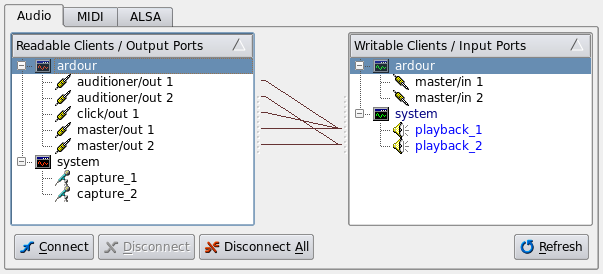
With the Jack server on, click on the Routing button in JackPilot to bring up the Connections Manager window. The following is an example of what you might see if you had not yet Jack-enabled any applications. All you see is the physical audio device (generically called “system”) and its send (“capture”) and receive (“playback”) ports.

As you open other Jack-enabled audio applications, their inputs and outputs will show up in the Connections Manager. For example, when you have Ardour open, you will see something like this:

Any sound source listed on the left may be connected to any of the receive ports listed on the right. Multiple Send Ports can be routed to one Receive Port and, conversely, one Send Port can be routed to multiple Receive Ports.
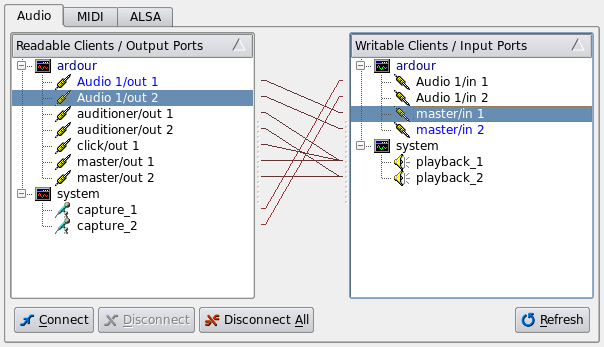
Here's an example of some routings that are internal to Ardour:

The ardour:Audio 1 track outputs are routed to the ardour:master inputs. This is the default routing for all new Audio tracks created in Ardour, and it allows the master bus to 'collect' the audio signals from all tracks together.
Managing Ardour connections may be done in this window, or this may be done entirely from within Ardour. The result is the same. If you will be working only with Ardour, you probably won't need to come back to JackPilot Connections Manager at all. However, as you start doing more complex connections between different audio applications, you may need to use JackPilot Connections Manager. For more information, please refer to the JackPilot Documentation.
Starting Ardour on Mac OS X
Now that you have Ardour installed on your Mac, let's start it. First you have to open and start JACK (JackPilot) as described in the previous section. Then, simply double-click on the Ardour icon in your Applications folder.

OS X may warn you that Ardour is an application downloaded from the internet. Click 'Open' to confirm you want to open it.

If you are using a newer Mac (Powerbook 2007 or later), Ardour may give you an error stating that 'you do not have any audio device capable of simultaneous playback and recording'. This is because newer Apple machines see input and output as separate devices and do not have an aggregate device configured by default.
Refer to the Configuring the Soundcard for post-2007 PowerBooks & MacBooks chapter for information on how to fix this.

Otherwise the Session Control window shows up. Name your new project and click on New. This same window can be used to open existing sessions by clicking on the Open Session tab.

Starting Jack
You need to have the JACK Audio Connection Kit up and running before launching Ardour.
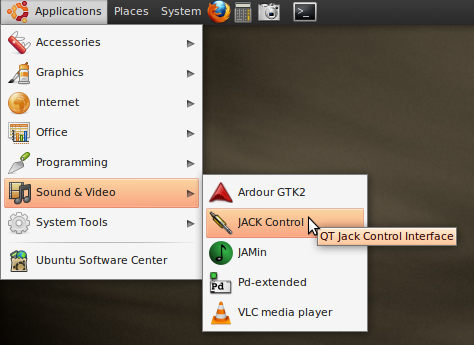
Newly installed software appears in the drop down menus at the top left corner of the desktop. Click on Applications > Sound & Video > JACK Control:
Alternatively, you can run JACK Control from the command line by entering
qjackctl&
in a terminal.
Tip: it is a good idea to explore JACK a bit further and get familiar with its features. Click on Setup to see several of the configuration options. Click on Connect to see where you can make connections between different audio applications. Both are also explained in more detail below.
Starting the Server
The JACK Control window is simply a separate user interface that makes it possible to control both the engine (JACK Server) and the routing (JACK Router). You can start the JACK Server by clicking on Start, and you can manage connections between applications by clicking on Connect. Once JACK is running, JACK Control should look like this:
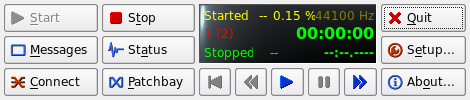
You can also check the current state of the server by clicking on Status:
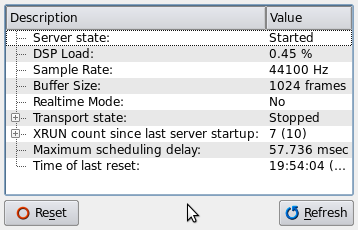
The JACK Server should now be running without any error messages. At this point, you can run Ardour.
Later on, when you want to quit JACK, the correct procedure is first to click on the Stop button on JACK Control and then to close the JACK window itself (ctrl + Q or Quit). It is important to note that if you quit JACK without having clicked on the Stop button beforehand, you will be closing the user interface called JACK Control (or QjackCtl), but NOT the JACK Server itself (the "engine"), which in this case will still be running in the background.
Setup
The Setup window allows you to configure important settings, such as Driver, Interface, Sample Rate, Buffer Size, and Input and Output Channels. See below for more information on each of these settings.
Understanding the Setup Window
The following section presents a brief explanation on some of the options in the Setup window:
Driver – the physical audio driver. On Linux, the default option is ALSA.
Realtime - although this option is selected as the default, it requires a Real-time capable system to use. Unless you have configured your operating system for Real-time, uncheck this option or the JACK server may not start properly! A Real-time system can substantially improve the quality of your recording and playback, however. Some resources for learning how to set up a Real-time system can be found in the Advanced Linux Configuration chapter.
Interface – select the physical audio device that you would like the Jack server to communicate with (for example, a FireWire or USB interface or the built-in audio of your computer). Currently, JACK can only communicate with one hardware audio device at a time.
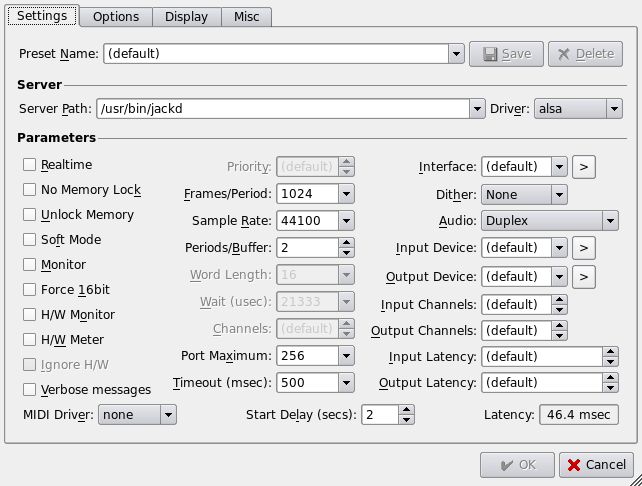
Sample Rate – choose your desired sample rate for the Jack server. This determines the sample rate that Ardour will use for recording and playback. Only sample rates supported by the selected Interface will be displayed. If in doubt, leave the default.
Buffer Size – choose your desired audio buffer size (in samples). Only buffer sizes supported by the selected Interface will be displayed. If in doubt, leave the default.
Interface Output/Input Channels – choose your desired number of Output and Input audio channels for JACK to communicate with your physical audio interface. The maximum number of channels is limited by the number of output and input channels supported by your physical audio device.
Verbose Messages - verbose logging for debug purposes: check to allow JACK to write more complete log messages to the Console, which is useful for debugging in problem cases. If JACK is working normally then leave this unchecked.
Once you have chosen your settings, click on OK to exit the Setup window. Note that however the new settings will be saved, you will have to restart the JACK Server for the changes to take effect.
Routing with JACK Connect
This section will help familiarize you with JACK's routing interface.
With the JACK server on, click on the Connect button in the main window to bring up the Connections window. The following is an example of what you might see if you had not yet JACK-enabled any applications. All you see is the physical audio device (generically called “system”) and its send (“capture”) and receive (“playback”) ports.
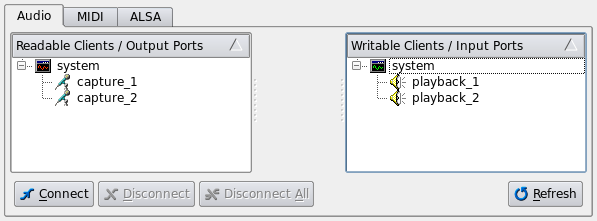
As you open other JACK-enabled audio applications, their inputs and outputs will show up in the Connections Manager. For example, when you have Ardour open, you will see something like this:
Any sound source listed on the left may be connected to any of the receive ports listed on the right. Multiple Send Ports can be routed to one Receive Port and, conversely, one Send Port can be routed to multiple Receive Ports.
Here's an example of some routings that are internal to Ardour:
The ardour:Audio 1 track outputs are routed to the ardour:master inputs. This is the default routing for all new Audio tracks created in Ardour, and it allows the master bus to 'collect' the audio signals from all tracks together.
Ardour connections may be managed in this window or entirely within Ardour. The result is the same. If you will be working only with Ardour, you ⁞probably won't need to come back to 'JACK Control - Connections' at all. However, as you start doing more complex connections between different audio applications, you may need to use JACK Control - Connections. For more information, please refer to the Ubuntu QjackCtl Documentation pages.
Starting Ardour on Ubuntu
Now that JACK and Ardour are installed, and JACK has been successfully started, you can start up Ardour.
On Ubuntu, software is automatically placed in the Applications drop-down menu at the upper left of the screen. So you just need to click Applications > Sound & Video and you will see Ardour listed there:
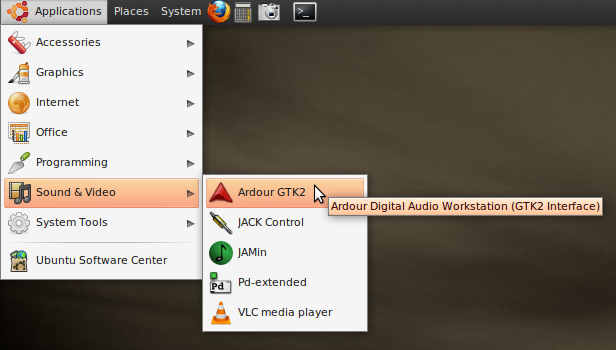
Click on ArdourGTK2 and the program will start.
Alternatively, you can run Ardour from the commandline by entering
ardour2 &
in a terminal.
Once you have started Ardour, the Session Control window shows up. Name your new project and click on New. This same window can be used to open existing sessions by clicking on the Open Session tab.
An Overview of the Interface
This section will give you an overview of the basic interface of Ardour, as found in the Editor Window and the Mixer Window. Later chapters will give more detailed information on each feature listed here.
The Editor Window
When you create a new session, Ardour opens an empty new window called the Editor Window. The Editor Window is the most important window in Ardour, as this is how you will control the program as well as see and edit the audio you have recorded or imported.

At the top of the Editor Window are several main areas: the Transport Menu, the Clocks, the Edit Modes/Cursor Modes menu, the Snap Mode menu and the Auxiliary Controls. Below that area is the Main Canvas, which contains the Tracks and Busses used in the Session. The Mixer Strips for the Tracks appear on the left, and a set of tabs allowing for an overview of the Regions, Tracks/Busses, Snapshots, Edit Groups and Chunks appear on the right.
We will introduce these controls briefly here and cover them more extensively in dedicated chapters later on.
Transport Menu

The Transport Menu controls include the following buttons:
- Rewind
- Fast forward
- Jog/shuttle controls
- Loop playback
- Play range/selection
- Play from playhead
- Stop
- Record-enable
Clocks

The main Clocks are located next to the transport controls. Clocks in Ardour can display time in 4 different formats: Time Code, Bars:Beats, Minutes:Seconds, and Samples. Right-click on the clock to select a format. You can also turn the clock off. Please see the Setting Up the Timeline chapter for more details on the Clocks.
Edit Modes and Cursor Modes

The Edit Modes and Cursor Modes controls define the behavior of the main canvas and the different functions the cursor can have. There are 3 Edit Modes in the drop-down menu: Slide Edit, Slice Edit, and Lock Edit. Next to the drop-down menu are the 6 Cursor Modes: Select/Move Object, Select/Move Range, Select Zoom Range, Draw Gain Automation, Stretch/Shrink Regions, and Listen to Specific Regions. These behaviors are discussed in the Working With Regions chapter.
Snap Mode

The Snap Mode menu controls the Grid, Grid Points and Edit Point. Please see the chapters on Setting Up the Meter, Using Ranges and Working With Regions for more details.
Auxiliary Controls

These are the 8 buttons to the right of the Clocks, that largely have to do with Recording functions:
- Punch In
- Punch Out
- Auto Play
- Auto Return
- Auto Input
- Click
- Solo
- Audition
Main Canvas
The main canvas is just below the top rows of controls described above. It basically comprises the Rulers, the space where Tracks and Busses are displayed, horizontal and vertical scroll bars and a Zoom Options section at the bottom. The very bottom of Ardour's Editor Window also displays useful information, such as sample rate of the session, available recording time, DSP use, and miscellaneous error messages.
Rulers
Right-click on the rulers space and you will see a menu with all the possible rulers at your disposition. You may uncheck rulers that you don't need in order to save screen space. More information on these operations can be found in the Setting up the Timeline and Setting up the Meter chapters.

Tracks and Busses
Just below the Rulers is where Tracks and Busses are displayed. In the example below, you can see one Bus called "master" and one Track called "Audio 1". The Track Audio 1 also contains one region, which represents an audio file with a drawing of its waveform. More information on Tracks and Busses can be found in the Creating a Track or Bus chapter.

Zoom Options

At the bottom of the main canvas you can define the behavior of zooming operations. You have standard Zoom In and Zoom Out buttons, plus a third called Zoom to Session (useful for having a quick overview of your entire session: it zooms it to fit the available space on the screen). Useful shortcuts: + (the plus sign on your main keyboard) for Zoom In, and - (the dash key on your main keyboard) for Zoom Out.
The drop-down menu controls the Zoom Focus. It defines the focus point of zooming operations. Try zooming in and out with + and - with a different Zoom Focus each time. For example, choosing Playhead will cause zoom to behave in relationship to the position of the Playhead. Mouse will take your current mouse position as the reference, and so on.
Editor Mixer

The Editor Mixer is located at the left of the Edit Window. It displays the Mixer Strip of the currently selected Track or Bus. It controls the volume, Plugins and Routing for the Track or Bus to which it corresponds. You can toggle to view or hide the Editor Mixer by clicking on the menu View > Show Editor Mixer (shortcut "Shift" + "E"). This Mixer is covered in the Using the Mixer Strip chapter.
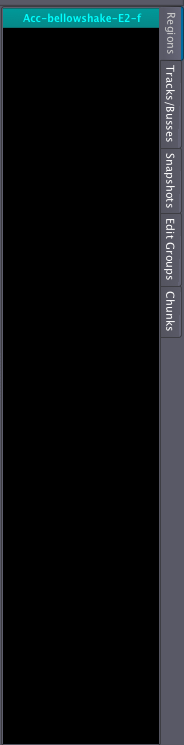
Regions, Tracks/Busses, Snapshots, Edit Groups, Chunks
The space on the right of Ardour's Editor Window can have 5 different functions, depending on which tab is currently selected: Regions, Tracks/Busses, Snapshots, Edit Groups, and Chunks. Regions is the tab selected by default. This part of the Editor Window is commonly referred to as Regions List. Regions represent audio files stored on the hard drive which can be dragged from the Regions List directly onto a track in the main canvas. More information on Regions can be found in the Working With Regions chapter. The Tracks tab is covered in the Arranging Tracks chapter, and Snapshots are discussed in the Saving Snapshots chapter.
Mixer Window Controls
The second window, the Mixer Window, can be viewed by going to the main menu and clicking Window > Show Mixer.

The main function of the Mixer Window is to display all the Mixer Strips for the various Tracks side by side for easy reference. This window is mainly used during the Mixing process, and it also provides access Plugins and other Routing features. See the chapters on Understanding Routing, Mixing and Using Plugins for details.

This window also contains a listing of the available Mixer Strips in the upper left hand corner. The check boxes in this area can be used to view and hide the Mixer Strips of the different Tracks. Finally, there is an area for managing Groups.
Switching Between Windows
You can use the key combination "Alt" + "M" ("Option"+ "M" on a Mac) in order to toggle which window is on top: Editor or Mixer.
Detaching and Reattaching Menus
Most of the major menus in the Editor Window can be detached from the Editor Window by clicking the white, downwards pointing arrow on the far right-hand side of that menu.
The detached menu will become a separate window on your screen, which can be reattached to the Editor Window by clicking the white, upwards-pointing arrow which now appears on the far right-hand side.

Starting a Session
Ardour groups your work in Sessions. A Session is a group of Tracks which eventually may be mixed down into a single Mono, Stereo or multi-channel sound file. Sessions are essentially projects; all your data is saved in a single Session folder.
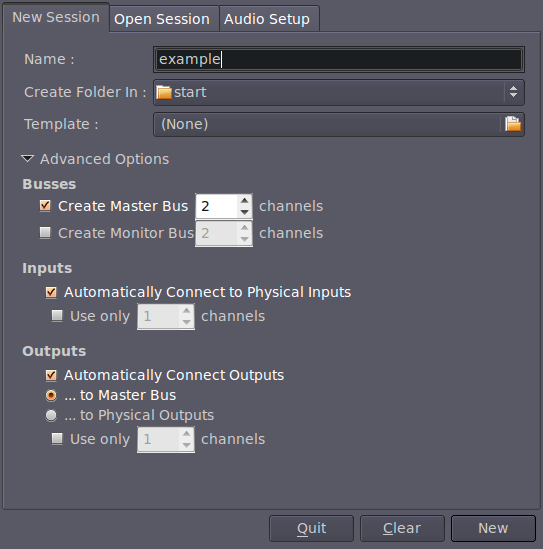
When you start Ardour, you are asked if you want to start a new Session or open an existing one. When creating a new Session you must choose a name for it. You also need to tell Ardour where you would like the Session folder to be stored. When you are ready, click 'New'. Ardour will create the new Session and then open it.

Advanced Options
The Sample Rate (the number of audio samples recorded in one second) of the new Session will be the Sample Rate at which JACK is currently running. Ardour only allows you to open a Session created at the current JACK Sample Rate. For example, a Session created when JACK was running at 96 kHz will not open if JACK is currently running at 48 kHz.
If you click Advanced Options, you will have finer control over the following options:
- Whether or not to create a Master Bus (i.e. the final audio output of the session), and how many channels it will have.
- Whether or not to create a Monitor Bus, and how many channels it will have.
- Whether or not to automatically connect inputs from the computer's audio interface (the sound card) to Tracks in the session, and how many channels to use.
- Whether or not to automatically connect outputs to either Master Bus or outputs of the audio interface, and how many channels to use.

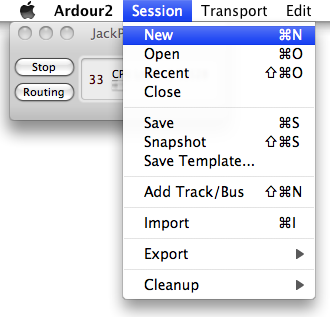
To create an Ardour session after Ardour has already started, select Session > New in the menu.
Continuing
Once you've started a Session, you will most likely want to learn about Setting Up the Timeline to match the kind of musical meter or other timeframe which you will use. Please continue to the next chapter.
Setting Up the Timeline
Because different users will want to use Ardour for different tasks, the way time is measured in the application can be changed. Users creating audio plays, documentaries, reportages or soundscapes may wish to use Minutes and Seconds, for example, while those recording bands or producing electronic music will most likely use Bars and Beats. Video producers will find a frames-per-second Timecode handy, while those wishing for extreme precision may even want to use Samples. All of these can be viewed in Ardour and used as a means to organize your regions and edits.
Primary and Secondary Clocks
There are two clocks near the top of the Editor Window which can display the time in a number of formats: Timecode, Bars:Beats, Minutes:Seconds and Samples. Right-click to change the format of each of the two clocks.

Snap Modes
The Snap Mode menus are found just below the Clocks. They control the amount Quantization of the time grid, i.e., the amount of "snap" an audio Region has to the type of grid you have chosen.

When No Grid is selected, Regions may be moved freely around within the Tracks. When Grid is selected, Regions will "snap" to the nearest Grid Point. When Magnetic is selected, Regions can be moved freely but will "snap" to a Grid Point when they are moved very close to one.

The middle Units menu is used to select what the Grid Points will be, such as Beats, Bars, Marks, Minutes, Seconds, various aspects of the SMPTE Timecode, or the edges of Regions.

Timeline
The Timeline is located below the Snap Mode menus, just above the Main Canvas. By Right-Clicking on it, you can set the check boxes to display the different types of time information.

Minutes/Seconds
To view Minutes and Seconds on the Timeline, right-click the Timeline and select
Minutes:Seconds. You will be able to set the Grid to either
Seconds or
Minutes.
Bars/Beats
To view Bars and Beats on the Timeline, right-click the Timeline and select Beats/Bars. You will be able to set the Grid to either Bars, Beats or a convenient multiple of beats, such as 3, 4, 8, 16 or 32.
It is possible to set a Meter and Tempo for the entire Ardour session, as well as to change them at different points in the same session. For more information on this, please see the Setting Up the Meter chapter.
Timecode
To work with SMPTE video Timecode, first you need to set the Timecode fps (Frames per Second). This can be found in the main Ardour menu under Options > Sync >Timecode fps.

Once you have done that, make sure you make the Timecode ruler visible by right-clicking in the Timeline and checking the Timecode box. You will be able to set the Grid to SMPTE Frames, SMPTE Seconds and SMPTE Minutes.
Continuing
Now that you've set up the Timeline, continue on to the chapter on Creating a Track to add one or more Tracks to your Session.
Creating a Track or a Bus
What is a Track?
A Track is a place where you can drag a Region from your Region List and where you can record sounds coming from an outside source. A Region represents an audio clip, i.e., one of your sound files or just a portion of a sound file. In the image below, the area marked "Audio 1" is a Track, and the audio information inside that Track is a Region.
What is a Bus?
A Bus is similar to a track except that it does not contain its own regions. You cannot record directly into a bus or drag regions into it. In the image above, the area marked "master" is a Bus. Usually every session has a Master Bus. All the audio to be Exported from your Session will be sent to the Master Bus.
How are Tracks and Busses Used?
Audio-processing Plugins and Automation can be applied to both Tracks and Busses.
Audio tracks can be routed to Busses. In fact, many Tracks can be simultaneously routed to one Bus. Busses are traditionally used as a convenient way to apply any kind of signal processing to many Tracks at once. For instance, you might find it useful to route all Tracks that contain drum sounds to a single Bus that you would call 'drum bus'. Then, if you decide that all your drum Tracks are too loud, you can quickly adjust the level of the 'drum bus' rather than adjusting each separate Track that feeds into it.
Another use of a Bus would be to have a common Reverberation Plugin, so that any audio Track which requires the Reverb effect could be routed to a single Bus.
Adding Tracks and Busses
Right-Click in the empty area beneath the dark-gray box labeled 'master' (or, alternatively, click on the menu Track > Add Track/Bus). The following window will appear:
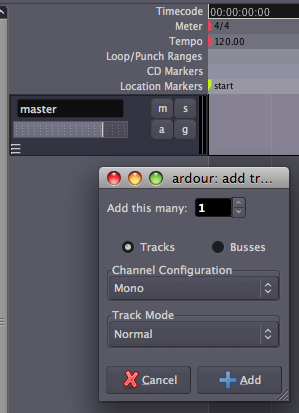
Add this many lets you specify how many Tracks (or Busses) you would to like to create.
Choose Tracks or Busses to specify whether you want to create Tracks or Busses.
The Channel Configuration drop-down menu allows you to specify how many channels of audio you'd like the new Track or Bus to handle. The choice made here will affect which Plugins you can use on the track (Mono tracks cannot use Stereo Plugins and vice versa), as well as the kind of audio files which can be Imported to the Track.
The last menu, Track Mode, gives you a choice between Normal Mode and Tape Mode. Normal Mode creates a new Region for each Recording Take, and is suggested for beginners. Tape Mode destructively records--in other words the previous Take of a Track is eliminated with each new Take.
Finally, click the Add button to create the Tracks or Busses you have just configured. You will see them appear as new rows in the Main Canvas.
Continuing
Once you've added one or more Tracks, you will want to put some audio material into them to work with. Continue on to the Importing Audio and Recording Audio chapters to learn how to do this.
Importing Audio
Sections of audio are known as Regions in Ardour. A Region can be an entire sound file or a portion of it. Here you will learn how to import audio files from the hard drive of your computer so they can be used in your Ardour session.
To import an audio file, first Right-Click on the
Region List, located at the far right of the editor window. Please note there are other tabs which change the function of this area. Before you Right-Click, make sure the
Regions tab is selected.

Once you have Right-Clicked, a menu will appear with the option to Import to Region List. Click this option.

You will now see the Add existing audio dialog. On the left side of this dialog you will see a file browser which allows you to search your hard drive for appropriate sound files to add (preferably, start with a common file format, such as WAV or AIFF). At the lower left corner there is a menu which indicates how these files will be added. This should be set to "Add files: to region list".
Note: if you do not have any suitable audio files on your hard drive to follow these steps, we recommend visiting the freesound.org website, where you can find a large collection of Creative Commons–licensed samples in a variety of Sample Rates and Formats.
Tip: if you compile Ardour yourself, you can add freesound support, which allows browsing the freesound.org website directly from this dialog. The process of compiling applications, however, is outside the scope of this manual.
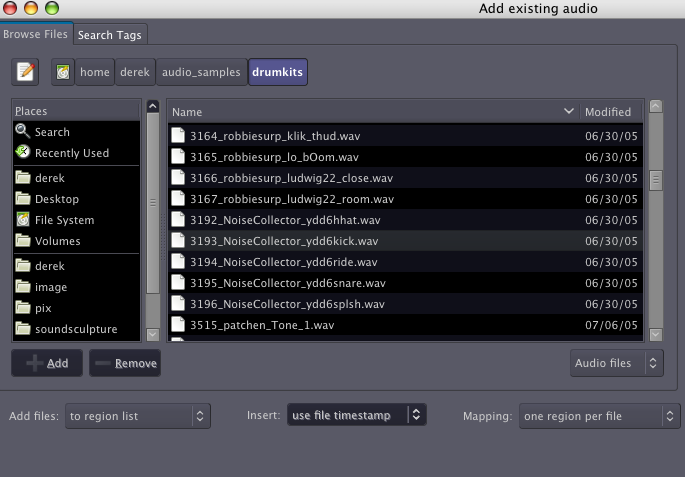
On the right side of the Add existing audio dialog you will see a section allowing you to inspect the properties of the file you selected. Here you will see the name, number of channels, sample rate, format and length of the sound file, along with any tags you have chosen to add to the file.
The Play button allows you to preview the file, using the Audition bus. Finally, this dialog gives you the option of copying the file(s) into the folder of the current session (Copy Files to Session). This is safer, but it uses more disk space. If you leave this option unchecked, Ardour will use the sound file from its current location on the hard drive. In this case, if the file is moved to a new location on the hard drive, you may run into trouble, because Ardour won't be able to find it the next time you open this session.
Click OK to proceed. The file(s) you have selected will appear listed in your Region List.

If the sample rate of the file you have chosen does not match the sample rate of the current session, Ardour colours the mismatched sample rate in red. If you try to import the file, Ardour will also warn you of the mismatched rate and ask you to confirm if you want to embed it anyway. If you do choose to embed the file in question, it will not play back at the sample rate it was recorded with, but rather at the sample rate of the current Ardour session. This will cause the sound to play at the wrong speed and pitch.

Once you have successfully embedded your audio file in the Region List, you will see it on the screen.

And by dragging and dropping the Region onto the Main Canvas, you can insert it in an existing track.

Release the mouse-click to complete the drag-and-drop operation. The Region will be inserted at the exact time point where you dropped it.

Importing Audio Directly to a Track
The Add existing audio dialogue also allows you to import audio files directly onto tracks.
Choose Add files: as new tracks in order to automatically create a new track and add the selected file to it.
Choose Add files: to selected tracks in order to add a sound file into an existing selected track.
In either case, the chosen sound files will always be embedded in the Region List, from which you can drag-and-drop them into tracks as explained above. Below is an example of adding a file as new track.

The Region appears in a new track in the session. The new track automatically receives the name of the imported sound file.

The sound file will also appear in the Region List so that it can be inserted into other tracks as well.

To remove a region, one can select it with the mouse and use the Cut function from the menu, the Control (or Apple) key and the X key, the Delete key or the key combination of fn and Backspace (which is used, for example, on a laptop keyboard that does not have a proper Delete key).
Continuing
At this point, you may wish to add some new material to your Session by Recording Audio in the following chapter, or you may want to skip directly ahead to the Editing Sessions section to learn how to arrange the Regions you have Imported into a composition. You should also have a look at the Understanding Routing chapter to discover how audio can be sent to other Tracks or Busses, to the soundcard of your computer, or even to other JACK-enabled audio programs.
Recording Audio
Besides Importing Audio, another way to create Regions in your Ardour session is to record new audio. The source of this audio could be the line or microphone inputs of your audio interface, or it could even be sound originating from other applications on your computer which have been connected to Ardour via JACK. Please see the section on Routing for more details.
This section will show you how to record audio from an external source (for example, a microphone) onto a track in Ardour.
First, you should check that the proper inputs have been routed to the track you wish to record to. Select the track by clicking on the empty space just below its name and volume slider. The Track becomes highlighted. The vertical Mixer Strip located on the left side of the Editor window should now show the Track you just selected (Audio 1 in this example). Just below the Track name in the Mixer Strip you will find a button that allows you to edit the Routing. Click on that button and select Edit to investigate the Routing.

In the image below you can see that the first and second inputs of the Track are receiving signals from system:capture_1 and system:capture_2, respectively.
On the right side, in Available connections, we see two tabs, ardour and system. The ardour tab shows the connections that can be made from other sources within Ardour. The system tab displays audio connections available from outside Ardour (for example, the built-in microphone of your computer or the inputs from your sound card). In both cases, this Routing menu communicates directly with JACK to change the Routing in the JACK system itself.

To select a source for each input, select in1 or in2 with the mouse, and then click one of the options from Available connections. Once you have selected a connection for one of the inputs, the other input will be automatically selected. Please note that with the default settings used in creating the Ardour session, the capture inputs from the sound card are automatically routed to the inputs of the Tracks. Click on Close to exit this window.

Note: the example above assumes you are recording a Stereo sound source onto a Stereo Track. If you want to record in Mono, the instructions are pretty much the same: simply remove in2 by clicking on Remove.
Arming the Track
"Arming the Track" is simply to get it ready for recording. Once you have checked that the proper capture inputs have been routed to the Track, you can arm the Track to record by clicking on the small red icon on the horizontal track strip (not the big one in the Transport controls) or the Record button on the mixer strip. When properly armed, the small red icon will remain highlighted, and you will be able to see the incoming signal by looking at the Peak Meter on the Mixer Strip or on the horizontal Track strip.
Note: unless you have told Ardour to do otherwise, the input being recorded will be monitored (in other words, heard) via the Audition output. If you are not using headphones to monitor the recording process, you may get some loud feedback at this point!
Arm Ardour and Start Recording
Now that you have armed the Track to record, you must arm Ardour itself to record by clicking on the big red button in the Transport menu. The button will blink in red, indicating that Ardour is ready to record. To start recording, click on the Play button in the Transport menu, or press the space bar of your computer keyboard. Clicking the Play button again (or pressing the space bar) will stop recording.

While recording, the armed Track will capture the sounds from the input. Any existing sound on other tracks will play normally during the recording. This allows you to play, sing or speak along with other Regions and Tracks you have already recorded or embedded in your Session.

While recording, you will be able to see the Levels (the amplitude in Decibels) of the incoming sound, as well as see the Peaks of the Waveform appearing as it is recorded.
The audio in the screenshot below was recorded too loud and produced Clipping (in other words, the signal recorded was outside the bounds of what could be represented digitally), which results in a loss of information and audible distortion. The clipped peaks in the waveform are marked in red, and the Peak Meter in the Mixer Strip has registered a maximum signal level of 10.5 Decibels over the limit of zero Decibels.

The best and easiest way to avoid Clipping is have some control over the volume of the incoming audio signal before it gets to the sound card. For example, you can can move the microphone further away from the sound being recorded or use a mixer to reduce the volume of the incoming signal.
In the following example, the audio signal has been recorded within proper limits. There are no red Peaks, and the level meter indicates a maximum of −4.7 Decibels, allowing for a comfortable distance from the Clipping Point.

The range of decibels between the region's maximum Peak and the Clipping Point is commonly referred to as Headroom. It is common recording practice to keep approximately three to six Decibels of Headroom between the maximum of your signal and the Clipping Point, with the Clipping Point itself being represented as 0dB (zero Decibels). In other words, an audio region with a comfortable amount of Headroom would have its maximum Peaks between −6dB and −3dB.
Recorded audio appears as a new Region in the recording Track. Like all Regions, this newly recorded one will be available in the Region List, from where you can drag-and-drop it into other Tracks if needed.
The Region you just recorded will automatically receive the name of the Track where it was recorded, with different takes being automatically numbered.

You might want to plan ahead and organize your recording Session by giving appropriate names to different tracks. For example, a Track used only for recording vocals can be named "Voice". This way, recorded sound files will be named accordingly, and different takes will appear in the Regions List identified as "Voice-1", "Voice-2", etc, rather than the default generic names, such as "Audio 1".
To rename a Track, just click on its name (before you arm the track to record) and type in the new name.
Continuing
At this point, you may want to skip directly ahead to the Editing Sessions section to learn how to arrange the Regions you have Recorded into a composition. If you plan on doing more complicated Recording than what we have discussed here, in particular with a multichannel soundcard, or from other JACK-enabled audio programs on your computer, you should also have a look at the Understanding Routing chapter.
Understanding Routing
Routing an audio signal is sending it from somewhere to somewhere else. In addition to getting audio signals to and from Ardour, routing plays an important part inside Ardour itself. Examples of using routing inside Ardour include routing audio from Tracks to the Master Bus or to other Busses, creating 'sends', routing the outputs from Busses to the Master Bus, etc. (see chapter on Creating a Track for an explanation of Tracks and Busses). All routing, both internal and external to Ardour, is handled by JACK.
Routing in Ardour
The standard routing of inputs, tracks and busses in Ardour is determined when a new Session is created in the Advanced Options of the New Session dialog box (see Starting a Session chapter). By default, the routing is as follows:
- The audio device inputs are routed to the Track inputs.
- All outputs from Tracks and Busses are routed to the master bus inputs.
- The Master Bus outputs are routed to the audio device outputs.
Note that when a new Bus is created, nothing is routed to its input.
This routing setup makes sense for sessions containing only Tracks, but to make use of any Busses (other than the Master Bus) or to get creative with the paths of the audio signals inside Ardour, we need to be able to change the routing. This can be done in JACK's Connections Manager window, but it is much more convenient to do this from within Ardour.
We can edit the routing of each track or bus by clicking on the corresponding Input or Output buttons at the top and bottom of their Mixer Strip. Hovering the cursor over a Routing button will make a tool-tip appear showing the current routing.
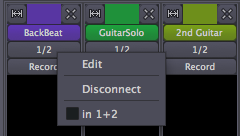
When you click the Routing button, a pop-up menu appears which allows you to edit the routing, disconnect it altogether, or select a standard routing scheme from a short list.
When you select 'Edit', a Routing Editor window appears.

This window is functionally very similar to JACK's Connections Manager. It just looks and works a bit differently. It is important to realize that any routings that you make or disconnect from within Ardour are in fact JACK routings.
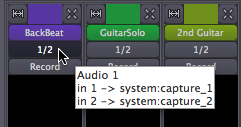
The title bar of the Routing Editor shows what is being routed (in this case, the inputs of the track called BackBeat). The left-hand pane ("Inputs") shows how many input ports this track currently has (two, in this case: "in 1" and "in 2"), and from which ports these inputs are receiving signals (in the example, "system:capture_1" and "system:capture_2"). Clicking on an existing connection will disconnect it.
The right-hand pane ("Available connections") shows the available ports from within Ardour, displayed under the "ardour" tab, and from outside Ardour, displayed under the "system" tab. All these are available for connecting to the input ports of the track we are currently editing.
You will find a similar window for routing the output of a Track or Bus by clicking on the "Output" button at the bottom of each Mixer Strip.
In this example session, there are two guitar Tracks and one unused Bus called Guitar Bus. Suppose you want to send the output from the two guitar Tracks to the Guitar Bus instead of the Master Bus. This can be useful to control the volume of both guitars with just one Fader (in this case the Guitar Bus fader). Then the output of the Guitar Bus, which is the sum of the two guitars, goes directly to the Master Bus.
Here is how to edit the output routing of one guitar Track in order to send its outputs to the Bus inputs.

We disconnect the outputs of the GuitarSolo Track from the "ardour:master/in" ports by clicking on them. Then we click on the desired "ardour:Guitar Bus/in" ports in order to connect them. Then we do the same for the 2nd Guitar Track. This is how the connection window of each guitar track will look like afterwards:

Now both guitar tracks are routed to the Guitar Bus, and no longer directly to the Master Bus. We then make sure that the Guitar Bus is, by its turn, routed to the Master Bus (the output routing of a Bus is edited in the same way as for a Track), so that we can still hear the sound from both guitar Tracks. Now we can control the volume of both guitar Tracks together by changing the Fader of the Guitar Bus. What's more, we can now add Plugins to the Guitar Bus to process the sound of both guitar Tracks together.
Continuing
In this chapter, we covered how to manage Routing inside Ardour, or between Ardour and the sound card. However, one of the strengths of using the JACK system is that it can also manage connections between applications on the same computer. To gain a better understanding of how this works, please continue to the chapter Routing Between JACK Applications. If you would prefer to work only with Ardour, then skip ahead to the section on Editing Sessions.
Routing Between JACK Applications
Since JACK manages the audio connections for any application that uses it, JACK can be used to connect the output of one application to the input of another. In this chapter, we will connect the output of Pure Data Extended (a FLOSS multimedia application) to an input of Ardour.
Tip: Pure Data Extended can be downloaded from http://puredata.org/ and the Pure Data FLOSS Manual can be found here http://en.flossmanuals.net/puredata
Setting Up Pure Data Extended To Play a Test Tone Via JACK

For this example, open Pure Data Extended from the Applications menu (Applications > Pd-extended). Then tell Pure Data Extended to use the JACK audio system by clicking Media > jack. And finally, within Pure Data Extended open a simple patch emitting a test tone with Media > Test Audio and MIDI. Clicking the small box marked "-20" under the TEST SIGNAL text produces a test tone we can route to Ardour.
Creating a New Track in Ardour
First create a new Track in Ardour called From Pure Data, and arm it to record.

Making the Connection With Jack Pilot or Qjackctl
Now, using the JACK Pilot Connections Manager (or the Connections menu of Qjackctl), look for the outputs of Pure Data Extended, found here as "output0" and "output1" under "pure_data_0". By selecting an output and clicking on one of the inputs labeled "From Pure Data/in", the audio output of Pure Data Extended is connected to an audio input of Ardour.

Making the Connection with the Ardour Mixer Strip Input Menu
The input Routing menu in the Ardour Editor Mixer Strip can also be used to make the connection, as shown here. Since the track is armed to record, we see the Levels of the signal being sent to Ardour from Pure Data Extended in the Editor Mixer. From here, follow the normal procedure to record the signal.

Continuing
This concludes the section on Starting Sessions. Now that you have some audio Imported, recorded from a line or microphone input or even from another JACK application, proceed to the Editing Sessions section and learn how to arrange your composition.
Arranging Tracks
In the following chapters we will use Ardour to create a short rhythmic passage using several drumkit samples. We will continue working on this passage in later tutorials, such as Working with Regions and Creating Looped Sections. We assume that you have read the chapters in the Getting Started section already, and are familiar with Importing Audio, Tracks and the Timeline.
Importing Samples
The first step is to add some sounds, which is discussed at length in the Importing Audio chapter. Here, we are using the Add existing audio dialog to embed some drumkit samples as regions. Note that each new audio file is added "as new tracks" in the menu option at the lower left. The samples used in this tutorial were downloaded as a sample pack from the freesound.org website.

The drumkit samples will appear as new individual tracks in the Editor Window, each with the name of the audio file used.

Organizing the Tracks
Now we rename the tracks so we can quickly see the location of each instrument.

You may also wish to rearrange the order of the tracks from top to bottom in the editor window. Do that by clicking the Tracks/Busses Tab at the far right of the Editor Window and drag-and-dropping the tracks in the order you want.

Tip: you can also use the check boxes in this tab to view or hide Tracks in the Main Canvas.
Here we have ordered the drumkit so that the kick drum is on the bottom, the snare and high hat are in the middle, and the cymbal is on top.

Continuing
In the next step we will learn about Setting Up the Meter to organize these samples into a rhythm.
Setting Up the Meter
The Meter determines the musical speed of the passage we are composing, as measured in Beats Per Minute. If we are composing something which is rhythmic, it will also determine the lengths of the sound samples we use to some extent. So it is important to be able to set up the Meter before we continue.
To see the Meter of our session, we can right-click anywhere in the Timeline and check the Bars & Beats box in the menu which appears.

It is possible to set a Meter and Tempo for the entire Ardour session, as well as to change them at different points in the same session. In order to do this, locate the Meter section of the Timeline Bar in the Editor Window, and right-click on the first small red mark to open the Meter Dialog.

Here you can enter new values for the Beats Per Bar as well as the Note Value. Click "Apply" to apply the changes globally to your session.

Then, locate the first red mark in the Tempo section and repeat the process.

In the Tempo Dialog you can enter a new Beats Per Minute value, which will affect the whole session.

If the Meter or Tempo of your session changes later in the song or composition, simply add a new marker by right-clicking in the Meter or Tempo section and selecting New Tempo or New Meter and entering the new Tempo or Meter in the resulting dialog.

Continuing
Next, we will explore Using Ranges to set up a loop we can listen to while we arrange the rhythm.
Using Ranges
A Range is a selection of the Timeline that can include one or more Tracks. The Range tool is located just below the Transport Menu in the Edit Window.

When you have selected the Range tool, your mouse pointer will look like this:

It can be useful to create Range selections that align with the edges of regions on your Timeline. Selecting the 'Grid' and 'Region bounds' items for Grid and Grid Point menus respectively makes this easy.

To make a Range selection, drag anywhere on the Timeline. The current Grid and Grid Point options determine exactly how the Range selection behaves. Once a Range has been selected, Right-Clicking on it opens a menu with Range-specific operations.
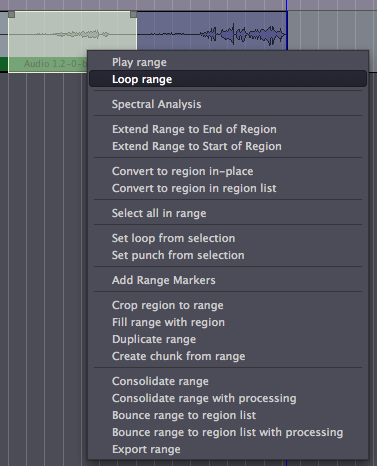
Loop range, for example, sets up Loop Markers around the current Range and begins looped playback. The Loop Start and Loop End points can be changed by moving the green triangles which correspond to the each point.

Other useful options here for editing allow you to Duplicate the Range, Select All within the Range or Crop the Range.
Setting Up a Loop
Returning to our rhythmic passage example, we will want to hear the passage we are composing, perhaps as a loop, while we are moving the samples around.To do that, we must create a Range to listen to within our session, so that we can return to exactly this point in the Session again and again.
Use the Range tool to select an entire bar with the help of the Grid settings, and right-click inside that range to "Set loop from selection". You will probably want to set the Grid so that your actions snap to certain metric elements of the session. Here the Grid is activated, and snaps to Beats/16.

This will set up a loop range which you can play by using the Play Loop button in the Transport Menu at the very top of the Editor Window. While the Range is looping, you can use the Solo button on each track to listen to each the instruments individually.

Continuing
In the next step, we will learn about Working With Regions to compose a rhythm with these samples.
Working with Regions
Sections of audio are known as Regions in Ardour. To compose the short rhythmic passage we've been working on, we will need to know how to Select, Move, Split and Trim these Regions, as well as how to Fade In or Fade Out their volume and create Crossfades between them. Some of these options may need to happen at specific Edit Points in the composition, or according to the musical Meter we can define with the Timeline and the Grid as well.
Selecting Regions
The Select/Move Objects (shortcut O) is located just below the Transport Menu in the Editor Window. You will use this tool a lot in your Ardour work.

When it is active, your mouse pointer will look like this:

Click on the Waveform of the region to select it. You can add individual Regions to an existing selection using Control + Click (Command + Click on OS X). Both the Region itself and the Track containing it will turn blue when you select a Region. You can select sequential regions on one track all at once by holding down the Shift key while selecting the first and the last Regions of the sequence.
When you select a Region, make sure to click on the Waveform section of its rectangle. The lower stripe with the Region name is used for a different action (see Trimming Regions below).

You can also drag a selection box over multiple Regions to select them all.

Moving Regions
While moving a Region, a Timecode will appear on the screen in yellow numbers. This Timecode is the Region's starting point on the Timeline. You can move Regions horizontally (sideways) to a different point in time on the same Track, or you can move the selected Region vertically (up or down) to a different Track.
When a set of one or more Regions is selected, you can move the whole set by dragging with the mouse.
Note: make sure to select the Region in its Waveform section, because selecting the bottom title bar area is used for a different action (see Trimming Regions below).
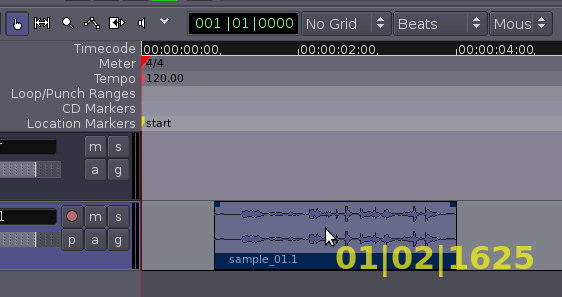
Tip: if you press and hold the Alt key while dragging a Region between Tracks, the Region will be copied to the new Track instead of moved.
Duplicating Regions
Use the Select/Move Objects tool to select a set of Regions, and use the Duplicate function to make a copy of the set (menu Regions > Duplicate Region, shortcut D). The duplicates will appear immediately after (and on the same track as) the originals.
In the following screenshot, a sound has been duplicated twice, creating a simple loop.

Using Edit Points
Another way to copy Regions is by using the standard commands Copy (Control + C or Command + C on a Mac) and Paste (Control + V or Command + V). The exact location where the copied Region will be pasted is determined by the Edit Point drop-down menu.

If Mouse is selected as the Edit Point, the copied Region will be pasted at the current position of the mouse.
If Playhead is selected as the Edit Point, the copied Region will be pasted at red Playhead line on the same Track where the original Region is.

Finally, if Marker is selected as the Edit Point, then the copied Region will be pasted immediately after the currently selected Location Marker.

Markers
Markers can be added to the Timeline by right-clicking on the Location Markers strip and selecting Add New Location Marker. They can also be selected with the mouse and moved to new positions.

Splitting Regions
To Split a Region simply means to divide a single Region into two independent Regions. This point at which a Region will be split depends on the currently selected Edit Point. If Mouse is selected as your current Edit Point, select a Region and place the cursor at the point you would like to Split. Click on Edit > Split Region (shortcut S).
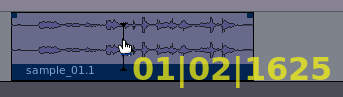
After being split, the original single Region becomes two independent Regions, with a new name for each:
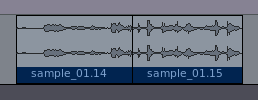
The two new Regions are now entirely independent. You can move and edit them separately.
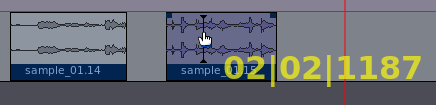
Regions can also be split by using the Playhead or a Marker as the Edit Point.
Trimming Regions
If you move the cursor to the bottom strip of the Region, where its name appears, you will see that the pointer becomes a double arrow. Click and drag inwards from either end of the Region, and the Region will be shortened accordingly. This is called Trimming the Region. Regions can be trimmed from the start of the Region (drag from left to right at the edge) or from the end (drag from right to left).

This action is non-destructive: no audio is actually being deleted. It is as if you were just "hiding" those portions of the Region that you don't want or don't need anymore. Later on, you can "un-trim" the Region (i.e., extend it back to its original full size), even if it has been moved or copied to a new Track. A trimmed Region will receive a name derived from the original name of its parent Region, and you will see this reflected in your Region List. For example, in the images above, a single original region named sample_01 has its trimmed versions named as sample_01.1, sample_01.2, (...) sample_01.15, and so forth.
Removing a Region
A Region can be removed from a Track in four different ways:
- Select the Region and use the Delete key (not the Backspace key) to remove it.
- Select the Region and use the fn (Function) + Backspace key to remove it.
- Select the Region and use the Control + X key (or Apple + X key) to Cut it (for later Pasting).
- Select the Region and use the Edit > Cut option on the main menu to Cut it (for later Pasting).
Again, because Ardour is non-destructive, the Regions are not removed from the Session and can be accessed from the Regions tab on the far right side of the Editor Window.
Creating Fades in Regions
A Fade is a change in the volume of a Region, either as the Region starts or as it ends. A Fade at the start of the Region is a Fade In, and at the end of a Region it is a Fade Out. Each Region has two small handles along the top, which can be dragged inwards from either edge to create a Fade In or Fade Out.

By right-clicking on one of the Fade handles, the speed of the Fade can be adjusted from Slowest to Fastest.

Crossfading Between Two Regions
When one Region Fades Out while another Fades In, this is called a Crossfade. If the two Regions are in different Tracks, you can use the method described above with the Fade handles. However, if both Regions are in the same Track, then Ardour will automatically create a Crossfade when one Region is moved over another one.

The speed of the Crossfade can be edited by right-clicking on Crossfade and selecting Crossfade > Edit.

This will bring up the X-Fade Edit menu, where the curves representing the change in volume of each Region in the Crossfade can be selected from a range of options, or redrawn by using edit handles.

Using Grid Settings
Experiment with the Grid setting, as discussed in the Setting Up the Timeline chapter, to give different kinds of Quantization—in other words, to constrain the boundaries of each Region to certain grid points. Here, the Grid has been activated and set to Beats/4, to quantize the Regions to quarter notes within each bar. You may wish to Trim the endpoints of some of the samples, as discussed above, to fit within the metric structure you have set up (for example, the first kick in the screen below has been trimmed so that it does not overlap with the second kick).

Continuing
In the next chapter, we will explore Further Region Operations.
Further Region Operations
Right-clicking a selected Region reveals a context menu. The first item in the menu (labeled with the Region's name) contains a large sub-menu. This section describes a few of the most commonly used operations accessible from this menu.
The Region Right-Click Menu

Rename
The Rename function lets you change a Region's name.

Region Editor
The Region Editor is a powerful menu which can be used to Audition the Region (see below), change the Position of the Region in the Timeline, Trim the length via the File Start and Length values, and Scale amplitude of the Region.

Audition
Further down in the menu, the Audition option plays the Region back via the Audition Bus. See the chapters on Understanding Routing and Starting JACK to learn how to change the routing of the Audition Bus.
Spectral Analysis
Clicking the Spectral Analysis function opens up a new window which displays the overall frequency content of the Region.

Lock
The Lock toggle box locks the Region so that it cannot be Moved or Trimmed. It can still be Split, however, and the resulting Regions will be unlocked.
Mute
The Mute toggle box renders the selected Region silent.
Transpose
The Transpose function alters the pitch of a Region without changing its duration. The function applies a pitch-shifting algorithm to create a new audio clip based on the source clip.
When the transpose item is selected, a window opens allowing the user to specify the amount and direction of pitch shifting desired. The window includes a Preserve Formants button. When pitch shifting by large amounts, the Preserve Formants option can give results that sound slightly more natural, particularly when used on vocal material.
The Transpose function can also be entered by pressing the F5 key.
Normalize
The Normalize function non-destructively boosts the level of the selected Region so that the Peaks are at 0dB. In other words, it makes the region as loud as possible while avoiding Clipping. The boost applied when a Region has been normalized can be reversed by selecting DeNormalize menu item.
Reverse
The Reverse function reverses the selected region of audio, in effect causing it to play backwards. Reversing a region creates a new audio file 'behind the scenes'.
Trim
The Trim function trims the Region in a number of ways, including from the Start to edit point and Edit point to end (see previous chapter for a discussion of Edit Points).

Make Mono Regions
The Make Mono Regions function splits a stereo Region into two mono Regions which can be accessed via the Regions Tab at the far right of the Editor Window.
Duplicate, Multi-Duplicate, Fill Track
Duplicate, Multi-Duplicate and Fill Track are methods to Duplicate the Region. Please see the chapter Creating Looped Sections for a detailed discussion of these.
Remove
The Remove function deletes the selected Region from the Track. The Region remains available from the Regions List at the far right of the Editor Window, so it can be brought back into a track at any time by dragging and dropping.
Continuing
In the following chapter, we will learn a bit more about the powerful tools Ardour has available by Changing Edit Modes.
Changing Edit Modes
We have already learned a bit about the Select/Move and Range tools. In this chapter we will get an overview of all the Edit Modes and Cursor Modes available on that part of the Editor Window.
Edit Modes and Cursor Modes
These controls define the behavior of the main canvas and the different functions of the cursor.
The drop-down Edit Mode menu contains three options. Slide Edit is the standard mode. It allows you to drag regions around horizontally (within the same track) and vertically (between tracks). Slice Edit does not allow dragging regions, but still allows you to perform slice operations (such as cut, paste, and split). Space between regions will be kept constant after any edit operation that affects it. If you delete the second half of a region, for example, any subsequent regions on the same track will automatically move back in the time grid. Lock Edit is similar to Slice Edit, but regions will remain at their original positions regardless of any edit operation performed.
Select/Move Object (shortcut "O")

This Cursor Mode allows you to select or move objects such as regions and breakpoints (in an automation curve). When this Cursor Mode is selected, your cursor pointer will look like this:
Range (shortcut "R")

This Cursor Mode allows you to click and drag to define or resize Ranges. When this Cursor Mode is selected, your cursor pointer will look like this:
Zoom Range (shortcut "Z")

This Cursor Mode provides a box which can be dragged around an area of the Main Canvas. When the mouse is released, the view of the Canvas will Zoom to that selection. When this Cursor Mode is selected, your cursor pointer will look like this:

Draw Gain Automation (shortcut "G")

Use this Cursor Mode if you want to draw Region-specific volume Automation. The automation curve created this way will stick to the region on which it was created, even when the Region is moved around. This type of gain Automation is drawn directly on the Region itself, which makes it different from the Automation used in the drop-down Automation region (see chapter on Automation). When this Cursor Mode is selected, your cursor pointer will look like this:

Stretch/Shrink Region (shortcut "T")

This Cursor Mode allows you to drag and resize the duration of an entire Region without changing the Pitch. This is sometimes called 'Timestretching', hence the shortcut "T". Please see the chapter on Stretching/Shrinking Regions for more details. When this Cursor Mode is selected, your cursor pointer will look like this:

Listen to Specific Regions

This Cursor Mode allows you to click on any existing Region on any track and have it immediately played back. Playback stops at the end of the Region. When this Cursor Mode is selected, your cursor pointer will look like this:

Continuing
In the following chapter, we will see how to take the Regions we have edited and Create Looping Sections from them.
Creating Looped Sections
You can easily repeat sections of audio in your Ardour session. Here, we take the short rhythmic passage we created in Working with Regions and duplicate it to make a loop.
Consolidating the Range
When you've arranged your Regions into a single "loop cycle" and you're satisfied with the sound, you're ready to create a Range with all the regions that will make up the loop. First, make sure every Track used in the loop is selected. Unselected Tracks are gray, and selected ones are blue. If any of the Tracks you used are not selected, hold down the Shift key while clicking on them to add them to the selected group. Finally, use the Range tool to select the entire loop.
Once again, the Grid setting will help you to set the range precisely to the start and end points of your metric bar. Once you have the entire loop selected, Right-Click on the range and select "Consolidate range". If you would like any Automation or Plugin effects you have added to the loop to be included, select "Consolidate range with processing".

When the range is Consolidated, new Regions will appear in each Track, each containing all the repetitions of the samples which you set up in the previous steps.

Duplicating the Range
Previously, we learned to Duplicate the Regions one at a time and one after the other, by using the "D" key. Now, with all the Regions in the loop still selected, we can go to the Region Menu at the very top of the Ardour window. Here, we have the option to Duplicate Region as well, but there are also two more choices. If we want to duplicate the selected regions more than once, we can use the Multi-Duplicate Region menu item to choose how many duplications, or use the Fill Track menu item to duplicate the selected regions all the way to the End marker of the session.

In the Multi-Duplicate Region dialogue, we enter "20" for the Number of Duplications.

And when we click Duplicate twenty identical duplications of the Regions we selected will appear, one after the other.

Continuing
In the next tutorial we will learn about Stretching/Shrinking Regions that are longer or shorter than one Bar in order to fit the rhythm of our passage.
Stretching/Shrinking Regions
Regions can be stretched or shrunk in length without changing their Pitch by using the Stretch/Shrink Regions tool. A small adjustment to the length of a Region may not cause noticeable sound Artifacts. However, the more extreme the change in length, the more obvious the effect of processing on the sound.

To use Stretch/Shrink Regions, place your cursor on top of the region, and then Click-drag left or right. While dragging, you will see a highlighted area, which represents the new duration to which the Region will be shrunk or stretched when you release the mouse at the current position.

Time-Stretching a Region to Fit the Loop
In this tutorial, we've added another sound sample—this time, a synthesizer line—from freesound.org to the rhythmic passage we composed in the Creating Looped Sections chapter. When we add that Region to a new Track, we see that the length of our new Region doesn't match the existing rhythm we've already created. It's too long to be one bar and too short to be two bars.

We can correct this by using the Stretch/Shrink tool. Select the Region you wish to stretch, and drag the new length to the end of the second Bar, again assisted by the Grid settings.

When you release the mouse button, the Time Stretch dialog will appear. You can experiment with different settings for the Time Stretch operation. Each will affect the sound in different ways. It's a good idea to experiment with a few different stretch settings to find out which gives the result you're most happy with.

Click Stretch/Shrink in the Time Stretch dialog to start the operation.

When the Time Stretch operation is complete, the region of the synthesizer line will now be exactly two Bars long, and should fit in with the rhythm we already created with the drum samples.

Continuing
In the next and final chapter of the Editing Regions section, we will learn about Adjusting the Rhythm of a Region so that it fits better with the passage we are composing.
Adjusting the Rhythm of a Region
You may wish to Import a Region whose rhythm doesn't quite fit the Session you are working on.

Luckily, Ardour contains a tool for analyzing the rhythm of a Region called the Rhythm Ferret. You can load this tool by selecting a Region and clicking Window > Rhythm Ferret from the main menu.

The Rhythm Ferret has two modes. One is for locating the Note Onset (the starting point of a change in pitch in the Region).

However, here we will use the other mode—the Percussive Onset mode—which looks for sharp changes in volume in the Region. Click Analyze to analyze the Region. Experimenting with the Threshold and Sensitivity controls can help when analyzing a complex Region.

Once the Rhythm Ferret has analyzed the section, it will suggest some places where it has found sharp changes in volume. If you select the Split Region Operation, it will Split the Region into new, smaller Regions based on the changes in volume that it has found.

Next, you can use the Move and Shrink/Stretch tools, combined with the Grid and Grid Points set to a reasonable division, such as Beats/4, to adjust the length and location of each smaller Region. When you are done, the divisions of the original Region should fit the rhythm of the passage we have been working on.

Continuing
Once you have composed a short passage which you like, you will have reached the end of the Editing Sessions tutorials. Please continue to the next section on Mixing Sessions to learn about Mixing, Panning and using Plugins to improve the sound of your composition.
Using the Mixer Strip
Mixing
Mixing is the process of converting multiple Tracks into a Stereo Mix where all the instruments can be heard clearly. Levels, Panning, Equalization (EQ), and Compression are the main tools used to achieve a good Mix. In addition to these core tools, a wide range of Plugin effects can also be used to enhance to sound, such as Reverb and Delay.
Introducing the Mixer Strip
The Mixer Strip is the vertical column that contains various controls related to signal flow. Each Track and Bus in Ardour has its own Mixer Strip. The Mixer Strip is also the main tool we will use in the process of Mixing our Tracks. In this chapter, we will get a general overview of the Mixer Strip, with each section described. We will also provide references to chapters containing information specific to each aspect of the Mixer Strip.
The Mixer Strip from Top to Bottom
Mixer Strips can be accessed from both the Editor Window and the Mixer Window. Mixer Strips in either window (Editor or Mixer) mirror each other: any actions performed on a Mixer Strip in the Mixer Window will be reflected in the corresponding Mixer Strip in the Editor Window, and vice-versa. The Editor Window and Mixer Window are more fully explained in the An Overview of the Interface chapter.
Overview
Here we see the entire Mixer Strip, as it would appear in either the Editor Window or the Mixer Window.

Regular & Narrow Modes
In the image above, you will notice that the Mixer Strip can be switched between the regular width and a more narrow width to conserve space. The very first section of the Mixer Strip, pictured below, switches between regular and narrow modes using the left button. The right button hides the Mixer Strip entirely.

Track Name/Routing/Record/Pre-Fader Plugins&Sends
The next section of the Mixer Strip contains three narrow regions. The first of these regions, named "Audio 1" in this image below, lists the name of the Track which the Mixer Strip controls. The next region, named "1" in the image below, is a button which allows access to the input Routing. Please see the Understanding Routing and Recording Audio chapters for more information on input Routing. The last narrow region is a button to Arm the Track to record, as discussed in the Recording Audio chapter.

The large black region at the bottom of this section is the Pre-Fader Plugins and Sends region. Please see Using Plugins and Using Sends for a detailed discussion of this area.
Fade/Peak Meters
The most prominent control present in a Mixer Strip is the Fader, used to adjust the overall gain for the corresponding Track or Bus. The Peak Meter shows the Peak Value of the selected track, and is located directly to the right of the Fader. Each Peak Meter consists of one Bar Graph in the case of a Mono Track, and two Bar Graphs in case of a Stereo track. The small rectangular field above the meters shows the highest Peak Value that has been played on that track so far.

As you can see in the image above, there is a smaller version of the Mixer Strip in each Track, called the Track Mixer, which contains a Fader and Peak Meter which mirror those found in the Mixer Strip for that Track.
By clicking the right-hand button at the bottom of the Mixer Strip, you will be able to select the Metering Point, in other words whether the "input" from the sound card, the "pre" Fader signal or the "post" fader signal is metered.

Please refer to the chapter on Mixing Levels for more detailed instruction about using the Fader and Peak Meters.
Solo
Click the Solo Button to Solo the Track/Bus. When a Track or Bus is on Solo, all the other Tracks or Busses which are not likewise on Solo will be inaudible through the Master Bus or the Audition.
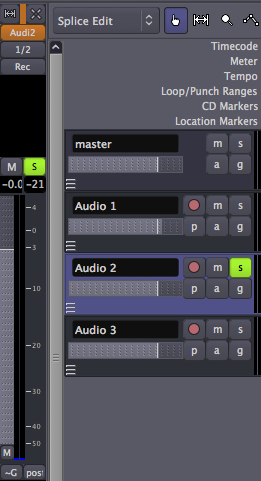
As with the Fader and Peak Meters, we can also find a miniaturized Solo Button in the Track Mixer.
Note that soloing a bus will not silence any tracks and vice-versa.
When any Track or Bus is on Solo, the Solo Indicator in the Auxiliary Controls menu will flash red. Clicking the Solo Indicator while it is flashing will deactivate every Solo in the Session.

Mute
Click the Mute Button to Mute the Track/Bus. Any Track or Bus on Mute will be inaudible through the Master Bus or the Audition. The Track Mixer also contains a miniaturized Mute Button, in between the Record Arm Button and the Solo Button.
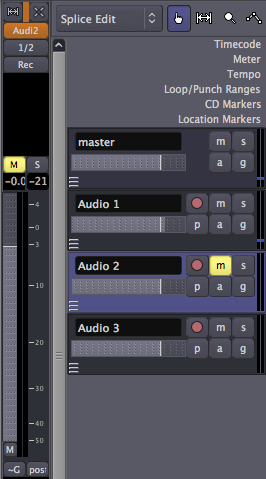
Right-Clicking on the Mute Button gives the options for it to mute the signal at different points its path, such as "Pre Fader", "Post Fader", "Control Outs" and "Main Outs".

Post-Fader Plugins&Sends/Panning
Continuing downwards in the Mixer Strip, we next find another large black region for using Plugins and Sends, this time arranged Post-Fader. Please see Using Plugins and Using Sends for a detailed discussion of this area.

Under the Post-Fader Plugins & Sends region, we find the Panning Sliders and their related controls. These controls are discussed at length in the Panning chapter.
Routing/Comments
Finally, we reach the bottom of the Mixer Strip. Here we find the Output Routing Button, marked here as "master", which is discussed in the Understanding Routing chapter.

The last button on the Mixer Strip opens an area where Comments about the Track can be written for later reference.
Continuing
Now that we've had a look at the main areas of the Mixer Strip, we can proceed to the Mixing Levels chapter to see how we can start to use it.
Mixing Levels
Levels are the volumes that each Track have relative to the others. If you can't hear a bass line above the other instruments, the obvious choice would be to raise the bass line volume. Levels can be adjusted in the Mixer Strip and in each Track below the Track name. The first step in Mixing is to listen to everything that has been recorded and adjust the levels of all Tracks so you can hear everything clearly, but in a manner that is appropriate for the song. For example, the vocal track is normally louder than the rhythm guitar because the voice is the focal point of the song.
Using the Fader
The Fader is the primary control of Levels for each Track. The exact value of the Track's Levels are displayed in the small rectangular field above the Fader. You can change the Levels by either dragging the slider or typing in a new number directly into the rectangle with the number. By default the Fader is set to −0.0 dB, meaning that the Levels of the Track are not changed while it is played.

Avoiding Clipping
One other important task in Mixing is to avoid Clipping. The Peak Value on the Mixer Strip turns red when the signal has peaked above 0.0dB. You can use this tool to monitor the highest Levels of your Track while Mixing. Click on it to reset it.
Because Ardour uses Floating Point Numbers internally, signals are not necessarily Clipping as long as the information remains within Ardour. So it may be OK if a track or bus occasionally turns red. But you should make sure that anything that you send to your sound card or that you will eventually Export as a sound file (such as for CD mastering) never goes above 0.0dB to avoid actual Clipping.

Continuing
When you are finished with this chapter of the tutorial, you should have a collection of Tracks whose Levels are well adjusted to each other and do not Clip when added together in the Master Bus. Once this is accomplished, we can proceed to learn about Panning in the next chapter, so that our Mix takes on a strong feeling of Stereo space.
Panning
Once you have established a good balance of levels on all the Tracks, you can begin to think about Panning. Panning helps to establish a Stereo Field, a relative space between the speakers in which to place your Track instruments.
The Panning Interface
The Panning Slider in Ardour is located toward the bottom of the mixer strip and can be adjusted by moving the green vertical line left or right. A Mono Track will have a single Panning Slider, while a Stereo Track will have two Panning Sliders, one for the left signal and one for the right signal.

In a Stereo Track, the Link Button can be used to link the actions of the Panning Sliders. Click the Link Button to engage this link. The Link Button becomes red when active.

The next control is the Panning Link Direction Button. When both arrows on this button point in the same direction, as shown above, the Panning Sliders will move together from left to right and back.
When the Panning Link Direction Button's arrows are pointing in opposite directions, as seen below, the left and the right channels will "swap" by moving in opposite directions.

Panning Techniques and Philosophy
As a general rule of thumb, guitars tend to be Panned to the left and right. Vocals and bass tend to placed in the center. You want to create a balance so that one side is not louder then the other. Headphones may be helpful in determining how instruments should be Panned and whether one side is too loud and makes the mix feel lopsided.
Two other tools that are useful in creating a "spatial" or Stereo Field are Reverb and Delay. These effects can be used together with sends to create a drum send which would be further back in the mix with more Reverb, and a vocal send which might have a little more Delay but sound closer than the drums. Please see the chapter on Using Plugins and Using Sends for more information.
Note: Always keep an eye on your Levels while Panning Tracks! Panning a Track to one channel increases the Level of that channel. This may change the balance of Levels you set up in the previous chapter, and in extreme cases can result in Clipping. When this happens, reduce the overall Levels of that Track and check again how it sits in the Mix.
Continuing
By now, you should have a collection of Tracks which are both Mixed well and have an exciting Stereo Image. In the following chapters, we will learn about Using Plugins to enhance the sound of your Mix.
Using Plugins
Plugins can be used to enhance or transform the sound of individual Tracks via a Track Plugin, or groups of Track via a Send. Later in this FLOSS Manual, we will discuss some Plugins specific to the Mixing process, such as Compressors, Limiters, Parametric Equalizers, Reverbs and others.
Plugin Formats
LADSPA (Linux Audio Developers Simple Plugin API)
LADSPA Plugins are the "native" Plugin format for Ardour. They were initially developed for Linux, but since have been ported to OS X as well.
LV2
LV2 is a simple but extensible successor of LADSPA, which can be used to display sound characteristics in a graphical manner. LV2 Plugins can be used on OS X and Linux.
AU (Audio Unit)
AU Plugins are the "native" Plugin format for OS X. They will only work in Ardour if you have made a donation when you downloaded the program. See the Installing OS X chapter for details. AU Plugins will not work on Linux at all.
VST (Virtual Studio Technology)
VST Plugins are a Plugin format common to Microsoft Windows. Some VST Plugins can be used on Linux, however they may not function correctly, or even cause Ardour to crash. Using these Plugins requires manually Compiling the Ardour application, a task which is outside the scope of this manual.
More information about using LADSPA, LV2 and VST plugins with Ardour, you can find here: http://ardour.org/plugins
Pre-Fader vs Post-Fader
You have a choice whether you would like to add your Plugin to the Pre-Fader Plugin Region or the Post-Fader Plugin Region. The black region at the top of the far-left Mixer Strip functions as Pre-Fader, and the black area at the bottom of the Mixer Strip is used as Post-Fader. Pre-Fader Plugins are inserted in the signal path before the Fader, so that the Fader controls the level of the signal coming out of the Plugin. Post-Fader Plugins are inserted after the Fader: the Fader controls the level of the signal going into the Plugin. For some Plugins, Pre- or Post-fader placement does not matter. For others, the difference is subtle. For others still, inserting them in the right place is absolutely essential.
Adding a Plugin to a Track or Bus
Select the Track or Bus to which you want to add the Plugin.
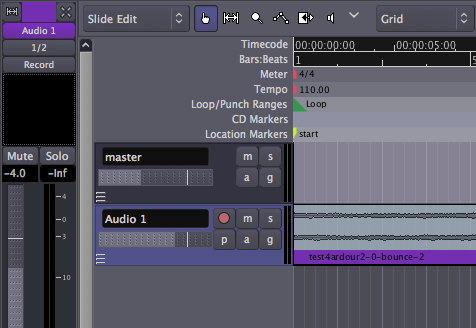
Right-click in the area you want to use, and click New Plugin > Plugin Manager to open the Plugin Window (you can also access the Plugin window by double-clicking in the black region).
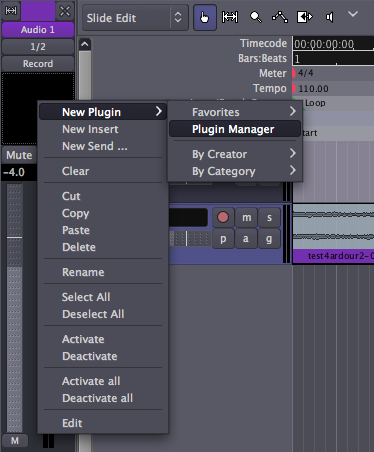
All available Plugins are listed at the top of the Plugin Window. Choose one by double-clicking it, or select it and press the Add button. The selected Plugin is listed in the black region at the bottom of the Plugin window. Select all the Plugins you want to add.
You can search for a Plugin by typing in the name or type of effect wanted. In this example, we look for a Reverb effect.
Insert the Plugins in the track by pressing the Insert Plugin(s) button. The Plugins are listed in the black area above the Mixer Strip.

Editing and Saving Plugin Parameters
Double-click a Plugin to edit its parameters. In this example, we change the pitch shift or the buffer size.
Click the Save button to save the preset under a new name.
Bypassing Plugins
To bypass the Plugin, press the Bypass button. This turns the Plugin off and allows the signal to pass by it unaffected.
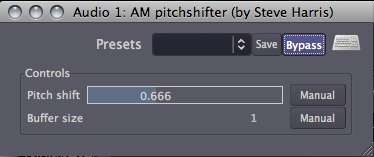
Bypassed Plugins are shown with parenthesis on the Mixer Strip.
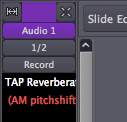
Right-Clicking the Plugins will give a menu with the option to Activate and Deactivate them.

Continuing
In this chapter, we learned how to add a Plugin to a single Track. This is useful if that Track needs a specific Plugin, but if you have a Plugin which is used for many Tracks at the same time, you should continue to the next chapter about Using Sends. You can also continue to the various, Plugin-specific chapters such as Dynamics and Equalizing.
Using Sends
In Ardour, you can add Sends to Tracks and Busses. A Send is an extra output for a Track or Bus with its own Fader that can be used to route the signal to other points in Ardour.
To add a particular effect to a set of Tracks without creating multiple instances of the same Plugin, one approach would be to create a Bus, add one instance of the effect Plugin to the Bus, and Route the outputs of multiple Tracks to that Bus. This applies the effect equally to all routed Tracks and the "clean" (unprocessed) signal of these tracks is no longer available.
A more flexible approach is to use Sends. To do this, create a Bus with the desired Plugin, then add a Send in each track to which you want to apply the effect. Next, Route the Send outputs to the Bus. Now you can use the send Faders to control how much of each Track's signal is sent to the effect Bus Plugin. Using this approach, the 'clean' signals from each Track remain available to the Master Mix. Because Sends are very useful for this kind of work with effect Plugins, they are also commonly called "Effect Sends".
Creating and Using a Send
This section will show how to create and use a Send in the manner described above. First create a Bus, name it appropriately, and add a Plugin in the Pre-Fader Region, as discussed in the chapter Using Plugins. In this example, we have added the "Freeverb" Reverb LADSPA Plugin.
The "-" display in the Bus Input-Routing button indicates that nothing is Routed to this Bus yet. Before routing a send to this Bus first make sure that the Bus outputs are Routed to the Master Bus, as shown below.
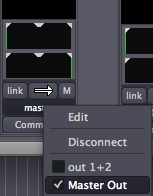
Also, open the Plugin Window and set the Plugin's signal mix to "100% Wet".

This ensures that the Bus carries all of the processed signal (the 'Wet' signal) from the Plugin, and none of the unprocessed signal (the 'Dry' signal) to the Master Bus. Remember, the unprocessed, 'clean' signals are still available from their original tracks, so there is no need to duplicate them in this Bus.
Now we can create Sends in the other Tracks and route them to the Bus inputs.
Sends can be created in the same Pre-Fader Regions and Post-Fader Regions above and below the Fader where Plugins are inserted. In Pre-Fader Sends, the Send Level is controlled only by the Send Fader, independently of the Track/Bus Fader. In Post-Fader Sends, the Send Level is controlled by both the Track/Bus Fader and the Send Fader. This means that the Post-Fader Send level is always proportional to the Track/Bus level, which controls the 'Dry' signal.
It is important to consider whether you want to create a Pre-Fader or Post-Fader Send. Generally this depends on the type of effect Plugin used and the desired result.
To create Post-Fader Sends, Right-Click in the Post-Fader area below the Fader in one of the Audio Tracks and select New Send ...
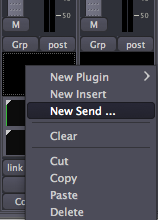
This creates a new Send and pops up the Send Output Routing Editor window. Since this is a Stereo Track, first add 2 outputs and then connect each output to the corresponding input of the previously created Reverb Bus.

When a new Send is created, it is deactivated by default. When a Send is not active, its name is shown in parentheses. In order to actually send signal out, the Send must first be activated. Right-click on the Send and select Activate.
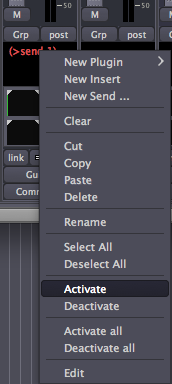
To give the Send a more appropriate name, Right-Click on it and select Rename. This pops up a little rename window.

Now our new Send is activated (note that the parentheses have disappeared) and ready for action.
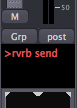
To control the Send level, double-click on the Send to open the Send window.

The Fader on the left controls how much of this Track's signal is sent to the Reverb Bus. Since this is a Post-Fader Send, this Send level is proportional to the actual (clean) Track level as set by the Track Fader.
Continuing
Now that you know how to Add Plugins to a Track, as well as how to Add Sends to Tracks to create Plugin Busses usable by any number of Tracks, it might be helpful to learn about a few other Plugins useful in the Mixing Process. Please continue on to the following chapters covering Dynamics and Equalizing.
Dynamics
One of the problems you may encounter in a Mix is that the loud parts are too loud, but the quiet parts are too quiet. This kind of problem cannot be easily solved using Faders to adjust the Levels alone. You may set the Levels so high that they clip, or you may add unwanted background noise by simply turning Levels up. These are all problems with what is called the Dynamic Range, i.e., the difference between the loudest and quietest parts of your Session. There are several types of tools for adjusting the Dynamic Range available as LADSPA Plugins within Ardour, including Limiting, Compression and Gating.
Limiting
A Limiter is a tool that prevents the volume of a Track from going over a certain Level, usually the Peak Level (0dB) or something close to it. Many Limiters have the option to boost the Levels of the incoming signal before they are Limited, and in this way you can "close the gap" between the loudest and quietest parts of your Mix. A Limiter can be used on the Master Bus to prevent the overall Mix from Clipping. Limiters are almost always used Post-Fader.
The "Fast Lookahead Limiter" can be found among the LADSPA Plugins. To set how much the Fast Lookahead Limiter limits, simply adjust the "Limit (dB)" slider. The Fast Lookahead Limiter literally "looks ahead" in the signal by a few milliseconds, and when it sees that the signal is about to go over the limit you have set, it automatically turns the Levels down.

The "Input Gain (dB)" slider determines how much the Levels are increased before they reach the Limiter, and the "Attenuation (dB)" meter on the right-hand side shows how much the Levels are being reduced at any given moment. While the reduction in volume is nearly-instantaneous, the "Release time (s)" slider determines how long it takes the Limiter to return to 0 Decibels of Attenuation.
Note that the "harder" one drives the Limiter (by increasing the Input Gain and/or decreasing the maximum Peak Limit allowed), the more reduction the Limiter is forced to make, and the more likely it is that Artifacts of the processing will occur (such as Distortions or erratic changes in volume). On the Master Bus, it is generally best to avoid excessive Limiting.
Compression
A Compressor boosts the overall volume of a sound, but then "squeezes" it depending on how loud it is. This can make vocals sound more even or drums sound fuller and louder. The end effect is similar to how a Limiter can reduce the range between the quietest and the loudest sound, however the effect is more selective when using a Compressor.
The simplest Compressor has relatively few controls, such as the "Simple Compressor" LADSPA Plugin shown below. Here, the "Threshold" sets the Level at which the Compressor will start to act, and the "Compression Ratio" controls how much the Compressor will "squeeze" the sound. The "Attack" and "Decay" parameters control how quickly the Compressor affects the sound.

A more complex Compressor, the "SC1 Compressor" LADSPA Plugin, can be found among the Ardour Plugins, in the "Steve Harris" folder.
The SC1 Compressor has three main buttons: "Threshold level (dB)", "Ratio (1:n)" and "Makeup gain (dB)". The "Threshold level" sets the Level at which Compressor will compress or squeeze the sound. The "Ratio" controls how much it will squeeze when it reaches the Threshold. The "Makeup gain" boosts the whole signal after the Compression occurs. To soften out a vocal, you could set a "Threshold level" of −10dB or so and a "Ratio" of 2.5, and then bring the volume back up with the "Makeup gain".
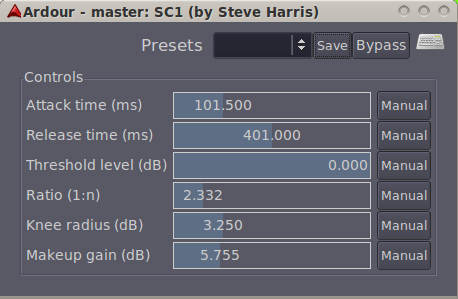
The other three controls—"Attack time (ms)", "Release time (ms)" and "Knee radius (dB)"—allow you to control the shape of the Compression. For soft vocal Compression, you would want a semi-fast "Attack time" so that the Compressor catches the beginning of each word, a slower "Release time" to let the voice ring out, and a soft "Knee radius" to create a gentle form of compression that isn't too noticeable. If you want to make drums sound big, you might try a slow "Attack time" so that you don't Compress the pop of the drum, a fast "Release time" so that the Compressor can catch the next hit of the drum, and a large "Ratio" to make the Dynamics between the beginning and end of the drum hit similar.
Gating
The simplest kind of Gate allows a signal to pass through when it is over a certain Level, and blocks the signal when it is lower than that. Gates are often used as a kind of noise reduction. For example, the Gate on a microphone channel might only open while the singer is singing, preventing other background noises from coming through as well when she is not singing. Gated drums are also a very well-known studio production trick to make them sound "sharper".
Here, the "Hard Gate" LADSPA Plugin displays a single control parameter, the "Threshold" at which the Gate will open and let the signal through.

Other kinds of Gates, such as Steve Harris' "Gate" LADSPA Plugin, are more complex. They have independent control over how quickly the Gate opens (the "Attack") and closes (the "Decay"), as well as other parameters quite similar to those described for the SC Compressor above.

Continuing
Now that we've explored some tools for getting the Dynamic Range exactly where you want it, it's time to look at adjusting the balance of Frequencies present in each individual Track and in your overall Mix. In the next chapter, we'll learn how to use the Equalizer to do just that.
Equalizing
Often, even after adjusting Levels and Panning, different tracks with similar frequency content (for example, a bass guitar and a kick drum) may be difficult to tell apart in the Mix. A good tool to address this issue is an Equalizer (or EQ). Essentially, an equalizer allows you to separately control the gain of different frequency ranges of a sound. This can be useful not only to sculpt the timbre of an isolated sound (for example, to make it sound 'sharper' or 'smoother'), but also to make sounds of various timbres to integrate better into the Mix.
3-Band Equalizer
The simplest kind of Equalizer is the one familiar to us from analog mixers. It has three parameters, which adjust the Levels of three Bands, or frequency ranges: one for the Bass (low frequencies), one for the middle range frequencies and one for the Treble (high frequencies). The "DJ EQ" LADSPA Plugin is just such an EQ.

Multi-Band (or Graphical) Equalizer
A more complex Multi-Band (or Graphical) Equalizer often has between eight and thirty-two Bands. Each Band is centered on a frequency, and the Level of each Band can be independently adjusted. In some Multi-Band EQs, such as the "TAP Equalizer" LADSPA Plugin shown below, the center frequency of each Band can be defined by the user. This allows you to either attenuate (or remove) an unwanted frequency, or to reinforce (boost) a desired one.

The overall "curve" of the Bands can also be used to determine the general tone of your Track or Mix. In the example above, the lower part of the mid-range frequencies have been "scooped out" a bit (note how Bands 1 and 8 are left untouched at 0 dB, while intermediary Bands 2 to 7 draw an attenuation curve, with Band 4 at -13 dB as the lowest point).
Parametric Equalizer
The Parametric Equalizer is the most versatile type of EQ used for Mixing because of its extensive control over all types of EQ parameters. In Ardour there is a Parametric Equalizer called the "Triple Band Parametric with Shelves", located in the Plugin folder labeled "Steve Harris".
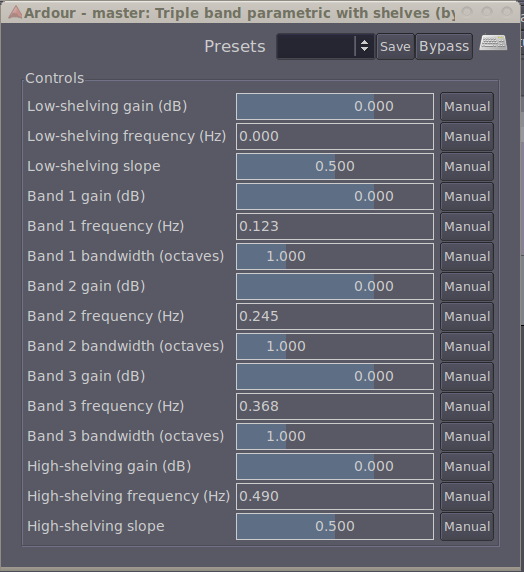
There are three options for each Frequency Band. Each of the three Bands has a "gain (dB)" adjustment to cut or boost frequencies, a "frequency (Hz)" adjustment to select center frequency, and a "bandwidth (octaves)" slider which determines how wide the range of frequencies to be affected will be. This plugin also contains a High Shelf and Low Shelf. A Shelf cuts or boosts everything above (High Shelf) or below (Low Shelf) a specific frequency. For example, a Low Shelf can be used to remove unwanted rumbling sounds, and a High Shelf can be used to reduce hiss.
An Example of Using an Equalizer
In order to achieve a better separation of two instruments in the Mix through the use of EQ, you first need to find out where the two instruments overlap.
Here's one approach. In the Triple Band Parametric with Shelves Plugin, select an appropriate Band for one of the instruments. In the case of a bass guitar, it would be "Band 1", the low frequency band. Boost the "gain" to 10dB, increase the "bandwidth" so that is a narrower range up to 3, and then scroll the "frequency" up and down slowly. You'll hear a pitch move up and down. Then scroll it down slowly until you hear the frequency range where the two instruments overlap. Now simply reduce the "gain" to -5dB, and you will hopefully hear the instruments a bit clearer. Next, apply the same process to the other instrument.
There are many approaches to EQ. Hopefully this will provide one example of how to begin EQ'ing Tracks in your Mix. But most importantly, when it comes to EQ, it is better to use too little than too much, unless you're consciously using extreme EQ as a compositional parameter.
Continuing
You should have enough tools now to create a clean, well-balanced Stereo Mix of your Session. However, if you want the parameters of your Faders, Panning or Plugins to change over Time, then you will want to explore the Using Automation chapter next. If not, then skip ahead to learn how to Export Sessions in the following section.
Using Automation
Automation is a way of representing and specifying changes in audio processing parameters over time. The Fader, Panning and any of the parameters of the Plugins used in that Track can be automated. An automated parameter is displayed underneath the parent track in its own Automation Track. Automation data is visually represented as an Automation Line, made up of a number of Automation Points. Here's how a track with Fader Automation looks like:
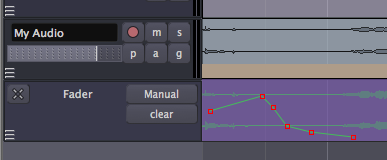
In the image above, the Automation Track called "Fader" is associated to the parent Track called "My Audio". The Automation Line controls Gain changes over time.
Creating an Automation Line
To add Automation to a Track, click the "a" button or Right-Click on the Track area.
A menu will appear, where you can select the parameter you would like to Automate. Plugin parameters are accessed from the Plugins submenu.
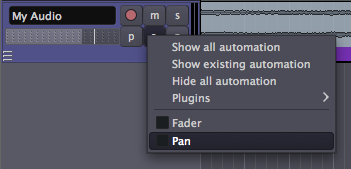
An Automation Track will then appear. With the Select/Move Objects tool active, Automation Points can be created by clicking anywhere in an Automation Track. An Automation Line joins the Automation Points you add.
Selecting a Plugin for Automation
You may add Automation to any Plugin which has already been added to a Track. In order to select a Plugin parameter for Automation, click the button on the Track marked "
a", or Right-Click on the Track area. A menu will appear, listing the Plugins you have added.
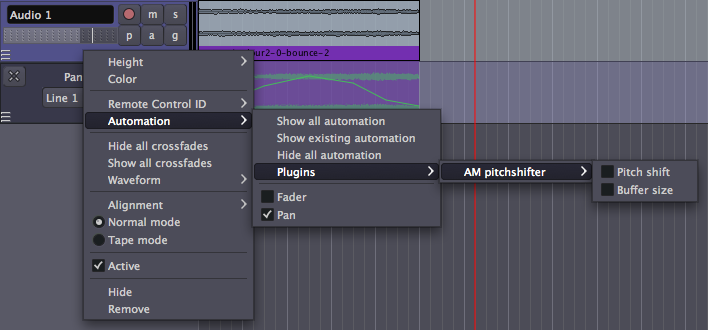
Within each listed Plugin, you may choose which parameter you want to Automate from a list. In the example, we chose the parameter "Pitch shift" of the Plugin "AM pitchshifter". An Automation Track for that parameter appears. Note that as you open several Automation Tracks, they will appear one after the other below the main parent Track.
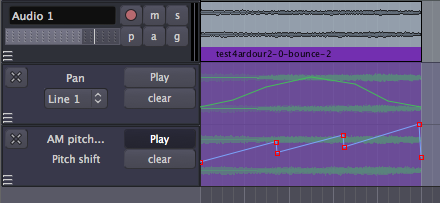
You can hide an Automation Track by clicking on the "X" at the upper left corner of the Automation Track. Note that a hidden Automation Track continues to function even when it is not visible.
Adding Better Visual Resolution to Automation
You can achieve a greater amount of vertical precision by increasing the height of the Automation Track by Right-Clicking on the gray region of the Automation Track and selecting the "Height" sub-menu.

Working with Automation Points
An Automation Point can be dragged in any direction with the mouse. To remove an Automation Point, hold down the "Shift" key while Right-Clicking on it.
Any segment of the Automation Line between Automation Points may be dragged vertically, affecting both end points at once, without affecting their horizontal position.
Useful variations for Automation Point adjustment include:
- "Alt" + left mouse button mouse drag gives increased precision of movement in any direction.
- Middle mouse button drag allows vertical movement, constrains horizontal.
- "Alt" + middle mouse button drag constrains vertical, allows horizontal (with increased precision).
- "Ctrl" + "Alt" + middle mouse button drag allows vertical (with increased precision), constrains horizontal.
- "Ctrl" + left mouse button mouse drag moves the current point in any direction, and also all subsequent points horizontally only.
- "Shift" + Right-Click deletes a point.
It is also possible to select multiple Automation Points by dragging a box starting on the track background around the points. Then the selected points may be deleted by hitting "Delete" (or "Fn" + "Backspace" if you do not have a true "Delete" key) on the keyboard.
The end points in the Automation Line have special significance. They determine the value of the Automated parameter before and after the Automation. In other words, the starting point determines the value of the Automation from the beginning of the Region to the start of the Automation, regardless of whether or not you have drawn Automation all the way to the beginning of that Region. Likewise, the Automated parameter remains the same value as the last Automation Point until the end of the Region, regardless of whether or not you have drawn the Automation to the end or not.
Playback of Automation
In order to make automation lines to actually playback after you draw them, select Play mode in the first drop-down button in the automation track (set by default to Manual).
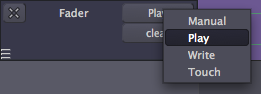
Automation Modes
Play mode will apply the existing Automation data during playback. No recording of Automation data will take place in this mode.
Manual mode tells Ardour to ignore Automation data during playback.
Write mode will continuously record user changes to the Automated parameter as the Transport plays, creating an Automation Line. For instance, you may start playback and then make real-time changes in gain using the Fader on the Mixer Strip of your Track. All the changes you make will be written (recorded) as an Automation Line, which then you can play back later by switching the Automation Mode back to Play. The process of "live recording" Automation Lines is the same for Plugins. Open an existing Plugin by double-clicking on it via the Mixer Strip. While the Plugin interface is open, start playback. Any changes you make by moving the controls of the Automated parameter in Plugin interface will be written as an Automation Line. Warning: leaving the Automation in Write mode during playback can over-write any previous Automation you have created!
Touch mode is similar to Write mode. Unlike Write mode though, Touch mode won't record over existing Automation data unless the parameter is being changed.
Continuing
Once you have your Automation in place, you're just about ready to Export your Stereo Mix to an audio file which you can listen to, burn as a CDR or convert to an MP3/OGG to share on a website. Please continue on to the next section, Exporting Sessions, to learn the different ways of doing this. However, if at any point during the Editing process you move a Region which contains Automation, you will discover that the Automation does not move with the Region. To find a solution for this problem, read the next chapter, Moving Automation.
Moving Automation
Moving a Region to a new location will not automatically move the Automation data that might be aligned with it, as we can see in the following screen shots.


Dragging Automation
Using the "Control" or "Apple" key while dragging moves the current Automation point in any direction, and also all subsequent points horizontally only. This may provide a way to move groups of Automation points to the new Region location in certain situations.

Consolidating the Region with Processing
However, dragging the Automation points independent of the Region may not be accurate enough in many circumstances. To preserve a Region with the Automated processing of the Fader, Panning and Plugins preserved, it is necessary to Consolidate the Region with the processing.
First, set the Automation to "Play".

Next, with the appropriate Track selected, create a Range with the Range tool and Right-Click to get the Range options menu. Then, select "Consolidate range with processing".

This creates a new Region with the Automated processing applied to it. The new Region containing this Automated processing will appear on the same Track and place in the Timeline, replacing the previous, unprocessed Region. The original Region is still preserved in the Regions List in case it is needed elsewhere.

Be sure to use the "clear" button in the Automation section to remove the previous automation. Then the newly consolidated Region can be moved to the desired location.

Bouncing the Region with Processing
Another option is to use the "Bounce range to the regions list with processing" option, also available from the Range options Right-Click menu.


This creates a new Region, with all of the processing included, in the Regions list. You can then create a new Track, here shown as "Audio 2", and drag the new Region ("Audio 1.1-0-bounce-5") to that Track. As can be seen here, the original Region is left unchanged in the "Audio 1" Track.

Drawing Gain Automation
Another type of Automation was introduced in the Changing Edit Modes chapter. This tool, the Draw Gain Automation tool, is found in the Edit Modes menu, and can also be used by typing the keyboard shortcut "G".
Use this tool if you want to draw Region-specific volume Automation. When this Cursor Mode is selected, your cursor pointer will look like this:
With this tool, Region Gain Automation can be drawn directly in the Region itself, unlike Fader Automation which is drawn or recorded in the Automation track. Region Gain Automation is separate from, and in addition to, Fader Automation.
As with the Automation Tracks, a Gain Automation Point can be dragged in any direction with the mouse. To remove a Gain Automation Point, hold down the "Shift" key while Right-Clicking on it.

The Automation created in this way will stick to the Region on which it was created, even when the Region is moved around.

This type of gain Automation is drawn directly on the Region itself, which makes it different from the Automation used in the drop-down Automation region (see chapter on Using Automation).
Deactivating and Removing Gain Automation
Gain Automation can be reset or deactivated from the Region context menu, which is reached by Right-Clicking on the Region. Here, the Gain Automation is referred to as the Envelope. In this menu, you have the options of "Reset Envelope", which removes the Gain Automation Points you have drawn in the Region, "Envelope Visible", which toggles visibility of the Gain Automation on and off (leaving it active however) and "Envelope Active", which toggles whether the Gain Automation is active or not (but leaves it visible). An inactive but visible Envelope is blue rather than green.

Continuing
By now you should have a complete Session ready, with Regions, Tracks, Mixing, Plugins and Automation all in place. The only thing left to do now is to Export your Stereo Mix to an audio file which you can listen to, burn as a CDR or convert to an MP3/OGG to share on a website. Please continue on to the next section, Exporting Sessions, to learn the different ways of doing this.
Exporting Regions
Exporting is the process of saving a Region, Track or Session to a file on your computer. You may wish to Export only a Region of your Session, perhaps to use as a sample in another application, or to Edit it in a different editor program.
Export a Region
To Export a Region, select it (so it becomes blue), and then right-click Export or use the top menu: Session > Export > Export selected regions to audiofile.
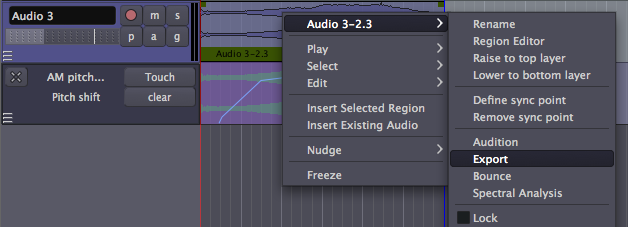
This will open up a dialogue box with several options. You'll usually Export as an AIFF or WAV file, at either 16-bit or 24-bit. 16-bit files can be burnt directly to an audio CD, but if you intend the audio to be further processed, it is best to export it at 24-bit. Having chosen your options, enter the track name at the top and select Export.
Warning: overwriting existing files causes Ardour to become confused, resulting in empty files being Exported. Be sure to use a unique file name each time you Export!

Please note that when exporting a Region, not all parameters and edits are Exported. Trimmed, split, stretched and reversed regions can be Exported, but edits such as Normalizing, Fading and Panning, and Automation are not Exported. Also, the volume of the audio Track itself or the Master Bus will not affect the Exported file. To Export these edits, please see the chapters on Exporting a Range and Exporting a Session.
Continuing
In the next chapter, we will learn about Exporting Ranges rather than just an individual Region.
Exporting Ranges
Exporting is the process of saving a Region, Track or Session to a file on your computer. As we learned previously, Exporting a Region does not Export all of the changes you might have made to that Region. To Export edits such as Normalizing, Fading and Panning, and Automation, you must Export either a Range or the entire Session.
To Export a range, select the Select/Move Ranges tool, then Right-Click Export range or use the top menu: Session > Export > Export selected ranges to audiofile.
Since the Export is handled through the Master Bus, every Track within the Range you select is Exported together, exactly as they play back in your Session. Unlike the Export Region command, this kind of Export includes any Normalizing, Fading and Panning, and Automation you have created, along with the individual edits made to the Regions as well. If any of the Tracks have the Mute or Solo buttons engaged, this will also affect which Tracks are heard in the Exported file.
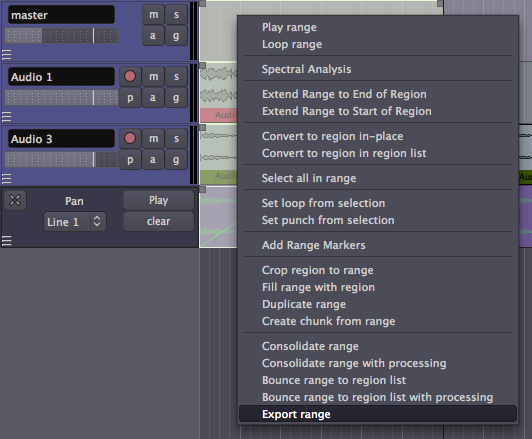
This opens a dialogue box with several options. Generally, you will want to export a Stereo mix as an AIFF or WAV file, at either 16-bit or 24-bit. 16-bit files can be burnt directly to an audio CD, but if you intend the audio to be further processed, it is best to export at 24-bit. Having chosen your options, enter the track name at the top and select Export.
Define the output channels by selecting them: left and right are normal stereo outputs.
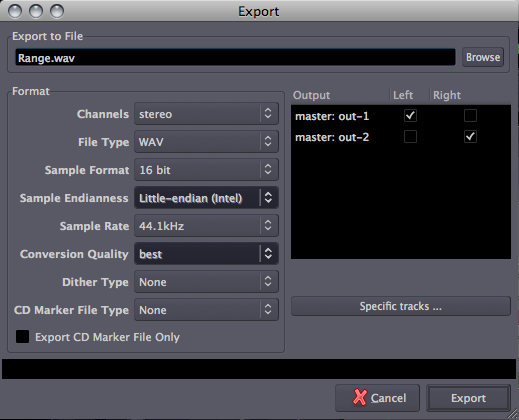
To export only specific Tracks, de-select the master outs, and click the ”Specific tracks” button and select the channel(s) of the Track(s) you wish to Export.

Warning: overwriting existing files causes Ardour to become confused, resulting in empty files being Exported. Be sure to use a unique file name each time you Export!
Continuing
Once you are happy with your entire Session, you will probably want to to Export the whole thing as a Stereo Mix. Please go ahead to the next chapter to learn about Exporting Sessions.
Exporting Sessions
Exporting is the process of saving a Region, Track or Session to a file on your computer which you can listen to, burn as a CDR or convert to an MP3 to share on a website. As we learned previously, Exporting a Region does not Export all of the changes you might have made to that Region. To Export edits such as Normalizing, Fading and Panning, and Automation, you must Export either a Range or the entire Session.
To Export a Session, use the top menu: Session > Export > Export session to audiofile.
Everything included between the "start" and "end" Location Markers in the Timeline will be Exported, so you have to set the markers first if they are not in the correct position.
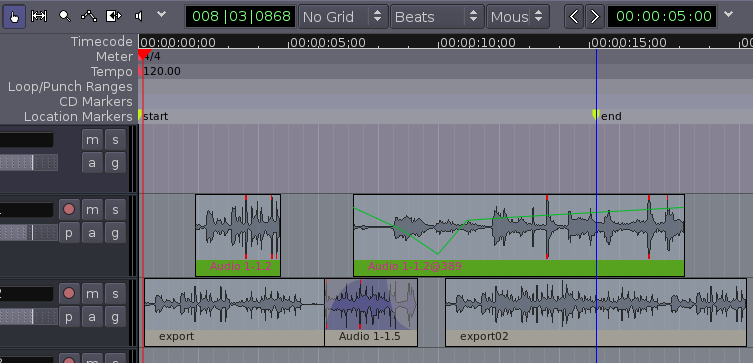
Since the Export is handled through the Master Bus, all the Tracks within the Range you select will be Exported together, exactly as they play back in your Session. Unlike the Export Region command, this kind of Export includes any Normalizing, Fading and Panning, and Automation you have created, along with the individual edits made to the Regions as well. If any of the Tracks have the Mute or Solo buttons engaged, this will also affect which Tracks will be heard in the Exported file.
This will open up a dialogue box with several options. You'll want to export a Stereo mix, usually as an AIFF or WAV file, at either 16-bit or 24-bit. 16-bit files can be burnt directly to an audio CD, but if you intend the audio to be further processed, it is best to export it at 24-bit. Having chosen your options, enter the track name at the top and select Export.
Define the Output channels by clicking the check boxes in the section on the right. Left and Right are normal Stereo outputs.
To export only specific Tracks, de-select the master outs, and click the ”Specific tracks” button and select the channel(s) of the Track(s) you wish to Export.
Warning: overwriting existing files causes Ardour to become confused, resulting in empty files being Exported. Be sure to use a unique file name each time you Export!
Continuing
At the end of this Session, you now have an Exported Stereo Mix representing your entire Session. You're almost finished! The only thing left to do is save the Ardour Session itself. There are a number of ways to do this, and we will discuss them in the following section, Saving Sessions.
Saving Sessions
There are a number of ways to save Sessions in Ardour, so that each Session can be use later on. The simplest way is to save the entire Session as a single Ardour file.
Save a Session
You can save your session by pressing "Control" + "S" (or "Apple" + "S" on OS X), or by using the menu Session > Save.
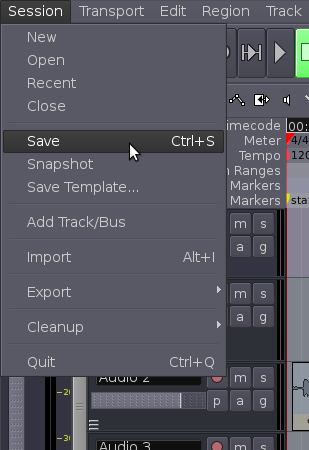
Ardour File & Folder Format
A typical Session's folder on your hard drive might look something like this:
2009-11-25T20:03:10.ardour      interchange
2009-11-25T20:03:10.history     looping2.ardour
analysis                        looping2.ardour.bak
dead_sounds                     looping2.history
export                          looping2.history.bak
instant.xml                     peaks
The name of this Session is "looping2". The first entries, listed here as
2009-11-25T20:03:10.ardour
2009-11-25T20:03:10.history
are a timestamped Snapshot of the Session and its history. Ardour will use this Snapshot to recover from a crash.
The folder named export is often used for Exporting files from your Session.
A Session file has the .ardour extension. The Session file is periodically backed up by Ardour with a .bak extension.
looping2.ardour
looping2.ardour.bak
The .history file keeps a record of changes you have made during your Session, and is also periodically backed up.
looping2.history
looping2.history.bak
The interchange folder contains the actual audio data of all the Regions used in your Session.
$ ls interchange/looping2/audiofiles/
Audio 1-1%L.wav
Audio 1-1%R.wav
cheesy synth-1%L.wav
cheesy synth-1%R.wav
cymbal-0-bounce-1.wav
cymbal-1.wav
guitar_drone.edit1.wav
highhat-0-bounce-1.wav
highhat-1.wav
kick-0-bounce-1.wav
kick-1.wav
slap bass 2-1.wav
slap bass-1.wav
snare-0-bounce-1.wav
snare-1.wav
And finally, the peaks folder contains the data Ardour uses to graphically display the Peaks of your soundfiles.
$ ls peaks/
cymbal-0-bounce-1%A.peak
guitar_drone.edit1%A.peak
guitar_drone.edit1%B.peak
highhat-0-bounce-1%A.peak
kick-0-bounce-1%A.peak
snare-0-bounce-1%A.peak
teeeest%A.peak
teeeest%B.peak
teeeest2%A.peak
teeeest2%B.peak
Continuing
Saving an entire Session allows you to open it again at a later time. However, if you would like to preserve a certain state that your Session is in, to be able to return to that state later on after you have made changes, then please continue to the next session called Saving Snapshots.
Saving Snapshots
Saving a Snapshot in Ardour is similar to saving your Session to a new file, however using a Snapshot avoids overwriting the original Session file. A Snapshot contains the current state of your work, while sharing all the audio and data files of the Session.
Save a Snapshot
You can save a Snapshot via the menu: Session > Snapshot
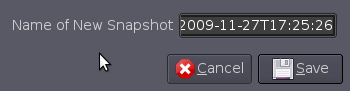
By default the program will name the new Snapshot according to the current date and timestamp of your system. If you wish, you can change the name to one that more meaningfully corresponds to the Session you are working on.
Recalling Snapshots
You can recall a saved Snapshot via the 'Snapshots' tab in the area on the right:
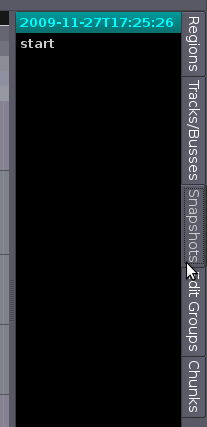
There you see the Snapshot we just created, and the 'start' entry represents the original state of our session.
Continuing
Sometimes it is helpful to have a default starting point for your Sessions rather than a Snapshot of changes you have made. To learn how to do this, please continue to the next session called Saving Templates.
Saving Templates
If you often go through the motions of setting up the same information in each new Session you create, such as the number of input and output Channels, the number and names of Tracks or Busses, or the Routing, then you may wish to create a Template of that information instead.
With a Template, you can re-create your current working Session without all the Region information files. Templates are useful if, for example, you're doing extensive Routing on Tracks and Buses and want to save the Editor Window's state for use in other Sessions. An example might be a Template to record Tracks of drums, bass, guitar and vocals, each with their own input on the soundcard, which you might use as a basis for each Session you created in that situation.
Save a Template
You can save a new Template from the Main Menu: Session > Save Template
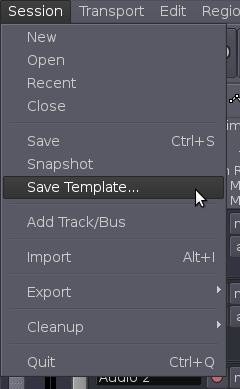
After which you can give the new Template a name:
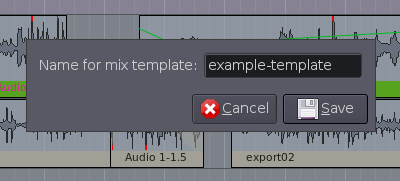
Load a Template
When creating a new Session, you get can also load up a previously saved Template:
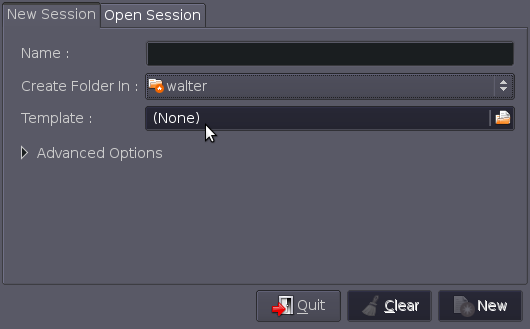
The example Template that was just created can be loaded from '/home/yourname/.Ardour2' (or '/Usr/yourname/.Ardour2' on OSX ) :
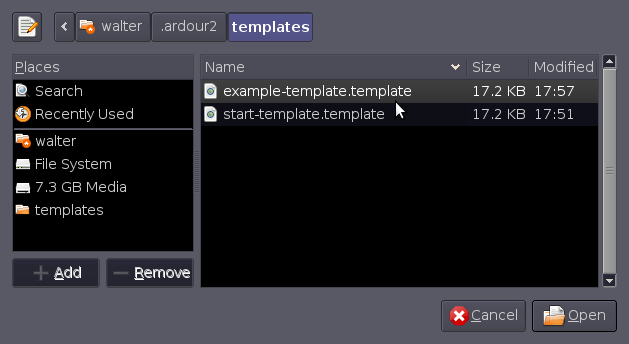
There are also several example Templates to be found in 'usr/share/yourname', each set up for a number of Tracks:
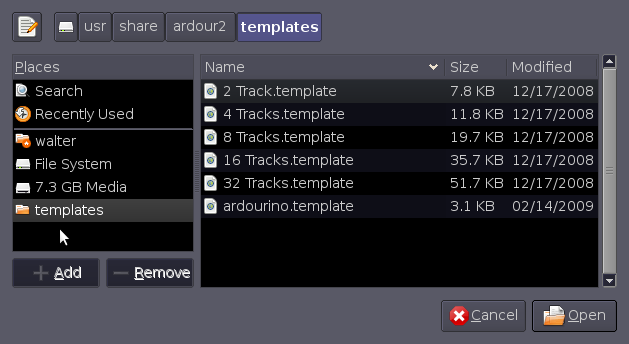
On OSX you can find these in '/Applications/Ardour2.app/Contents/Resources/share/ardour2/templates/'.
Conclusion
Congratulations, you have reached the end of the Introducing Ardour FLOSS Manual! We hope that this manual has been useful for you to learn the key functions of Ardour: Installing Ardour, Getting Started, Starting Sessions, Editing Sessions, Mixing Sessions and Saving Sessions.
In the following section, the Appendices, we have included some extra information we thought would be useful to new users of Ardour, including how to get Further Help, a Glossary of technical terms used in this manual, some Links to further information about Ardour on the Internet and, last but not least, the Credits of those involved in creating this FLOSS Manual.
Thanks for reading, and if you have some knowledge about Ardour that is not included here, please remember that this manual can be edited on the web at http://en.flossmanuals.net/bin/view/Ardour/WebHome. Changes made there will be reviewed by the FLOSS Manuals moderators for inclusion into new editions of this manual.
Further Help
Besides the URLS listed in the Links chapter, there are a couple of resources on the Internet to help you learn Ardour and fix some of the problems that you might have along the way.
Ardour Shortcut Cheatsheets
To make working with Ardour faster and easier, there are Ardour Shortcut Cheatsheets available for OSX and Linux (http://ardour.org/node/2894). These are likely to change between versions, so it is always a good idea to get the latest versions from this website.
Getting Help via Chat
A good way to get support when learning Ardour and working with it, is using the Chat function. Ardour has a built in "Chat" option, found in the Main Menu under Help > Chat to connect (via your web browser) to the Ardour IRC channel at Freenode.
You could also use your IRC capable chat application (like Pidgin or Xchat) to connect to the Ardour channel (#ardour or #ardour-osx) at the Freenode network, or use this weblink directly:
http://webchat.freenode.net/?channels=ardour .
Enter a nickname and connect, you are welcome!
In such a IRC Chat channel or room, you find the Ardour developers and other users to chat about using Ardour, problems and/or bugs you are facing, or about suggestions for Ardour which you want to discuss.
Getting Help via Mailing Lists
For those that prefer mailing lists to IRC chatting, the Ardour Users mailing list is also a good place where users and some developers discuss all kinds of problems and ideas related to using Ardour. This is an active list, with many helpful and knowledgeable users around to help guide less experienced people. There are sometimes more general discussions about topics like recording technique, audio interface selection, etc.
http://lists.ardour.org/listinfo.cgi/ardour-users-ardour.org
Getting Help via the Online Forum
If you would rather not sign up for an email list, you can also browse or post questions to the online forum at Ardour.org. Many common questions about setting up and using Ardour have been answered there already. Posting to this forum requires registering with the Ardour.org website.
http://ardour.org/forums
Glossary
Aggregate Device (Mac OS X)
An Aggregate Device is one virtual soundcard made of of two or more physical soundcards. PowerBooks and MacBooks made in 2007 or later will need this set up in order for JACK to have both input and output channels. This is set up in the Audio MIDI Setup application.
AIFF
A sound file format developed by Apple and commonly used for lossless and uncompressed audio. AIFF files are compatible with Windows, Macintosh and Linux operating systems.
ALSA (Linux)
Advanced Linux Sound Architecture. ALSA provides audio and MIDI functionality to the Linux operating system.
Arm (Track to record/Ardour to record)
Action that makes Ardour ready to start recording. Before recording in Ardour, one or more tracks need to be armed first, and then Ardour needs to be armed itself.
Artefacts (sound)
Perceivable distortion or decrease in sound quality generated as a by-product of certain signal processing operations. Artefacts are usually seen as undesirable or unexpected results of an otherwise intentional sound transformation.
Attenuation
Reducing the level of an audio signal, usually measured using a logarithmic scale. See also gain.
Audio MIDI Setup (Mac OS X)
The Audio MIDI Setup utility is a program that comes with the Mac OS X operating system for adjusting the computer's audio input and output configuration settings and managing MIDI devices.
Audio Unit Plugins
Audio Unit (AU) is a plugin architecture in Mac OS X computers. It may be thought of as Apple's equivalent to the popular VST plugin format by Steinberg. Mac OS X comes with a collection of AU plug-ins such as EQ filters, dynamic processors, delay, reverb, time stretch, among others.
Audition
The auditioner is a hidden mixer strip which auditioned regions are played back through. Auditioning a region will play only that region, without processing sends or plugins.
Automation
Automation is the automatic adjustment of various parameters such as gain, panning or plugin settings. Changes can be made once and then will be repeated every time the mix is replayed. Automation in Ardour is controlled by automation lines linked to each Track or Bus.
Auxiliary Controls
Buttons on the top right side of the controls found in the Editor Window: Punch In/Out, Auto Play, Auto Return, Auto Input, Click, Solo, and Audition.
Amplitude
The level or magnitude of a signal. Audio signals with a higher amplitude usually sound louder.
Bands (equalization)
The particular frequency regions to be boosted or attenuated in the process of Equalization.
Bars (music)
Same as 'measure', a bar is a metrical unit. In Western notation, it is the space comprised between two vertical lines drawn through the staff. The specific duration of a bar depends of its time signature and the current Tempo of the music.
Bass (Frequencies)
A generic way of referring to the lower frequencies of the Spectrum of a sound.
Beat
The basic pulse underlying a piece of music.
Beats per Minute
Beats per minute (BPM) is a measure of Tempo in music. A rate of 60 beats per minute means that one beat will occur every second; 120 bpm equals two beats per second, and so on. BPM indications usually appear at the beginning of a traditional musical score as a metronome mark (for example, "quarter note equals 60", meaning one quarter note per second).
Bit
A bit (
binary dig
it) is a single number with a value of either 0 or 1.
Bit Depth
Refers to the number of bits used to write a sample. In the CD standard, each sample of audio is represented by a 16-bit number. This gives 2^16 (two to the power of sixteen = 65,536) possible values that a sample can have. A higher bit depth means a greater possible dynamic range. Studio recordings are usually first made recorded with a bit depth of 24 (or even 32) to preserve as much detail before transfer to CD. DVDs are made at 24 bit, while video games from the 1980s remain famous for their distinctively rough "8 bit sound". Bit depth is also referred to as word length.
Buffer Size (JACK)
The buffer is a section of memory specifically allotted to temporary signal data. Small buffer sizes allow a lower latency and so are needed when using audio applications that require real-time interaction. The drawback is that CPU consumption for the system is higher with smaller buffer sizes. Larger buffers (like 512 or 1024) can be used when there is no such requirement.
Built-in Input and Output
These are the default interfaces for getting sound in and out of your computer if you don't have an external sound card. In a laptop, they are the common input (mic) and output (headphone) connections.
Bus
A bus is similar to a Track except that it does not contain its own regions. You cannot record directly into a bus or drag regions into it. The Mixer Strip vertically represents the signal flow of a bus, whereas the Main Canvas horizontally displays time-based information for each bus (such as automation lines).
BWF
Broadcast Wave Format (BWF) is an extension of the popular Microsoft WAVE audio format and is the recording format of most file-based non-linear digital recorders used for motion picture and television production. This file format allows the inclusion of metadata to facilitate the seamless exchange of sound data between different computer platforms and applications.
CAF
CAF (Core Audio Format) is a file format for storing audio, developed by Apple. It is compatible with Mac OS X 10.4 and higher. The Core Audio Format is designed to overcome limitations of older digital audio formats, including AIFF and WAV. Just like the QuickTime .mov file format, a .caf file format can contain many different audio formats, metadata tracks, and much more data.
Center Frequency
In some EQ plugins, the user has the possibility of choosing the center frequency for each of the Frequency Bands. The center frequency of a Band will be the one most sharply attenuated or reinforced by the equalizer for that specific band. Frequencies surrounding the center frequency will be less affected.
Click (Mouse)
In this manual, it specifically means to click on the left button of your mouse. Whenever the right button is required, the action is referred to as "right-click".
Clipping
Clipping occurs when a signal is too high in level to be reproduced. Any samples too high in level will simply be truncated, resulting in distortion, loss of audio detail, and artefact frequencies which were not present in the original sound.
Clipping Point
The clipping point of a digital system is referred to as 0 dB, and the level of any sound is measured in how far below the clipping point it is (-10 dB, -24 dB, etc).
Clocks
The two big numerical displays near the top of the Editor Window. They can display the time in a number of formats: Timecode, Bars:Beats, Minutes:Seconds, and Samples.
Compile
FLOSS applications are distributed as source code, which is human-readable but cannot be run as an actual application. To turn this source code into a running application, it must first be Compiled. When you download a disk image for Mac OS X or a software package from your distribution (such as Ubuntu, Debian or Fedora), it has been compiled for you already. However, if you wish to add features (such as support for VST Plugins) which your distribution does not provide, then you must Compile the application from source code yourself.
Compression (DSP)
Essentially, compression makes the quiet parts of a signal louder without changing the level of
the louder parts. This entails a reduction of the actual dynamic range: a compressed sound is less dynamic (has a smaller range of levels)
Compression (data)
Like any other data, audio data can be compressed so that it uses less hard disk space. Compression such as FLAC, ALAC, or MLP reduce the size of audio files compared to WAV or AIFF without changing the data, which is referred to as lossless compression. Audio can be compressed to a still smaller size by using lossy compression such as MP3, Ogg Vorbis or AAC but this is achieved by removing data which can have an audible effect.
Connections Manager (JACK)
The window in Jack that allows to manage all connections between audio inputs and outputs.
CoreAudio (Mac OS X)
CoreAudio provides audio functionality to the Mac OS X operating system.
Cursor Modes
These are the six buttons just below the Transport commands in the Editor Window. The six different functions that the mouse pointer can have in Ardour are: Select/Move Objects, Select/Move Ranges, Select Zoom Range, Draw Gain Automation, Stretch/Shrink Regions, Listen to Specific Regions.
Decibels
Decibel is a logarithmic scale used to measure many quantities, including the gain, level or loudness of a signal. Decibel is usually abbreviated to dB and in digital audio usually denotes how far under 0 dBFS (the clipping point of a system) a signal is.
Delay (effect)
The amount of time between one event and another. As an audio effect, a delay takes an incoming sound signal and delays it for a certain length of time. When mixed with the original sound, an "echo" is heard. By using feedback to return the delayed signal back into the delay (usually after lowering its gain), multiple echos with a decay result.
Destructive Editing/Recording
Destructive actions are those that permanently modify or erase the original data (sound files) in the course of editing or recording.
Distortion
Distortion occurs when an audio signal is changed in some way that produces frequencies not present in the original. Distortion can be deliberate or unwanted, and can be produced by driving the signal to a clipping point, or by using mathematical transformations to alter the shape (or "waveform") of the signal (usually referred to as "waveshaping").
Disk Image (.dmg)
A disk image is a single file containing the complete contents and structure representing a data storage medium or device. By double-clicking on a .dmg file on a Mac, a virtual device will be mounted to your Desktop (it will look as if you had inserted a USB device or a DVD, for example). Many software installers in OS X are available as .dmg files.
Driver (JACK)
Software written to control hardware. CoreAudio is the Mac sound driver. ALSA is the most common Linux driver.
DSP
Digital Signal Processing.
Dynamic Range
Used to refer to the difference between the loudest and the quietest sound that can possibly recorded, as well as the amount of detail which can be heard in between those extremes. Sounds which are too quiet to be recorded are said to be below the noise floor of the recording system (microphone, recorder, sound card, audio software, etc). Sounds which are too loud will be distorted or clipped.
Edit Modes
The three available Edit Modes (Slide Edit, Slice Edit, and Lock Edit) control the behavior of editing operations in the Main Canvas.
Edit Point
The point in the Main Canvas where an action such as Paste takes place. This can be the Mouse, the Playhead or a Marker.
Editor Window
Ardour provides two ways of viewing a session: the Editor and the Mixer. The Editor represents the time based aspects of a session: it shows tracks and busses as horizontal timeline displays, with material within the tracks (audio, MIDI, video, automation data, etc.) arranged along the horizontal (time) axis.
EQ
See Equalization.
Equalization
Equalization (EQ) is the process of adjusting the relative levels of different frequencies in a recording or signal. In other words, it is the process of boosting or attenuating the various frequency bands of a sound according to a chosen artistic goal.
Filter
A type of signal processing that supresses some frequencies.
Floating Point Numbers
It is simply a number with a decimal point. "Floating Point" refers to the specific technique the computer uses to represent a larger range of integer and non-integer values.
FLAC
An open source lossless audio format generally compatible with Linux, Windows and Macintosh. Unlike AIFF and WAV, FLAC is a compressed format, allowing file sizes to be reduced.
FLOSS
FLOSS stands for Free Libre Open Source Software. FLOSS Manuals is a collection of manuals about free and open source software together with the tools used to create them and the community that uses those tools. They include authors, editors, artists, software developers, activists, and many others.
Format (audio file)
The types of sound file that sounds are saved as. Among the most common are AIFF, WAV, FLAC, mp3 and Ogg Vorbis.
fps
Frames Per Second. Frame rate, or frame frequency is the frequency (rate) at which an imaging device produces unique consecutive images called frames. The term applies equally well to computer graphics, video cameras, film cameras, and motion capture systems. Frame rate is most often expressed in frames per second (FPS).
Frequency
Refers to the number of times an oscillation occurs in one second. Frequency is measured in Hertz, and is correlated to the pitch of a sound. Frequency is a linear scale, while pitch is logarithmic. The pitch 'A' above the middle C has a frequency of 440 Hz. The 'A' one octave above is twice that frequency (880 Hz).
Gain
Increasing the level of an audio signal, usually measured using a logarithmic scale. See also attenuation.
Grid
The Grid is a system of points that a Region might snap to while editing it. The Grid can be "No Grid", "Grid" or "Magnetic".
Grid Points
The points in the Grid which Regions will snap to when it is active. Grid Points may be minutes, seconds, video frames, bars, beats or some multiple of beats.
Hertz
A term used to describe the number of times something occurs in one second. In digital audio, it is used to describe the sampling rate, and in acoustics it is used to describe the frequency of a sound. Thousands of Herz are described as kHz (kilo Herz).
High Shelf
In an Equalizer, a Shelf cuts or boosts everything above (High Shelf) or below (Low Shelf) a specific frequency.
Headroom
The range of Decibels between the region's maximum Peak and the Clipping Point is commonly referred to as Headroom. It is common recording practice to keep approximately three to six Decibels of Headroom between the maximum of your signal and the Clipping Point.
Jack Audio Connection Kit (JACK)
JACK is a low-latency audio system which manages connections between Ardour and the soundcard of your computer, and between Ardour and other JACK-enabled audio programs on your computer. You must install JACK for Linux or JackOSX before you can use Ardour.
JackOSX (OS X)
The name of the version of JACK that runs on Mac OS X. See JACK for more details.
JackPilot
The control interface that comes with JackOSX.
Jack Server
The Jack Server is the "engine" or "backend" of the Jack Audio Connection Kit.
Jack Router
The Jack Router allows audio to be routed from one application to another using the Jack Server.
JAMin
JAMin is the Jack Audio Connection Kit Audio Mastering interface. JAMin is an open source application designed to perform professional audio mastering of stereo input streams. It uses LADSPA for digital signal processing (DSP).
LADSPA Plugins
Linux Audio Developer Simple Plugin API (LADSPA) is a standard that allows software audio processors and effects to be plugged into a wide range of audio synthesis and recording packages. For instance, it allows a developer to write a reverb program and bundle it into a LADSPA "plugin library." Ordinary users can then use this reverb within any LADSPA-friendly audio application. Most major audio applications on Linux support LADSPA.
Latency
Latency is the amount of time needed to process all the samples coming from sound applications on your computer and send it to the soundcard for playback, or to gather samples from the sound card for recording or processing. A shorter latency means you will hear the results quicker, giving the impression of a more responsive system. However, with a shorter latency you also run a greater risk of glitches in the audio because the computer might not have enough time to process the sound before sending it to the soundcard. A longer latency means fewer glitches, but at the price of a slower response time. Latency is measured in milliseconds.
Amplitude (mixing)
The strength of an audio signal. The scale of amplitude is logarithmic, since it expresses the physical ratio of power between one sound and another. Levels in digital audio systems are usually represented as the number of Decibels below the clipping point of 0 dB. See also loudness.
Limiting
The process by which the amplitude of the output of a device is prevented from exceeding a predetermined value.
Linear
A scale of numbers which progresses in an additive fashion, such as by adding one (1, 2, 3, 4...), two (2, 4, 6, 8...) or ten (10, 20, 30, 40...). Multiplying an audio signal, for example, by either a linear or a logarithmic scale will produce very different results. The scale of frequency is linear, while the scales of pitch and gain are logarithmic.
Linux kernel
The core of the GNU/Linux operating system. In a Real-time System, this kernel is usually Compiled with new parameters which speed up the use of audio applications in the system.
Lock Edit
One of the three available Edit Modes, Lock Edit is similar to Slice Edit, but regions will remain at their original positions regardless of any edit operation performed.
Logarithmic
A scale of numbers which progresses according to a certain ratio, such as exponentially (2, 4, 8, 16, 256...). Both scales of pitch and gain are logarithmic, while the scale of frequency is linear.
Lossless
See Compression (data)
Lossy
See Compression (data)
Loudness
Unlike amplitude, which expresses the physical power of a sound, loudness is the perceived strength of a sound. Tones at different frequencies may be perceived as being at different loudnesses, even if they are at the same amplitude.
LV2
LV2 is an open standard for plugins and matching host applications, mainly targeted at audio processing and generation. LV2 is a simple but extensible successor of LADSPA, intended to address the limitations of LADSPA which many applications have outgrown.
Main Canvas
In the Editor Window of Ardour, the Main Canvas is the space just below the timeline rulers where Tracks and Busses are displayed horizontally.
Master Out
A master out is a bus to which all (or most) tracks and other busses send their output. It provides a convenient single point of control for the output of Ardour, and is a typical location for global effects. Master out use is enabled by default, and the master out bus is set up to be stereo.
Meter
The grouping of strong and weak beats into larger units called bars or measures.
Mixing
Audio mixing is the process by which a multitude of recorded sounds are combined into one or more channels, most commonly two-channel stereo. In the process, the levels, frequency content, dynamics and panoramic position of the source signals are commonly manipulated and effects such as reverb may be added.
MIDI
MIDI is an industry-standard protocol defined in 1982 that enables electronic musical instruments such as keyboard controllers, computers and other electronic equipment to communicate, control, and synchronize with each other. MIDI allows computers, synthesizers, MIDI controllers, sound cards, samplers and drum machines to control one another, and to exchange system data. MIDI does not transmit audio signals, but simply messages such as note number (pitch), velocity (intensity), note-on, and note-off.
Mixer Strip
Each track and bus is represented in the Mixer Window by a vertical Mixer Strip that contains various controls related to signal flow. There are two places in Ardour in which you can see mixer strips. The mixer window is the obvious one, but you can also view a single mixer strip on the left hand side of the Editor (shift + E to hide/view)
Mixer Window
The Mixer shows the session by representing tracks vertically as Mixer Strips, with controls for gain, record enable, soloing, plugins etc. The Mixer represents the signal flow of Tracks and Busses in an Ardour session. The mixer window provides a view that mimics a traditional hardware mixing console.
Monitoring
Monitoring is the process of routing a specific mix or submix of your session into separate outputs (like headphones). For example, a musician being recorded may want to listen to existing material while performing. Ardour and JACK make it easy to setup monitor outs since any incoming signal can then be delivered back to any output, optionally mixed together with other signals and with any kind of sound processing added.
Mono
A mono sound file contains only one channel of audio. A mono track in Ardour has only one input and handles mono sound files.
MP3
A lossy, size-compressed sound file Format.
Graphic Equalizer/Multi-Band Equalizer
A Graphic (or Multi-Band) Equalizer consists of a bank of sliders for boosting or attenuating different frequency of a sound.
Non-destructive Editing/Recording
This is a form of editing where the original content is not modified in the course of editing. Behind the scenes, the original sound file is kept intact, and your edits are in fact a list of instructions that Ardour will use in order to reconstruct the signal from the original source when you play it back. For example, creating fade-ins and fade-outs on your Regions is a type of non-destructive editing.
Normalize
To normalize an audio signal means to adjust its Gain so that it peaks at the maximum the sound card allows before Clipping.
Normal Mode
See Track Mode.
Note value
The proportional duration of a note or rest in relation to a standard unit. For instance, a 'quarter note' (crotchet) is so-called because its relative duration is one quarter of a whole note (semibreve).
Octave (music)
A distance of 12 semitones between two notes. In Hertz, the ratio of an octave is 2:1. For example, the note 'A' above the middle C has a frequency of 440 Hz. The note 'A' one octave above is 880 Hz, and one octave below is 220 Hz.
Ogg Vorbis
An open source lossy, size-compressed sound file format.
Panning
Panning is the location of sounds in the Stereo Field.
Parametric Equalizer
The Parametric Equalizer is the most versatile type of EQ used for Mixing because of its extensive control over all the parameters of filtering.
Peaks
Peaks are a graphical representation of the maximum Levels of a Region.
Peak Meters
Peak Meters are a running representation of the maximum Levels of a Region, and are located next to the Fader in the Mixer Window, and also in the Track Mixer, of each Track.
Pitch
Pitch represents the perceived fundamental frequency of a sound.It is one of the three major auditory attributes of sounds along with loudness and timbre. In MIDI, pitch is represented by a number between 0 and 127, with each number representing a key on a MIDI keyboard. The relation of pitch to Frequency is Logarithmic. This means that a sound which is heard as one Octave (+12 MIDI notes) above another one is twice the frequency in Hz, while a sound one octave below (-12 MIDI notes) is half the frequency.
Playhead
In Ardour, the Playhead is the red line that moves in time (i.e., left to right) to indicate the current playback position.
Plugin
In computing, a plugin consists of a computer program that interacts with a host application (in this case, Ardour) to provide a certain function "on demand", usually a very specific one. Reverb, filters, and equalizers are examples of plugins that can be used in Ardour in association with Tracks or Busses.
Portaudio
A free and open source set of audio drivers for Linux and Mac OS X.
Post-Fader (Plugin or Send)
In the Mixer Strip, the post-fader area is the black space below the gain slider, to which plugins or sends can be added. The input of these plugins and sends will be the signal after any manual or automated gain change (thus "post-fader").
Pre-Fader (Plugin or Send)
In the Mixer Strip, the pre-fader area is the black space above the gain slider, to which plugins or sends can be added. The input of these plugins and sends will be the incoming signal before it is affected by any manual or automated gain changes controlled by the slider (thus "pre-fader").
Quantization
In signal processing, quantization may refer to bit depth (see bit depth definition). In MIDI, quantization refers to the process of aligning notes to a precise temporal grid. This results in notes being set on beats or exact fractions of beats. MIDI sequencers typically include some type of quantization function.
Range
A segment of time. Ranges are created with the Select/Move Ranges tool and may include one or more tracks. Loop and punch ranges are special types of ranges that are created and manipulated with the loop/punch ranges meter.
Real-time System (Linux)
In a Real-time System, the Linux kernel is usually recompiled (rebuilt) with new parameters, and other settings in the system are optimized which speed up the use of audio applications in the system.
Regions
Regions are the basic elements of editing and composing in Ardour. Each region represents all or part of an audio file. Removing a region from a track does not remove the audio file from the disk.
Region List
The region list is located at the right hand side of the Editor Window and it shows all the regions associated with the session.
Reverberation
Reverberation is the persistence of sound in a particular space after the original sound source is removed.A reverberation, or reverb, is created when a sound is produced in an enclosed space causing a large number of echoes to build up and then slowly decay as the sound is absorbed by the walls and air. Digital reverberation can be added to a sound in Ardour through the use of plugins.
Right Click (mouse)
Click on the right button of your mouse.
Routing
Routing is sending an audio signal from somewhere to somewhere else. Signals can be routed not only from the outside world into Ardour and vice-versa, but also within Ardour itself (for example, from a Track to a Bus).
Rulers
Rulers are the thin horizontal bars that display the time line, helping to see when exactly a region or sound starts or stops. Also displayed with the rulers are the meter and tempo markers, the location markers, the range markers and the loop/punch ranges.
Sample (data)
In digital audio, a sample is the smallest possible segment of a recorded sound. In CD audio, for example, it takes 44,100 samples to make one second of recorded sound, and so we can say that the sampling rate is 44,100 Hertz. Samples also have a bit depth which determines the dynamic range that is possible to record and playback. Common bit depths are 16 (for CD audio), 24 (for studio recording and DVDs) or 32 (for sounds inside the computer).
Sample (music)
In electronic music, the word sample can mean any portion of sound extracted from an existing piece of music to be reused in a new composition.
Sampler
An electronic music instrument or software which plays back a recorded sound (or sample) whenever it is sent a note message. The pitch of the note determines how fast or slow the sample is played back, which emulates the pitch changes in other instruments. Samples can be looped (played over and over) and one-shot (played once).
Sampling Rate
The rate at which the computer records and plays back sound, which is measured in Hertz representing the number of samples per second. CD audio is recorded and played at 44,100 Hz (or 44.1 kHz), while DVD audio runs at 96,000 Hz (96 kHz) and cheap consumer gadgets like voice recorders, video games, mobile phones, toys and some MP3 players often use a rate of 22,050 Hz (22.05 kHz) or even less. The sampling rate determines the highest frequency that can be recorded or played, which is expressed by the Nyquist number (half the sampling rate). Playing back sounds at a different sampling rate then they were recorded at will result in hearing that sound at the "wrong speed".
Send
An optional auxiliary output for a track or bus.
Session
A session is all of the information that constitutes one project in Ardour. Each session is saved in its own folder containing all the audio, region and parametric data, and a master file with the .ardour extension.
Shelf
In an Equalizer, a Shelf cuts or boosts everything above (High Shelf) or below (Low Shelf) a specific frequency.
Slice Edit
One of the three available Edit Modes, Slice Edit does not allow dragging regions around, but still allows you to perform slice operations (such as cut, paste, and split). Space between regions will be kept constant after any edit operation that affects it. If you delete the second half of a region, for example, any subsequent regions on the same track will automatically move back in the time grid.
Slide Edit
Another one of the three available Edit Modes, Slide Edit is the default mode. It allows you to drag regions around horizontally (within the same track) and vertically (between tracks).
SMPTE timecode
A set of cooperating standards to label individual frames of video or film with a timecode defined by the Society of Motion Picture and Television Engineers. Timecodes are added to film, video or audio material, and have also been adapted to synchronize music. They provide a time reference for editing, synchronization and identification.
Snap Mode
The Snap Mode menus are found just below the Clocks. They control the amount Quantization of the time grid, i.e., the amount of "snap" an audio Region has to the type of grid you have chosen.
Snapshots
Saving a snapshot in Ardour is similar to saving the session to a new file to avoid overwriting the original session file. A snapshot contains the current state of your work, while sharing all the audio and data files of the Session. If you were trying to find a "Save As" function in Ardour, saving a snapshot is probably what you are looking for.
Solo
Toggle switch found in track controls and mixer strips. When toggled on, only solo tracks will send output. Several tracks can be marked solo at once. The general Solo button (top row of controls in the Editor Window) can be used to un-solo all soloed tracks at once.
Spectrum
The representation of a signal in terms of its frequency components.
Stereo
A stereo sound file contains two channels of audio (usually known as Left and Right channels). A stereo track in Ardour has two inputs and outputs, in order to record and playback stereo files.
Stereo Field
Stereo field is the perception of spatial location of sounds based on a sound reproduction system of 2 channels (Left and Right).
Take (recording)
A sequence of sound recorded continuously at one time.
Tape Mode
See Track Mode.
Tempo (music)
The rate at which beats occur. Precise Tempo indications are measured in bpm (beats per minute), although subjective indications are also common in scores (Allegro, Adagio, Very Fast, etc).
Terminal
A "terminal" is the text-based interface that allows to operate a computer by typing commands into it. Most computer users today rely solely on a graphical interface to control their systems. Both Mac OS X and Linux though, include a terminal which may make some tasks easier for some users.
Timecode
A time code is a sequence of numeric codes generated at regular intervals by a timing system. The SMPTE family of timecodes is almost universally used in film, video and audio production.
Time Signature (music)
A sign placed at the start of a piece of music (after the clef and key signature) or during the course of it, indicating the meter of the music.
Track
A Track is the place to where you can drag a Region from your Region List and where you can record sounds coming from an outside source. The Mixer Strip vertically represents the signal flow of a track, whereas the Main Canvas horizontally displays time-based information for each track.
Track Mode
Track Mode gives you a choice between Normal Mode and Tape Mode. Normal Mode creates a new Region for each Recording Take, while Tape Mode destructively records--in other words the previous Take of a Track is eliminated with each new Take.
Transport
The buttons located on the upper left corner of the Editor Window, with controls such as Rewind, Play, Stop.
Treble (frequencies)
Generic way of referring to high frequencies of the Spectrum of a sound.
VST (Virtual Studio Technology)
VST is an interface for integrating software audio synthesizer and effect plugins with audio editors and digital workstations such as Ardour. VST and similar technologies use digital signal processing to simulate traditional recording studio hardware with software. Thousands of plugins exist, both commercial and freeware. VST was created by Steinberg.
WAV
A sound file format developed by Microsoft and IBM and commonly used for lossless and uncompressed audio. WAV files are compatible with Windows, Macintosh and Linux operating systems.
Waveform
The time-domain visual representation of a sound. Waveforms are drawn inside the colored rectangles representing Regions in the Main Canvas.
Word length
See Bit Depth.
License
All chapters copyright of the authors (see below). Unless otherwise stated all chapters in this manual licensed with GNU General Public License version 2
This documentation is free documentation; you can redistribute it and/or modify it under the terms of the GNU General Public License as published by the Free Software Foundation; either version 2 of the License, or (at your option) any later version.
This documentation is distributed in the hope that it will be useful, but WITHOUT ANY WARRANTY; without even the implied warranty of MERCHANTABILITY or FITNESS FOR A PARTICULAR PURPOSE. See the GNU General Public License for more details.
You should have received a copy of the GNU General Public License along with this documentation; if not, write to the Free Software Foundation, Inc., 51 Franklin Street, Fifth Floor, Boston, MA 02110-1301, USA.
Authors
ABOUT THIS MANUAL
© Derek Holzer 2009
Modifications:
adam hyde 2009
Bruno Ruviaro 2009
Dave Peticolas 2009
Walter Langelaar 2009
ADJUSTING THE RHYTHM OF A REGION
© Derek Holzer 2009
Modifications:
adam hyde 2009
David Elwell 2009
Thomas Goose 2009
ADVANCED LINUX CONFIGURATION
© Derek Holzer 2009, 2010
Modifications:
adam hyde 2009
Chou shoichi 2010
Damian Soto 2010
David Elwell 2009
Derick H. 2009
Rob Fell 2009
Thomas Goose 2009, 2010
Walter Langelaar 2009
INSTALLING ARDOUR
© stefan hanser 2009
Modifications:
adam hyde 2009
Bruno Ruviaro 2009
David Elwell 2009
Derek Holzer 2009
Thomas Goose 2009
William Abernathy 2009
ARRANGING TRACKS
© Derek Holzer 2009
Modifications:
adam hyde 2009
Dave Peticolas 2009
David Elwell 2009
CREATING A TRACK OR BUS
© Tomasz Kaye 2009
Modifications:
adam hyde 2009
Bruno Ruviaro 2009
Dave Peticolas 2009
David Elwell 2009
Derek Holzer 2009
Dick MacInnis 2009
Mr Stock 2009
Thomas Goose 2009
Walter Langelaar 2009
CREATING LOOPED SECTIONS
© Derek Holzer 2009
Modifications:
adam hyde 2009
Christian Herzberg 2010
Dave Peticolas 2009
David Elwell 2009
Ross Johnson 2010
Thomas Goose 2009
Tomasz Kaye 2009
Walter Langelaar 2009
CREDITS
© adam hyde 2006, 2007, 2009
Modifications:
Derek Holzer 2009
DYNAMICS
© Derek Holzer 2009
Modifications:
adam hyde 2009
Bruno Ruviaro 2009
Christian Herzberg 2010
jon cohrs 2009
CHANGING EDIT MODES
© Derek Holzer 2009
Modifications:
adam hyde 2009
Dave Peticolas 2009
Malcolm Smith 2010
Thomas Goose 2009
EQUALIZING
© Derek Holzer 2009
Modifications:
adam hyde 2009
Bruno Ruviaro 2009
jon cohrs 2009
Malcolm Smith 2010
EXPORTING A RANGE
© Derek Holzer 2009
Modifications:
adam hyde 2009
David Elwell 2009
stefan hanser 2009
Thomas Goose 2009
EXPORTING A REGION
© Derek Holzer 2009
Modifications:
adam hyde 2009
Dave Peticolas 2009
David Elwell 2009
stefan hanser 2009
EXPORTING A SESSION
© Derek Holzer 2009
Modifications:
Dave Peticolas 2009
David Elwell 2009
jon cohrs 2009
Thomas Goose 2009
Walter Langelaar 2009
GLOSSARY
© Derek Holzer 2009
Modifications:
adam hyde 2009
Bruno Ruviaro 2009
Malcolm Smith 2010
Thomas Goose 2009
IMPORTING AUDIO
© Tomasz Kaye 2009
Modifications:
adam hyde 2009
Bruno Ruviaro 2009
Dave Peticolas 2009
David Elwell 2009
Derek Holzer 2009
Dick MacInnis 2009
Thomas Goose 2009
INSTALLING JACKOSX
© Derek Holzer 2009
Modifications:
adam hyde 2009
Bruno Ruviaro 2009
Claudia Borges 2009
David Elwell 2009
Thomas Goose 2009
AN OVERVIEW OF THE INTERFACE
© Bruno Ruviaro 2009
Modifications:
adam hyde 2009
Christian Herzberg 2010
David Elwell 2009
Derek Holzer 2009
Dick MacInnis 2009
Ma Rk 2009
INTRODUCTION
© adam hyde 2006, 2007, 2009
Modifications:
Al Thompson 2009
David Elwell 2009
Derek Holzer 2009
jay maechtlen 2009
Rob Fell 2009
LINKS
© Derek Holzer 2009
Modifications:
adam hyde 2009
Derick H. 2009
Giorgio Moscardi 2010
Thomas Goose 2009
OTHER LINUX
© Walter Langelaar 2009
Modifications:
adam hyde 2009
Derek Holzer 2009
Derick H. 2009
Thomas Goose 2009
William Abernathy 2009
MIXING LEVELS
© Derek Holzer 2009
Modifications:
adam hyde 2009
Dave Peticolas 2009
David Elwell 2009
jon cohrs 2009
Thomas Goose 2009
MOVING AUTOMATION
© Derek Holzer 2009, 2010
Modifications:
Ben Loftis 2010
Christian Herzberg 2010
Thomas Goose 2009
PANNING
© Derek Holzer 2009
Modifications:
adam hyde 2009
Christian Herzberg 2010
Giorgio Moscardi 2010
jon cohrs 2009
RECORDING AUDIO
© Derek Holzer 2009
Modifications:
adam hyde 2009
Bruno Ruviaro 2009
Christopher Stamper 2009
Dave Peticolas 2009
David Elwell 2009
Mr Stock 2009
Thomas Goose 2009
Walter Langelaar 2009
FURTHER REGION OPERATIONS
© Tomasz Kaye 2009
Modifications:
adam hyde 2009
Bruno Ruviaro 2009
Dave Peticolas 2009
David Elwell 2009
Derek Holzer 2009
Malcolm Smith 2010
Thomas Margolf 2009
ROUTING BETWEEN JACK APPLICATIONS
© Derek Holzer 2009
Modifications:
adam hyde 2009
Dave Peticolas 2009
SAVING A SESSION
© Derek Holzer 2009
Modifications:
adam hyde 2009
Dave Peticolas 2009
David Elwell 2009
Thomas Goose 2009
Walter Langelaar 2009
SAVING A SNAPSHOT
© Derek Holzer 2009
Modifications:
adam hyde 2009
Bruno Ruviaro 2009
Dave Peticolas 2009
Thomas Goose 2009
Walter Langelaar 2009
SAVING A TEMPLATE
© Derek Holzer 2009
Modifications:
David Elwell 2009
Walter Langelaar 2009
SETTING UP THE METER
© Derek Holzer 2009
Modifications:
adam hyde 2009
David Elwell 2009
SETTING UP THE TIMELINE
© Derek Holzer 2009
Modifications:
adam hyde 2009
Bruno Ruviaro 2009
David Elwell 2009
FURTHER HELP
© Derick H. 2009
Modifications:
adam hyde 2009
Derek Holzer 2009
STARTING ARDOUR ON OSX
© stefan hanser 2009
Modifications:
adam hyde 2009
Bruno Ruviaro 2009
Christopher Stamper 2009
Claudia Borges 2009
David Elwell 2009
Derek Holzer 2009
Thomas Goose 2009
STARTING ARDOUR ON UBUNTU
© Walter Langelaar 2009
Modifications:
adam hyde 2009
David Elwell 2009
Derek Holzer 2009
Mark Lindhout 2009
Thomas Goose 2009
STARTING JACKOSX
© stefan hanser 2009
Modifications:
adam hyde 2009
Bruno Ruviaro 2009
David Elwell 2009
Derek Holzer 2009
Mr Stock 2009
Thomas Goose 2009
STARTING JACK ON UBUNTU
© Walter Langelaar 2009
Modifications:
adam hyde 2009
Bruno Ruviaro 2009
David Elwell 2009
Derek Holzer 2009
Derick H. 2009
Thomas Goose 2009
STARTING A SESSION
© Claudia Borges 2009
Modifications:
adam hyde 2009
Bruno Ruviaro 2009
Christopher Stamper 2009
Dave Peticolas 2009
David Elwell 2009
Derek Holzer 2009
Mark Lindhout 2009
Mr Stock 2009
Thomas Goose 2009
Walter Langelaar 2009
POWERBOOKS & MACBOOKS
© stefan hanser 2009
Modifications:
adam hyde 2009
Derek Holzer 2009
Mr Stock 2009
Thomas Goose 2009
William Abernathy 2009
STRETCHING / SHRINKING REGIONS
© Tomasz Kaye 2009
Modifications:
adam hyde 2009
Christian Herzberg 2010
Dave Peticolas 2009
David Elwell 2009
Derek Holzer 2009
UBUNTU
© adam hyde 2007, 2008
Modifications:
Janet Swisher 2008
Matteo Cortese 2008
UNDERSTANDING ROUTING
© Derek Holzer 2009
Modifications:
adam hyde 2009
Bruno Ruviaro 2009
David Elwell 2009
Malcolm Smith 2010
Mr Stock 2009
Rob Fell 2009
Thomas Goose 2009
Tomasz Kaye 2009
USING AUTOMATION
© Tomasz Kaye 2009
Modifications:
adam hyde 2009
Bruno Ruviaro 2009
Christian Herzberg 2010
David Elwell 2009
Derek Holzer 2009
Mark Lindhout 2009
Peter Lutek 2009
stefan hanser 2009
Thomas Goose 2009
Thomas Margolf 2009
USING THE MIXER STRIP
© stefan hanser 2009
Modifications:
adam hyde 2009
Bruno Ruviaro 2009
David Elwell 2009
Derek Holzer 2009
Giorgio Moscardi 2010
Joern Nettingsmeier 2009
Mr Stock 2009
Walter Langelaar 2009
USING PLUGINS
© stefan hanser 2009
Modifications:
adam hyde 2009
Christian Herzberg 2010
Christopher Stamper 2009
David Elwell 2009
Derek Holzer 2009
Derick H. 2009
Malcolm Smith 2010
Mr Stock 2009
Thomas Goose 2009
William Abernathy 2009
USING RANGES
© Tomasz Kaye 2009
Modifications:
adam hyde 2009
Dave Peticolas 2009
Derek Holzer 2009
Thomas Margolf 2009
USING SENDS
© Mr Stock 2009
Modifications:
adam hyde 2009
Bruno Ruviaro 2009
David Elwell 2009
Derek Holzer 2009
Thomas Goose 2009
Tomasz Kaye 2009
William Abernathy 2009
WHAT IS DIGITAL AUDIO?
© Derek Holzer 2009
Modifications:
adam hyde 2009
Al Thompson 2009
Bruno Ruviaro 2009
Christian Herzberg 2010
David Elwell 2009
Ma Rk 2009
Thomas Goose 2009
Tomasz Kaye 2009
WORKING WITH REGIONS
© Walter Langelaar 2009
Modifications:
adam hyde 2009
Bruno Ruviaro 2009
Christian Herzberg 2010
Dave Peticolas 2009
David Elwell 2009
Derek Holzer 2009
Rob Fell 2009
Thomas Margolf 2009

Free manuals for free software
General Public License
Version 2, June 1991
Copyright (C) 1989, 1991 Free Software Foundation, Inc.
51 Franklin Street, Fifth Floor, Boston, MA 02110-1301, USA
Everyone is permitted to copy and distribute verbatim copies
of this license document, but changing it is not allowed.
Preamble
The licenses for most software are designed to take away your freedom to share and change it. By contrast, the GNU General Public License is intended to guarantee your freedom to share and change free software--to make sure the software is free for all its users. This General Public License applies to most of the Free Software Foundation's software and to any other program whose authors commit to using it. (Some other Free Software Foundation software is covered by the GNU Lesser General Public License instead.) You can apply it to your programs, too.
When we speak of free software, we are referring to freedom, not price. Our General Public Licenses are designed to make sure that you have the freedom to distribute copies of free software (and charge for this service if you wish), that you receive source code or can get it if you want it, that you can change the software or use pieces of it in new free programs; and that you know you can do these things.
To protect your rights, we need to make restrictions that forbid anyone to deny you these rights or to ask you to surrender the rights. These restrictions translate to certain responsibilities for you if you distribute copies of the software, or if you modify it.
For example, if you distribute copies of such a program, whether gratis or for a fee, you must give the recipients all the rights that you have. You must make sure that they, too, receive or can get the source code. And you must show them these terms so they know their rights.
We protect your rights with two steps: (1) copyright the software, and (2) offer you this license which gives you legal permission to copy, distribute and/or modify the software.
Also, for each author's protection and ours, we want to make certain that everyone understands that there is no warranty for this free software. If the software is modified by someone else and passed on, we want its recipients to know that what they have is not the original, so that any problems introduced by others will not reflect on the original authors' reputations.
Finally, any free program is threatened constantly by software patents. We wish to avoid the danger that redistributors of a free program will individually obtain patent licenses, in effect making the program proprietary. To prevent this, we have made it clear that any patent must be licensed for everyone's free use or not licensed at all.
The precise terms and conditions for copying, distribution and modification follow.
TERMS AND CONDITIONS FOR COPYING, DISTRIBUTION AND MODIFICATION
0. This License applies to any program or other work which contains a notice placed by the copyright holder saying it may be distributed under the terms of this General Public License. The "Program", below, refers to any such program or work, and a "work based on the Program" means either the Program or any derivative work under copyright law: that is to say, a work containing the Program or a portion of it, either verbatim or with modifications and/or translated into another language. (Hereinafter, translation is included without limitation in the term "modification".) Each licensee is addressed as "you".
Activities other than copying, distribution and modification are not covered by this License; they are outside its scope. The act of running the Program is not restricted, and the output from the Program is covered only if its contents constitute a work based on the Program (independent of having been made by running the Program). Whether that is true depends on what the Program does.
1. You may copy and distribute verbatim copies of the Program's source code as you receive it, in any medium, provided that you conspicuously and appropriately publish on each copy an appropriate copyright notice and disclaimer of warranty; keep intact all the notices that refer to this License and to the absence of any warranty; and give any other recipients of the Program a copy of this License along with the Program.
You may charge a fee for the physical act of transferring a copy, and you may at your option offer warranty protection in exchange for a fee.
2. You may modify your copy or copies of the Program or any portion of it, thus forming a work based on the Program, and copy and distribute such modifications or work under the terms of Section 1 above, provided that you also meet all of these conditions:
- a) You must cause the modified files to carry prominent notices stating that you changed the files and the date of any change.
- b) You must cause any work that you distribute or publish, that in whole or in part contains or is derived from the Program or any part thereof, to be licensed as a whole at no charge to all third parties under the terms of this License.
- c) If the modified program normally reads commands interactively when run, you must cause it, when started running for such interactive use in the most ordinary way, to print or display an announcement including an appropriate copyright notice and a notice that there is no warranty (or else, saying that you provide a warranty) and that users may redistribute the program under these conditions, and telling the user how to view a copy of this License. (Exception: if the Program itself is interactive but does not normally print such an announcement, your work based on the Program is not required to print an announcement.)
These requirements apply to the modified work as a whole. If identifiable sections of that work are not derived from the Program, and can be reasonably considered independent and separate works in themselves, then this License, and its terms, do not apply to those sections when you distribute them as separate works. But when you distribute the same sections as part of a whole which is a work based on the Program, the distribution of the whole must be on the terms of this License, whose permissions for other licensees extend to the entire whole, and thus to each and every part regardless of who wrote it.
Thus, it is not the intent of this section to claim rights or contest your rights to work written entirely by you; rather, the intent is to exercise the right to control the distribution of derivative or collective works based on the Program.
In addition, mere aggregation of another work not based on the Program with the Program (or with a work based on the Program) on a volume of a storage or distribution medium does not bring the other work under the scope of this License.
3. You may copy and distribute the Program (or a work based on it, under Section 2) in object code or executable form under the terms of Sections 1 and 2 above provided that you also do one of the following:
- a) Accompany it with the complete corresponding machine-readable source code, which must be distributed under the terms of Sections 1 and 2 above on a medium customarily used for software interchange; or,
- b) Accompany it with a written offer, valid for at least three years, to give any third party, for a charge no more than your cost of physically performing source distribution, a complete machine-readable copy of the corresponding source code, to be distributed under the terms of Sections 1 and 2 above on a medium customarily used for software interchange; or,
- c) Accompany it with the information you received as to the offer to distribute corresponding source code. (This alternative is allowed only for noncommercial distribution and only if you received the program in object code or executable form with such an offer, in accord with Subsection b above.)
The source code for a work means the preferred form of the work for making modifications to it. For an executable work, complete source code means all the source code for all modules it contains, plus any associated interface definition files, plus the scripts used to control compilation and installation of the executable. However, as a special exception, the source code distributed need not include anything that is normally distributed (in either source or binary form) with the major components (compiler, kernel, and so on) of the operating system on which the executable runs, unless that component itself accompanies the executable.
If distribution of executable or object code is made by offering access to copy from a designated place, then offering equivalent access to copy the source code from the same place counts as distribution of the source code, even though third parties are not compelled to copy the source along with the object code.
4. You may not copy, modify, sublicense, or distribute the Program except as expressly provided under this License. Any attempt otherwise to copy, modify, sublicense or distribute the Program is void, and will automatically terminate your rights under this License. However, parties who have received copies, or rights, from you under this License will not have their licenses terminated so long as such parties remain in full compliance.
5. You are not required to accept this License, since you have not signed it. However, nothing else grants you permission to modify or distribute the Program or its derivative works. These actions are prohibited by law if you do not accept this License. Therefore, by modifying or distributing the Program (or any work based on the Program), you indicate your acceptance of this License to do so, and all its terms and conditions for copying, distributing or modifying the Program or works based on it.
6. Each time you redistribute the Program (or any work based on the Program), the recipient automatically receives a license from the original licensor to copy, distribute or modify the Program subject to these terms and conditions. You may not impose any further restrictions on the recipients' exercise of the rights granted herein. You are not responsible for enforcing compliance by third parties to this License.
7. If, as a consequence of a court judgment or allegation of patent infringement or for any other reason (not limited to patent issues), conditions are imposed on you (whether by court order, agreement or otherwise) that contradict the conditions of this License, they do not excuse you from the conditions of this License. If you cannot distribute so as to satisfy simultaneously your obligations under this License and any other pertinent obligations, then as a consequence you may not distribute the Program at all. For example, if a patent license would not permit royalty-free redistribution of the Program by all those who receive copies directly or indirectly through you, then the only way you could satisfy both it and this License would be to refrain entirely from distribution of the Program.
If any portion of this section is held invalid or unenforceable under any particular circumstance, the balance of the section is intended to apply and the section as a whole is intended to apply in other circumstances.
It is not the purpose of this section to induce you to infringe any patents or other property right claims or to contest validity of any such claims; this section has the sole purpose of protecting the integrity of the free software distribution system, which is implemented by public license practices. Many people have made generous contributions to the wide range of software distributed through that system in reliance on consistent application of that system; it is up to the author/donor to decide if he or she is willing to distribute software through any other system and a licensee cannot impose that choice.
This section is intended to make thoroughly clear what is believed to be a consequence of the rest of this License.
8. If the distribution and/or use of the Program is restricted in certain countries either by patents or by copyrighted interfaces, the original copyright holder who places the Program under this License may add an explicit geographical distribution limitation excluding those countries, so that distribution is permitted only in or among countries not thus excluded. In such case, this License incorporates the limitation as if written in the body of this License.
9. The Free Software Foundation may publish revised and/or new versions of the General Public License from time to time. Such new versions will be similar in spirit to the present version, but may differ in detail to address new problems or concerns.
Each version is given a distinguishing version number. If the Program specifies a version number of this License which applies to it and "any later version", you have the option of following the terms and conditions either of that version or of any later version published by the Free Software Foundation. If the Program does not specify a version number of this License, you may choose any version ever published by the Free Software Foundation.
10. If you wish to incorporate parts of the Program into other free programs whose distribution conditions are different, write to the author to ask for permission. For software which is copyrighted by the Free Software Foundation, write to the Free Software Foundation; we sometimes make exceptions for this. Our decision will be guided by the two goals of preserving the free status of all derivatives of our free software and of promoting the sharing and reuse of software generally.
NO WARRANTY
11. BECAUSE THE PROGRAM IS LICENSED FREE OF CHARGE, THERE IS NO WARRANTY FOR THE PROGRAM, TO THE EXTENT PERMITTED BY APPLICABLE LAW. EXCEPT WHEN OTHERWISE STATED IN WRITING THE COPYRIGHT HOLDERS AND/OR OTHER PARTIES PROVIDE THE PROGRAM "AS IS" WITHOUT WARRANTY OF ANY KIND, EITHER EXPRESSED OR IMPLIED, INCLUDING, BUT NOT LIMITED TO, THE IMPLIED WARRANTIES OF MERCHANTABILITY AND FITNESS FOR A PARTICULAR PURPOSE. THE ENTIRE RISK AS TO THE QUALITY AND PERFORMANCE OF THE PROGRAM IS WITH YOU. SHOULD THE PROGRAM PROVE DEFECTIVE, YOU ASSUME THE COST OF ALL NECESSARY SERVICING, REPAIR OR CORRECTION.
12. IN NO EVENT UNLESS REQUIRED BY APPLICABLE LAW OR AGREED TO IN WRITING WILL ANY COPYRIGHT HOLDER, OR ANY OTHER PARTY WHO MAY MODIFY AND/OR REDISTRIBUTE THE PROGRAM AS PERMITTED ABOVE, BE LIABLE TO YOU FOR DAMAGES, INCLUDING ANY GENERAL, SPECIAL, INCIDENTAL OR CONSEQUENTIAL DAMAGES ARISING OUT OF THE USE OR INABILITY TO USE THE PROGRAM (INCLUDING BUT NOT LIMITED TO LOSS OF DATA OR DATA BEING RENDERED INACCURATE OR LOSSES SUSTAINED BY YOU OR THIRD PARTIES OR A FAILURE OF THE PROGRAM TO OPERATE WITH ANY OTHER PROGRAMS), EVEN IF SUCH HOLDER OR OTHER PARTY HAS BEEN ADVISED OF THE POSSIBILITY OF SUCH DAMAGES.
END OF TERMS AND CONDITIONS