


Calligraphy Tool
![]()
The Calligraphy Tool uses dynamic drawing techniques that apply simple filters to the cursor place and motion. The SVG "stylus" transforms as if it were a physical stylus or brush, depending on its mass, speed, orientation and friction. (Some of these parameters are affected only by use of an input device such as a drawing tablet.) By changing these parameters, various types of "strokes" can be made. This makes the Calligraphy tool excellent for drawing more natural, smooth and consistent strokes, particularly when using a pen tablet or similar input device.
The Calligraphy Tool does not draw a single path line like the freehand tool, but a whole filled shape. This is not a live shape, like rectangles and stars, but an arbitrary shape consisting of node paths. Being comprised of multiple nodes, calligraphy strokes can be modified by other path tools, for example the Node and Tweak tools. Also, like all arbitrary SVG shapes, calligraphy paths have strokes at their edges, so they are affected by the usual Fill and Stroke settings.
How to Use
The Calligraphy Tool can be called by clicking its icon in the Toolbox or by pressing C or Ctrl+F6.
Calligraphy shapes are drawn in the same manner as any other shape - just click on the canvas and drag.
Options
The Calligraphy Tool has many options available in the Tool Controls bar which allow the artist to create very specific types of strokes.
![]()
Width
Used to set the basic width of the line. This basic width is then automatically modified depending on the other values (such as pressure of the tablet pen) and settings (such as the toggle setting of Input Device Pressure).
Warning: Calligraphy stroke width is relative to the current view and zoom factor.
Input Device Pressure
When on, Calligraphy uses pen tablet pressure to affect such values as stroke width.
Trace Lightness to Width
Trace Lightness to Width adjusts the width of the stroke to the lightness of objects behind it. In the background objects, white translates into the minimum stoke width (1) and black translates to the maximum (which is set by the Width parameter). This works with both bitmap and vector images and allows the artist to not only hatch over an imported bitmap image or any drawing, but to do so automatically reproducing the highlights and shades of the background with your strokes becoming lighter and heavier as needed. This can work alone or in combination with pressure sensitivity, depending on whether the "Use pressure" button is also toggled.

Thinning
Thinning is a way to modify the width of the calligraphy stroke dynamically according to the speed at which the stroke is made. This value enables the calligraphy tool to emulate true ink flow from a pen or brush. For instance, dragging a stroke at a uniform speed will create a mostly uniform stroke width, while increasing speed will decrease width, and decreasing speed will increase width (to a degree). The higher the thinning value is, the more the stroke will be thinned.
Some examples are shown below. Notice that a negative thinning results in a thicking. When set to 0.0, the line keeps its width with uniformity.

Angle
The Angle setting is used to emulate a stylus type of writing instrument. Angle will affect the direction at which the stroke creates its thinnest part, just like a calligraphy pen. Values can be set from -90° to 90°. When set to 0, the hair line is horizontal; to 90, vertical.

Tilt to angle
When activated, Angle is modified relatively to tilt of the tablet pen.
Fixation
Fixation changes the way the Angle width follows the calligraphic path. When set to 0.0, Angle is set always perpendicularly to the path so that the width looks nearly the same all along the path (as if the stylus were rotated constantly in the direction of the stroke). When set to 1.0, Angle is set to adjust to stroke direction most strictly (as if the stylus were kept exactly in the same direction at all times as a machine might be able to do). A setting of a little less than 1.0 (such as 0.9) will most closely follow natural hand movement, like using a real stylus.

Caps
Caps determines how the line ends. At 0, the end caps will be drawn flat. Increasing the value will create elliptical end caps, and the higher the value the longer the ellipses will be. The max value is 5.00.

Tremor
Tremor affects jitteriness of the stroke. It can be set from 0.0 to 1.0. When set to 0, the line is the most regular.

Wiggle
Wiggle is a kind of randomization on drawn curves, making a sort of "bumpy" stroke. It generates these curves or "bumps" regularly, and can help to draw some nice typographic shapes, though the result is hardly predictable.

Mass
Mass affects how quickly the stroke follows the cursor. A heavier mass makes the stroke slower and increases smoothness or regularity of the stroke. Values can be set from 0.0 to 1.0. When set to 0.0 the path just follows the mouse as normal. When set to 1.0, the drawing of the stroke is very slow.
Default
Default resets all Calligraphy Tool Controls settings to defaults as defined in Preferences.
Drawing
Adding a New Stroke to a Calligraphy Object
Press Shift to add a new calligraphic line to those that are selected, keeping all strokes together as a single object.
Engraving
Tracking a Shape
One of the most common operations in line engraving is hatching (or sometimes cross-hatching when several hatching grids cross): filling a space with many parallel straight or variously curved lines (usually of varying width to represent a gradual shading). You could try to achieve a similar effect with e.g. path interpolation (blending), but it is rather cumbersome and limited; manual drawing of hatch lines, on the other hand, is tedious and nearly impossible to do uniformly. Now Inkscape provides "assisted hatching" by tracking a guide path, allowing you to hatch quickly and uniformly and at the same time giving you sufficient manual control over the process.
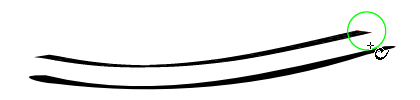
First, select the guide path that you will track. It may be another calligraphic stroke, any path or shape, or even a letter of a text object. Then switch to Calligraphic pen, select the desired parameters (line width, angle, fixation etc.) and, before starting to draw, press Ctrl. You will see a gray track circle centered at your mouse pointer and touching the closest point on the selected guide path. (If you have no guide path selected, a statusbar message will tell you to select it.)
The Now move your mouse close to the guide path, so that the track circle radius is equal to the desired spacing of your hatch pattern, and start drawing along the guide path. At that moment, the radius of the circle gets locked; now the circle slides along the guide path - and the actual stroke is drawn by the center of the tracking circle, not by your mouse point. As a result, you are getting a smooth stroke going parallel to the guide path and always at the same distance from it.
When the stroke is ready, release your mouse button (or lift your tablet pen) but do not let go of Ctrl because, as long as you have it pressed, the tool remembers the hatch spacing you set when you started drawing. Now, you have just created a new stroke and, as usual with Inkscape tools, it gets selected instead of what was selected before. In our case, this means that the newly drawn stroke itself becomes the new guide path. Next, you can draw a second stroke along the first one, then a third one along the second, etc. Eventually you can fill any desired space with uniform hatching.
Alternatively, if you uncheck "Select new path" in the Calligraphy tool preferences, newly created strokes will not be selected, so your original guide path will be kept selected. In this mode, Inkscape will increase the tracking distance after each created stroke so that you can create uniformly spaced hatching by tracking a single guide path.
The attachment to the guide path is not absolute. If you stray your mouse pointer far enough from the guide path, you will be able to tear it off (the track circle turns from green to red) and move freely. This is intentional; this feature allows you, for example, to continue drawing a stroke past the end of a guide stroke, thus making your hatching cover a wider area than the initial guide path. Special care is taken to make such tearing off as smooth as possible and to suppress violent jerks, but this is not always possible; the general advice is to not try to hatch too fast. If jerking and unintended tearoffs still bother you, try increasing the Mass parameter.
Also, special code is in place to prevent flipovers - accidental jumps to the other side of the guide path. Brief flipovers are suppressed, but if you intentionally go over to the other side and stay there, eventually Inkscape will obey and your tracking stroke will also flip over to follow you.
Tracking a guide also allows some slight feedback by gradually changing the tracking distance in response to your drawing behavior. Thus, if you're consistently trying to draw closer or farther from the guide than the current tracking distance, the distance will correspondingly decrease or increase, so you will get a hatching that is slightly spacing in or out. (The effect is very slight, however, so as not to become a nuisance.) Also, note that since tracking follows the edge of the stroke, strokes of varying width (such as those tracing background, see below) will result in gradual bending of the hatching pattern as you proceed


Engraving
Combined with the Ctrl key, the Calligraphy Tool is able to simulate the ancient art of line engraving. Traditional engraving is a very labour-intensive process, and while for a long time it was the only practical way of reproducing lifelike images in black-and-white print, about a century ago it was almost completely displaced by automatic halftone screens in industrial process. However, line engravings have their characteristic charm, and are often still used for certain art applications.