


Tweak Tool
The Tweak Tool is an exciting way to edit drawings which largely blurs the distinction between vector and raster editing. Instead of meticulously selecting some objects and then performing an action on the selection, you can select all objects (or all objects you are interested in) and apply the Tweak Tool's brush to smoothly and naturally change the shape or style of only those objects (or parts thereof) that the brush touches.
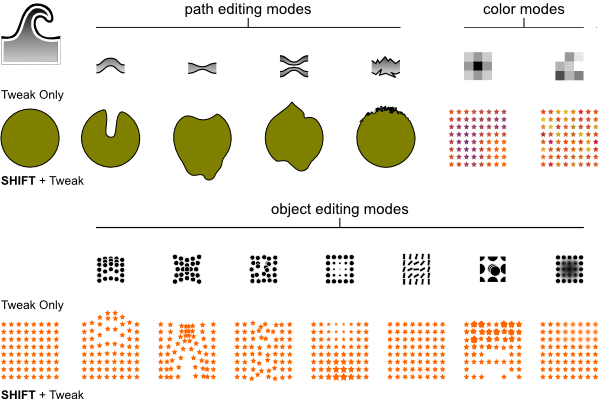
The editing modes of the Tweak tool fall into 3 different categories: Path Editing Modes where the shape of individual paths is modified; Colour Modes where the colour of individual objects is modified and Object Editing Modes where whole objects are moved, scaled or rotated but their shapes are kept intact.
The area of the tool's action - its brush - is marked by an orange-colored circular outline that moves with your mouse cursor. However, that area actually has no sharp boundaries; the power of the tool's action falls off gradually, following a smooth bell-shaped profile. This makes the tool act softly and smoothly.The tool will work on any number of selected objects; for example, you can select all Ctrl + A and "smear" your entire drawing by Push mode or paint it by Color Paint mode. You can also apply it to groups of objects; it will go into groups and act on individual objects inside groups. If you're trying to use it without anything selected, it will remind you by a statusbar message to select some objects.
How to Use
Width
The width of the tool's brush, in the range from 1 to 100, can be changed by the Width control in the tool's controls bar above the canvas. You can also change width by Left and Right arrow keys (same as in the Calligraphy Tool) at any time (including during action) as well as Home and End. Also, as in Calligraphy Tool, the visible width of the brush is independent of zoom; simply zooming in or out is often easier than adjusting the width if you want to cover a smaller or larger area of the drawing.
Force
The next control is Force which adjusts the power of the action, also in the range from 1 to 100. You can also change width by Up and Down arrow keys at any time (including during action).
If you have a pressure-sensitive tablet and your "Use pressure" button on the right-hand end of the controls bar is on, then the force will also depend on how hard you actually press your pen into your tablet, changing in the range from zero to whatever you set in the Force control. If all you have is a mouse, then the force will be constant but still settable by the Force control.
Path editing modes
The Tweak tool has a number of modes, selectable by toggle buttons in the tool's Controls bar and by keyboard shortcuts. Some of these modes change the shapes of paths, others affect the whole object leaving the path shape intact, while still others affect the colors of objects. All these modes share the Width and Force controls but otherwise are quite different. Let's look at the path editing modes first.
Unlike the Node tool, to edit paths with the Tweak tool you don't need to worry about where the nodes of a path are and how to manipulate them. You just apply the tool's brush to any point, and the selected paths at that point will reshape smoothly and naturally - as if made of soft jelly - regardless of where its nodes lie. If applied to a shape or text object, the tool converts them to paths automatically.
While not very useful for technical drawings, tweaking paths will be indispensable for artistic uses of Inkscape - cartoons, drawings, sketches, anime, etc. This new functionality is somewhat similar to the tools such as "Pucker" and "Bloat" in the latest versions of Adobe Illustrator.
There are currently six path editing modes in the Tweak Tool: Push, Shrink/ Grow, Attract/ Repel, and Roughen.
Push
This default mode of the tool, Push, Shift + P simply displaces the part of the path under the cursor in the direction of the drag. The path behaves like soft jelly, bending and bulging smoothly and naturally. It's an easy way to produce various irregular, lifelike, handmade-looking shapes starting from something as simple as an ellipse or a calligraphic stroke. For parallel-stroke hatching (engraving) done in the Calligraphy tool, pushing is an easy way to bend, pinch, or curve the entire hatching uniformly.
Shrink and Grow
Shrink ( Shift + S ) and Grow ( Hold Shift when using the Tweak Tool) are two opposite modes that move each point of a path in a direction perpendicular to the path's surface at the point, either inwards (Shrink) or outwards (Grow). This is similar to the Inset and Outset commands, except that the Tweak Tool can act on a part of a path instead of the whole path.
For example, the visible lightness/darkness of an engraving hatching may not exactly correspond to your artistic intention. Also, the ends of Calligraphy pen strokes are often far from ideal - they may be too blunt or have unsightly bends or blobs. This is where the Tweak Tool may help. Select all the strokes in a hatching pattern and apply a light Shrink action where you want the lines to become thinner (and the hatching to become lighter), up until total disappearance. If you press hard, shrinking works as an eraser, so you can easily clean the strokes' ends to make them thin, sharp, and uniform. Conversely, applying Grow makes strokes wider (i.e. the hatching becomes darker).
Of course, shrinking and growing are useful not only for calligraphic strokes. Same as with Push, with Shrink and Grow you can sculpt any path, spawning smooth treacle-like appendages with Grow and carving holes with Shrink. Unlike the "node sculpting" mode in the Node tool, however, this does not require adding new nodes to the shape.
Attract and Repel
Attract ( Shift+ A )and Repel ( Hold Shift when applying tool) mode works by moving each affected point on a path towards (Attract) or from (Repel) the cursor point. In some cases this may look similar to Shrink and Grow, but the difference is that shrinking/growing moves paths perpendicularly to the path in each point, whereas attracting/repelling moves them to or from the cursor regardless of the path shape. These modes are similar to the Pinch effect in AI; you can use them for various central-symmetric distortions in parts of your paths.
Roughen
The Roughen (Shift +R ) mode does exactly this: roughens the edge of the path without changing its overall shape. Slight roughening simply makes the edge crooked and uneven; strong roughening tears and explodes the edge into random blobs and splotches.
NOTE: This operation, especially when applied with high Fidelity, adds a lot of nodes, increasing the size of your SVG document and may slow down Inkscape considerably. In particular, pushing, shrinking, or growing of a roughened path becomes much slower and more difficult. It's recommended to finalise the overall shape of a path first and roughen it, if necessary, only as the final step.
Fidelity
Any tweaking of a path slightly distorts the entire path, including even those parts that you didn't touch. These distortions are similar to those that a Simplify command produces. The Fidelity value (also in the range from 1 to 100, default is 50) allows you to control the amount of these distortions. With a higher fidelity, the distortions are less noticeable, but the path may end up having a lot of nodes which inflates up the SVG size and slows down Inkscape.
The best value of Fidelity depends on the nature of your artwork. If you're sculpting an amorphous blob, you can do with low fidelity of about 20. If, however, you are pushing or inflating a text string (as a single path) and want the letters outside the distorted area to remain crisp and clean, you will need to raise fidelity to 80 or more.
Object editing modes
The Object editing modes, unlike the path editing modes, change the position, size, rotation, etc of objects instead of their shapes. Yet they share enough common features with the path editing modes to be part of the same tool: These modes also use a circular soft-edged brush controlled by the Width and Force parameters on the Controls bar and affected by the pen pressure (if you have a pressure-sensitive tablet).
Push Mode
Attract/Repel Objects Mode
Jitter Mode
Scale Mode
Rotate Mode
Duplicate/Delete Mode
Blur Mode
Color editing modes
The Color Paint ( Shift + C ) and Color Jitter ( Shift + J ) modes, unlike the path editing modes, change the colors of objects instead of their shapes. Yet they share enough common features with the path editing modes to be part of the same tool: These modes also use a circular soft-edged brush controlled by the Width and Force parameters on the Controls bar and affected by the pen pressure (if you have a pressure-sensitive tablet).
- Color Paint applies the style of the tool to the selected objects under the brush. The style of the tool is visible in the style swatch at the rightmost end of the tool's control bar; it can be changed by clicking on the color palette or by any other style assignment command, such as Fill and Stroke dialog. (Note: unlike all other tools, in Tweak tool in Color Paint mode you cannot assign style directly to selected objects; any style-setting command changes the tool's style instead.)
- The fill from the tool's style applies to the fills of the painted objects, and the stroke applies to the strokes. If the tool's style has no fill or no stroke, it won't affect fills or strokes, correspondingly. For example, if you want to color the fills of objects blue but leave their strokes untouched, assign blue fill to the tool's style (just click blue on the palette) but set its stroke to None (middle-click the Stroke swatch in the statusbar). Similarly, master opacity in the tool's style affects master opacities of the touched objects (if the O channel is on, see below).
- This mode allows you to literally paint over objects, shifting their colors towards the target style of the tool. For example, if you paint with yellow fill over a blue-filled object, the object will become greenish blue, then green, then yellowish green, and end up being exactly the yellow color you're painting with. This speed of this gradual transition depends on both Force parameter and pen pressure; also, objects touched by the periphery of the brush are less affected than those hit by the brush centre. Overall, using this tool is very similar to a soft brush in a raster editor such as Gimp or Photoshop.
- Color Jitter mode does not apply any color, but instead jitters (randomises) the colors of the objects it touches. The force of the action determines how strong is the randomisation, i.e. how far the colors deviate from the original values. This mode does not use the tool's style.
Both modes work on flat fills and gradients; for gradients, the tool takes into account not only the position of the entire object with gradient, but also the position of each gradient stop relative to the brush. This means that, for example, you can change the blue color only in an object filled with blue-red gradient simply by painting over its blue end with a brush small enough to not touch the red. (Note that color tweaking does not create gradients on objects that used flat color before, but only adjusts existing gradients in the drawing.)
Channels
Color Paint and Color Jitter honor the Channels control. This control comprises the four buttons: H, S, L, and O, which allow you to turn on and off the tool's action on the object's hue, saturation, lightness, and opacity, correspondingly. For example, if you want to raise the saturation of some part of your drawing without changing the hue, select some maximum-saturation color (e.g. pure red) and turn off all Channels buttons except S. Similarly, you can replace the hues without affecting saturation or lightness (only H pressed), or lighten/darken all colors without changing their hues and saturation (only L pressed). Pressing O allows you to apply the master opacity from the tool's style to the master opacity of objects (but not fill or stroke opacity).
Usage notes
Color painting with Tweak tool is similar, but not exactly analogous to bitmap painting. Even though the tool itself works as a soft brush, it still applies its color to vector objects, which behave as vector objects usually do. For example, if you want to change the tint of the face in your drawing, and if a hand in the drawing is part of the same object as the face, that hand will change its tint too even if it's located far from the point you are painting. (We foresee a "fracture" command in one of the next versions of Inkscape which will help you turn a monolithic object into a mosaic of small fragments that will be then easy to paint with Tweak tool.) Still, even with this limitation, color painting is a novel way of dealing with vector drawings which allows you to quickly and intuitively make adjustments which would be awkward and slow with traditional approach.
Drawings containing patterns or scatterings of small independent objects are best suited for color painting with Tweak tool. Examples include:
- freehand drawings with Calligraphy pen, consisting of many separate strokes;
- gradient meshes imported from Adobe Illustrator files (Inkscape renders these meshes as lattices of small polygons; while there's no direct support for gradient meshes in Inkscape yet, color painting on such lattices is almost as good);
- text converted to paths and with Break Apart command applied so that each letter is a separate path;
- patterns made with the Tile Clones command; note that you need to unset the fill and/or stroke on the original object and use the Color tab to assign some initial color to the clones - this will make them paintable with the Tweak tool without unlinking.
Moreover, color tweaking can be useful for compositions with a few objects or even for single objects. Unlike all other color selection methods, painting with the Tweak tool implements the color mixing metaphor which is much more familiar to traditional artists than RGB sliders or even the color wheel. For example, start with a rectangle of pure blue color; then, pick different colors by Color Paint and apply light touches with minimum Force and minimum pen pressure: add a little green, a little brown, a little yellow, etc. until you have the exact hue you need. Similarly, you can whiten or blacken any hue by admixing white or black.
You can also use color tweaking to add a tint, darken/lighten, saturate/desaturate, or color jitter your entire drawing. Just select all in all layers, zoom out, choose a large brush width so it covers all of the drawing, and apply a little color tweaking (with minimum Force) that will therefore affect all visible objects.
Hotkeys
- W, Shift + F2: switch to the Tweak Tool
- Shift +P: switch to the Push mode
- Shift+S: switch to the Shrink mode
- Shift+G: switch to the Grow mode
- Shift+A: switch to the Attract mode
- Shift+E: switch to the Repel mode
- Shift+R: switch to the Roughen mode
- Shift+C: switch to the Color Paint mode
- Shift+J: switch to the Color Jitter mode
- Left, Right, Home, End: change width
- Up, Down: change force
- mouse drag: act on selected path in the current mode
- Ctrl+mouse drag: temporarily switch to Shrink (while Ctrl is down)
- Shift+Ctrl+mouse drag: temporarily switch to Grow (while Shift+Ctrl is down)