Developing Sugar Activities Using HTML5 and WebKit
by Lionel Laské
Sugar Activities, like Sugar itself, are usually developed in Python. Python is a very nice dynamic language, with a clear and readable syntax that is both powerful and simple to learn. In addition to that, Python is an interpreted language that allows Sugar Activities to run unmodified on multiple platforms (from XO-1/XO 1.5 or a standard PC based on x86 architecture to XO-1.75/XO-4 based on ARM architecture).
But Python is not the only language that has these advantages. Recently HTML5 and JavaScript have become worthy alternatives to Python. In this chapter we'll explore how to develop a Sugar activity using mostly HTML5/JavaScript, with just a little Python wrapped around it.

What you need
Using HTML in a Sugar Activity is not new. The Wikipedia Activity has been embedding HTML contents for years. It does this by integrating into the Activity two things: the Sugar browser to render HTML and an HTTP server to react to user clicks by calling Python code.
However this architecture is not fully satisfying. First because it's relatively complex: three paradigms are in the same application (client code, embedded HTML and HTTP server code). Second because the initial version of Sugar browser was based on an old version of Gecko (the HTML engine from Firefox), so the HTML rendering had very limited capacity.
The solution described below uses an alternate way that allow to write Sugar Activities in HTML5, JavaScript, and Python. You'll get excellent HTML rendering and you'll be able to call Python code from JavaScript so your Activity can do anything an all-Python Activity can do, and you won't need to put an HTTP server inside your Activity to make that happen. You'll need:
- Sugar 0.96 or more,
- The Enyo JavaScript Framework,
- Some nice contents.
The first thing to do is to use a recent version of Sugar: Sugar 0.96 or later. Sugar 0.96 is now officially available as a signed release for XO 1, XO-1.5 and XO 1.75. Sugar 0.96 came with two very important features:
- Porting of Sugar to Gtk3 that allow to Sugar to have a powerful and up-to-date graphic framework. You will learn more on Gtk3 porting it in the next chapter.
- Using of WebKit as HTML rendering engine that allow a high-level support of HTML5 features (WebKit is the rendering engine for Chrome and Safari browsers).
The second thing to do is to use the Enyo JavaScript Framework (http://enyojs.com/). This is one of the many Open Source JavaScript frameworks on the market today. Enyo is very simple, elegant, component-oriented and, portable. "Portable" means that an application developed with Enyo could work easily on lot of different devices (smartphones, tablets, ...). So a developer could write an application not only for Sugar but at the same time for other systems. This might be a consideration for a developer who would otherwise view Sugar as a "limited market".

Finally, the last thing to think about when writing an HTML activity is content. When writing an Activity, coding is not all, content is important too, especially when you've got opportunity to write HTML contents that play sounds or display nice images. Because developers are not always artistic, it will be useful to have an existing library of images and sounds that you can use in your Activity.
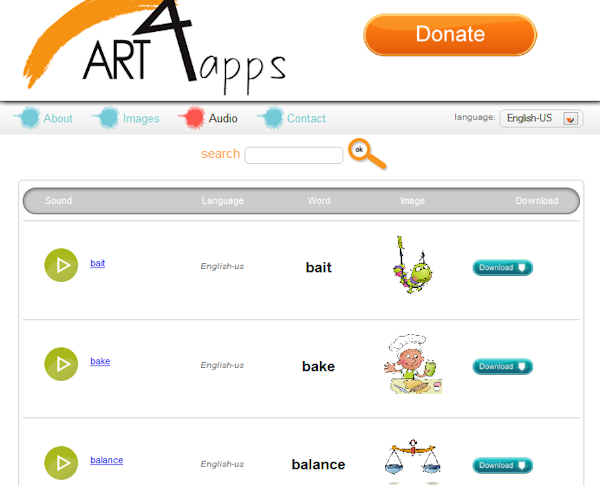
ILearn4Free is an editor of iStory, which are nice interactive stories for the iPad. ILearn4Free provides a large database of professionally recorded audio and images on a dedicated website called Art4apps (http://www.art4apps.org/). All the contents can be distributed freely (under CC BY-SA). It's a good start to conceive new HTML Activities.
Your first HTML5 Activity
We've got now all the pieces of the puzzle, so let's start writing our first HTML Activity. We'll start with a very simple HTML page with images and sounds coming from the Art4Apps library. The capture below show you the page in the browser. You could play with the page here: http://laske.fr/art4apps/
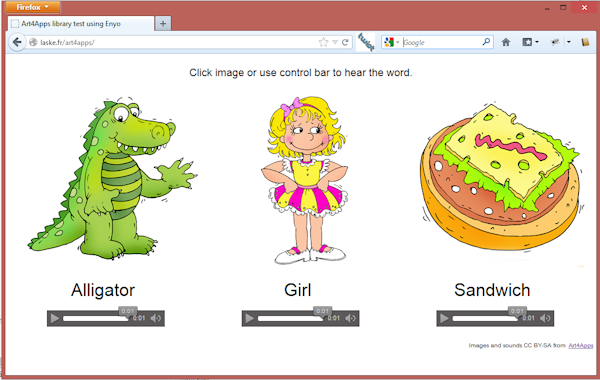
When you click on an image, you could hear the pronunciation of the word.
Here is the HTML5 code for this page: "index.html".
  <!doctype html>
  <html>
  <head>
    <title>Art4Apps library test using Enyo</title>
    <link href="enyo/enyo.css" rel="stylesheet"
          type="text/css" />
    <script src="enyo/enyo.js" type="text/javascript"/>
    <link href="styles.css" rel="stylesheet"
          type="text/css" />
    <script src="package.js" type="text/javascript"/>
  </head>
  <body>
  <script type="text/javascript">
      new TestArt4Apps().renderInto(document.body);
  </script>
  </body>
  </html>
As you could see, it's almost empty because with Enyo, all the design of your page is built into JavaScript classes. In the HTML file you've got only the link to the Enyo framework ("enyo.css" and "enyo.js"), the style sheet for your content ("styles.css") and a "package.js" file that you use to reference all JavaScript files in your project.
Here is the "package.js" file content:
  enyo.depends(
    "audio.js",
    "app.js"
  );
"enyo.depends" is an Enyo framework method that allow you to list all JavaScript files that you need. We're going to ignore "audio.js" that contain only HTML5 audio stuff. Let's see the source code for the "app.js" file, our main file:
  enyo.kind({
    name: "TestArt4Apps",
    kind: enyo.Control,
    components: [
      { components: [
        { content:
           "Click image or use control bar to hear the word.",
           classes: "title" },
          { kind: "Item.Element", text: "Alligator",
            image: "images/alligator.png",
            sound: ["audio/alligator.ogg", "audio/alligator.mp3"],
            classes: "item" },
          { kind: "Item.Element", text: "Girl",
             image: "images/girl.png",
             sound: ["audio/girl.ogg", "audio/girl.mp3"],
             classes: "item" },
          { kind: "Item.Element", text: "Sandwich",
             image: "images/sandwich.png",
             sound: ["audio/sandwich.ogg", "audio/sandwich.mp3"],
             classes: "item" },
            { classes: "footer", components: [
              { content: "Images and sounds CC BY-SA from",
                 classes: "licence" },
              { tag: "a",
                 attributes: {"href":"http://art4apps.org/"},
                 content: "Art4Apps", classes: "licence" }
            ]}
          ]}
        ],

        // Constructor
        create: function() {
          this.inherited(arguments);
        }
  });
This source code creates a new JavaScript Enyo class named "TestArt4Apps" with three "Item.Element" and some simple text contents. I'm sure you could appreciate here the simplicity of the Enyo framework: you just need to compound components of the page in JavaScript objects and arrays. The "TestArt4app" object is created by the JavaScript contents in the HTML page (see before) and rendered as the body of the HTML document using the "renderInto" Enyo method.
The "Item.Element" class mentioned in the "TestArt4apps" class is another Enyo component that consolidates image, sound and text. Here is the source code:
  enyo.kind({
    name: "Item.Element",
    kind: enyo.Control,
    published: { image: "", sound: "", text: "" },
    ontap: "taped",
    components: [
      { name: "itemImage", classes: "itemImage", kind: "Image",
        ontap: "taped" },
      { name: "itemText", classes: "itemText", ontap: "taped" },
      { name: "itemSound", classes: "itemSound",
        kind: "HTML5.Audio", preload: "auto", autobuffer: true,
        controlsbar: true }
    ],

    // Constructor
    create: function() {
      this.inherited(arguments);
      this.imageChanged();
      this.soundChanged();
      this.textChanged();
    },

    // Image setup
    imageChanged: function() {
      if (this.image.length != 0) {
        this.$.itemImage.setAttribute("src", this.image);
        this.$.itemImage.show();
      } else {
        this.$.itemImage.hide();
      }
    },

    // Sound setup
    soundChanged: function() {
      this.$.itemSound.setSrc(this.sound);
    },

    // Text setup
    textChanged: function() {
      if (this.text.length != 0) {
        this.$.itemText.setContent(this.text);
        this.$.itemText.show();
      } else {
        this.$.itemText.show();
      }
    },

    // Play sound when image taped
    taped: function() {
      if (this.$.itemSound.paused())
        this.$.itemSound.play();
      else
        this.$.itemSound.pause();
    }
  });
Here you could see that Enyo allows you not only to declare new class but let you also declare properties (here "image", "sound" and "text" for the "Item.Element") and let you react to event (properties value changed or taping on a component).
You could be surprised to not seen any styles and formatting stuff in the HTML and JavaScript files. It's because all formatting is done in the CSS file. Here is the content of the CSS file:
   .title {
    margin-bottom: 20px;
    margin-top: 20px;
    text-align: center;
    font-size: large;
  }

  .item {
    display: inline-block;
  }

  .itemImage {
    margin-left: 30px;
  }

  .itemText {
    font-size:30px;
    text-align: center;
    padding: 16px;
  }

  .itemSound {
    width: 200px;
    margin-left: 70px;
  }

  .footer {
    width: 100%;
    text-align: right;
  }

  .licence {
    display: inline-block;
    font-size: x-small;
    margin-right: 5px;
    margin-top: 30px;
  }
The CSS file define classes that you associate to each JavaScript component using the "classes" attribute. For example, the line:
  { content:
    "Click image or use control bar to hear the word.",
    classes: "title" },
Tell to Enyo to display the text centered, using a large font with a margin top and bottom of 20 pixels.
Okay, we've got now a cool HTML5 contents but let's convert this into a Sugar Activity.
As you learn at Chapter 3, a Sugar Activity is a ".XO" file. A "XO file" is just a zipped file with Python code and initialization (setup and a manifest). To avoid complexity related to this file, I've prepared a template here http://git.sugarlabs.org/art4apps-Activity/master/trees/master. This template is a standard Activity but with a "WebView Gtk3 widget" that fills the main part of the screen. A WebView Gtk3 Widget is a widget that encapsulate the WebKit browser into a control that you could use like any other Gtk control. Here is the Python code to create it:
  vbox = Gtk.VBox(True)
  self.webview = webview = WebKit.WebView()
  webview.show()
  vbox.pack_start(webview, True, True, 0)
  vbox.show()
At startup the Python code will open an HTML page into the WebView using the "load_uri" method. This HTML page could be an external page (pointing anywhere on the web) or a local one. My template uses an "html" local subdirectory inside the activity to store all HTML contents and the latest version of the Enyo Framework. So here how the initialization of the WebView is done for the activity :
  web_app_page = os.path.join(activity.get_bundle_path(), \
                              "html/index.html")
  self.webview.load_uri('file://' + web_app_page)
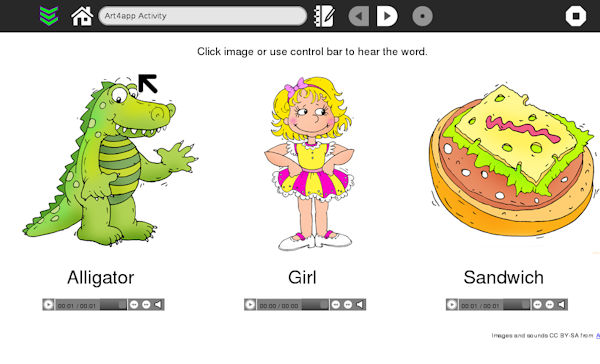
That's all ! You've got now a standard Sugar activity like any other but mainly in HTML5. The resulting XO activity is downloadable on http://laske.fr/art4apps/art4app-1.xo. Here is the result.
The complete source code can be found on http://git.sugarlabs.org/art4apps-activity/master/trees/master.
Going further: integrate HTML5 content with Sugar
Writing an Activity using HTML5 and JavaScript is nice but there are times when you will need to call the Sugar API. It's the case for example when you would interact with the Activity toolbar or when you need to store contents in the Sugar Datastore (i.e. Journal).
To avoid integration of an HTTP Server in the Activity, I choose to develop a small framework that allows bi-directional exchange between the Activity and the embedded HTML content. The framework is available both in Python and in JavaScript. So you could call Python code from your HTML5 content and conversely.
Let's see it in another example to understand how this framework works. You can download the activity example on http://olpc-france.org/download/enyo-1.xo and see the complete source code on http://git.sugarlabs.org/enyo-activity/.
This time the main screen of the Activity is split in three parts: the standard toolbar, the WebView with the HTML5/JavaScript content and a set of Python Gtk controls.
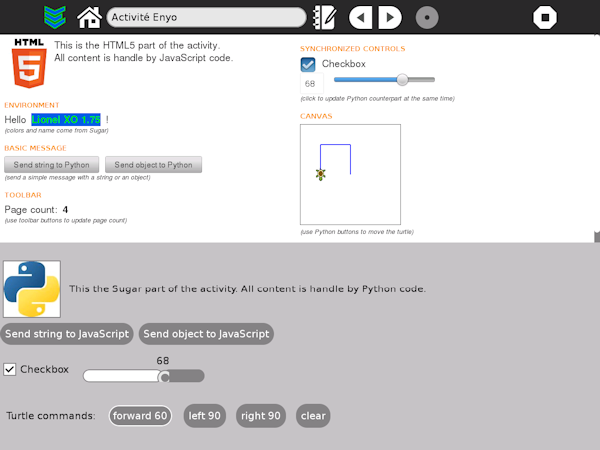
The sample show how JavaScript and Python code could be mixed together. Specifically features that we're going to demonstrate are:
- Toolbar buttons that call JavaScript code in the HTML5 page,
- JavaScript code that call Sugar API to get XO buddy colors and name,
- Synchronized Python and HTML controls (checkbox and progress bar),
- Sending of basic and complex data between Python and JavaScript and conversely.
All these stuff use the same feature, the capacity to send custom message between JavaScript and Python code. To do that, on the Python side, you first need to import the Enyo class from then enyo.py file:
from enyo import Enyo
Then you need to create a new instance of a class named "Enyo" with the WebView object that you created before, as parameter :
self.enyo = Enyo(webview)
This new object will give you access to the framework. Two methods of the Enyo object should be learn: "connect" and "send_message".
You could subscribe to JavaScript messages using the "connect" method. For example, we subscribe to the JavaScript "ready" message so the "init_context" Python method will be called when the HTML5 page will send this message.
self.enyo.connect("ready", self.init_context)
The source of then "init_context" method will give us opportunity, to discover the second method of the Enyo object, the "send_message" method:
  def init_context(self, args):
    """Init Javascript context sending buddy information"""
    # Get XO colors
    buddy = {}
    client = gconf.client_get_default()
    colors = client.get_string("/desktop/sugar/user/color")
    buddy["colors"] = colors.split(",")

    # Get XO name
    presenceService = presenceservice.get_instance()
    buddy["name"] = presenceService.get_owner().props.nick

    self.enyo.send_message("buddy", buddy)
As you can see, the "init_context" method call the Sugar API (presence and gconf) to build a Python object with colors and name value of the buddy XO (the small icon in the center the Sugar home view). Using the "send_message" method, we'll send these values to the JavaScript code.
Another interesting "send_message" call is used in our sample to handle toolbar events. Here is a part of the Python code to create and handle events for Toolbar button Back and Forward (go to chapter 19 to learn more about Toolbar handling).
 def make_toolbar(self):
    # toolbar with the new toolbar redesign
    toolbar_box = ToolbarBox()

    # ...

    back_button = ToolButton('go-previous-paired')
    back_button.set_tooltip('Page count -1')
    back_button.connect('clicked', self.go_back)
    toolbar_box.toolbar.insert(back_button, -1)
    back_button.show()

    forward_button = ToolButton('go-next-paired')
    forward_button.set_tooltip('Page count +1')
    forward_button.connect('clicked', self.go_forward)
    toolbar_box.toolbar.insert(forward_button, -1)
    forward_button.show()

    # ...

  def go_back(self, button):
    """Back clicked, signal to JavaScript to update page count"""
    self.enyo.send_message("back_clicked", -1)

  def go_forward(self, button):
    """Forward clicked, signal to JavaScript to update page count"""
    self.enyo.send_message("forward_clicked", 1)
The "back_clicked" and "forward_clicked" events are sent to JavaScript when the toolbar forward buttons previous/next are clicked in Python. These events will receive a parameter (number 1 or -1) that tell to JavaScript to update page count in the HTML page.
Let's see now the JavaScript of the activity. It's no more complex.
Like the Python side, you'll start by embedding the framework in your code. Here you just had to include the "Sugar.js" file in the list of dependencies in the "package.js" file:
  enyo.depends(
    "sugar.js",
    "app.js",

    // ...
  );
Then you need to instantiate a "Sugar" class object in your HTML5 content.
this.sugar = new Sugar();
The Sugar object has the same "connect" and "sendMessage" methods that its Python counterpart. You could subscribe to Python messages using the "connect" method that you bind to a JavaScript method. Here the code to react to the Python Toolbar message "forward_clicked" explained before:
  this.sugar.connect("forward_clicked",
                     enyo.bind(this, "upgradePageCount"));
Note than I'm using it the Enyo bind function to reference a JavaScript method but you could use the standard JavaScript syntax as well:
  this.sugar.connect("forward_clicked",
                     function(args) { /* ... */ } );
The source code of the "upgradePageCount" method will give us opportunity to learn about the "sendMessage" method.
  // Handle Python message coming from toolbar
  upgradePageCount: function(args) {
    // Process toolbar button click
    var currentValue = parseInt(this.$.pageCount.getContent());
    switch(args)
    {
    case 1:
      currentValue++;
      break;
    case -1:
      currentValue--;
      break;
    case 0:
      currentValue = 1;
      break;
    }
    this.$.pageCount.setContent(currentValue);

    // Change toolbar button sensitivity depending of current page
    var back = "False";
    var forward = "False";
    if (currentValue == 1)
      back = "True"
    else if (currentValue == 10)
      forward = "True"
    this.sugar.sendMessage("disableBack", back);
    this.sugar.sendMessage("disableForward", forward);
  },
As you probably understand, this method just upgrade the counter in the HTML5 page depending of the message parameter. Finally, you could see at the end of the method, two calls of the "sendMessage" method. These calls just ask to Python to change Toolbar button sensitivity depend of the current page. 1 is the minimum page number and I choose arbitrarily to set 10 as the maximum page number.
Here is a comeback to the Python source code to understand how it works:
    self.enyo.connect("disableBack", self.disable_back)
    self.enyo.connect("disableForward", self.disable_forward)

    # ...

  def disable_back(self, args):
    """Change sensitive status of the toolbar back button"""
    self.back_button.set_sensitive(args != "True")

  def disable_forward(self, args):
    """Change sensitive status of the toolbar forward button"""
This same process: "User interaction / Python message / JavaScript processing / JavaScript message / Python user interface changing" is used in the sample to synchronize HTML5 and Python controls. I will let you to discover how it works as an exercise.
Note three important things about message sending between Python and JavaScript:
- The parameter to the "sendMessage/send_message" method is optional. You could forget it. It will be replaced by a "null/None" value in the receiving method.
- The "sendMessage/send_message" method is call synchronously. There is no delay between the send messasge call and the connected method processing.
- Thanks to JSON format, the framework automatically handle value conversion between Python and JavaScript for basic data types (number, string, boolean, …), arrays and object composed of basic data types and arrays. Let's see it in the source code of the sample in Python first:
  class DummyObject:
    """Dummy class used for object transfer to JavaScript"""
    name = "Lionel"
    version = 2.0
    modified = date.today()
    language = ['Python', 'JavaScript']
    def foo(self):
      pass

  def send_string(self, button):
    """Send a simple string to JavaScript"""
    self.enyo.send_message("helloFromPY", "Hello JavaScript !")

  def send_object(self, button):
    """Send a simple string to JavaScript"""
    self.enyo.send_message("helloFromPY", self.DummyObject())
Then in JavaScript:
    // Send a simple string message to Python
    buttonStringClicked: function() {
      this.sugar.sendMessage("helloFromJS", "Hello Python !");
    },

    // Send a dummy JavaScript object to Python
    buttonObjectClicked: function() {
      var person = { name: "Lionel", version: 2.0,
                     language: ["Python", "JavaScript"] };
      person.modified = new Date();
      this.sugar.sendMessage("helloFromJS", person);
    },
In both case you will receive an object like if it comes from the target language of the message.
The next step: publish your HTML5 activity for Sugar
These first samples demonstrate the capacity to easily write new pedagogical Activities for Sugar using HTML5/JavaScript.
I've published, FoodChain, my first activity using the content of this chapter in the Sugar App Store. It's downloadable on http://activities.sugarlabs.org/en-US/sugar/addon/4612/.
FoodChain is a pedagogical game to learn the name of animals (word and pronunciation currently in French and English) and concept of food chains: Who eats what? Who eats who?
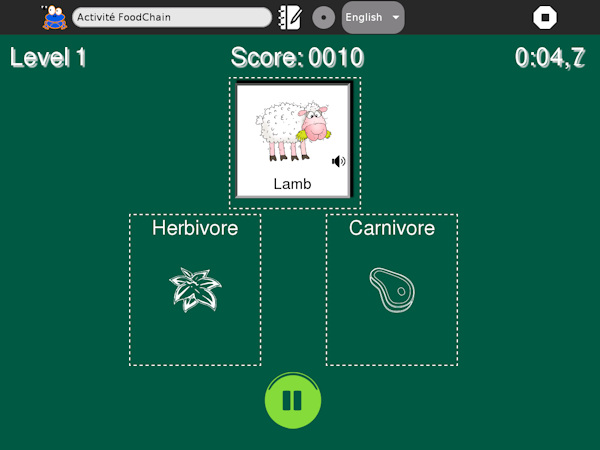
You can see the complete source code of the FoodChain activity on http://git.sugarlabs.org/foodchain-activity. It will show you some other advanced features that you could use for your own HTML5 Activity:
- Saving activity context into the Journal,
- Using Sugar localization for both Python and HTML5 contents,
- Embedding a debug console to log JavaScript message,
- Using of HTML5 extended features: media tag, drag&drop, SVG, Canvas, Touch support, ...,
- Multi-device handling (XO, PC, tablet).


