


Scanning Book Pages
I like going to used book sales and one of the things I generally pick up at these sales are interesting older books. I'm not talking about first editions of well known books, but obscure books that will probably never be printed again but which have something neat about them. It's kind of fun owning books that nobody else has, but I think it would be more fun to share my collection with the world in e-book format. To do that I need to create images of the book pages.
Flatbed Scanner Or Digital Camera?
You might think you need a flatbed scanner to create book page images. While you could do it that way, it isn't the only method. Flatbed scanners are very, very slow. When scanning printed material (as opposed to photos) you need to scan at a very high rate (300 DPI or more) to get a clear image. Putting a book on a flatbed scanner can damage the binding too. There is an alternative, which is to take pictures of the pages with a digital camera.
Using Digital Cameras
Libraries and other institutions use machines like the Atiz Book Drive, which uses two digital cameras to digitize books. You can read about it here:
There are no prices on the website, which suggests that these are really, really expensive.
Many amateurs have built their own book scanners, and the place to read about their work is here:
These book scanners go from bare bones to professional quality. Here is an elaborate one designed and built by Daniel Reetz, who runs the site and has given permission to use these pictures:
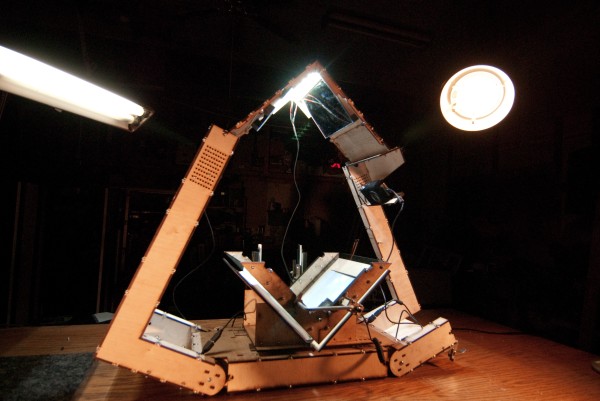
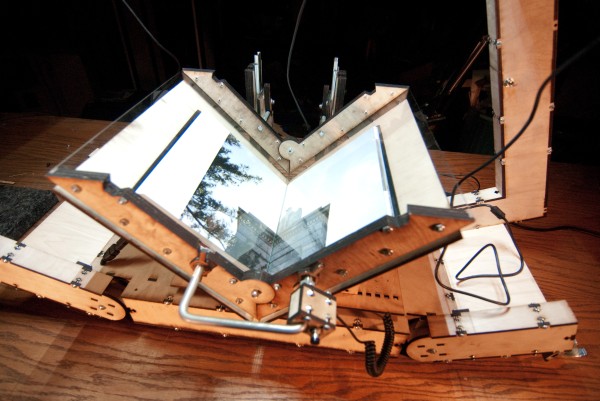
The basic idea is that the book is held open at a 90 degree angle in a cradle. Two pieces of glass, also at a 90 degree angle and called a platen, hold the pages flat so they can be photographed by two digital cameras. Bright lights shine down on the book from above. Here is a view of the book in the cradle held flat by the platen:
If I didn't value my marriage so much I would build something like this. Fortunately for me there is an alternative. The very simplest book scanner you can make is described in an article at www.instructables.com:
http://www.instructables.com/id/Bargain-Price-Book-Scanner-From-A-Cardboard-Box/
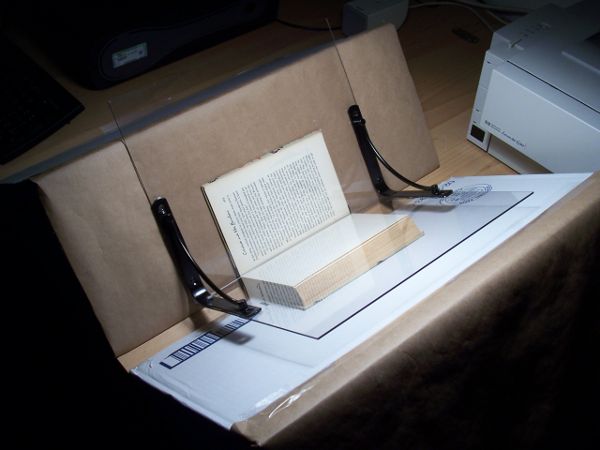
I built one of these myself one Friday evening and spent most of that Sunday scanning my first book. Here it is, the Simmons Home Book Scanner Mark I:
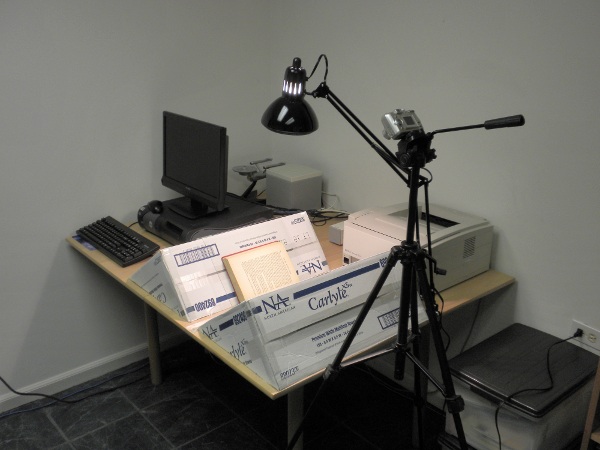
If you could see it up close you'd find it even less impressive than the picture. It consists of the following parts:
- One cardboard box, salvaged from a dumpster at work, sealed shut with strapping tape and sliced diagonally to create two wedges. The wedges are taped with strapping tape to the table. The distance between the wedges is the thickness of the book's spine. The purpose of the wedges is to cradle the book so that the pages can be photographed.
- One desk lamp, cost without bulb. The lamp should shine straight downwards onto the book as shown. If there are other lights in the room turn them off.
- One 100 watt incandescent bulb, saved from when we converted to Compact Fluorescents because I never throw out anything that might be useful.
- One piece of glass from a picture frame bought at Walgreen's. The glass needs to be bigger than the book page. You will use the glass to hold the page you are photographing flat.
- One tripod originally bought for use with a video camera. It is vitally important to have something to hold the camera steady and pointed at the page in such a way that the camera is parallel to the page and the image of the page is an untilted rectangle. If you don't get it completely perfect you may be able to fix some problems with software, but you definitely do not want a hand held camera for this!
- One Kodak 5 Megapixel camera which we already had. You might want a better camera for books with larger pages, but for the books I'm doing the Kodak was fine.
- One computer with free software to post-process the images taken by the camera. Whatever computer you already have should be fine.
There are many designs for platens, and they are all cheap to make, but what I was looking for was something easy to make. The design I came up with consists of:
- Two Lexan sheets, 10" x 11", eight dollars apiece at Menard's
- Two metal brackets meant for mounting shelves, a little under seven dollars apiece at Do It Best Hardware. I have seen similar brackets at a local Dollar Store for a dollar apiece.
- Epoxy glue and a set of small clamps to hold everything in place while the Epoxy cured. I could have drilled holes in the Lexan and used nuts and bolts instead of epoxy, and if I was going to make another one I'd do it that way..
The procedure to scan books with this setup is as follows:
- Put the book between the two wedges with the front cover facing the camera.
- Remove all existing pictures from the camera's memory. This is important!
- Using the glass (or platen) to hold down the pages, start photographing the book from front to back getting the front cover and all the right-hand pages all the way to the end of the book. Zoom in so the book doesn't quite fill the frame. Use a close-up setting if your camera has one. Set white balance to Incandescent or Tungsten. Try very hard not to photograph a page more than once or miss a page.
- When you're done connect the camera to your computer and download all the images to their own directory named something like "Book Title Right Pages". Have the computer delete the images from the camera afterwords.
- Plug the camera into the charger and take a nap.
- Repeat the process for the left side pages, being sure to go from front to back. You will very much regret going the other way. Download the pictures into a different directory than you used for the right side pages.
- The scanning process proper is complete. What remains is post-processing.
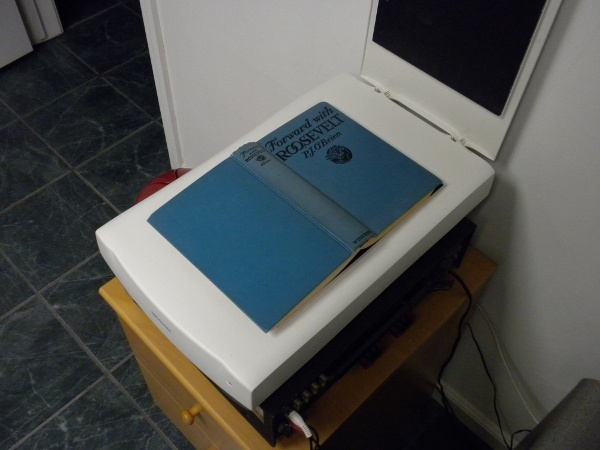
Using A Flatbed Scanner
At this point you might think that the digital camera method is definitely the way to go and that you should never use a flatbed scanner at all. It isn't that simple. There will be times when the flatbed scanner will do a better job with less work than using cameras.
- If your book is small enough to scan two pages at a time, you might save enough time not having to find and replace missing or duplicated pages to make up for the additional time scanning the pages.
- If you plan to submit the book to Distributed Proofreaders they'll want black and white PNG files for all the pages for OCR and proofing purposes. A scanner can produce output like that directly and give better results than converting photos for that purpose.
- There are a whole host of problems like keystoning, white balance, and skewing that are easier to avoid on a flatbed scanner than they are when using a digital camera.
The Post Processing Fork In The Road
There are two ways you can take the images you have made and make an e-book out of it. One way is easy, mostly automated, and produces pages that are readable and attractive. The downside is that the pages don't look exactly like the pages in the book. ⁞ The margins will be different, and the text will be black on a white background no matter what the page color was originally. However, the result will be a nice, compact e-book.
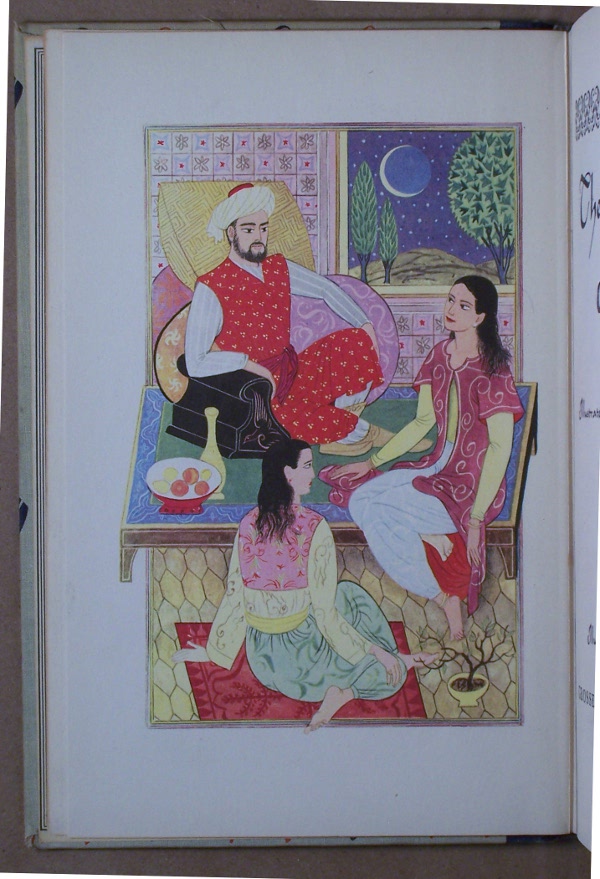
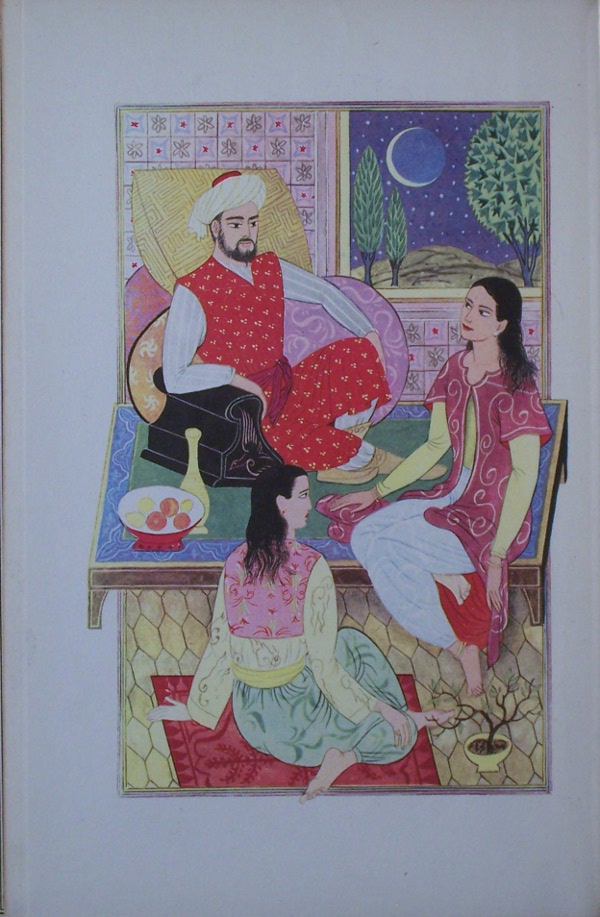
The other way strives to preserve the original look of the pages as much as possible, and is largely manual. It is more work, and may give results that are less than perfect. The file size of the e-book may be larger. In the scans the Internet Archive does itself they try to preserve the look of the original book, and if you want to follow their example this method is the way to go. (There is no requirement to do this. You can use Scan Tailor to prepare submissions to the Internet Archive if you wish). If you have a book that is lavishly illustrated (children's books are a good example) you'll want to use this manual method. For example, consider this book from the Internet Archive:
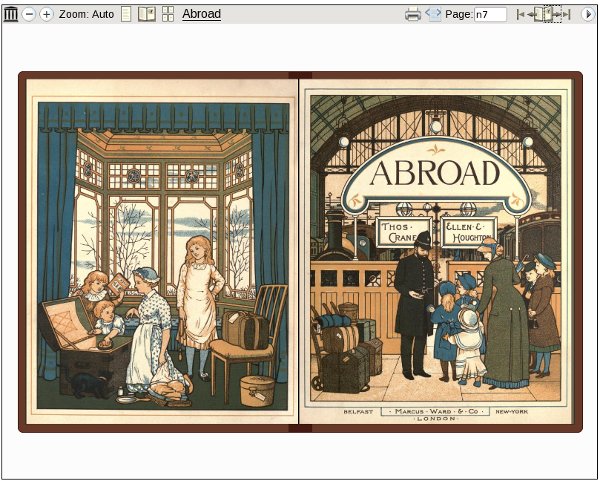
You can't get results like that automatically.
The steps in both methods are the same, but in the mostly automated method the computer does most of the work. To make the whole process understandable it makes sense to describe the manual method first. I will call this method ...
The Road Less Traveled
Trimming The Pages
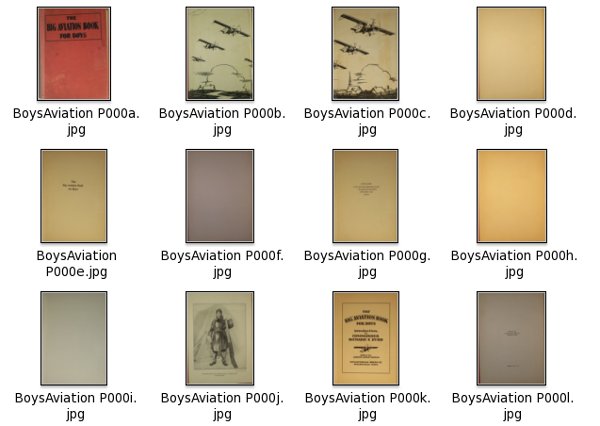
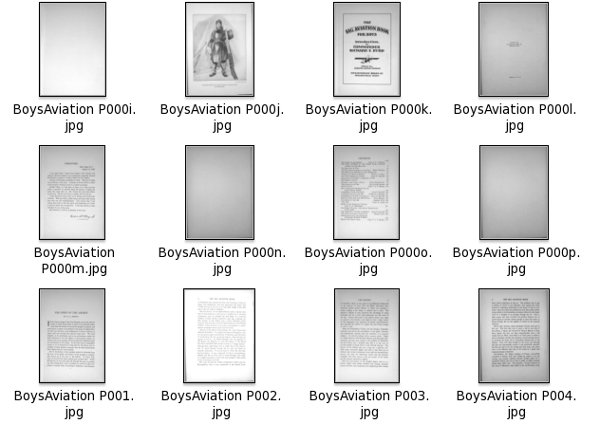
If you've done everything right when scanning the book you'll have a bunch of images that look like this:
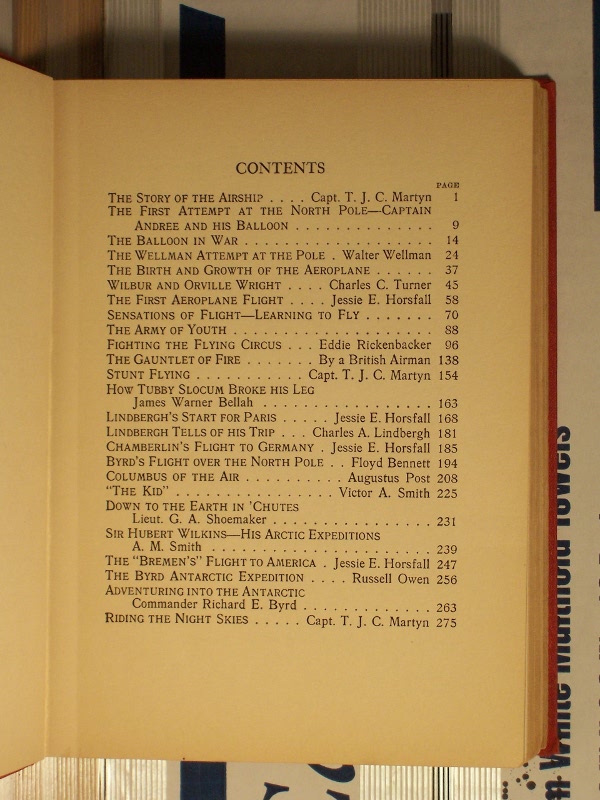
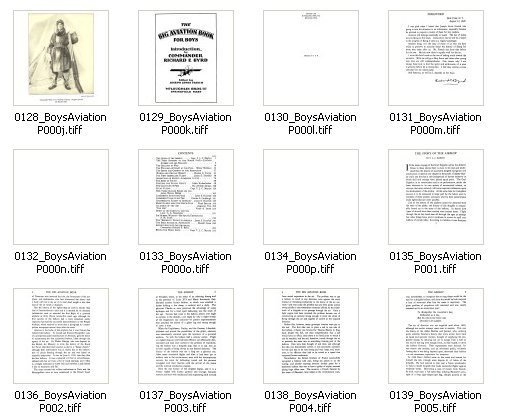
Granted, that doesn't look too promising but it will get better. The book I scanned was published in 1928 and is titled The Big Aviation Book For Boys. It is filled with true stories of aerial heroism and will appeal to any boy with red blood in his veins and the sort of girl who is not put off by books with Boys in the title.
The first thing we need to do is rotate all the images. In Windows you can open the directory in an Explorer window, do a Select All, then right-click on one of the images and choose one of the Rotate options. In Linux the gThumb Image Viewer will let you do the same thing. In this example right-side pages are rotated clockwise, left side pages counter-clockwise. Doing it this way will rotate every image in the window, giving results like this:
Next we need to crop the image so all that is visible is the page. We do this with a free program called The GIMP (GNU Image Manipulation Program). The GIMP is like a free version of Adobe Photoshop. You can download it here:
There are versions for Windows, Linux, and the Macintosh.
A more elaborate book scanner than the Mark I might hold pages in place consistently enough that you could crop the page images automatically. As it is I probably moved my camera on the tripod several times when photographing the pages, so I decided to crop the pages by hand. I did this by loading each picture into The GIMP, selecting the boundaries of the page with the Select tool, then choosing Crop Image from the Image menu. This created an image like the one below, which I then saved.
You'll notice that the text on the pages is a little cockeyed (the technical term is skewed) and if the book is as old as the one I'm scanning here the pages look old and dirty. Actually, the real book pages are not as brown as this image would suggest. I could not find the white balance setting on my camera when I took these pictures, so I used the normal setting. Since then I found how to change the setting and why it's needed. When a camera takes an indoor picture without a flash the color in the picture is distorted a bit depending on what kind of light is in the room. If the light is incandescent you get an orange tint to the picture. You can set the white balance to Incandescent (on my Kodak camera it's called Tungsten) to correct for this.
Correcting Skewed Pages Manually
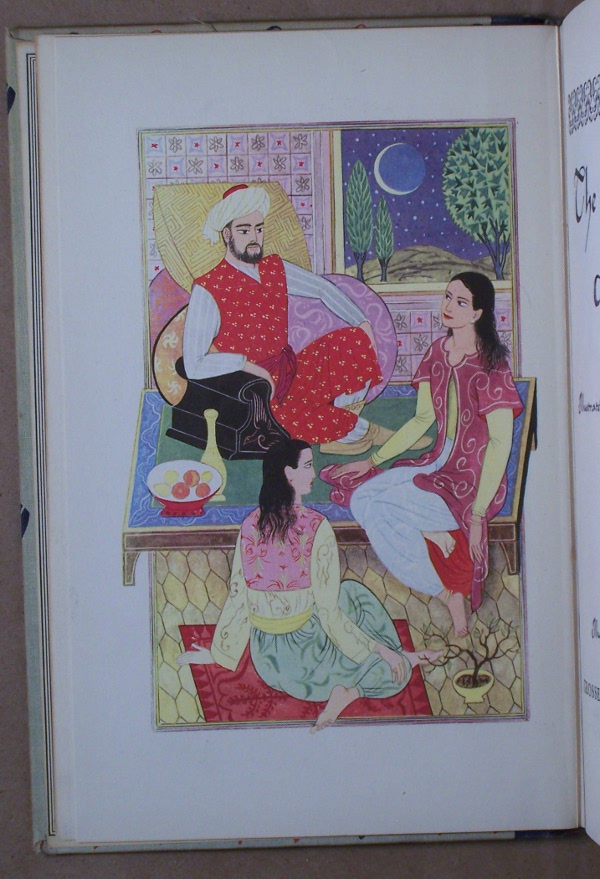
When I scanned my second book, an Illustrated Junior Library version of The Arabian Nights, I managed to set the white balance to Tungsten and figure out a way to de-skew the pages. Here is a page image that has been rotated.
The page looks great, but it's skewed. Under the Layer menu of The GIMP is a sub menu called Transform which has a menu option Arbitrary Rotation. Select that and you'll get this dialog:
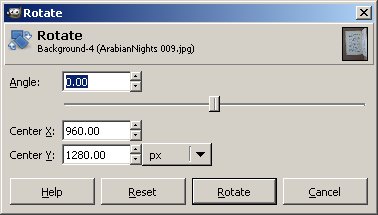
By moving the slider to the left and right we can rotate the entire image so that the page within the image is reasonably vertical. Tip: when the focus is on the slider you can use the arrow keys on your keyboard to get a more precise control than is possible with the mouse. Second tip: you can use the edges of the dialog to line up the edges of the page. When they are parallel the page is correctly aligned.
Now we do our final crop to get the page, ready to save:
If I had the opportunity to re-scan the Boy's Aviation book I would definitely do it this way. (Some would argue that I do have this opportunity, since I still own the book. What is lacking is the desire to re-scan the book. Soon you'll see how I was able to avoid re-scanning it and still have a usable e-book).
Correcting Keystoned Pages
If you didn't line up your camera exactly parallel to the page your page images won't be perfectly square. The borders of illustrations make this problem quite noticeable:
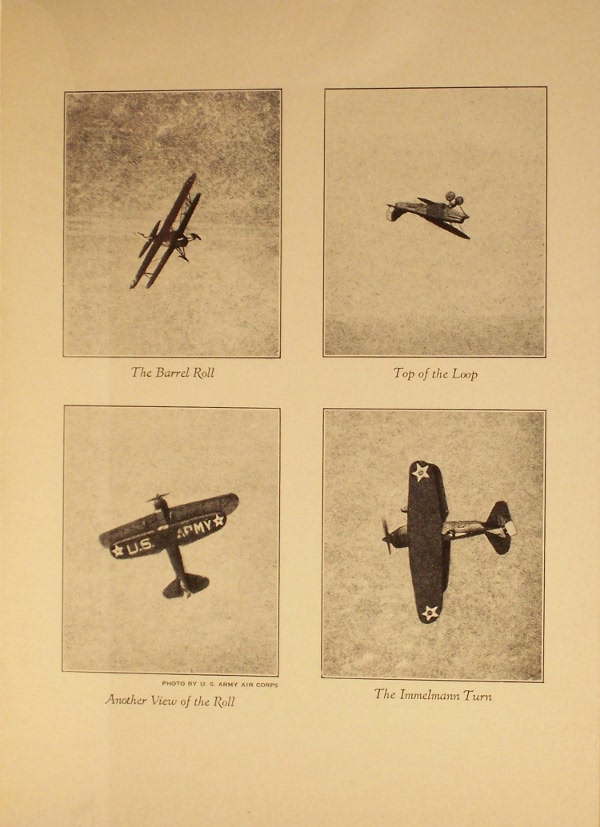
In the original book the four pictures were rectangular with square corners. If you have some pages that are noticeably like that you can use the Perspective Tool in The GIMP to try and fix it. Select the area that needs fixing and the tool will give you four corners you can move around to try and square things up:
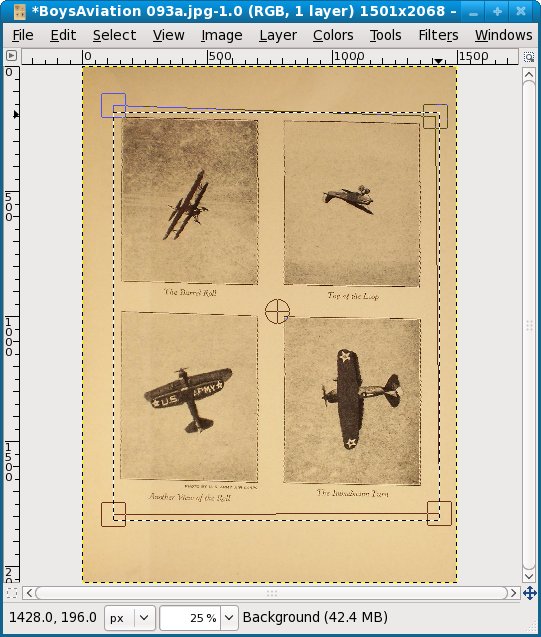
It is of course better to attempt this before cropping the page.
Image Magick
If there is one indispensable program for making e-books out of scanned page images that program is Image Magick. It is free software that runs on Windows, Linux, or the Macintosh. Every Linux distribution includes it. For Windows and the Mac you can download it here:
http://www.imagemagick.org/script/index.php
Image Magick needs software called Ghostscript to create PDF's and you should install that software first. Ghostscript comes with every Linux distribution and should be installed by default. For Windows and the Mac you can download the install programs here:
http://pages.cs.wisc.edu/~ghost/
Click on the latest version and look for the installer for your operating system.
Batch Cropping
If you did a good (or reasonably good) job of keeping your book and camera in the same position when you photographed the pages you may be able to do batch cropping, which will save you a great deal of time and tedium. Batch cropping is a way to apply the same cropping dimensions to many pages. Even if your photos are not perfectly aligned all the way through you might still be able to batch crop them in multiple passes. I did this with my second book. Here is what some pages looked like before cropping:
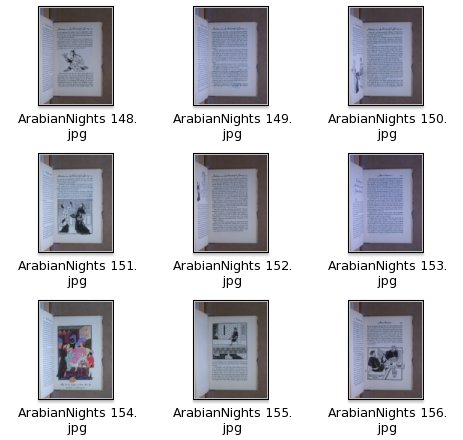
I copied a bunch of uncropped images to another directory which I called TestCropping. Next I loaded the first picture in that directory into The GIMP and used the rectangle selection tool on the Toolbox to select the area I wanted to crop the image to. I did not crop the image. Instead, I had a look at the dimensions of the selected rectangle in the toolbox:
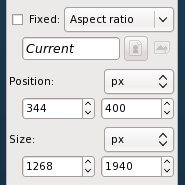
You should read these dimensions as:
- Upper left corner of the rectangle has an X offset of 344 pixels
- That corner has a Y offset of 400 pixels
- The selected rectangle is 1268 pixels wide
- The rectangle is 1940 pixels in height
If I want to apply the same crop to every image in the directory I can use the Image Magick mogrify command, which updates a file in place:
mogrify -crop 1268x1940+344+400 *.jpg
When I did this I got these results:
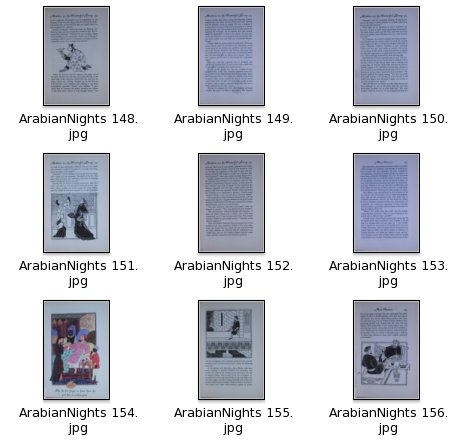
The first few pages came out OK, so I copied them back to the original directory, overlaying the uncropped files. Then I copied the remainder of the uncropped pictures to the TestCropping directory and repeated the process. The images where batch cropping didn't work showed a bit of the facing page so when I selected the rectangle for the rest of the pages I moved the left side of the rectangle a bit away from the left edge of the page to avoid this. This time mogrify did well on all the rest of the pages, with the exception of the inside of the right cover, which had a beautiful illustration that really demanded manual de-skewing and cropping with The GIMP. If you do batch cropping you can spend time on manual tweaking like that when it makes a real difference to the end product.
Batch Rotation
If your pages are skewed you can do a batch rotation with mogrify as well. The time to do this is before you combine left and right pages, because the pages on the same side of the book are likely to be skewed the same amount or close to it. Use The GIMP to figure out how much rotation you need, but don't actually do the rotation on the image. Instead, use a mogrify command like this:
mogrify -rotate .9 *.jpg
This with rotate every JPEG in a directory .9 degrees clockwise. Just like when you rotate with The GIMP, you want to rotate the complete image first, then crop.
Dealing with Focus Issues
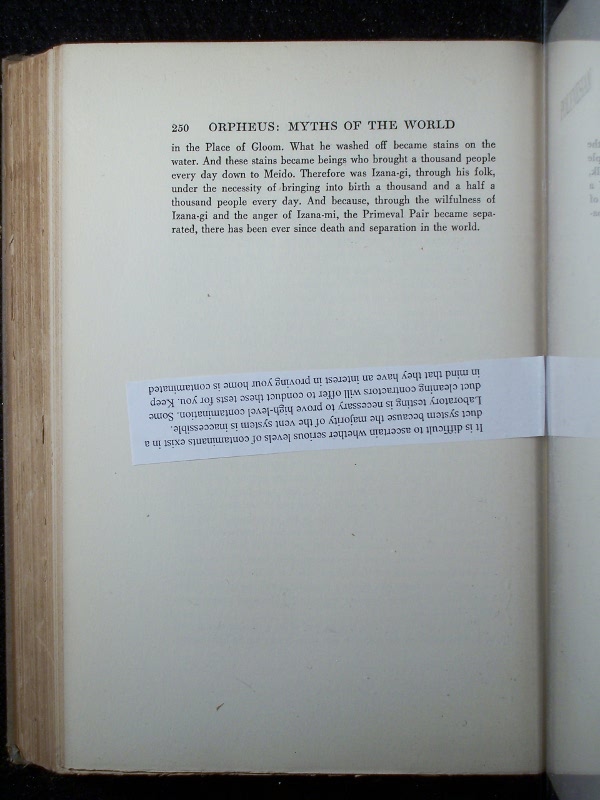
More likely than not your digital camera will auto focus, with no option for manual focus. This works just fine if the center of the page you're photographing has something the camera can focus on. If the center of the page is blank the camera can't focus properly. Now if the whole page is blank, no problem, because a cropped out of focus page does not look much different than it would in focus. However, you may find yourself with a few pages that look like this:
You're going to have to photograph those pages again. This time, cut out a paragraph of text from something you've printed out and put that slip of paper in the middle of the page, between the page and the glass. This will give your camera something to focus on:
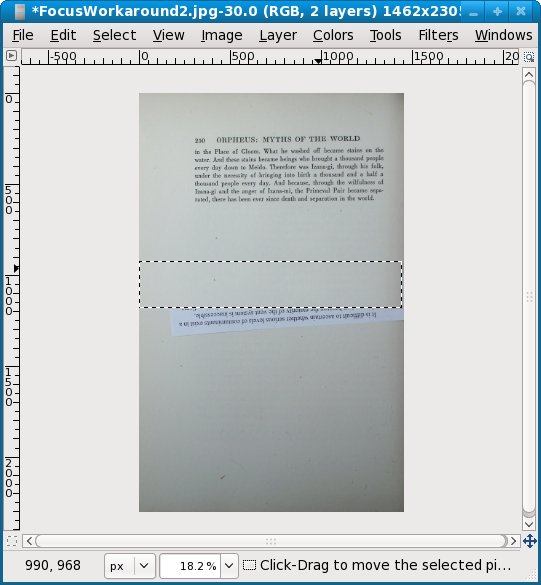
Well, that solved the focus problem. Now we have to use The Gimp to get rid of that slip of paper. The first thing we do is to use the Select tool to select a blank area of the page just above where the paper is. Then we copy the selection to the clipboard using the Copy option on the Edit menu:
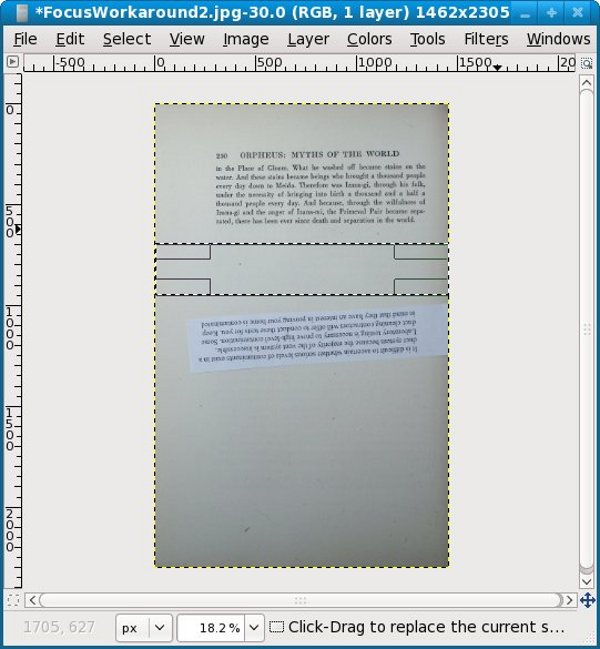
Now we do a Paste from the Edit menu. What that does is create a Layer which we can move around with the Move tool. We can cover the slip of paper with this layer, then save the image. This shows moving the layer in progress:
Combining Left And Right Pages
When you have all the pages in both left-hand and right-hand directories cropped it's time to bring the pages together. If you paid attention to my warnings to clear your camera's memory of pictures and photograph both sets of pages front to back you should have two directories with pictures named something like
BoysAviation 001.jpg, BoysAviation 002.jpg ... BoysAviation nnn.jpg
What you need to do now is rename the right side pages to
BoysAviation 001a.jpg, BoysAviation 002a.jpg ... BoysAviation nnna.jpg
and the left side pages to
BoysAviation 001b.jpg, BoysAviation 002b.jpg ... BoysAviation nnnb.jpg
In Linux and probably on the Macintosh too there is a command rename which will do this quite easily:
rename .jpg a.jpg *.jpg
This can be read as "for every file named ending with .jpg change the .jpg in the name to be a.jpg".
For Windows you can try the Renamer utility which can be downloaded from:
http://www.albert.nu/programs/renamer/main.htm
This is what the Renamer utility looks like in action:
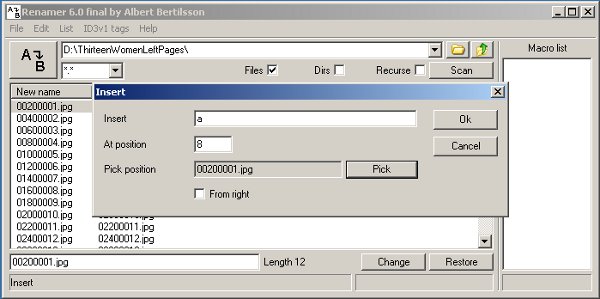
The Insert operation in the program allows you to insert text at a relative position in the file name, and is just what we need.
Be aware that there are two versions of Renamer: the original and the unfortunately named RenamerNG. You want the original. RenamerNG has some bugs, the most important of which is that when you select files to be renamed they are not listed in ascending sequence. This makes that version of the program useless for our purposes.
When you have the files in both directories renamed you can copy (not move) them into one new directory. Before you do that, check to see if both original directories have the same number of files in them. If they do, chances are you didn't miss or duplicate any pages when you photographed them. If not, you'll need to figure out which pages are missing or duplicated, correct that and rename files so that you have a complete set of pages in sequence from front to back. There is no painless way to do this. As it happened, I missed three pages when I scanned the left pages of my first book. The only way I could think of to make things right was to rename each and every page with its page number, then see which ones were missing.
If you need to do this, the Windows Renamer program can help. It can do a great deal more than simply insert a character in a file name. It can also remove the existing sequence number from a file and replace it with a new one. You can start the number at any value and increment it by any amount. If you use this on your left and right pages before combining them you should be able to give each page a sequence number that matches its page number.
On Linux there are krename and pyrename. These should be included in your distribution.
When you have a complete set of pages in sequence back up your work to a CD. You've done a lot of work and you don't want to lose any of it.
Cleaning Up Page Images
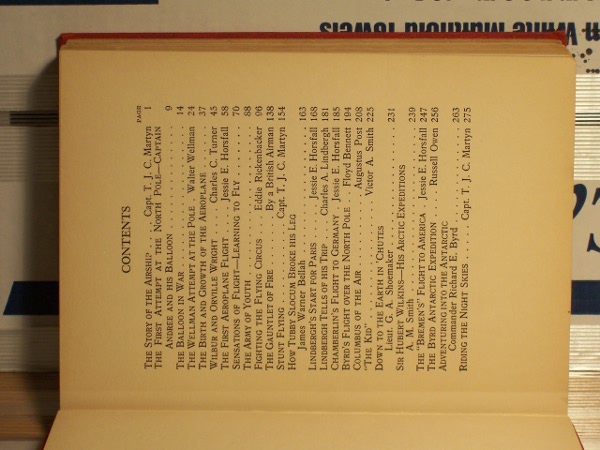
The pages of the Boy's Aviation book are showing signs of age (and a lack of white balance), and it would be nice to clean them up a bit. As you can see in the illustration, some are dirty brown and some are dirty gray.
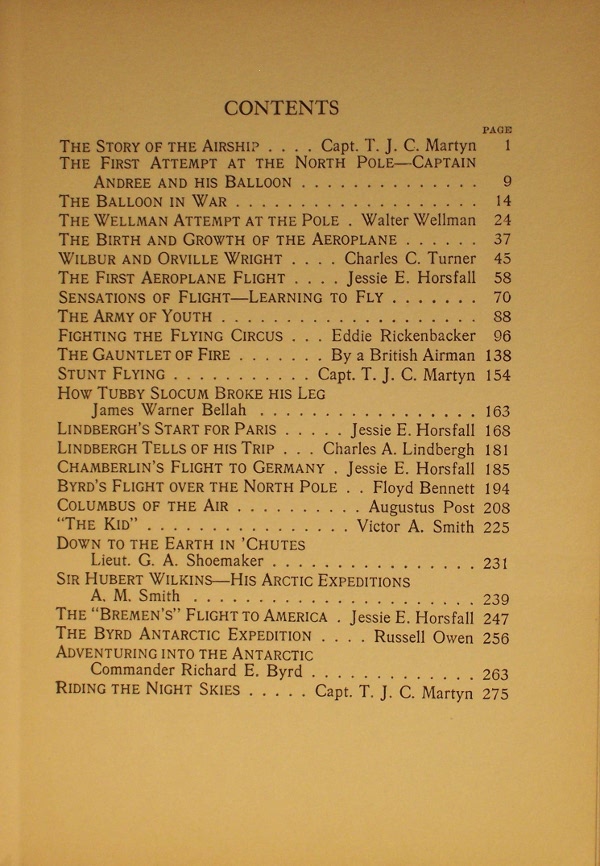
I asked for suggestions on cleaning up the pages in the sugar-devel mailing list and got several, plus I figured out a method on my own. My first thought was I wanted some sort of filter that takes the darkest color on the page and makes it black and makes everything else white. It turns out that The GIMP has such a filter, called Threshold, which is found on the Tools menu. Running Threshold on the Table of Contents page gives this result:
This might do for some uses, especially if you're preparing pages for OCR (Optical Character Recognition). It isn't much good for illustrations. Several people suggested that I convert the image to Grayscale (Mode under the Image menu) and use the Brightness-Contrast dialog (found in the Tools menu) to lighten the page and darken the text to come up with a cleaned up page image.
You do not need to edit each page with The GIMP to pretty it up. Once you figure out what you want to do you can change the pictures as a group from the command line using Image Magick. The changes you do with Image Magick's mogrify command cannot be undone, so before you use it copy all your images into another directory and work with that.
I ran the following command on my images:
mogrify -modulate 150,0,0 *.jpg
This cranked away for about an hour and produced the following results:
The command as shown converts the file to grayscale and increases the brightness to 150%. After it's done some pages are still darker than others, but all are quite readable:
Other than some tolerable skewing the pages look good. I would be entirely justified in making a PDF with these images and considering my work done. Of course, if we're going to submit to the Internet Archive we'll want to replace the now grayscaled images of our front and back covers with the original full color versions.
If you look at these images closely you'll see that part of the page is brighter than the rest of it. This is where the desk lamp I used shined brightest on the page. To get a good quality image you really need to have more than one light shining on the page. After I had done a few books and had grown frustrated with the dingy color of my photographed pages I invested in a couple of clamp-on desk lamps to shine light on the either side of the page, as well as directly from above. This seems to have helped, and the lamps were only about five dollars apiece at Menard's. If post-processing does not give you the page color you want, consider investing in improved lighting.
The Easier Road: Scan Tailor
You can use Scan Tailor on Windows or on Linux. For Windows there is the usual install program. For Linux you will need to compile from source. You can get both here:
http://scantailor.sourceforge.net/
Scan Tailor is an amazing program that can do all of the following to the images you originally captured with your camera:
- Rotate the images clockwise or counter clockwise
- If you use a flatbed scanner, split 2-up scans into separate pages.
- Calculate the skew of your page so it can be corrected
- Identify the content of your page, whether it be a block of text or an illustration or both
- Clean up the content portion of the page. For blocks of text it will do the equivalent of the Threshold filter in The GIMP. For photos it will brighten the image.
- De-skew the content portion of the page.
- Place the content of the page in a new, empty page with the margins you specify.
- Create .tiff files in an output directory with all these corrections made, leaving the original images untouched.
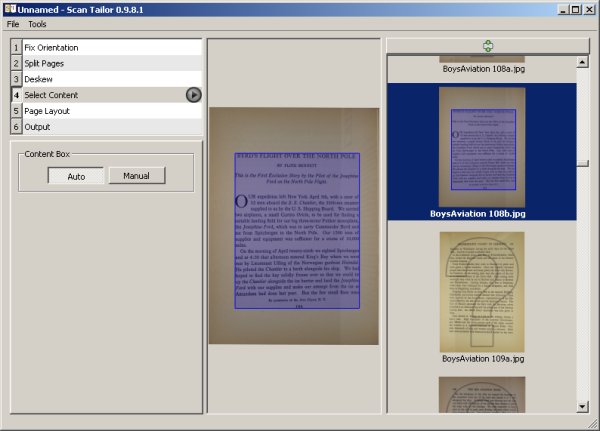
Here is a sample page for comparison purposes:

In the screen shot below you can see that there are six tasks that Scan Tailor performs in sequence. Split Pages doesn't apply in my situation; it would make sense if I was using a flatbed scanner to scan two pages at a time, for instance. Select Content must be run before you can generate output pages. As you can see in the screen shot it can easily find the content area on a page. It occasionally messes up a picture, but you can use the Manual button to correct this.
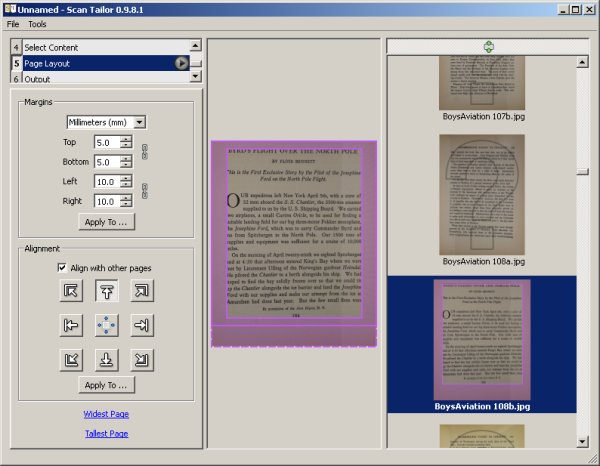
Page Layout is used to specify the margins of the page where content will be placed. The important thing to remember here is that Scan Tailor assumes that all pages given to it will have these margins. If the inside lining of the book cover has illustrations that go to the edge of the page that can mess up the way the rest of the pages are formatted, so it is best not to give such pages to Scan Tailor. Instead, you can do these pages by hand or simply don't include them in your e-book.
Output creates the pages as TIFF files in a separate directory. When you create output you have a choice of three formats:
- Black and White
- Grayscale/Color
- Mixed
If your book is a combination of text and images choose Mixed. This will detect which pages are just text and make them black and white, and make the rest color as needed.
Some examples will give you an idea of what to expect. This is a page rendered in Black and White.
This is the same page in color with White Margins selected. You can choose not to have white margins but you would not like the result. This is a good choice if the paper the book is printed on is acid-free and a nice color, clearly not the case here:
If you check the "Equalize Illumination" check box in Color mode you'll get this:
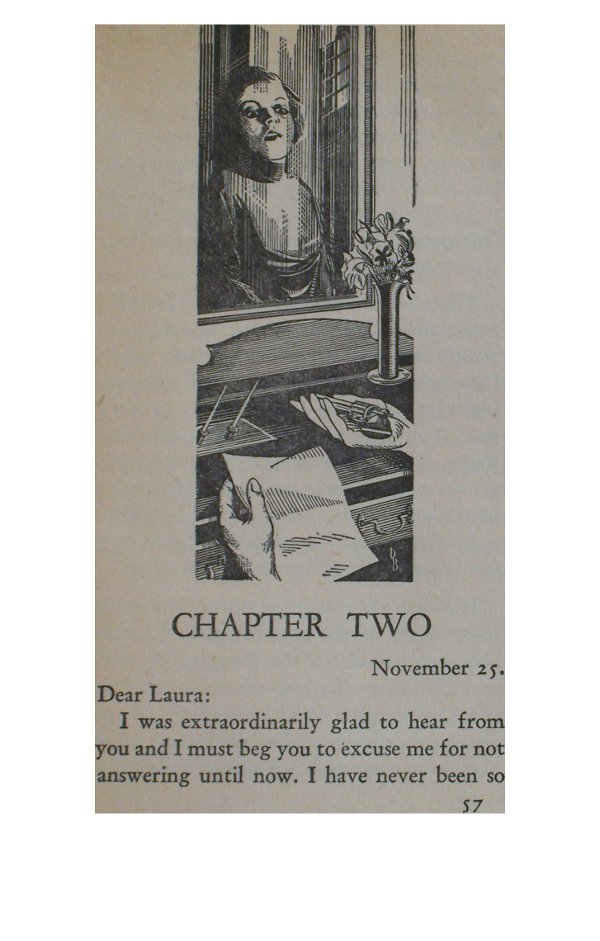
"Mixed" will try to give you a color or grayscale image with white borders and equalized illumination when it needs to and black and white for pure text pages. This is a reasonably good option, but for the book shown above (Thirteen Women by Tiffany Thayer) Black and White is clearly the best choice.
Scan Tailor has a User Guide here:
http://sourceforge.net/apps/mediawiki/scantailor/index.php?title=User_Guide