


Installing ownCloud Server
At the time of writing this manual, version 5.0.13 is the stable version of ownCloud server.
ownCloud can be installed on either Linux or Windows servers. Due to an issue with Mac OS Unicode support, installing ownCloud Server 5.0 on Mac OS is currently not supported.

There are many ways to install ownCloud. This guide covers two ways, via the web installer and by uploading the latest code via a tar/zip file to your webspace.
What you need to install ownCloud
It is beyond the scope of this document to fully describe the setup of the hosting part of running a server. If you are new to the process we would recommend a LAMP set up which involves (Linux, Apache, MySql and PHP).
Most hosting plans can provide an already working LAMP set up. If you a running your own server with root access there is good help online for 'setting up a LAMP server'.
Here are the prerequisites for installing ownCloud. You will need:
- webspace as part of a hosting package or VPS (virtual private server)
- php5 (>= 5.3) php5-gd & php-xml-parser
- file server (probably Apache if you are unsure but Nginx or Lighttpd are also good options)
- a way of accessing your files on the server and changing their 'owner' and 'permissions' (ftp, ssh and cpanel are the most normal ways)
There are other optional requirements that allow for additional functionalities. These include:
- MySql
- php5-intl php5-sqlite (>= 3) php5-mysq php5-pgsql (or php-pgsql depending on your distro)
You can choose to use an external database like MySql or the more simple file based system SqLite.
By default ownCloud installs with SQLite are not recommended for large ownCloud installations. The most popular database on Linux is MySQL but MariaDB or PostgreSQL are also good options.
There is fuller detail about this aspect and details of how to install these prerequisites, if they are already active on your server, at this page of the official ownCloud documentation.
Installing on Debian / Ubuntu
As an example here are some commands to install some needed components for Ubuntu and Debian using a LAMP (Apache) setup. Run these commands on the command line as root:
apt-get install apache2 php5 php5-gd php-xml-parser php5-intl
apt-get install php5-sqlite php5-mysql php5-pgsql smbclient curl libcurl3 php5-curl
If using Apache, you need to have the rewrite and headers modules enabled so run:
a2enmod rewrite
a2enmod headers
And restart your server for these settings to take effect:
service apache2 restart
Enabling .htaccess and Apache modules
You need to allow the .htaccess file of ownCloud space to be active. If you are a beginner to web administration you may need help with this aspect.
The most direct way is to changing None to All in the <Directory /var/www/> section of the VirtualHost file which is normally located here: etc/apache2/sites-enables/000-default
So an example could be:
         <Directory /var/www/>
                Options Indexes FollowSymLinks MultiViews
                AllowOverride None
                Order allow,deny
                allow from all
        </Directory>
This process can be done in different ways to make your server more secure. You may need to do some research or get support to find the most secure way for you to achieve this for your particular server.
We are also aware that it is possible to install your ownCloud directory in different folders on your server depending on how it is set up. In this guide we will presume that /var/www/ is the root folder for your web server and we are going to install ownCloud inside there. If this is not appropriate we use /path/to/owncloud/. If you see this you should replace it with the correct path to where you are installing ownCloud on your server.
Installing with Web Installer
This section covers how to install ownCloud with the web installer and using an external database MySql.
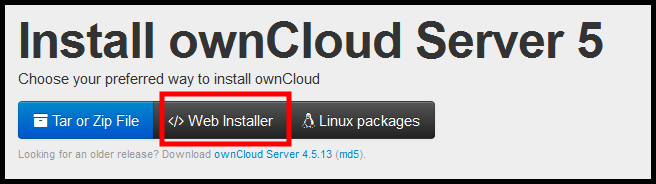
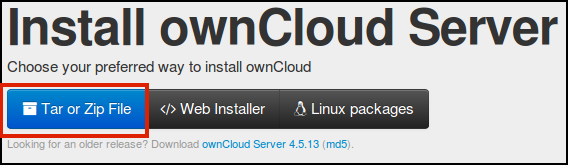
Point your browser at www.owncloud.org and find the link to the Install page:

The list of three options link to instructions on installing ownCloud manually (downloading the Tar or Zip File), the Web Installer and installing ownCloud using distribution specific packages.
Clicking the Web Installer link results in a pop-up window with instructions.
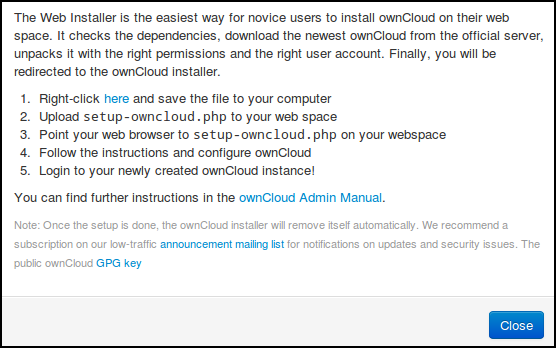
Before following these instructions, the web directory should be owned by the web server. This user must have read, write and execute permissions on the directory, plus read and write permissions on all the files in the directory. Finally, all future files created in this directory must have the same permissions:
chown -R www-data:www-data /var/www/
chmod 775 /var/www/
chmod 664 /var/www/*
chmod g+s /var/www/
Go to the web directory and download the script that ownCloud calls the Web Installer:
cd /var/www
curl -O -L https://download.owncloud.com/download/community/setup-owncloud.php
In a browser point it to your web server where you have installed ownCloud to run the setup script:
![]()
If all goes well you should see a page welcoming you to the setup wizard; click Next. The dependency check is run and one is served the following page:
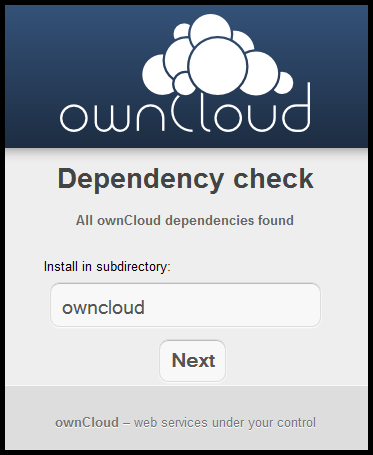
One can change the owncloud subdirectory to anything you like, for example mydocs. Click Next and wait about half a minute while the script creates the necessary files. You should see Success and press Next.
The final step is to create an database and a user:
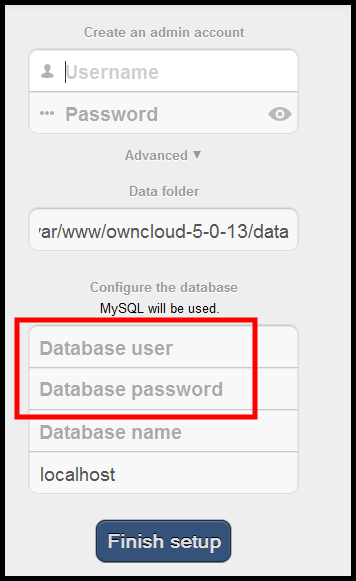
Make sure you have the details at hand for a Database user and Database password and Database name. You may need to create your database in phpmyadmin, cPanel or via the mySql command line. If this is not possible you may need to ask your hosting company or server admin to help you.
The Username for the admin account can be anything you wish to make it.
On completion of the ownCloud Web Installer you will automatically logged into your new ownCloud server setup. Congratulations! Happy saving, syncing and sharing of your own data.
Installing by downloading Tar/Zip file
This section covers how to install ownCloud by downloading the code to your website. We will use the simple method of using the default SqLite system and FTP to upload our files.
Point your browser to the install page of ownCloud at http://owncloud.org/install/
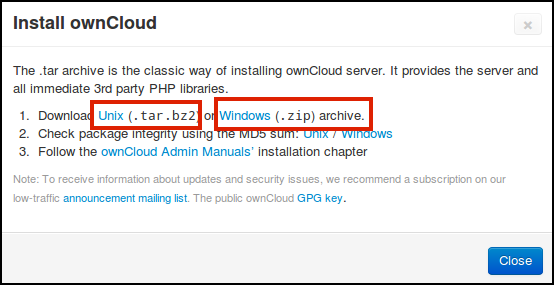
Click on the Tar or Zip File link.
Choose either the tar download for Linux or the zip download for Windows (or Mac).
Save the downloaded file to your computer and double click on it to uncompress it.
The next stage involves uploading this unzipped code to your web space. You can do this in different ways either via a (s)ftp client, a cPanel File Manager or other command line tools.
In this example we will use FileZilla, a (s)FTP client.
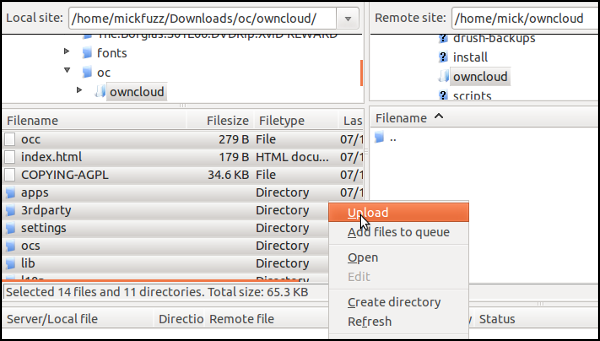
Connect to the server with your server login details and copy all the unzipped files to the directory on your server you are going to use as the home for your ownCloud directory.
When we point our browser to the URL that we have linked to this web directory we will see an error that we need to fix. Cannot create data directory (/path/to/owncloud/)
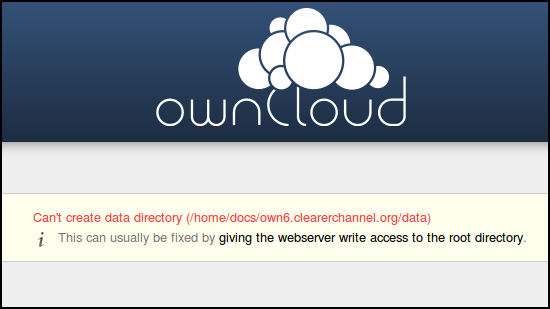
This message is asking us to change the ownership setting of some of the folders on the install. Specifically for this Linux server to be owned by the web server user www-data.
Unfortunately there isn't a way of doing this in FTP or even most SFTP clients. But we have a few options.
For Cpanel users to change permissions this is done in the File Manager section see this page for more help on using cPanel.
If you are renting space you can ask them to set the ownership of the /data /apps and /config folders to be owned by the web server. You can point them to this for more info.
We can learn how to get command line access to the server and enter the following commands as root user.
cd /path/to/owncloud/
mkdir data
chown -R www-data:www-data data config apps
The exact commands may be different depending on what server you are running. See this page for cross platform instructions.
If you return to the web page where ownCloud was installed the error should be replaced with a welcome screen asking you to create an admin user with the first log in.
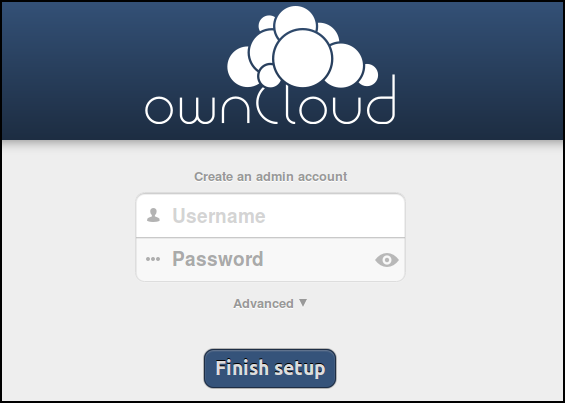
If you just want to get started with a basic install then enter your details, click Finish setup and continue using ownCloud.
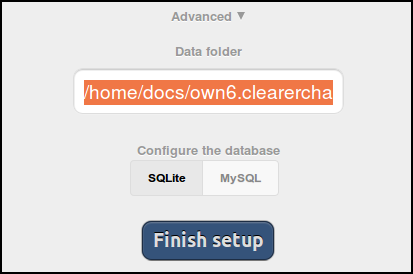
If you want to change the data directory or install with MySql you can click on the Advanced link.
Troubleshooting
Complementary documentation is available at:
http://doc.owncloud.org/server/5.0/admin_manual/
There is also a very useful user forum at:
http://forum.owncloud.org