Starting Record
You can start the Record Activity either from the Home View or from the List View. Let's try the Home View first :
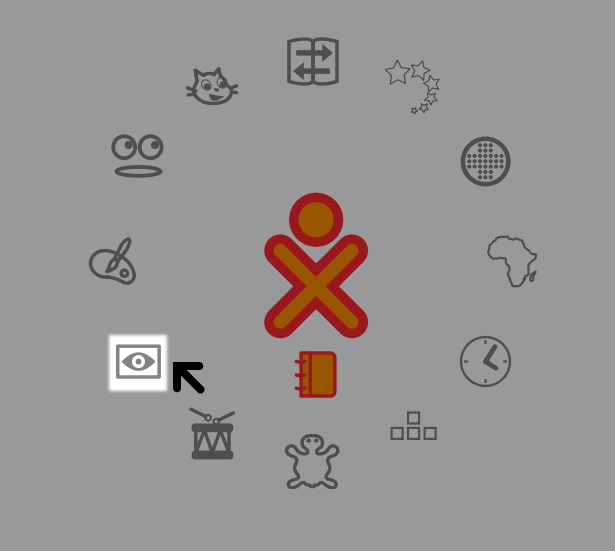
The 'eye' icon in the above image is what you click to start the Record Activity. Note: the icon might not be in the same place as you see here. If you do not see the icon at all then you should go to the List View. To do this click the icon that looks like five parallel lines at the top right of the Home View :

This takes you to a list of Activities :
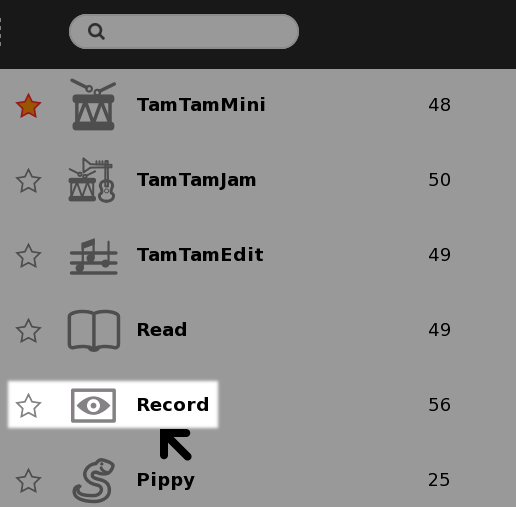
You should scroll down the list until you see the Record Activity. You can then do one of two things. You can click the star to the left. This adds the Record Activity to the Home View and then you can return to the Home View by clicking the Home View icon:

You would then start the activity in the way described above. However, if you do not wish to add Record to the Home View then just click the eye icon in the List View and Record starts immediately (it takes a little time to start up).
Overview of Record
The Record Activity can be used to record three types of media:
- Photographs
- Videos
- Audio Recordings
For those users who are running Sugar on an XO laptop, your machine comes with a camera and a microphone built in. These features allow you to create and share your own media. The Record Activity is a useful piece of software to help you make the most of your media creativity.
When you start up record, you encounter the following Activity UI.
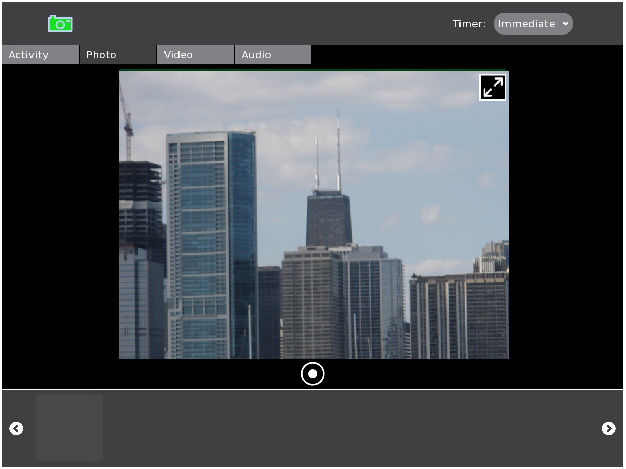
In the sections below, we look at how you can use this UI to create, save and share a variety of media. The process of recording photos, videos and audio is remarkably similar. We go through the individual properties of each type of media recording, but make sure to read the photo section first because it has many controls that are shared in audio and video (and so are not repeated for brevity).
Taking and Manipulating Photos
You can use the Record Activity to help you take photographs of the world around you. The marked up screenshot below highlights some of the key controls available in the main photo tab.
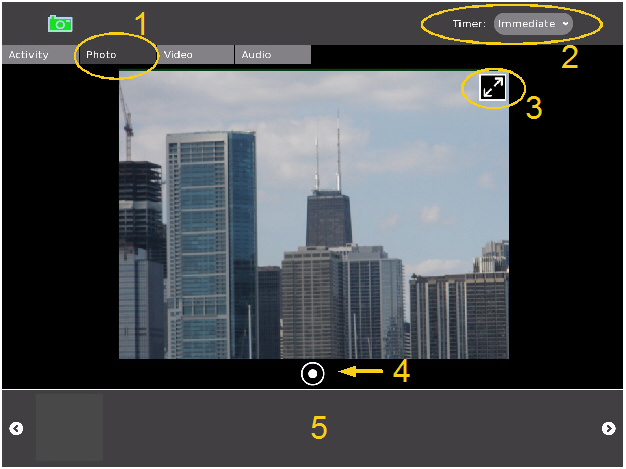
Let's look at some specific details about the items highlighted above:
- This item shows the photo tab has been highlighted. This means that the Record Activity is in photo capture mode and all of the controls you see in the toolbox and main window reflect this.
- Record allows users to set a timer before recording happens. In this case, the timer is a pulldown menu that allows you to chose among three options: "Immediate", "5 Seconds", and "10 Seconds". Delaying the timer might be useful if you want to give yourself some time to get to the right pose before the Record Activity takes a snapshot.
- You often see a double arrow at the top right corner of your picture window. This arrow puts record into full screen mode, where everything is hidden but the picture window and the record button (item 4 below). In full screen mode, you can navigate the pointer to the top right corner and a similar icon pops up to allow you to return to normal mode.
- This is the button that tells the Record Activity to start recording. In photo mode, Record takes a snapshot of whatever is in front of the camera.
- The area between the left and right arrows is called the tray. It is where previously recorded items are placed so that you can look at them later on.
Once Record successfully takes a photo, it shows up as an icon on the tray. You can click the icon to view the photo and to update metadata about the specific picture taken.
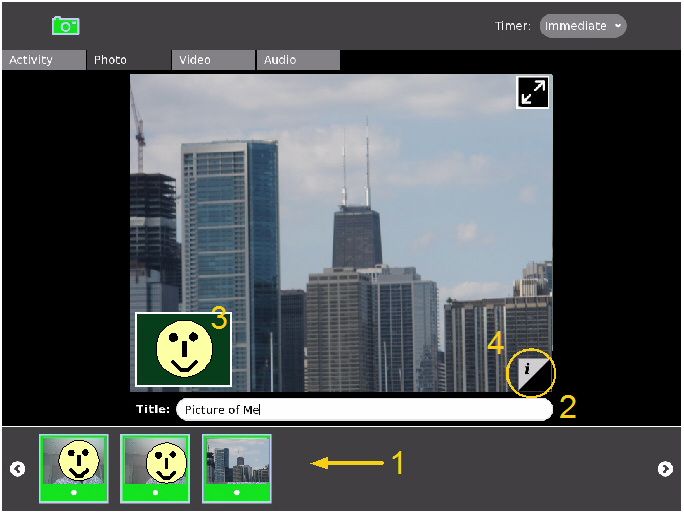
In the photo view screenshot above, item 1 shows how the tray displays a history of your previously taken photos. When you click on a photo, you are taken to the interface you see in the screenshot, which includes a text field where you can name your photo (item 2). You also see the image taken by your camera (in this case, the skyline of Chicago). Item 3 is a small output window of what your camera sees (in this case, a very happy student!). If you click on this small window, you are returned to the main photo screen from which you can take more pictures.
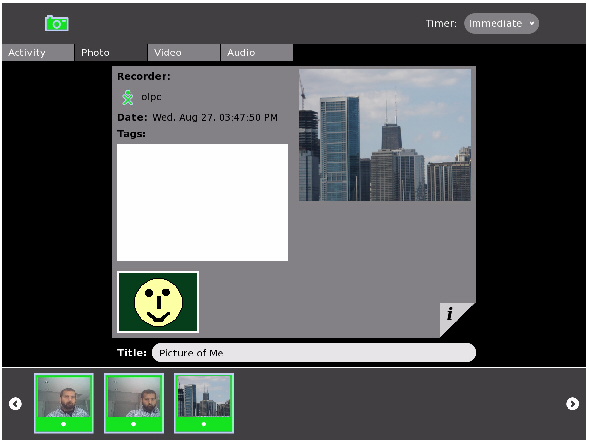
Item 4 on the bottom right of your image is a little tab that allows you to find out even more about the photo that was taken. The screenshot below shows the new window that appears. Here, you can read and enter new tags for your image, and find out about when the picture was taken and by whom. As with the photo view window, you have the output of your camera on the bottom left. You can click this to go back to taking photos.
Recording and Manipulating Videos
When you click the "Video" tab, the Record Activity then goes into video recording mode. Many of the details of the UI are very similar to recording photos: recorded videos show up in the tray at the bottom, you can name and tag your videos just as you name and tag photos, and you have many of the same UI controls for going in to fullscreen mode and navigating between video recording and viewing modes.
The screen capture below helps us to highlight a couple of items that are different or noteworthy in video mode.
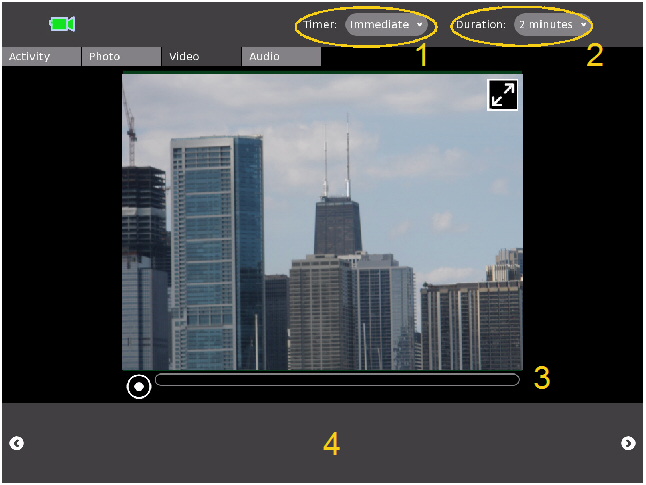
Notice that the toolbox now contains two specific control menus. Item 1 is a delay timer just like the one used on photo mode: it lets you delay the start of recording several seconds so you can get ready in front of the camera. The duration menu (item 2) allows you to specify a maximum length for your video. In the current implementation, you can record videos of 2, 4 or 6 minutes.
Once you are ready to record, click the button in item 3. When you finish recording, you should see your video show up in item 4. You can then click on the video to view it, name it, and update/view the tags assigned to the video.
Recording and Manipulating Audio
Finally, the Record Activity also allows you to record Audio. To do so, you simply go to the Audio tab in the Activity. An image appears in the picture window, but that is only be saved as a snapshot to help identify your audio recording. As with the photo and video modes, you see an icon for your recording show up once you are done. You can click on this icon to edit the name and tags assigned to your new audio recording.
The UI controls for audio recording are virtually identical to that of video recording. You have "Timer" and "Duration" controls in the toolbox that allow you to specify when and for how long your voice is recorded. You also have a tray at the bottom of the Activity that allows you to browse and view details of previously recorded audio.
Audio
The Record Activity also allows you to record Audio. To do so, you simply go to the Audio Tab in the Activity.

If you have a camera, an image appears in the picture window and looks like live video.
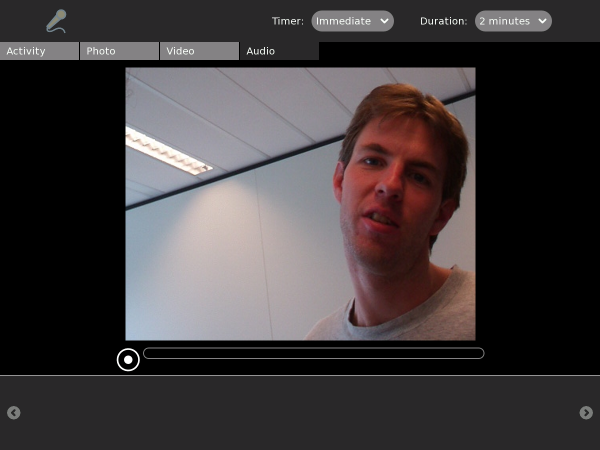
Don't worry... this is only saved as a snapshot to help identify your audio recording.
The controls for audio recording are virtually identical to that of video recording. You have "Timer" and "Duration" controls that allow you to specify when and for how long your voice is recorded. You also have a tray at the bottom of the Activity that allows you to browse and view details of previously recorded audio.
To start recording press the button at the bottom:

Your recording starts:

You can either leave the audio recording to run until it is complete or you can stop it by pressing on the same icon you pressed to start it. As with the photo and video modes, you see an icon for your recording show up once you are done. You can click this icon to edit the name and tags assigned to your new audio recording.
To replay the audio click the icon of the recording at the bottom of the page.
Taking Photos
You can use the Record Activity to take photographs of the world around you. The screenshot below highlights some of the key controls available in the main Photo Tab.

Let's look at some specific details about the items highlighted above:
- This item shows the Photo Tab has been highlighted. This means that the Record Activity is in photo capture mode and all of the controls you see now reflect this.
- Record allows users to set a timer before recording happens. In this case, the timer is a pulldown menu that allows you to chose among three options: "Immediate", "5 Seconds", and "10 Seconds". Delaying the timer might be useful if you want to give yourself some time to get to the right pose before the Record Activity takes a snapshot.
- You often see a double arrow at the top right corner of your picture window. This arrow puts record into full screen mode, where everything is hidden except the picture window and the record button (item 4 below). In full screen mode, you can navigate the pointer to the top right corner and a similar icon pops up to allow you to return to normal mode.
- This is the button that tells the Record Activity to start recording. In Photo mode, Record takes a snapshot of whatever is in front of the camera.
- The area between the left and right arrows is called the tray. It is where previously recorded items are placed so that you can look at them later on.
Once Record successfully takes a photo, it shows up as an icon on the tray. You can click the icon to view the photo and to update information about that picture.

In the Photo View screenshot above, item 1 shows how the tray displays a history of your previously taken photos. When you click on a photo, you are taken to the interface you see in the screenshot, which includes a text field where you can name your photo (item 2). You also see the image taken by your camera (in this case, the skyline of Chicago). Item 3 is a small output window of what your camera sees (in this case, a very happy student!). If you click on this small window, you are returned to the main photo screen from which you can take more pictures.
Item 4 on the bottom right of your image is a little tab that allows you to find out even more about the photo that was taken. The screenshot below shows the new window that appears. Here, you can read and enter new 'tags' for your image, and find out about when the picture was taken and by whom. A tag is a single word that helps categorise or describe the photo.
As with the photo view window, you have the output of your camera on the bottom left. You can click this to go back to taking photos.

Video
When you click the Video Tab, the Record Activity goes into video recording mode. Much of this process is very similar to recording photos: recorded videos show up in the tray at the bottom, you can name and tag your videos just as you name and tag photos, and you have many of the same controls for going in to fullscreen mode and navigating between video recording and viewing modes.
The screen capture below helps us to highlight a couple of items that are different or noteworthy in video mode.

Notice that there are two control menus. Item 1 is a delay timer just like the one used on photo mode: it lets you delay the start of recording several seconds so you can get ready in front of the camera. The duration menu (item 2) allows you to specify a maximum length for your video. In the current implementation, you can record videos of 2, 4 or 6 minutes.
Once you are ready to record, click the button in item 3. When you finish recording, you should see your video show up in area 4. You can then click on the video to view it, name it, and update/view the tags assigned to the video.
Sharing Media
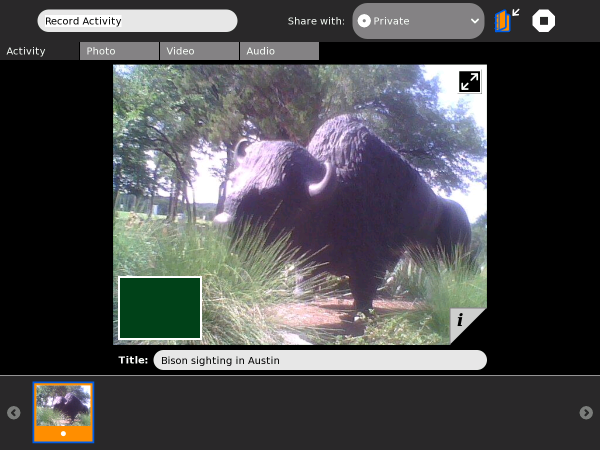
You can share photos, video and audio recordings (these can just be refered to as 'media') with your friends. To share media you must first have some media in the bottom tray. In our example we have the image of a Bison (see below) in the tray. Now select the Activity Tab on the left and the Record Activity looks something like this:
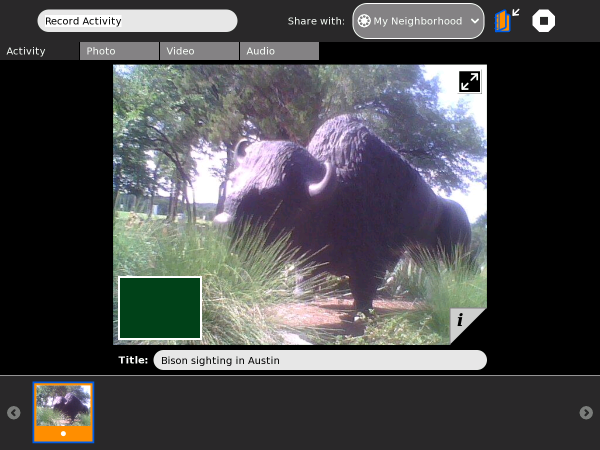
You then see on the right the text "Share with:". To the right of this is a drop-down menu. Change the selection here to "My Neighborhood" as shown:
Others looking at the Neighborhood View see your icon with an 'eye' (the Record Activity icon) next to it:
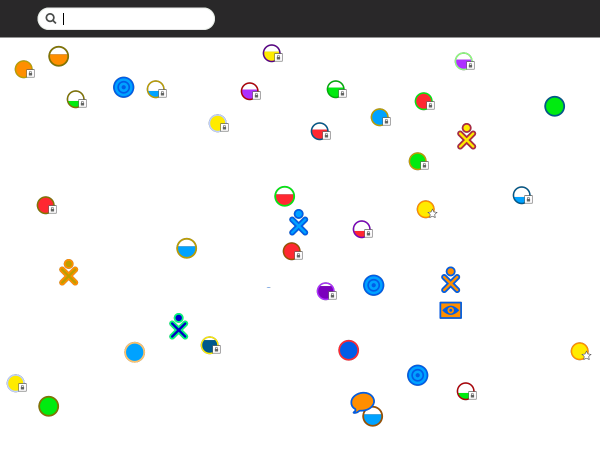
Others can now join your Activity and you can share your media with them.
Joining the Record Activity
Once you have shared your Record Activity others need to do the following to join.
From the Neighborhood View, they need to click the 'eye' icon next to your icon:
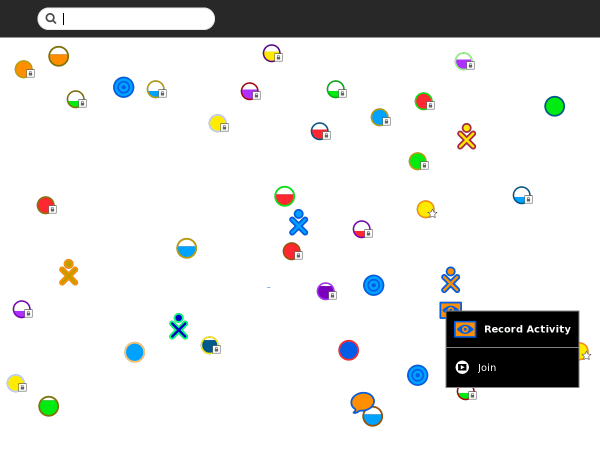
They must then choose 'Join' and their Record Activity opens with your images in their tray. In the Record Activity, thumbnails of photographs are shared. The photograph's frame is in the same colors as the XO icon of the person who took the photo.
On your Frame, you can see the icons of all of the people with whom you are collaborating. You can also see their shared media.
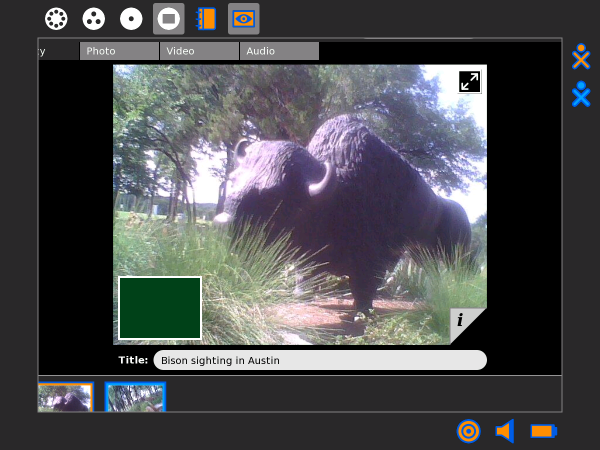
You can exit a shared Activity at any time.
Upload your Photos to Wikimedia Commons!
You can share your photos with the world by uploading them to Wikimedia Commons for anyone to use! To do this you need to have some photos you made using the Record Activity and then start the Browse Activity.
Most pages on Wikimedia Commons can be edited without registering an account. However, users must be logged in to an account in order to upload files. The good news is, once you've registered an account on Wikimedia Commons, you can use that account on all Wikimedia projects. Once you've logged in at one site, you'll be automatically logged in to all the others, too.
Registering
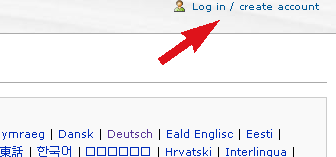
In the top right-hand corner you'll find a link that says "Log in / create account". This link takes you to http://commons.wikimedia.org/wiki/Special:UserLogin .
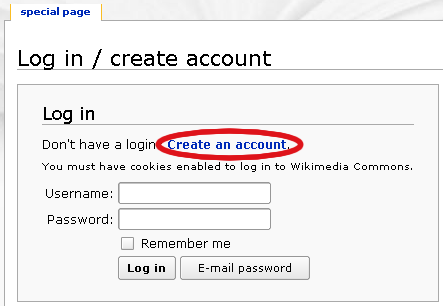
Follow the link to create an account.
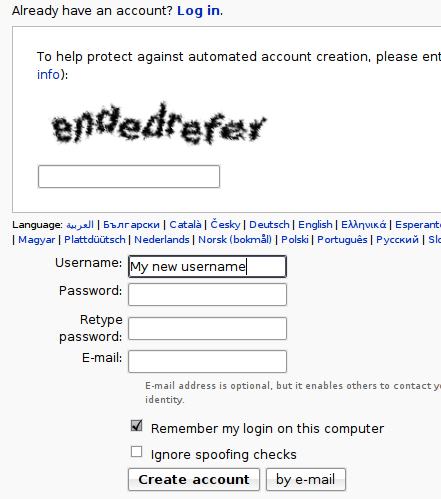
The top part of the screen shows some two fuzzy words mashed together. New users are required to enter the words in the box below. This is known as a "CAPTCHA" and it helps block spammers from automatically signing up hundreds of accounts.
Below the CAPTCHA are some fields for your username, password and e-mail address. Note that
- usernames are case sensitive - "Doug" is different than "DOUG" which is different than "DoUG" which is different than "DOuG" ...
- your username must be unique, so if you can't sign up because someone else already has an account with that name, try making it longer or appending some numbers to the end.
Putting your e-mail address is optional, but it's a good idea. Firstly, it means if you forget your password, you can request a new one to be sent to your e-mail. Secondly, it means you request notification via e-mail if someone leaves you a message on-wiki. This is very useful if you don't intend to return and check the site regularly. Thirdly, it means you can send e-mails via the wiki to other users, and you can allow other users to e-mail you, too.
Logging in

Simply follow the same link to http://commons.wikimedia.org/wiki/Special:UserLogin, enter your username and password and click "Log in".
When you are logged in, you will notice a new set of links in the top right-hand corner, starting with your username, followed by
User links
As a registered user, you have several extra options available to you. The first is your very own user page. This is located at [[User:Your username here]]. You can get to it by clicking on your username in the top right-hand corner.
This is a good place to put some profile information about yourself, such as your interests and skills. Putting your proficiency in various languages is also useful to let other users know how they can best communicate with you. For special templates for this purpose, see http://commons.wikimedia.org/wiki/Commons:Babel .
Your talk page, located at [[User talk:Your username here]], is where other users can leave messages for you. When your user talk page has been edited, a large orange bar appears at the top of all the wiki pages you visit that says, "You have new messages", until you read your talk page.
You can respond to messages on your talk page either in place on it, or on the other person's talk page. (There is probably a link in their signature to their talk page.) Be sure to sign all messages you write on talk pages by appending your messages with four tildes: ~~~~. When you save the page, these are automatically converted into a link to your user page and a timestamp.
Your watchlist is where you can see the latest changes made to pages that are on your watchlist. By default, files you upload have their Image pages added to your watchlist. This means you can follow the changes that other people make to your file's descriptions. You can also add pages to your watchlist by opening the "edit" tab and ticking the box that says "Watch this page".
Under your contributions, you'll find a list of all the edits or uploads you've done, starting with the most recent. This can be useful if you remember editing an interesting page but forgot to add it to your watchlist.
Setting your preferences
There are dozens of preferences available, but just a few of the most important are covered below.

Follow the right-hand corner link to http://commons.wikimedia.org/wiki/Special:Preferences .
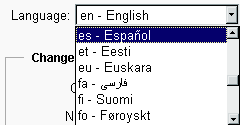
Under "User profile", there is a drop-down list for "Language". This changes the language that interface messages (e.g. menu links) are presented in. If you are more comfortable with a language other than English (which is the default) then it's definitely worth changing this to your preferred language.
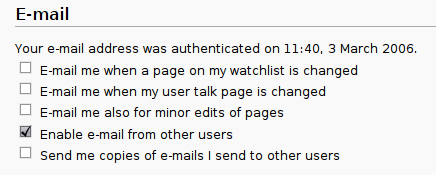
At the bottom under the "E-mail" section there are a number of preferences. If you don't intend to check the site regularly, it's a good idea to tick the option for "E-mail me when my user talk page is changed".

Don't forget to save your preferences!
Uploading your first file
 So you've made some creative work, found a Wikimedia project page that it can improve, registered an account and logged in. Time to start uploading!
There's a wiki page which you might find useful to help guide you through this process as well: http://commons.wikimedia.org/wiki/Commons:Contributing_your_own_work.
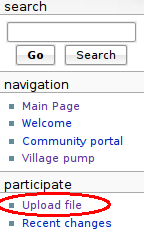
The first link in the menu on the left under "participate" is "Upload file", which leads to http://commons.wikimedia.org/wiki/Commons:Upload.
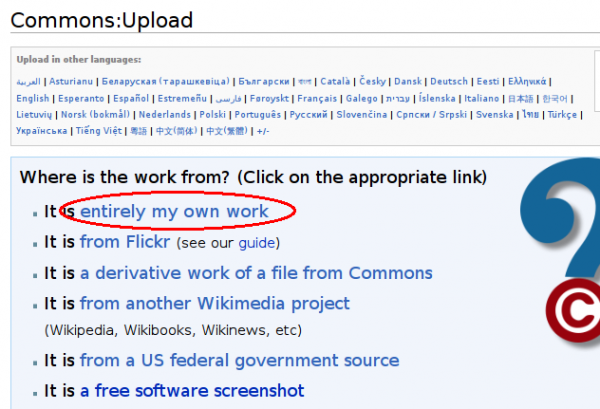
At Commons:Upload, the first link leads to the "Upload your own work" form.
Navigating the upload form
The top half of the form contains need-to-know information about what constitutes ones "own work" (for example, taking a screenshot typically does not), and information and categories and licensing. The bottom half of the form contains fields for you to fill out about your work.
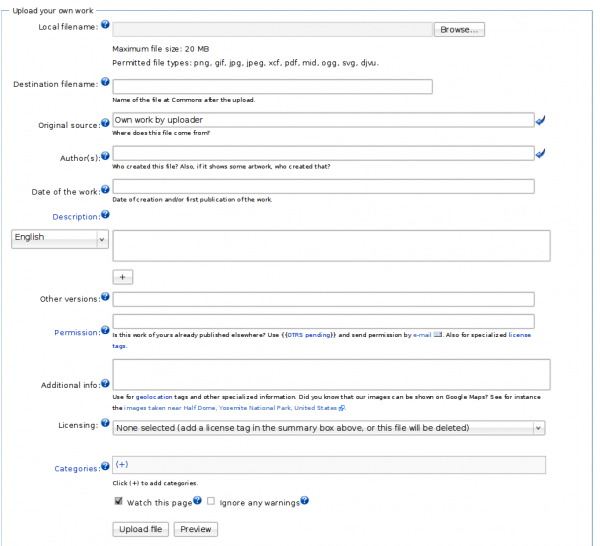
Each field has a small question mark icon next to it. Clicking this icon reveals a small help box. Clicking it again makes the help box disappear.
The first few fields are pretty easy. Clicking the "Browse" button gives you a view of your local files so you can choose the one you want to upload. Doing this automatically fills out the Destination filename field. Be sure to change the "Destination filename" to something descriptive if it's not already. It's not straightforward to change file names after they've been uploaded, which means it's important to choose a good filename the first time around. You can append your name or the date to the filename if you're concerned it won't be specific enough.
The Original source field should be already filled out, and your username should be present in the Author(s) field. If you would rather be credited as your real name rather than your username, feel free to delete the text already there and put your preferred name.
In Description you find a text box for an English description by default. You can use the drop-down menu on the left to change it to a different language if you prefer, or click the "+" button to add a field for another language (if you feel competent to write a description in multiple languages).
When writing the description, write it as if you are describing the image to someone who can't see it. That is, after all, what you're doing -- the description is of most benefit to users searching the site. Of course, if it's a complex scene that requires explanation, that also belongs in this field -- but don't neglect the basics.
Other versions is only necessary if you are uploading an edited version of an existing file. So most of the time it's fine to leave this blank. Likewise, Permission is mostly relevant when you're uploading other people's works, rather than your own. So this one can also be left blank. Additional info is also fine to leave blank.
The final two fields are Licensing and Categories. These are both important.

Although this is a pretty simple little drop-down box, it represents some significant thinking. Free content licenses can't be revoked, so it's best to do all the hard thinking about it once, fairly early on, and after that just pick your choice without giving it so much thought.
A separate FLOSS Manual chapter, "Choosing a license", is available at http://en.flossmanuals.net/WikimediaCommons/License .
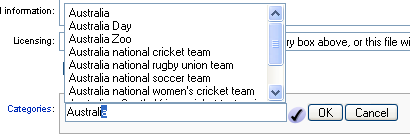
In Categories, clicking the "(+)" produces a text field. When you start to type in it, existing categories appear in a list above the text field. When you choose one from the list, click "OK" to add the file to that category. This can be repeated for multiple categories.
Categories are similar to but not exactly the same as "tags", commonly used in sites like Flickr. Categories are hierarchical, which means only the most specific category for a particular aspect of a file should be added. For example, if you add the category Paris to a file, you don't need to add France as well.
When you're new to Wikimedia Commons, don't worry too much about finding the best categories. At least one relevant category is what's most important. You will find that over time, other community members will sort your files into more specific categories. That's the beauty of a wiki!
Other places to upload images and videos
There are an ever-growing number of websites that host image or video collections. Perhaps the most popular are Facebook, Flickr, and YouTube. But you may want to explore sites that are more friendly to the non-proprietary formats used by Record, such as Dailymotion (http://dailymotion.com), which lets you upload OGG-formatted videos.
Things to Try with Record
You can easily take pictures and make videos by using a built-in camera for still photography and video recording. You can also use the camera for video conferencing, which involves talking to others on a video screen knowing that the others can also view your video.
You can express yourself with sound, images, and video using the cameras and microphones. You are learning about light, observations, angle, and perspective.
By recording the sights and sounds around you, others can learn about you, your culture, and environment. You can communicate with your voice and pictures. You can tell factual or emotional stories with film or pictures to help change perceptions or take action.
You could also try some of the following :
- Use the Record Activity to record your voice with a built-in microphone.
- Take a photo of where you live by aiming the camera lens at your home, and then clicking the circle icon.
- Record sounds of your city or town.
- Record and leave messages for your family.
- Teachers - record a message for parents.
- Interview your friends and record it to audio or video.
- Make a video diary.
- Open your photos in the Paint Activity and draw on them.
- Add your pictures to a story using Write.
- Upload a picture to Flickr or Wikimedia Commons.
- Attach a picture to an e-mail you send to a friend or family member.
- Take a picture of a flower or plant from the same place every day to show how it changes.
- Take a picture of a baby animal every week to show how it grows.

![]()


 So you've made some creative work, found a Wikimedia project page that it can improve, registered an account and logged in. Time to start uploading!


