


Recording a sound
Software name : Audacity
Software version : 1.2
Recording sound with Audacity is very straightforward you just need to have a computer that has a sound card with at least a microphone (mic) or line input.
Getting started
Before making a recording you need to make sure that what you want to record from ( the "sound source") connected to the audio input of your computer's sound card. Once you have done that you can launch Audacity.
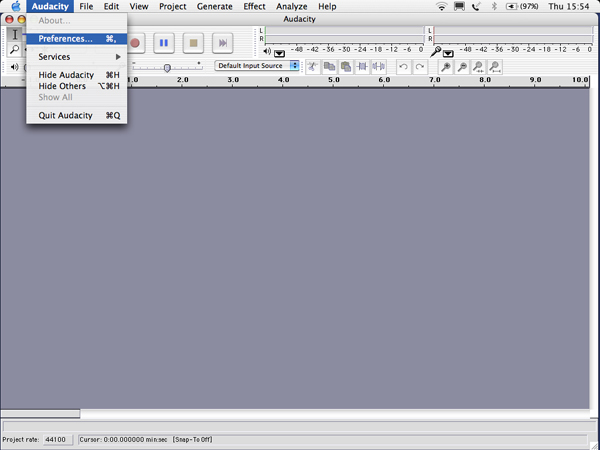
MacOSX
OS X has a unique way to configure the audio hardware, which is not shared by other operating systems (Windows, and Linux). So if you use OSX you will need to make sure that it is set up appropriately. To do this first open the "Preferences" window by clicking on "Preferences" under "Audacity" in the Menu Bar :
The Preferences window open and look something like this:

Click on "Audio I/O". The use of "I/O" means "Input or Output", so "Audio I/O" means "Audio Input or Output". The Audio I/O preferences page is where you can choose the sound source (audio input) and how you play back the sounds so you can hear them (the output settings). This can turn into a jungle of terms but essentially these things are the same:
- input
- sound source
- audio input
- input device
- recording device
and these are the same :
- output
- playback device
- output device
- sound output
The way you configure the input effects how you will record sounds. The configuration of the output effects how you will play back sounds so you can hear them.
Lets start with the output settings, these are refered to within the "Playback" section. In the "Playback" section use the "Device:" dropdown menu to select the audio output you wish to use. Unless you have another sound card installed "Built-in Audio" will be the only option available.
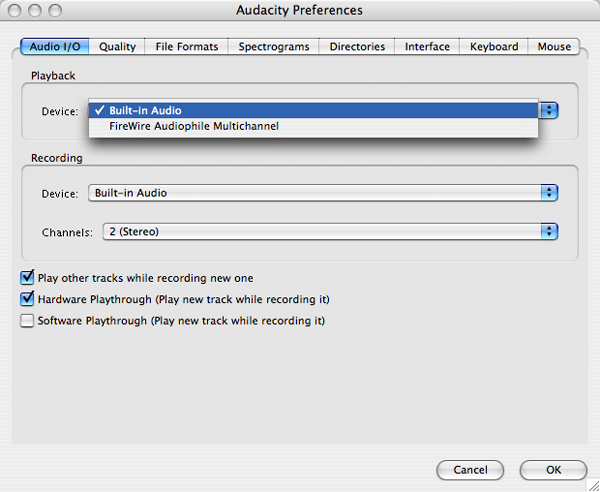
The input settings are chosen from the "Recording" section. In the "Recording" section use the "Device:" dropdown menu to select the audio input device you wish to use. Unless you have another sound card installed "Built-in Audio" will be the only option available.
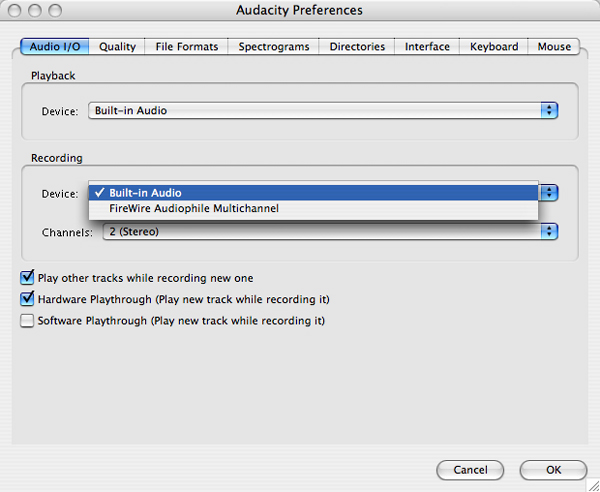
In the "Recording" section use the "Channels" dropdown menu to select the number of channels you wish to use. A "Channel" (also known as a "track") refers to the number of audio signals you wish to use to record or playback. A mono recording uses one audio signal (1 channel), and a stereo recording records two audio signals (2 channels).
Audacity defaults to "1 (mono)" so you can leave it at this if you are recording from a mono audio input. Most microphones are only capable of producing a mono signal. Select "2 (stereo)" if you are recording from a stereo audio input such as a cassette or mini disc player (or a stereo microphone). It is possible to select up to 16 channels but do not select more than 2 unless you have something other than a 'normal' sound card.
Below the "Playback" and "Recording" sections are three check boxes.
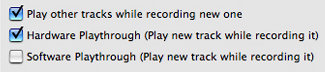
The first check box is not important for this exercise because we are only recording one channel. If you want to listen to the sound as you are recording it you will need to have either "Hardware Playthough" or "Software Playthrough" ticked. "Hardware Playthrough" lets you hear the sound directly from the input source while "Software Playthrough" lets you hear the sound as it will be when the recording is played back.
Now click on "Quality" to bring up this page of preferences:
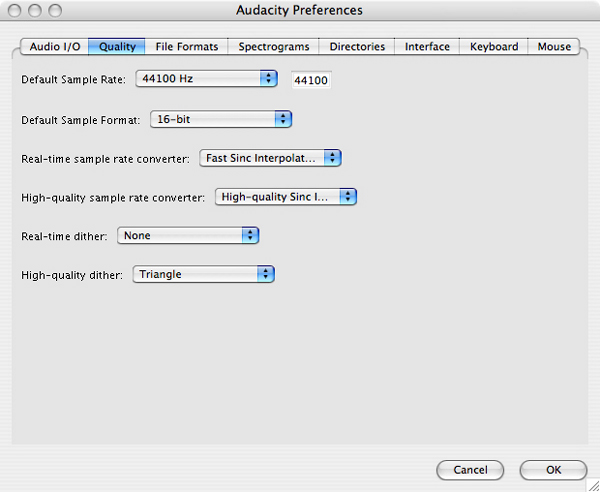
For this exercise you only need to worry about the first two settings; Default Sample Rate and Default Sample Format. Unless you really know what you are doing, use the dropdown menus to set Default Sample Rate to "44100 Hz" and Default Sample Format to "16-bit". This will give you CD quality recording.
Those are the only preferences you need to adjust before beginning to record so click "OK" to save the changes and close the Preferences Window. Audacity remembers these preferences so the next time you go to make a recording you will not have to repeat the steps above unless you wish to make changes.Windows and Linux
Windows and Linux use the same kind of controls. First you need to choose the input device. The Mixer Toolbar has three controls, used to set the volume levels of your audio device and choose the input source.
![]()
Testing Audio Levels
Now that you have everything set up and ready to go you can begin the recording process.
Before making the recording it is important to preview the loudest section of the source audio so that you do not end up with a distorted recording.
First you need to switch the input meter on. This can be set in the main interface :
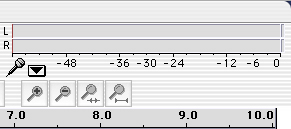
Simply click on the bars above the microphone symbol or click on the arrow next to the microphone symbol and select "Monitor input" like so :

Now play the loudest passage of the audio you are recording and, while doing so, look at the input level meter.
At the loudest point the red bars should be at about -12. You can adjust the input level by moving the slider next to the microphone symbol.
![]()
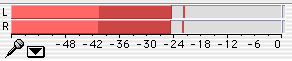
Keep playing back the loudest passage while adjust the input level until it peaks at about -12. Once you have done that click the "Stop" button :
![]()
Recording
Now you are ready to make your proper recording.
Click the "Record" button,

then play the audio you wish to record. Once the sound source has finished click the "Stop" button.
Your recording is now complete so save it immediately by selecting "Save Project" from the "File" menu.

That's it! Your recording is completed and saved. You can play it back by clicking the "Play" button.

Troubleshooting - Linux
Linux :: Host Error?
If you are a Linux user and you see a message similar to this "Error Initializing Audio: There was an error initializing the audio i/o layer. You will not be able to play or record audio. Error: Host error." then you may have to try one of the following :
Kill esd
It maybe that the esd sound server is running which is not permitting Audacity to access the sound card. You can try running this in a terminal:
ps ax | grep esd
If you see an output similar to this :
5164 ?        Ss     0:00 /usr/bin/esd -terminate -nobeeps -as 1 -spawnfd 18
10352 pts/1    R+     0:00 grep esd
Then you can see from the first line that esd is running ("/usr/bin/esd"). To kill the esd sound server you need to type this in a terminal (you need to have the permissions to run the sudo command) :
sudo killall esd
You will then be prompted for a password, enter your password notthe superuser password (also known as the "root" or "admin" password). Then try and start Audacity again, hopefully you won't get this error.
Start with aRts
You could also try running Audacity through the aRts sound server ("analog Real time synthesizer"). To do this quit Audacity if you already have it opened and restart it with this command in a terminal:
artsdsp audacity
Kill aRts
Lastly, you may wish to try starting Audacity after killing the aRts sound server. You can try this:
sudo killall artsdThen try starting Audacity again.