Publicise your Podcast
It's important to be able to publicise your podcast. Part of this process is to be able to track how many and who is subscribing to your feed.
Create a Subscribe button for your podcast
It is helpful to have a small graphic button which links to an RSS feed of different kinds of content. Here are some screen shots of different websites. The way that people subscribe to them is details in a tutorial here.This tutorial will show you how to create one of these buttons to incorporate into your webpage. It assumes you have created an audio or video feed and that you know the URL (the web address) of the feed. There is also a way of getting iTunes and the Miro video player to subscribe to your podcast just by clicking on it. This is detailed at the end of this tutorial.
Adding Generic Media RSS Button
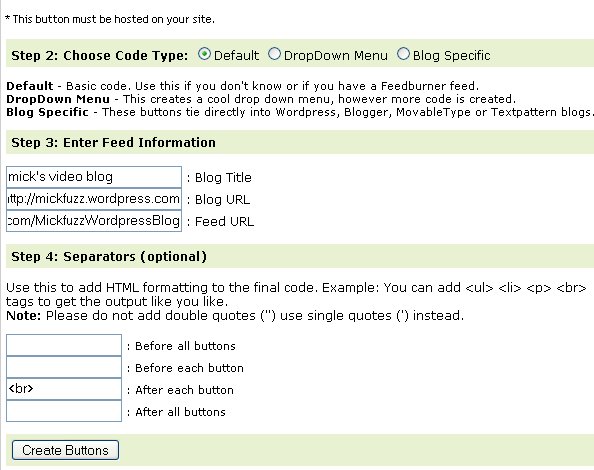
There are some online tools which allow you to enter the address of your Media RSS feed and create a button to go with it.
http://www.toprankblog.com/tools/rss-buttons/ - Here is one.
You need to fill out the form and choose which graphics you want to use. Annoyingly there isn't currently one saying 'Podcast' or 'Media RSS'.

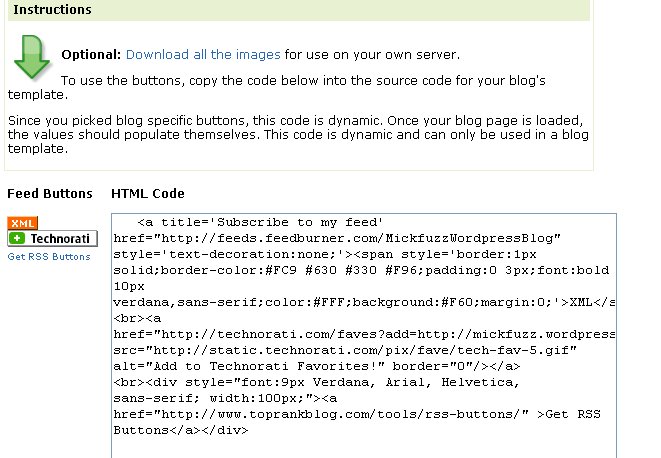
When you click on Create Buttons you are presented with some code to embed in your website or blog.

You now need to embed this code in your page, or side bar of your blog.
Adding a 1-Click button for Miro
This part of the tutorial is from makeinternettv.org
We suggest you test your feed in the various players before you commit to using a 1-click button. Make sure the feed works and that the experience is good.
When a visitor clicks a 1-click button, Miro opens up with the feed automatically subscribed to and ready to watch (when Miro isn't installed, the button leads to a download page).
Miro 1-Click Subscription
Here is an example of a 1 click button.Use the Miro 1-Click Button Maker to create a button for your site — paste in your RSS feed and then you will get code for a personalized button. Just paste the HTML into your site.
Creating Code for an iTunes Chicklet
Here is another way of creating a iTunes button. Use the graphic and code below.Code:
<a href="itpc://feeds.feedburner.com/MickfuzzWordpressBlog" target="_self" title="podcast">
<img border="0" src="../http://clearerchannel.org/images/sub_itunes.gif" alt="podcast" />
</a>
Button:
We need to change the code so that it links to your Media RSS feed. Also, note that instead of linking to http:// change that to put iptc:// , at the front of your feed.
Embedding this code in your Web page / Blog
If you know how to embed HTML code in your website or blog that's great. If not there are so many different blog types that is is difficult to explain how to do it for all of them. For help on doing this for an HTML page you can look at the chapter embedding video into an HTML page.
Using Feedburner to track your subscribers
Finding your Feed
An RSS feed is a URL, just like any other link on a website.

Scroll to the bottom of the page and look for the RSS feed links.

Right click (for mac, ctrl + click) on Entries (RSS). Now select Copy Link Location (Copy Shortcut for Internet Explorer).
Burn a Video RSS Feed
Browse to Feedburner.com. 

Use Edit > Paste to input your RSS address into the field. MAKE SURE YOU CHECK THE BOX THAT SAYS I am a podcaster!
Now click the Next button.
Create a Feedburner Account
Now Feedburner will prompt you to create an account.

Make sure your feed title and address are good, and then fill out the account information. Once you're set, press the Activate Feed button.

The link in blue is your optimised video RSS feed. In order to have viewers subscribe to your videos, they will need this magic link. Write it down.
Customize Your Feedburner Feed
Feedburner has a ton of advanced options, such as custom feed icons, descriptions and titles.


