


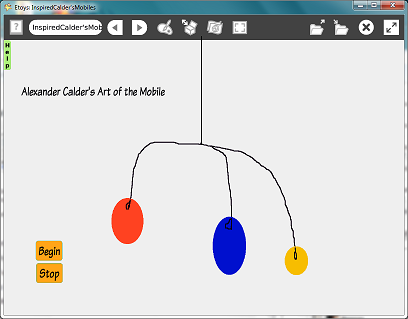
Inspired by Calder's Mobiles:
Imagine Art in motion. It can be found in dance, in music and in sculptures that are affected by machines, or wind or touch. Alexander Calder created many mobiles; some were suspended and some that were anchored to the ground. The shapes in a mobile are suspended from wire. In this project students Invent mobiles by painting shapes that appear to be suspended from wire and using script commands make the mobile move when it is touched. Calder may Inspire them to be first computer mobilest.
In this project we use:
Paint Tools, Halo Handles, Text, Width Length,Tests Category,Normal Ticking, Button Fires a Script
The project also uses the Scripting category of tiles and they will be explained in the lesson.
The Project
http://etoysillinois.org/library?sl=2137
To begin, open Etoys and click on the cloud that says Make a Project:
Be inventive; use the Paint Tools to be an artist and paint shapes with your favorite colors. Be sure to make them look like they hang from a wire.
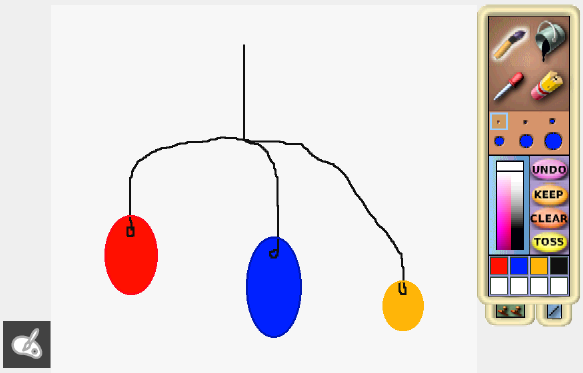
To quit the paint tool when you finish drawing click on Keep.
Now let's make this painting move like Calder's mobiles. We will use many of the Halo Handles useful tools. Click on the small aqua color dot that looks like an eye, to open a set of script tiles in a new pane.
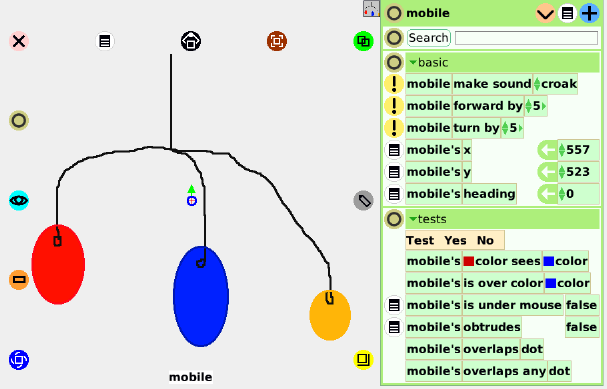
Change the name of your sketch to "mobile". Look in the new pane, the Viewer, and you will see all the tiles for the sketch you just named are now called "mobile".
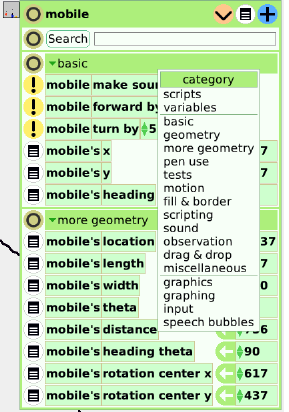
We can make the mobile's dimensions change to make it look like it moves in space. The first script will make the mobile shrink; the second one will make it grow. Click on Basic and select the More Geometry category.
Drag out the "width" tile and drop it in an empty part of the window. The new box around the tile is called a Script Editor. The tile shows us how wide the mobile is but we can make the size change by clicking on the small black arrow to open a menu of options.
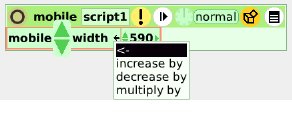
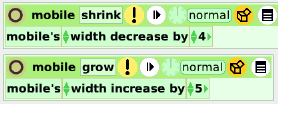
Choose decrease by, rename the script, and experiment with the number to see how different numbers work. Click the exclamation mark to run the script one time. Use the same set of steps to make a script that increases the width. Give each script a meaningful name. You will have two scripts that look like these, but you might have different numbers. The green circle with the clock is a button that starts and stops the script.
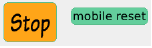
Now let's make a reset script. Drag out the "width" tile and the "length" tile and put them in one script. Remember what your mobile looked like before you started experimenting with it and adjust the width and length in the tiles to resize it. When it looks right, change the name of the script to Reset.
One last thing to do with the reset script is to select its white Menu option: button to fire a script. The little button is smaller but does the same work as the script. It will look like this small aqua one but you can change the size, the label and the letter style. Experiment with the options in the button's white menu. My finished button looks like this big orange one.
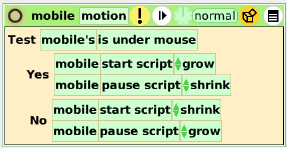
The next step is to make a script that will start and stop the shrink and grow scripts. This example uses a test statement to cause one script to work if the mobile is under the mouse and if it is not under the mouse the other script will be ticking. The test is found in the Test category in the Viewer.
There are no Quick Guides for the Scripting tiles but they are useful for this project, and many other projects. In the Scripting category find tiles with "start" and "pause". The tile ends with the words " empty script" but, if you have been naming your scripts as you created them, clicking on the words "empty script" will open a menu that lists all of your scripts . . . by name.
The finished script looks like this. Name this script too.
The last script for this project is one that controls when the motion script starts. Click on the white menu in the top of the motion script and choose: button to fire a script. Make the new button look like your Reset button and change its label using its white menu.
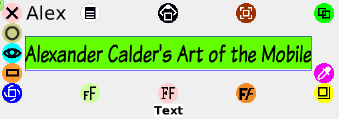
Now let's give the project a title. Open Supplies in the Navigator Bar and drag out a copy of the Text. Text is a box that you type into and fill with the information or directions for your project. Just like in word documents, the text's font, color and style can be changed. There are three special icons in the Halo for Text: pale green pale pink and brown.
Experiment with your text's options until you like the way it looks and then think about where in your project window is the best place for it. Do you want it near the buttons or above the mobile, or someplace altogether different? Your project shows the results of all the decisions that you have made.
As the author of an interactive art work you have a responsibility to the people who visit your project to make it ready for them. Throw away trash cans and other objects you do not want visitors to see. Correctly spelled words make a good impression. Click on the little tabs that open Viewer panes and collapse them so they are out of view of visitors. If everything looks right, Save the project and share it.
More Inspirations
Are you inspired to learn more about Alexander Calder? Look at images of his work in books or on the internet.
Etoys projects inspired by other famous artists are available. Here are links to two sets of projects you might enjoy.
Kandinsky Inspired: http://etoysillinois.org/library?tags=Kandinsky%20Inspired
Miró Inspired: http://etoysillinois.org/library?tags=Mir%C3%B3%20Inspired
Alexander Calder (July 22, 1898 – November 11, 1976) was an American sculptor best known as the originator of the mobile, a type of kinetic sculpture the delicately balanced or suspended components of which move in response to motor power or air currents; by contrast, Calder’s stationary sculptures are called stabiles. He also produced numerous wire figures, notably for a vast miniature circus. http://en.wikipedia.org/wiki/Alexander_Calder