


Building a new Module
This chapter walks you through the process of adding a new module. This may sound like a big project, but the Sahana Eden Framework supports Rapid Application Development (RAD), which allows simple functionality to be added easily.
Example: Training Courses
Imagine that we want to add the capability to manage training courses from within our Sahana Eden instance. Instead of installing a separate package (such as Moodle) for this, we have decided to integrate this into our Sahana Eden instance so that:
- The Human Resource Management (HRM) module can use training records of personnel
- We don't need to define data (e.g. users, locations, training courses) in multiple systems
- We can use Sahana Eden's messaging, scheduling and mapping capabilities for the training courses
NOTE: This Training Course module is only an example as Sahana Eden includes functionality for managing trainings within the HRM module.
Identify the Resources
The first step in constructing a new module is to identify the Resources involved.
Here, the primary Resource for the Training module will be a 'course'. Each course includes:
- the date, time and site where the course will be held
- the facilitator
- participants
- course materials
Define the Basic Data Model
We'll start by defining a database table with a few simple fields:
Tip: By convention, database tables in Sahana Eden are named as 'module_resource'. Here, the module is 'training' and the resource is 'course'.
Create a new file in the models/ folder called training.py and add the following code (you may leave out the comments after the # characters).
models/training.py
tablename = "training_course"
db.define_table(tablename,
                # A 'name' field
                Field("name"),
                # The start time
                Field("start"),
                # The facilitator
                Field("facilitator"),
                # This adds all the metadata to store
                # information on who created/updated
                # the record & when
                *s3_meta_fields()
                )
Tip: If your configuration in models/000_config.py has
settings.base.migrate = True
then Web2py will automatically 'migrate' your database: creating and modifying tables according to your model changes.
Add a Controller
Next we add a Controller, which provides access to this resource.
Create another new file, this time in the controllers/ folder:
controllers/training.py
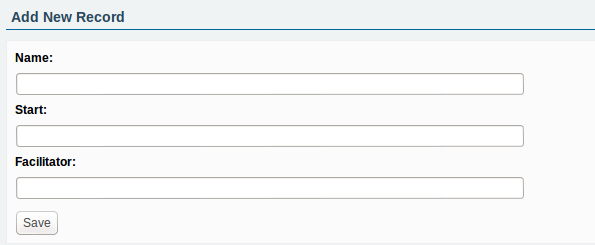
def course():
    return s3_rest_controller()
The s3_rest_controller function provides all the Sahana Eden framework support needed to access the resource, including automatic loading of the respective model definitions. You should now have a working module. You can see the CRUD (Create, Read, Update, Delete) user interface here:
http://127.0.0.1:8000/eden/training/course
Tip: You will need to register for a login to be able to create new courses. The 1st user to register gets the administrator role.
All resources can be accessed in other formats, such as XLS, XML or JSON, just by appending the representation name to the URL, e.g
- http://127.0.0.1:8000/eden/training/course.xls
- http://127.0.0.1:8000/eden/training/course.xml
- http://127.0.0.1:8000/eden/training/course.json
Reports
Pivot table reports with bar charts and pie charts can be generated for all resources, by appending the method name to the URL, e.g. http://127.0.0.1:8000/eden/training/course/report
Field Types
By default fields are created with type string, however we may wish to use other data types. All fields have both client-side widgets & server-side validation automatically added based on their data type.
models/training.py
tablename = "training_course"
db.define_table(tablename,
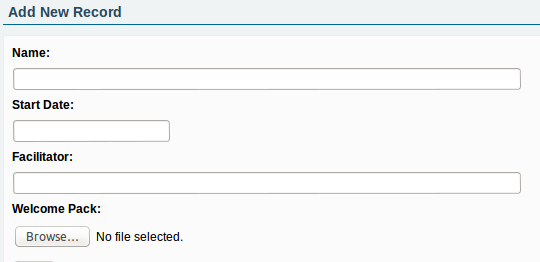
Field("name"),
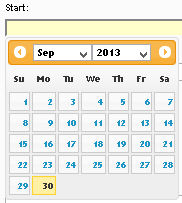
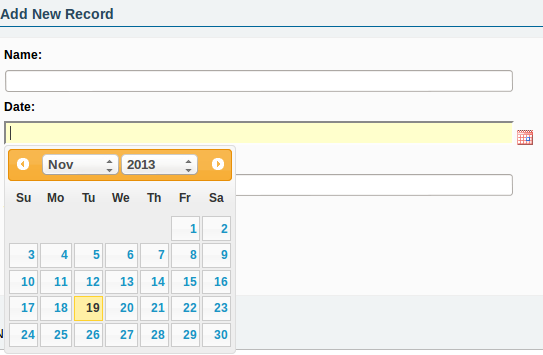
# A date type field (includes widget & validation)
s3base.s3_date(),
Field("facilitator"),
# This is a file attachment that contains
# a welcome pack that will be sent to each participant:
Field("welcome_pack", "upload"),
*s3_meta_fields()
)
Field Labels
Field labels are automatically generated from the field names, however we are able to customize these by adding a 'label' attribute.
models/training.py
tablename = "training_course"
db.define_table(tablename,
Field("name"),
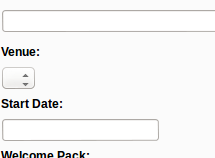
s3base.s3_date(label="Start Date"),
Field("facilitator"),
Field("welcome_pack", "upload"),
*s3_meta_fields()
)
Internationalize Field Labels
By wrapping a string in the T(...)function they will be added to language files which can be translated, allowing the system to be localized into other languages. To localize the field labels we need to provide a 'label' attribute with the string wrapped in T(...), even if the English version of the label is the same as the automatically generated one.
models/training.py
tablename = "training_course"
db.define_table(tablename,
                Field("name",
                      label=T("Name")),
                s3base.s3_date(label=T("Start Date")),
                Field("facilitator",
                      label=T("Facilitator")),
                Field("welcome_pack", "upload",
                      label=T("Welcome Pack")),
                *s3_meta_fields()
                )
Add Links to other Resources
The course resource needs connections to existing resources: people & sites./p>
These are represented in SQL databases as 'Foreign Keys' which are usually defined in Sahana Eden by using 'Reusable Fields' to make the process simple.
We can link to a person by adding a person_id to the table definition in the model:
models/training.py
tablename = "training_course"
db.define_table(tablename,
                      Field("name",
                             label=T("Name")),
                      # Link to the Person Resource
                      s3db.pr_person_id(label=T("Facilitator")),
                      s3base.s3_date(label=T("Start Date")),
                      Field("welcome_pack", "upload",
                            label=T("Welcome Pack")),
                      *s3_meta_fields()
                      )

Note how we over-ride the default label to be more appropriate to this context.
The site link is a little more complex as this is a Super Entity:
models/training.py
tablename = "training_course"
db.define_table(tablename,
                Field("name",
                      label=T("Name")),
                s3db.pr_person_id(label=T("Facilitator")),
                # Link to the Site resource
                s3db.super_link("site_id", "org_site",
                                label = T("Venue"),
                                # superlink fields are normally invisible
                                readable = True,
                                writable = True,
                                # we want users to see the site name
                                # rather than just the ID
                                represent = s3db.org_site_represent,
                                ),
                s3base.s3_date(label=T("Start Date")),
                Field("welcome_pack", "upload",
                      label=T("Welcome Pack")),
                *s3_meta_fields()
                )
Note that we make use of a 'represent' function so that users see site names in the drop-down and not just integer IDs
Tip: You will need to create a site (e.g. through /eden/org/office/create) to be able to see this
CRUD Strings
You can replace the default strings within the CRUD user interface with custom strings for your resource.
models/training.py
s3.crud_strings[tablename] = Storage(
label_create = T("Create Course"),
title_display = T("Course Details"),
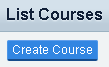
title_list = T("List Courses"),
title_update = T("Edit Course"),
title_upload = T("Import Courses"),
subtitle_list = T("Courses"),
label_list_button = T("List Courses"),
label_delete_button = T("Delete Course"),
msg_record_created = T("Course added"),
msg_record_modified = T("Course updated"),
msg_record_deleted = T("Course deleted"),
msg_list_empty = T("No Courses currently registered"))
Module Index Page
The "course" controller we created earlier, controls just a single page within our new module. More pages like it can be created by adding new controller functions. One such special controller function is the index function which handles the index page of the module. Any links we create to the module will be directed at this page.
controllers/training.py
def index():
    return dict()
This is a minimal controller function which passes control to a View template.
The default view template which is called has the same name as the function and is located in the folder named after the controller, so create this new file, and add the following code:
views/training/index.html
{{extend "layout.html"}}
<h2>Welcome to the Training Module</h2>
<ul>
 <li>
  <a href='{{=URL(f="course")}}'>
   List Training Courses
  </a>
 </li>
</ul>
Note that this is normal HTML code, apart from sections which are enclosed within {{...}}, which are normal python code, other than the special terms 'extend' & 'include' which allow HTML template fragments to be reused within each other.
Tip: The URL() function is an HTML helper which is used to generate a URL to access the course resource without hardcoding the application name.
Menus
There are two levels of menu within the system:
- The top-level 'Modules Menu' is visible in all modules.
- Underneath that, each module has its own menu for for module-specific navigation.
To change the top-level Modules menu, edit the following file and add a new entry for the Training Course module inside the 'modules' data structure:
models/000_config.py (at end of file)
settings.modules["training"] = Storage(
    name_nice=T("Training"),
    module_type=2)
Note: models/000_config.py is not in the version control system, and so is not changed when the software is updated. It is this instance's working copy, with local settings, of the configuration file. The template for this file is:
private/templates/000_config.py
Adding the module to settings.modules through 000_config.py is just a quick way of making a small modification to the template currently in use. Most implementations of Sahana Eden will define their own template, in which the modules to be used will be listed. See the customisation and configuration chapters of this book for further details. When a new module is ready to be added to the main Eden code base, the above code should be removed from 000_config.py and inserted into the sequence of similar operations in the default template (private/templates/default/config.py). By convention, the default template has all modules enabled (except experimental ones and those under development). Implementations then disable unwanted modules when they define their own templates.
To add a menu for use within the new training module, edit the following file and add a new function within the S3OptionsMenu class, which provides access to the 'course' controller. Note that the S3OptionsMenu class already exists - you just need to add a new function within it.
modules/s3menus.py
class S3OptionsMenu(object):

    def training(self):
        return M(c="training")(
                    M("Courses", f="course")(
                        M("Create", m="create"),
                        M("Import", m="import"),
                        M("Report", m="report"),
                      )
                )
You also need to add the training module to your list of active modules:
private/templates/default/config.py
settings.modules = OrderedDict([
    ...
    ("training", Storage(
        name_nice = T("Training"),
        module_type = 10,
        )),
    ...

Components
Note: This section is significantly more advanced than the previous example, so should only be tackled if you're feeling comfortable with the material so far.
We'd like to be able to record information relating to each participant in the course, such as whether they actually attended and what grade they attained.
To do this, we need to build a 'link' table between the participants and the course.
The natural way to do this within Sahana Eden is to make the link table a 'component' of the course. The course is the 'primary resource', and participants are a 'component' of the course.
Tip: See the Resource Model chapter in the appendices for an explanation of the resource and components concept.
Model
Edit the following file and add this after the existing code:
models/training.py
represent = S3Represent(lookup = tablename)
course_id = S3ReusableField("course_id", "reference %s" % tablename,
                            label = T("Course"),
                            ondelete = "RESTRICT",
                            represent = represent,
                            requires = IS_ONE_OF(db,
                                                 "training_course.id",
                                                 represent),
                            )
This defines a 'reusable field' which can be added to other table definitions to provide a foreign key reference to the course table:
Note that this uses a 'represent' function to allow a record in the course table to be represented by its name (The S3Represent class allows bulk lookups for scalability).
It also adds a 'requires' validator function. This provides both server-side validation and a client-side widget (in this case a dropdown of records in the course table).
Define a set of options for the course grade attained by each participant:
models/training.py
course_grade_opts = {
    1: T("No Show"),
    2: T("Failed"),
    3: T("Passed")
}
These options associate a number, which is what will be stored in the database, with a label meaningful to the users.
Define the participant component resource, making use of the course reusable field and grade options we just defined. (Note that we make use of another validator -- the client-side widget is again a dropdown, although here the options come from the grade options dictionary rather than a database table.)
models/training.py
tablename = "training_participant"
db.define_table(tablename,
                course_id(),
                s3db.pr_person_id(label=T("Participant")),
                Field("grade", "integer",
                      label=T("Grade"),
                      requires=IS_IN_SET(course_grade_opts),
                      ),
                *s3_meta_fields()
                )
Note, that unlike before, no "represent" parameter is required to specify the mapping from grade labels to numbers. This is because the IS_IN_SET requirement (a part of Web2py) automatically does this for you if you give it a dictionary.
s3.meta_fields() is a helper that provides a set of fields commonly needed in each table, such as what user created the record and when it was created.
Tip: Functions, classes, and values that start with 's3' or 'S3' are part of the Sahana Eden framework - have a look for more of these.
Tell the framework that a participant is a component of a course:
models/training.py
s3db.add_components("training_participant",
                    training_course = "course_id")
Controller
There is no need to create a separate REST controller to manage the component, since it will always be accessed via the existing course controller, however we must then extend the controller with 2 new elements to allow the Sahana Eden framework to display the component: 'tabs' and an 'rheader'.
Tabs are how the framework provides access to the different components in a web page for the primary resource.
The 'resource header' is a section of HTML that provides a summary of the primary resource record, in this case the course. This is displayed above the tabs so that when each component record is being viewed, its parent record is also visible at the same time.
Edit the following file, adding this content above the course controller:
controllers/training.py
def course_rheader(r, tabs=[]):
    if r.representation != "html":
        # RHeader is a UI facility & so skip for other formats
        return None
    if r.record is None:
        # List or Create form: rheader makes no sense here
        return None

    tabs = [(T("Basic Details"), None),
            (T("Participants"), "participant")]
    rheader_tabs = s3_rheader_tabs(r, tabs)

    course = r.record

    rheader = DIV(TABLE(
        TR(
            TH("%s: " % T("Name")),
            course.name,
            TH("%s: " % T("Start Date")),
            course.start,
            ),
        TR(
            TH("%s: " % T("Facilitator")),
            s3db.pr_person_represent(course.person_id),
            )
        ), rheader_tabs)

    return rheader
Modify the previous course controller with this code:
controllers/training.py
def course():
    return s3_rest_controller(rheader=course_rheader)
Tip: rheader is simply a variable passed through the REST controller unaltered & then serialized as rheader.xml() in the views.
Further Options
The following are some possible directions for this module, although they are currently beyond the scope of this tutorial. Please feel free to experiment with implementing them!
Instance-Specific Components
If a course is offered multiple times, most of the course details should be the same between instances, so courses could be refactored into a generic course (e.g. in a course catalog) with static information (e.g. name, and maybe the course materials), and course instances representing each offering of the course (date / time, site, and participants would be associated with course instances). The generic course would be a primary resource, and course instances would be its components. With this, we would have two levels of resource and component: a generic course has instances, and each instance has participants.
Authorization
If we need to define a 'role' to manage the training courses, so that only people who have that role can modify courses, or a facilitator role that is allowed to set grades. That can be done by editing the file: private/templates/default/auth_roles.csv
Messaging
We could add a button to a course's web page, to mail the course materials to the participants. See how the dispatch() custom method does this within the Incident Reporting System (IRS) by calling msg.compose().
Scheduler
We could set a reminder to mail the facilitator two weeks before the course start so they can make sure the course materials are up to date and mail them out to the participants.
The Scheduler API is defined is modules/s3/s3task.py and tasks are defined in models/tasks.py.
Mapping
We could display a map of all upcoming training courses. This is done by calling gis.show_map() from modules/s3/s3gis.py. There are further instructions on the wiki - search for the Developer Guidelines on GIS.
Conditional Model Loading
Not all of the Eden data models may be needed for the processing of a particular request. For optimum performance, the S3 framework provides a mechanism to only load those models which are needed.
Data models are implemented as Python modules in modules/s3db, which contain the database table definitions. Apart from the table definitions, modules can also define global functions and variables.
In modules/s3db/skeleton.py you can find a comprehensively documented example for how to implement such a module.
Tip: When doing this we need to ensure that the model is loaded when-required, such as in our represent function, by accessing it as s3db.training_course, or in order to detect cases where it has been disabled:
table = s3db.table("training_course")
if table is not None:
    # Code that depends on training_course
    ...
else:
    # Alternative code
    ...
# Independent code
...
Database Abstraction Layer
When getting deeper into the code, you'll noptice that we use Web2Py's Database Abstraction Layer (DAL) to do a SQL query.The variable db is an instance of the DAL class, which represents a database. Queries are written in a syntax that is much like a Python expression, but not quite. Look at the Web2Py book (http://web2py.com/book) for more on the DAL.