


Starting Jack
You need to have the JACK Audio Connection Kit up and running before launching Ardour.
Newly installed software appears in the drop down menus at the top left corner of the desktop. Click on Applications > Sound & Video > JACK Control:
Alternatively, you can run JACK Control from the command line by entering
qjackctl&
in a terminal.
Tip: it is a good idea to explore JACK a bit further and get familiar with its features. Click on Setup to see several of the configuration options. Click on Connect to see where you can make connections between different audio applications. Both are also explained in more detail below.
Starting the Server
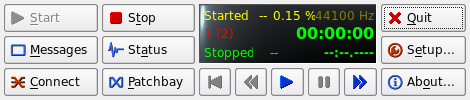
The JACK Control window is simply a separate user interface that makes it possible to control both the engine (JACK Server) and the routing (JACK Router). You can start the JACK Server by clicking on Start, and you can manage connections between applications by clicking on Connect. Once JACK is running, JACK Control should look like this:
You can also check the current state of the server by clicking on Status:
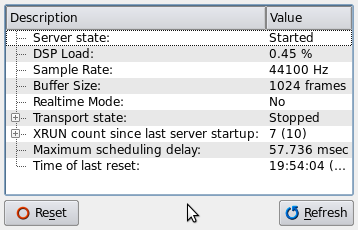
The JACK Server should now be running without any error messages. At this point, you can run Ardour.
Later on, when you want to quit JACK, the correct procedure is first to click on the Stop button on JACK Control and then to close the JACK window itself (ctrl + Q or Quit). It is important to note that if you quit JACK without having clicked on the Stop button beforehand, you will be closing the user interface called JACK Control (or QjackCtl), but NOT the JACK Server itself (the "engine"), which in this case will still be running in the background.
Setup
The Setup window allows you to configure important settings, such as Driver, Interface, Sample Rate, Buffer Size, and Input and Output Channels. See below for more information on each of these settings.
Understanding the Setup Window
The following section presents a brief explanation on some of the options in the Setup window:
Driver – the physical audio driver. On Linux, the default option is ALSA.
Realtime - although this option is selected as the default, it requires a Real-time capable system to use. Unless you have configured your operating system for Real-time, uncheck this option or the JACK server may not start properly! A Real-time system can substantially improve the quality of your recording and playback, however. Some resources for learning how to set up a Real-time system can be found in the Advanced Linux Configuration chapter.
Interface – select the physical audio device that you would like the Jack server to communicate with (for example, a FireWire or USB interface or the built-in audio of your computer). Currently, JACK can only communicate with one hardware audio device at a time.
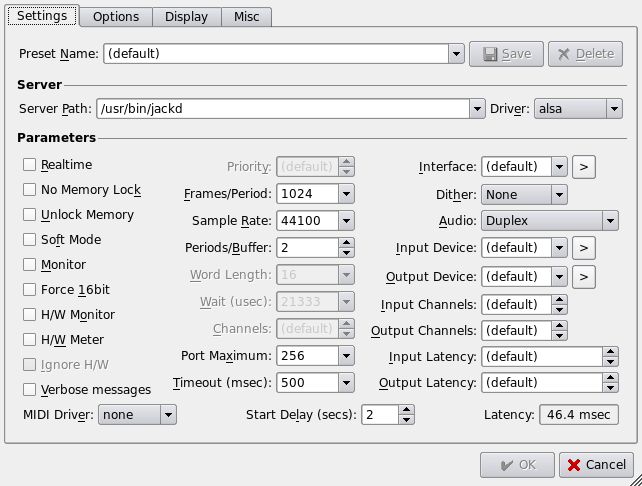
Sample Rate – choose your desired sample rate for the Jack server. This determines the sample rate that Ardour will use for recording and playback. Only sample rates supported by the selected Interface will be displayed. If in doubt, leave the default.
Buffer Size – choose your desired audio buffer size (in samples). Only buffer sizes supported by the selected Interface will be displayed. If in doubt, leave the default.
Interface Output/Input Channels – choose your desired number of Output and Input audio channels for JACK to communicate with your physical audio interface. The maximum number of channels is limited by the number of output and input channels supported by your physical audio device.
Verbose Messages - verbose logging for debug purposes: check to allow JACK to write more complete log messages to the Console, which is useful for debugging in problem cases. If JACK is working normally then leave this unchecked.
Once you have chosen your settings, click on OK to exit the Setup window. Note that however the new settings will be saved, you will have to restart the JACK Server for the changes to take effect.
Routing with JACK Connect
This section will help familiarize you with JACK's routing interface.
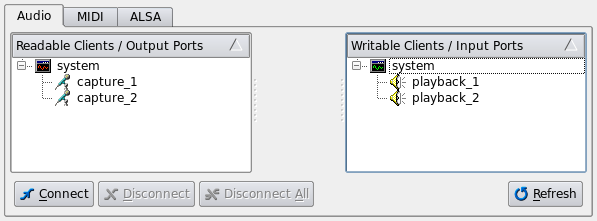
With the JACK server on, click on the Connect button in the main window to bring up the Connections window. The following is an example of what you might see if you had not yet JACK-enabled any applications. All you see is the physical audio device (generically called “system”) and its send (“capture”) and receive (“playback”) ports.
As you open other JACK-enabled audio applications, their inputs and outputs will show up in the Connections Manager. For example, when you have Ardour open, you will see something like this:
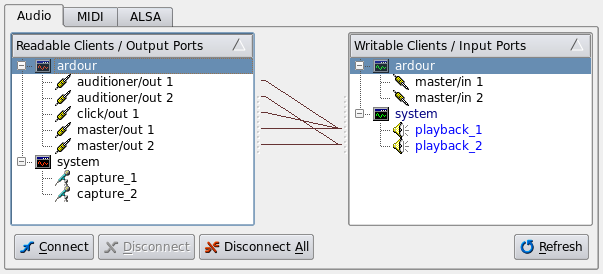
Any sound source listed on the left may be connected to any of the receive ports listed on the right. Multiple Send Ports can be routed to one Receive Port and, conversely, one Send Port can be routed to multiple Receive Ports.
Here's an example of some routings that are internal to Ardour:
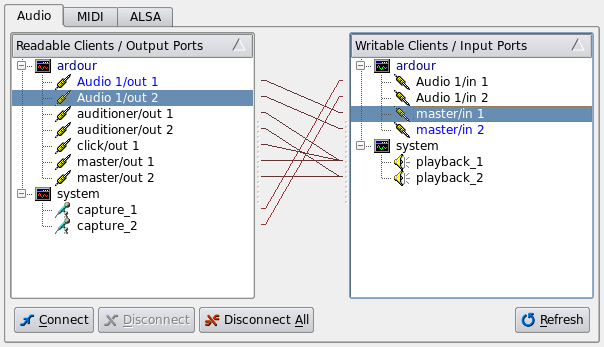
The ardour:Audio 1 track outputs are routed to the ardour:master inputs. This is the default routing for all new Audio tracks created in Ardour, and it allows the master bus to 'collect' the audio signals from all tracks together.
Ardour connections may be managed in this window or entirely within Ardour. The result is the same. If you will be working only with Ardour, you ⁞probably won't need to come back to 'JACK Control - Connections' at all. However, as you start doing more complex connections between different audio applications, you may need to use JACK Control - Connections. For more information, please refer to the Ubuntu QjackCtl Documentation pages.