Moving Automation
Moving a Region to a new location will not automatically move the Automation data that might be aligned with it, as we can see in the following screen shots.


Dragging Automation
Using the "Control" or "Apple" key while dragging moves the current Automation point in any direction, and also all subsequent points horizontally only. This may provide a way to move groups of Automation points to the new Region location in certain situations.

Consolidating the Region with Processing
However, dragging the Automation points independent of the Region may not be accurate enough in many circumstances. To preserve a Region with the Automated processing of the Fader, Panning and Plugins preserved, it is necessary to Consolidate the Region with the processing.
First, set the Automation to "Play".

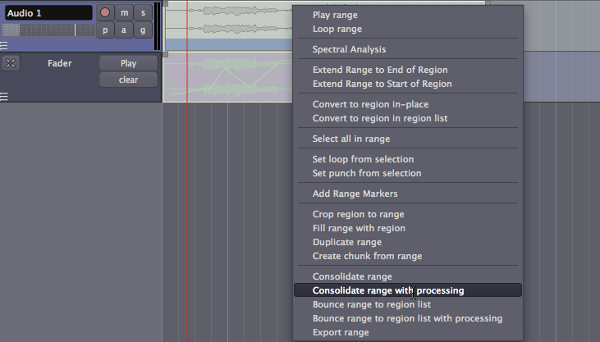
Next, with the appropriate Track selected, create a Range with the Range tool and Right-Click to get the Range options menu. Then, select "Consolidate range with processing".

This creates a new Region with the Automated processing applied to it. The new Region containing this Automated processing will appear on the same Track and place in the Timeline, replacing the previous, unprocessed Region. The original Region is still preserved in the Regions List in case it is needed elsewhere.

Be sure to use the "clear" button in the Automation section to remove the previous automation. Then the newly consolidated Region can be moved to the desired location.

Bouncing the Region with Processing
Another option is to use the "Bounce range to the regions list with processing" option, also available from the Range options Right-Click menu.

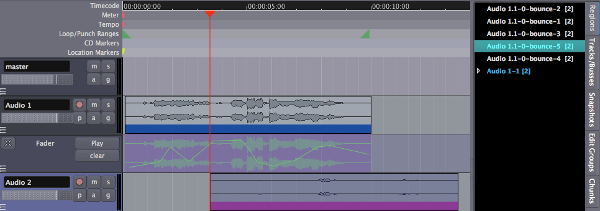
This creates a new Region, with all of the processing included, in the Regions list. You can then create a new Track, here shown as "Audio 2", and drag the new Region ("Audio 1.1-0-bounce-5") to that Track. As can be seen here, the original Region is left unchanged in the "Audio 1" Track.

Drawing Gain Automation
Another type of Automation was introduced in the Changing Edit Modes chapter. This tool, the Draw Gain Automation tool, is found in the Edit Modes menu, and can also be used by typing the keyboard shortcut "G".
![]()
Use this tool if you want to draw Region-specific volume Automation. When this Cursor Mode is selected, your cursor pointer will look like this:
![]()
With this tool, Region Gain Automation can be drawn directly in the Region itself, unlike Fader Automation which is drawn or recorded in the Automation track. Region Gain Automation is separate from, and in addition to, Fader Automation.
As with the Automation Tracks, a Gain Automation Point can be dragged in any direction with the mouse. To remove a Gain Automation Point, hold down the "Shift" key while Right-Clicking on it.

The Automation created in this way will stick to the Region on which it was created, even when the Region is moved around.

This type of gain Automation is drawn directly on the Region itself, which makes it different from the Automation used in the drop-down Automation region (see chapter on Using Automation).
Deactivating and Removing Gain Automation
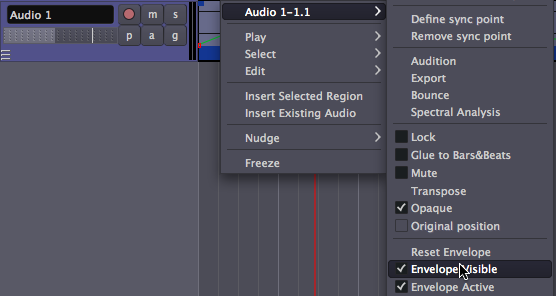
Gain Automation can be reset or deactivated from the Region context menu, which is reached by Right-Clicking on the Region. Here, the Gain Automation is referred to as the Envelope. In this menu, you have the options of "Reset Envelope", which removes the Gain Automation Points you have drawn in the Region, "Envelope Visible", which toggles visibility of the Gain Automation on and off (leaving it active however) and "Envelope Active", which toggles whether the Gain Automation is active or not (but leaves it visible). An inactive but visible Envelope is blue rather than green.

Continuing
By now you should have a complete Session ready, with Regions, Tracks, Mixing, Plugins and Automation all in place. The only thing left to do now is to Export your Stereo Mix to an audio file which you can listen to, burn as a CDR or convert to an MP3/OGG to share on a website. Please continue on to the next section, Exporting Sessions, to learn the different ways of doing this.


