


Panning
Once you have established a good balance of levels on all the Tracks, you can begin to think about Panning. Panning helps to establish a Stereo Field, a relative space between the speakers in which to place your Track instruments.
The Panning Interface
The Panning Slider in Ardour is located toward the bottom of the mixer strip and can be adjusted by moving the green vertical line left or right. A Mono Track will have a single Panning Slider, while a Stereo Track will have two Panning Sliders, one for the left signal and one for the right signal.
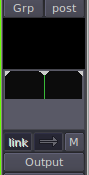

In a Stereo Track, the Link Button can be used to link the actions of the Panning Sliders. Click the Link Button to engage this link. The Link Button becomes red when active.
![]()
The next control is the Panning Link Direction Button. When both arrows on this button point in the same direction, as shown above, the Panning Sliders will move together from left to right and back.
When the Panning Link Direction Button's arrows are pointing in opposite directions, as seen below, the left and the right channels will "swap" by moving in opposite directions.
![]()
Panning Techniques and Philosophy
As a general rule of thumb, guitars tend to be Panned to the left and right. Vocals and bass tend to placed in the center. You want to create a balance so that one side is not louder then the other. Headphones may be helpful in determining how instruments should be Panned and whether one side is too loud and makes the mix feel lopsided.
Two other tools that are useful in creating a "spatial" or Stereo Field are Reverb and Delay. These effects can be used together with sends to create a drum send which would be further back in the mix with more Reverb, and a vocal send which might have a little more Delay but sound closer than the drums. Please see the chapter on Using Plugins and Using Sends for more information.
Note: Always keep an eye on your Levels while Panning Tracks! Panning a Track to one channel increases the Level of that channel. This may change the balance of Levels you set up in the previous chapter, and in extreme cases can result in Clipping. When this happens, reduce the overall Levels of that Track and check again how it sits in the Mix.
Continuing
By now, you should have a collection of Tracks which are both Mixed well and have an exciting Stereo Image. In the following chapters, we will learn about Using Plugins to enhance the sound of your Mix.