


Layering and Collage
In the middle of the 1800s, Hippolyte Bayard was one of the earliest photographers to create a combination print, where two separate images are juxtaposed in a single photographic print.

Self Portrait as a Drowned Man, 1840, Hippolyte Bayard, Combination Print.
Building on this tradition of combination prints, Cubists like Pablo Picasso and Georges Braque began adding found photographs, print materials, and other visual elements into their compositions. They called this technique collage, from the French word coller, "to paste."
In the 1920s, Dada and Constructivist artists explored this collage technique in their work. They cut and pasted found photographs, their own imagery, and various printed elements together to form "anti-aesthetic" collages that challenged the viewer to decipher multiple messages within the final composition. El Lissitzky's The Constructor is an example of this type of work. Lissitzky's self portrait combines his own head with fragments of machinery, along with a hand that has been interpreted as the Hand of God passing over his face.
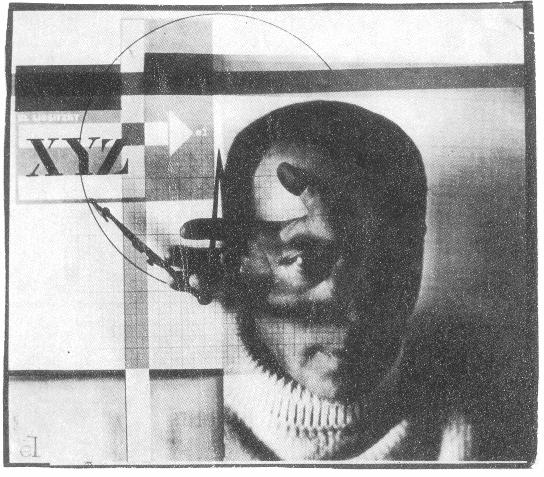
The Constructor, 1925, El Lissitzky, Self Portrait Photomontage.
The Lissitzky and Bayard prints employ different methods of artistic production. The combination print was made during the photographic printing process, while the photomontage combines various printed materials with adhesive. If Gimp had been invented in the early 1900s, Dada and Constructivist artists would have been using it as their adhesive material.
Before You Start:
You will need to download the following files from http://www.digital-foundations.net/downloads/floss:
hand01.jpg, hand02.jpg, arm.xcf, back.xcf, ear.xcf, head.xcf, shoes.xcf, and torso.xcf
Exercise 1: Using layers to create a double-exposure
In the camera, a double exposure requires releasing the shutter to create one photograph, then releasing the shutter again to create another photograph on top of the first one. An example of this process can be seen in Henry Van der Weyde's image of the actor Richard Mansfield as Dr. Jekyll and Mr. Hyde.

In Gimp, the double-exposure can be made by putting two images on separate layers, then adjusting the blending mode of the top layer. We've provided two images, but you might explore taking two pictures with a digital camera or scanning two images that address the subjects of time, dreams, paranoia, schizophrenia, otherworldliness, duality, etc. The double-exposure is often used to express duality or the passing of time (also see Duane Michaels' photographs).
1. Create a New Document using File > New. Set the width and height to 12 by 10 inches. Save it as double-exposure.

| 72 DPI is also known as "screen resolution." Working at 72 DPI is appropriate for any content that will appear on a screen and that will not be printed. |
2. Open hand01.jpg from http://www.digital-foundations.net/downloads/floss.
There are many ways to copy the hand into the new document we are using to assemble the double-exposure. One method is to drag the hand layer (in this case, the background layer is the hand layer) into a different document. Be careful! Don't click on the image of the hand in the main window. Look to the right at the Layers dialog. There is a tiny preview image of the hand and the word Background. This is the actual layer that the image of the hand is stored on. So click on the small preview image in the Layers dialog and drag it across to the blank window of the new document. When you depress the mouse button, the hand appears in the new window.

| Tip: The hand could have been copied and pasted using Select > Select All, followed by Edit > Copy, and then by clicking on the new document before choosing Edit > Paste. |
Notice that when the hand is dragged into the double-exposure document it appears very large. The hand file contains more pixels than the double-exposure file. We did this on purpose for two reasons: (1) to demonstrate that the number of pixels in a document has a noticeable affect on the way that the file is previewed in Gimp, and (2) to distinguish the hand, originally a digital photo (the camera we used stored a significant amount of information), from the working file that we generated from File > New. You can always create a new file with a higher resolution value, but for exercises that will not be printed it is faster to work in a file with resolution no greater than the screen. The larger the resolution, the larger the file size; and larger file sizes require greater computer processing power that tend to slow down the work process.
3. In the Layer dialog, double-click on the name Background Copy and rename it hand01. Notice the Background layer beneath the hand01 layer. The background layer is a white layer containing no images, placed underneath the image of the hand. The background layer is the first layer Gimp generates when a new document is created. By moving the hand into the new document, we created a new layer. Click once on Background layer in the Layers dialog and then click on the trash can icon in the bottom right corner of the Layers dialog. Now the background layer is gone and the hand01 layer is active (indicated by a yellow highlight). To scale the hand so that it fits into the document, click on the Scale tool icon in the Toolbox. With the Scale tool selected, you can click and drag on any corner of the hand layer to resize it. Before you start to scale the hand, take a look at the tool options that appear in the bottom half of the Toolbox. Click the box next to the last option Keep Aspect. No matter what size you make the hand, it will maintain its original proportions. Scale the hand until it fits in the frame and press the Return key.

4. Open hand02.jpg from http://www.digital-foundations.net/downloads/floss/ and move the image into the double-exposure document. Name the new layer hand02. Notice that this hand has already been scaled for you. While the second hand is still active in the Layer dialog, select the Flip tool from the Toolbox. In the Tool Options section of the Toolbox, you can choose how to flip the object. Check Horizontal, and click on the image. The hand flips. Notice that this does not modify the entire document. To see that the transformation only occurred on one layer, click on the eyeball icon next to the hand02 layer in the Layers dialog. The eyeball icon toggles the visibility of a layer, allowing you to see the layers beneath it. Toggle the eyeball off and on for each layer.

5. Select the hand02 layer. Use the Layer Blending Modes pull-down menu in the top left area of the Layer dialog to choose Multiply. Leave the hand01 layer in Normal mode. Now the two images appear as a single composite image. Use the Move tool to move each of the two layers and make the fingers and hands overlap in a way you find pleasing. You can only move the layer you have selected, so you will need to select whichever layer you want to move in the Layers dialog before clicking and dragging with the mouse. Blending modes such as Normal and Multiply define how layers interact. We will continue to explore these in the third exercise.

Exercise 2: Cropping and adjusting the hue

This illustration demonstrates the results of Exercises One and Two.
1. Click on the Crop tool in the Toolbox and notice the Tool Options for this tool. Check the box next to Fixed: Aspect Ratio. Enter "6 in" into the crop Width box and "9 in" into the Height box. Now, drag a crop box around the area of the document where the two layers overlap. As you drag, your crop selection area should constrain to the shape of a rectangle in the 6:9 proportion. Finalize the crop by pressing the Return or Enter key or by clicking the check-mark icon in the top right area of the Tool Options.

2. Select Colors > Hue-Saturation.

3. In the Hue-Saturation dialog box, use the Hue slider to create a cyan wash over the image. With each change you make, you will be able to see the effect in the image window. None of the changes will take effect until you press the OK button. The Hue-Saturation controls only effect a single layer. Press OK then select the next layer in the Layers dialog and repeat this process.

Exercises 3 and 4: Exquisite Corpse (in two parts)
"Exquisite corpse" is a parlor game that the Surrealists developed in 1925. In this game, each player submits images (drawings, paintings, photographs) of heads, torsos, and legs, and they are combined to produce surprising new bodies. We have played this game with students using images of each other that we captured in class on a digital camera, as well as by using images from pop culture, found on the web. Collaging celebrity and politician body parts can provoke thoughtful discussion. Images of body parts are available on our downloads page, but it's more fun to try this with pictures of your friends or family!
Exercise 3: Creating and manipulating layers
1. We'll work on top of the double-exposure file that we just created, so save the file as exquisite-corpse.xcf. Your file should look like the illustration.

2. Keep exquisite-corpse.xcf open and use File > Open in Gimp to open all of the documents used in this exercise (download the following files from http://www.digital-foundations.net/downloads/floss: arm.xcf, back.xcf, ear.xcf, head.xcf, shoes.xcf, and torso.xcf).

3. Move all of the body parts into the exquisite-corpse document, just as we moved the hands into the double-exposure document in Exercise 1. Once all of the parts are on separate layers in the exquisite-corpse document, rename all of the layers to indicate which body part is on the layer. Use the eyeball icon in the Layer dialog to hide and show the layer. This is a quick method of assessing which image is on the layer.

4. Click on a layer and drag it above or below another layer. The order of the layers in the Layer dialog is referred to as the stacking order. This determines which image appears in the foreground or closer to the viewer's eyes and which images fall to the background. Organize the layers so that they appear like the stacking order in the illustration above. Notice that our Layer dialog has a left and right arm! We named our first arm right arm then used the Layer Menu > Duplicate Layer... to name the duplicate layer left arm. Use the Flip tool as we did in the previous exercise.

5. Click on each layer to activate it, then use the Move tool to reposition the layer and the Scale tool in order to scale it. Some of the layers will need to be scaled if you want your image to look just like ours. Remember to keep the aspect ratio locked on all of the layers while you are scaling. It is safe to scale an image down in Gimp; however, it is never a good idea to scale an image up (or to make an image larger than it is) as this will add "bad pixel" information to the image.

Exercise 4: Adding an adjustment to some layers

This illustration demonstrates the results of exercises 3 and 4.
In this exercise we want to add all the layers of the corpse to the composition made earlier.
1. First, make the two hand layers from the first two exercises invisible by clicking their eyeball icons. Now, go to the Layers Menu in the Layers dialog and choose Merge Visible Layers.

2. Click on the merged layer to activate it. Assign it the Multiply blending mode from the Mode pull-down menu in the Layers dialog. Use the Hue-Saturation option from Colors to give it a different wash than the hand layers. Now make all the layers visible by clicking on the eyeball icons. The final image should look like the following illustration.
