Basic tutorial
In this tutorial, you will create a simple multiple-page Mallard document for the fictitious Beanstalk application.
Create the first page
Begin making a Mallard document by writing the index.page page in any text editor.
index.page
<page xmlns="http://projectmallard.org/1.0/"
      type="guide"
      id="index">

  <title>Beanstalk Help</title>

</page>
This simple example is a valid Mallard guide page. Taken alone, it is also a valid Mallard document.
The entire contents of the page are between the opening <page> and closing </page> tags. As with all XML formats, every element must either have opening and closing tags or use the special empty tag syntax. We'll see the empty tag below with link elements.
There are three attributes on the page element. The xmlns attribute specifies that the XML tags in this file are from the Mallard 1.0 namespace available at http://projectmallard.org/1.0/index. This must be set on all Mallard pages. The ID attribute provides a unique identifier that other pages can use to link to this page. You should match the ID attribute to the name of the file without the .page extension: so, for instance, the ID of the file index.page is "index". The type attribute specifies that this is a guide page.
View your document
You now have a simple document, but you can only view the raw markup in a text editor. Mallard is just the markup language and a specification of how documents should be processed. To view formatted output, you need to process your document with a Mallard processing tool.
For the purpose of this tutorial, we'll assume you have the GNOME help viewer Yelp installed. You can view this document by calling yelp from the command line and passing it the full path to the directory containing the page files. For example, if you have placed index.page in /home/drake/mydocument/, enter this at the command line:
$ yelp /home/drake/mydocument/
Add a topic page
Unless you are creating a simple set of instructions for a friend or colleague, you probably want to have multiple pages in your document. Add another page to the document by creating a new page file:
planting.page
<page xmlns="http://projectmallard.org/1.0/"
      type="topic"
      id="planting">

  <title>Planting Beans</title>

</page>
Notice that the type attribute is "guide" in index.page and "topic" in planting.page. Since index.page is a guide page, it can have links inserted automatically to other pages. In Mallard, guides don't have to specify which pages they link to. Instead, pages can specify that guides should link to them. Do this by adding a link element to planting.page:
planting.page
<page xmlns="http://projectmallard.org/1.0/"
      type="topic"
      id="planting">

  <info>
    <link type="guide" xref="index"/>
  </info>

  <title>Planting Beans</title>

</page>
The <link> element specifies that this page should be linked to from the guide page <index>, which we created above. This element has no content, so we use the XML empty element syntax, ending the tag with />. The <link> element is inside an <info> element. The <info> element contains various information about a page, including links to other pages.
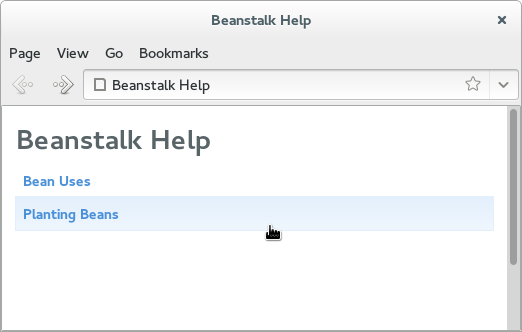
If you view your document again in Yelp, you will see that the front page now has a link to this page. This is one of the unique features of Mallard. Rather than requiring pages to specify everything they link to, Mallard allows pages to insert themselves into other guide pages. This makes it possible to add pages for plugins and additional functionality without modifying the original source pages.
Add another guide page
You can add additional guide pages to your document. This allows you to organize content to match what your readers are looking for. Add a guide page to link to ways you can use magic beans.
uses.page
<page xmlns="http://projectmallard.org/1.0/"
      type="guide"
      id="uses">

  <info>
    <link type="guide" xref="index"/>
    <link type="topic" xref="planting"/>
  </info>

  <title>Bean Uses</title>

</page>
Like planting.page, this page has a guide link to index. If you view your document in Yelp again, you will see that the front page now has two links.
This page adds a new type of link in the <info> element. Topic links are the inverse of guide links. When a guide page has a topic link to another page, it's as if the other page has a guide link to the guide page. Despite the name, topic links can link to topic pages or guide pages.
If you view “Planting Beans” in Yelp, you'll see it has links at the top and bottom to both “Beanstalk Help” and “Bean Uses”. Adding a page to a guide is like adding it to a section in a traditional linear document, except that pages can be linked to from multiple guides. This allows you to provide multiple ways to navigate to a page to better match how your readers are thinking.
Add content to the topic page
Currently, there's no real content in planting.page. Add content to explain to the user how to plant magic beans. The following example shows a basic paragraph and a step list. See the Core section of this document or http://projectmallard.org/1.0/ for more about paragraphs and step lists.
planting.page
<page xmlns="http://projectmallard.org/1.0/"
      type="topic"
      id="planting">

  <info>
    <link type="guide" xref="index"/>
  </info>

  <title>Planting Beans</title>

  <p>By the end of this page, you will be able to plant your magic
  beans and nurture them into a bean sprout.</p>

  <steps>
    <item>
      <p>Dig a hole 5cm deep.</p>
    </item>
    <item>
      <p>Place your magic beans in the hole.</p>
    </item>
    <item>
      <p>Fill the hole with clean dirt and pat it level.</p>
    </item>
    <item>
      <p>Water daily.</p>
    </item>
  </steps>

</page>
The <p> element is similar to HTML. It creates a simple paragraph. The <steps> element creates a list of steps to follow. Each <item> element is one step in the list, and must contain one or more paragraphs or other block content.
View your documentation in Yelp
To view a Mallard index page in Yelp, type $ yelp index.page at the command line in the directory where your Mallard index page is stored.

Find more tutorials
Find more Mallard tutorials at http://projectmallard.org/about/learn/index.


