


Connecting a 2N OfficeRoute
Setup via web browser
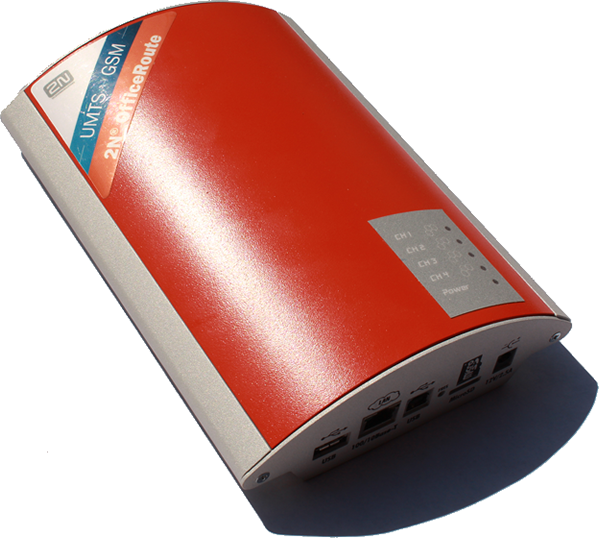
The 2N® OfficeRoute is a GSM gateway that can be connected to Freedom Fone to enable you to receive calls and SMSs. After installing Freedom Fone on your computer you can proceed to configure the OfficeRoute. We recommend using a crossover cable and configuring the OfficeRoute using the Firefox browser installed on your Freedom Fone server.
The OfficeRoute can also be configured using a computer running Windows, a USB cable and the Windows utility provided on the CD with your equipment.
Before you begin:
- Make sure you have a crossover cable
- Use your mobile phone to disable the PIN code request for all the SIM cards you intend to use, before inserting them in the OfficeRoute
- Locate the office_route folder on the desktop of the computer where you installed Freedom Fone. Inside the folder you will find an archive with a filename similar to backup_officeroute_2.3.11.tgz. The name will change depending on the OfficeRoute firmware version to be uploaded.
Setting Up
Be careful to not let the SIM card fall into the OfficeRoute - this can happen when you insert the card between the chassis and the gap (these can be removed by carefully balancing the OfficeRoute or opening with a screwdriver).
- While the OfficeRoute is switched off, insert your SIM cards into the bays at the front of the device.
SIM cards should be inserted into the top slots (SIM2 and SIM1) with corner into the chassis and chip-side down. Sim cards should be inserted into the bottom slots (SIM4 and SIM3) with corner into the chassis and chip-side up. Push until the SIM cards click into place. Pushing them gently is also how you remove the SIM cards. Do not remove or insert SIM cards when the OfficeRoute is switched on. - Connect the crossover cable to the ethernet point on the OfficeRoute and connect the other end of the crossover cable to the computer running Freedom Fone.
- Attach the aerial
- Attach power cable, plug your OfficeRoute in and turn it on; note that when you first power on the OfficeRoute, it takes a few minutes to boot as it cycles through checking the SIM cards
- Using the Firefox browser on the Freedom Fone server enter the default IP address of the OfficeRoute, 192.168.1.1 ; if it does not work, try 192.168.1.46.
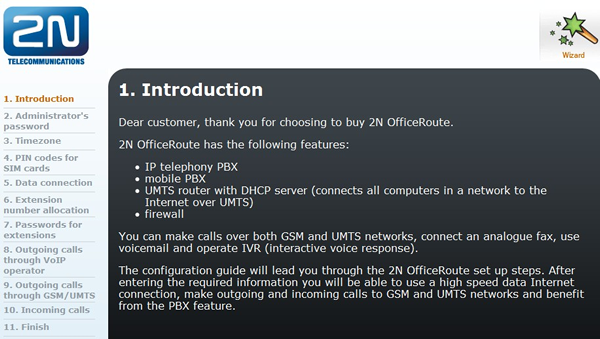
1. Configuration Wizard
If you are connecting to the 2N® OfficeRoute gateway for the first time or after a factory reset, the configuration wizard should appear.
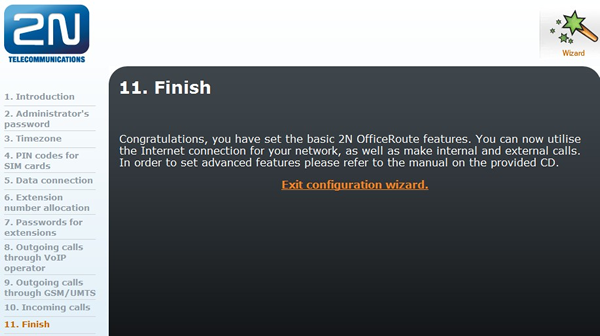
Finish
That’s all we need to do for now, so select Finish from the menu on the left hand side and exit the configuration wizard. In order for Freedom Fone to accept calls from the OfficeRoute and direct them to the Voice menus you have created, you will need to modify the default configuration settings on the OfficeRoute.
2. Modifying settings via web browser
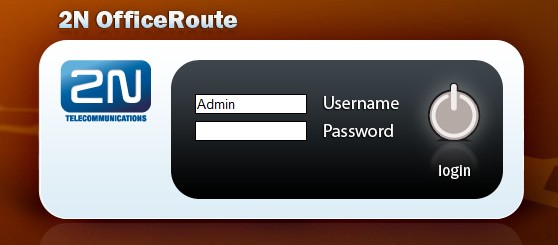
2a. Login
Now that the initial wizard configuration is completed, you can configure all the OfficeRoute parameters using the web browser interface. To establish connection with the OfficeRoute, enter the default IP address 192.168.1.1 of the OfficeRoute into the browser bar (if it does not work, try 192.168.1.46). After entering the IP address you should see a screen prompting you for a “Username” and “Password”. Username and Password are case sensitive.
Username: Admin
Password: 2n
Press the login icon.
2b. Clearing the browser’s cache
Sometimes your browser will not allow you to enter the Username and Password, instead it will keep redisplaying the Username it has cached in memory.
For Firefox users:
From the Firefox main menu select Edit > Preferences
Under Security ensure that the option to remember passwords for sites is off.
Under Privacy clear all history, including the cache.
Refresh the login page and the Username should now be blank.
2c. License
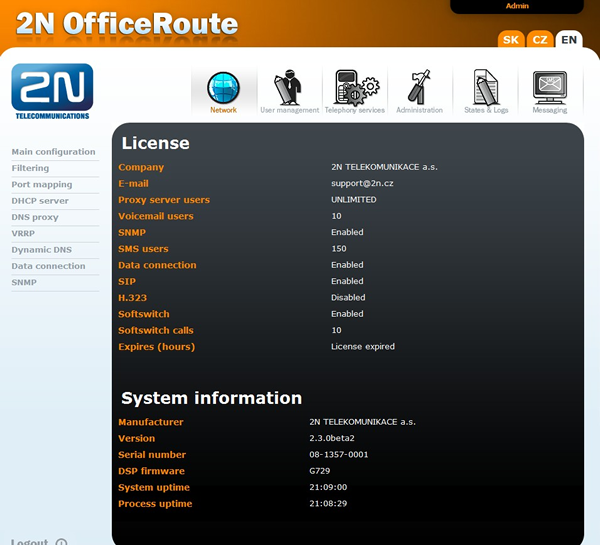
After a successful login, the network information page of OfficeRoute configuration application is displayed. You can return to this page at any time by selecting the Network tab at the top of the page.
On this page (see screenshot below) take note of the lines with the following settings:
“SIP” - adjacent to this the value should be Enabled
“Expires (hours)” - adjacent to this the value should be Unlimited or Never
“SNMP” - adjacent to this the value should be Enabled
If for any reason the three parameters have different values assigned to them please contact the dealer who supplied you with the equipment and request an unlimited licence with SNMP and POP enabled.
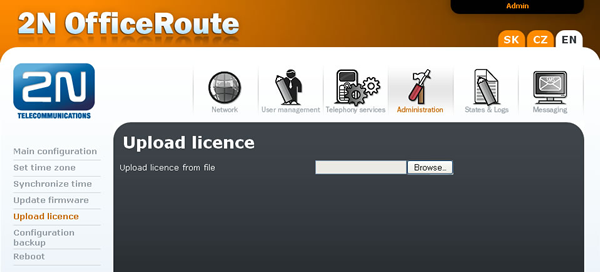
Uploading a licence to your OfficeRoute
If you have to request a licence from your supplier, it will be supplied in the form of a .key file. To upload the licence to your OfficeRoute, select the Administration tab at the top of the page. Select Upload licence from the menu on the left hand side. Use the browse button to locate and upload the key file provided by your supplier.
Also on the network information page, check to see that the firmware version running on your OfficeRoute is the latest available from 2N.
At the time of writing this guide the current firmware version is 2.3.13. You can view the firmware version under the System information section - check for the line which displays Version. If the version of firmware you are running is old you should download the latest from the 2n website: http://www.2n.cz/en/products/umts/officeroute/downloads/
2d. Upgrading Firmware
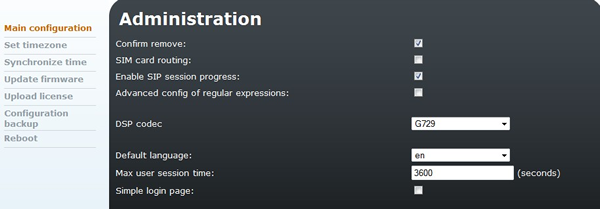
You can skip this section if you are running the current firmware version. Once you are done downloading the firmware, select the Administration tab at the top of the page. The page shown below should be displayed.
Select Update firmware from the menu on the left hand side and using the browse function navigate to your newly downloaded file, select it and click save from the options in the bottom right hand corner of the screen.
The loading process will start and should take about 5 minutes...be patient! Thereafter the OfficeRoute will reboot and you will be required to log in again. Once you are logged in, check to see that the version number has changed on the screen displayed. If not, repeat the upgrading firmware instructions.
2e. Synchronizing Time
In order for your call data records to be accurate you will need to synchronize the time of the OfficeRoute to that of the Freedom Fone server.
Select the Administration tab at the top of the page. Then select Synchronize time from the menu on the LHS of screen. A screen showing the time on the OfficeRoute and the time on the Freedom Fone server will be displayed. Click on the synchronize button to set the OfficeRoute time to the time of the Freedom Fone server.
2f. Uploading the backup file
Select the Administration tab at the top of the page. Then select Configuration backup from the menu on the LHS of screen. A submenu will be displayed beneath Configuration backup. Select Upload config. Browse for the backup file you found on the Freedom Fone desktop (look for a filename similar to backup_officeroute_2.3.11.tgz) and upload the file by clicking on the Upload icon. The process will take about 5 minutes after which the system will reboot.

After rebooting, the OfficeRoute will have the new default settings required for operation with Freedom Fone. The default IP address that Freedom Fone assigns to the OfficeRoute is 192.168.1.46. Hence, after uploading the backup file the IP address of the OfficeRoute will no longer be 192.168.1.1. To login again, you will need to enter 192.168.1.46 in your browser bar to access the OfficeRoute.
2g. Normalisation
The OfficeRoute can apply rules to the prefix of the incoming caller ID string (phone number) – allowing you to modify the OfficeRoute to work with phone number formats used in your country. The reason for this is to maintain consistency in the format of your call data records. Operators insert different prefixes at the start of the caller IDs (phone numbers) e.g. + or 00.
In order for your call records to be uniform regardless of the operator from which the call originates, it may be necessary to change the normalization settings. To do this select the Telephony Services tab at the top of the page. Next select GSM routing from the menu displayed on the LHS and Normalisation from the submenu that is subsequently displayed beneath GSM routing.
The screenshot below shows an example of normalization settings. In this example, any incoming caller ID number which begins with the pattern +420 will have +420 removed and a zero inserted at the beginning of the number.
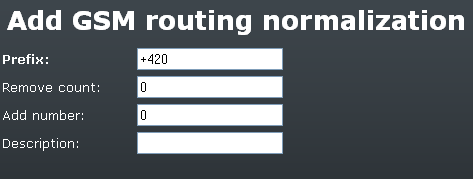
The Remove count specifies from which point of the prefix the OfficeRoute should start removing digits. A remove count of zero means characters will be stripped from the start of the prefix value. In the example above, all digits in the specified prefix, starting from +, will be removed and a zero (0) be prefixed to the remaining number. In this case, the country code (+420) is removed and a zero (0) inserted to make up the local area code.
2h. Routing calls to Voice Menus
If you have followed all the steps above, you should be able to make a phone call to a SIM card previously inserted into the OfficeRoute, and have it answered by Freedom Fone’s default IVR menu. Note that the default IVR menu is assigned a service number of 4100.
By default the SIM card in slot #4 (GSM module - 4 in screenshot below) is configured to direct all incoming calls on this number directly to the Leave-a-message with service 2100. If you wish to change this setting so that SIM #4 points to your Voice menu [4100], you can change this by following the instructions below
After you’ve created your own Freedom Fone voice menus, you will want to redirect incoming calls via the OfficeRoute to service numbers associated with these menus (Freedom Fone voice menu service numbers are displayed on the IVR centre > Voice menu page). To do this select the Telephony services tab at the top of the page. Next select GSM routing from the menu displayed on the LHS and GSM from the submenu that is subsequently displayed beneath GSM routing. You should see a page similar to the one in the screenshot displayed below.
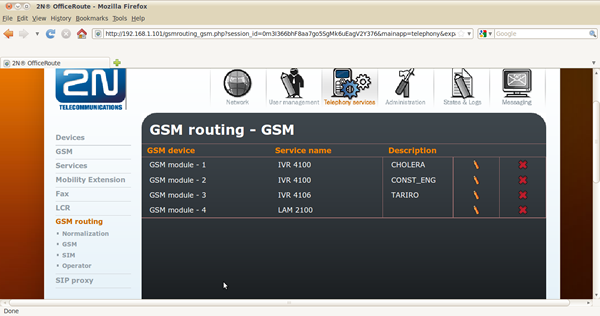
Use the pencil to the right of each row to change the service name of the IVR menu to that associated with your new Freedom Fone voice menu(s). When done, click the save button in the bottom right hand corner of the screen. As you will probably have figured out, it is possible to have each GSM module (SIM card) pointing to the same or a different IVR menu by changing the service name associated with the module. The Description field is for documentation purposes.

Having followed the steps to this point, you are ready to use your OfficeRoute with Freedom Fone.
3. Advanced Setup
The following is advanced set up and not necessary for basic use.
3a. Changing Admin user password
There are two ways of changing the default password of the OfficeRoute:
If you are connecting to the OfficeRoute for the first time, or connecting after a factory reset, you can use the OfficeRoute wizard.
The second way is to log into the OfficeRoute using the default username (Admin) and password (2n), then select the User Management tab at the top of the page to change these details.
The two methods are outlined below.
Important: Since Freedom Fone uses the password to authenticate with the OfficeRoute, you must modify a Freedom Fone configuration file to use the new password. Communication between Freedom Fone and the OfficeRoute will fail until you do so. Instructions are provided in the sub section entitled Modify Freedom Fone configuration file.
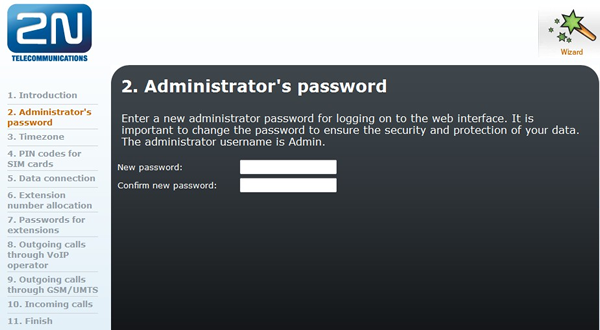
i. Using the Wizard
From the wizard’s LHS menu, select option 2, Administrator's password. You will be prompted to enter the new password twice and when done click on the save button at the bottom of the page.
ii. Changing Password using User Management tab
Select the User Management tab at the top of the page. Next select Users from the menu on the LHS. Use the edit function (pencil) on the row with user Admin. Enter the new password twice in the fields provided on the form and save.

3A1. Modify Freedom Fone configuration file
Use the command line terminal icon in Freedom Fone to go into terminal mode. (Click on the terminal icon in the centre of the title bar at the top of your screen). At the command line prompt type the following command:
For version 2.0 users
gedit /usr/local/freedomfone/office_route/config.php
For version 2.S users
gedit /opt/freedomfone/office_route/config.php
The config.php file should open in the gedit editor. Look for the code snippet shown below and change the 'pass' setting to the new password you have set for the OfficeRoute. Save and close the file.
If you are connecting more than one OfficeRoute you should change the other instances of 'pass' following the code snippet shown below.
$_OfficerouteParamSingle = array(
 array(
  'host'=>'192.168.1.46',
  'user'=>'Admin',
  'pass' =>'2n',
  'port' =>'110'
 )
);
3b. Changing the default IP address of the OfficeRoute
The default IP address assigned to a new OfficeRoute by the supplier is 192.168.1.1. If the Freedom Fone OfficeRoute backup config file has been uploaded to the OfficeRoute, the IP address of the device will be set to 192.168.1.46.
You can modify the OfficeRoute's IP address by selecting the Network tab at the top of the page. Next select Main configuration from the menu displayed on the LHS. Select the modify icon in the bottom right hand corner of the screen to edit details on this screen.
Important: Since Freedom Fone uses the OfficeRoute IP address to authenticate with the OfficeRoute, you must modify 2 Freedom Fone configuration files to reference the new IP address. Communication between Freedom Fone and the OfficeRoute will fail until you do so. Instructions are provided in the sub section entitled Modify Freedom Fone configuration files.
Remember to save your changes.

3B1. Modify Freedom Fone configuration files
Use the command line terminal icon in Freedom Fone to go into terminal mode.
i. At the command line prompt type the following command:
For version 2.0 users
gedit /usr/local/freedomfone/office_route/config.php
For version 2.S users
gedit /opt/freedomfone/office_route/config.php
The config.php file should open in the gedit editor. Look for the code snippet shown below and change the 'host' setting to the new IP address you have allocated to the OfficeRoute.
Save and close the file.
If you are connecting more than one OfficeRoute you should change the other instances of 'host' following the code snippet shown below.
$_OfficerouteParamSingle = array(
 array(
  'host'=>'192.168.1.46',
  'user'=>'Admin',
  'pass'=>'2n',
  'port'=>'110'
 )
);
ii. At the command line prompt type the following command:
For version 2.0 users
gedit /usr/local/freedomfone/config/officeroute_snmp_config.php
For version 2.S users
gedit /opt/freedomfone/config/officeroute_snmp_config.php
Look for the code snippet shown below and change the 'ip address' setting to the new IP address you have allocated to the OfficeRoute.
$config['OR_SNMP']= array(
  array('ip_addr'   => '192.168.1.46' ,
  'community' => 'public' ,
  'object_id' => '1.3.6.1.4.1.6530.4.2.2.1'
 )
);
Save and close the file.
3c. Changing the virtual IP address of the Freedom Fone server
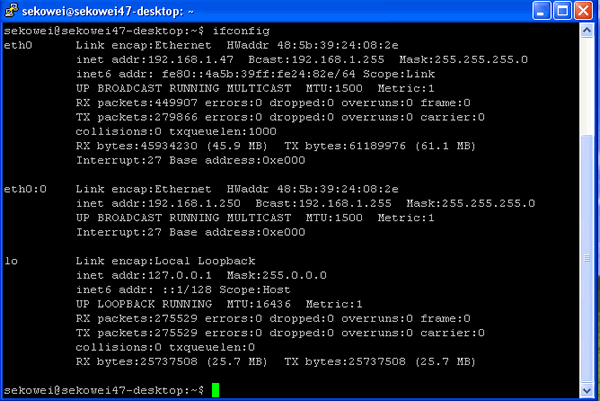
By default the Freedom Fone server is allocated a secondary fixed IP address of 192.168.1.250 which is assigned as a virtual IP address to eth0:0
To view the server’s network settings, use the command line terminal icon in Freedom Fone to go into terminal mode. Type the following command:
ifconfig
Details will be displayed as shown in the screenshot below.
If you need to change the secondary fixed IP address allocated by default to the Freedom Fone server you must follow the steps below.
Note though, that you can modify the OfficeRoute SIP server setting to refer directly to the primary IP address of the Freedom Fone server instead of the secondary fixed IP address. If you are having problems with your setup, try taking this step (3d) before modifying the secondary fixed IP address.
Use the command line terminal icon in Freedom Fone to go into terminal mode.
i. At the command line prompt type the following command:
gedit /etc/rc.local
Look for the code snippet shown below and change 192.168.1.250 as required for the interface aliasing for the OfficeRoute.
/sbin/ifconfig eth0:0 192.168.1.250 netmask 255.255.255.0 up
Save and close the file.
ii. At the command line prompt type the following command:
For version 2.0 users
gedit /usr/local/freeswitch/conf/sip_profiles/officeroute.xml
For version 2.S users
gedit /opt/freeswitch/conf/sip_profiles/officeroute.xml
Look for the code snippet shown below and change 192.168.1.250 as required
<!-- ip address to use for rtp, DO NOT USE HOSTNAMES ONLY IP ADDRESSES -->
<param name="rtp-ip" value="192.168.1.250"/>
<!-- ip address to bind to, DO NOT USE HOSTNAMES ONLY IP ADDRESSES -->
<param name="sip-ip" value="192.168.1.250"/>
Save and close the file.
Don’t forget to update the corresponding setting on the OfficeRoute by following the next step, "Change the SIP server setting on the OfficeRoute."
3d. Changing the SIP server setting on the OfficeRoute
If you do not want to use the default IP settings for the Freedom Fone server (a secondary fixed IP address of 192.168.1.250 which is assigned as a virtual IP address to eth0:0), you can modify the default SIP server setting used by the OfficeRoute to communicate with the Freedom Fone server.
Select the Telephony Services tab at the top of the page. Next select Devices from the menu on the LHS and SIP lines from the submenu that is subsequently displayed beneath Devices.

Use the edit icon (pencil) to change the IP address of the SIP server from 192.168.1.250 to the primary IP address of your Freedom Fone server.
Save your changes.
3e. Modifying your configuration to communicate with multiple OfficeRoutes
i. At the command line prompt type the following command:
For version 2.0 users
gedit /usr/local/freedomfone/office_route/config.php
For version 2.S users
gedit /opt/freedomfone/office_route/config.php
Look for the code snippet shown below and add the 'ip address' settings for all the OfficeRoutes to the OfficerouteParamMulti array. In the example below there are 3 OfficeRoutes connected and their IP addresses are 192.168.1.46, 192.168.1.45 and 192.168.1.44
$_OfficerouteParamSingle = array(
                               array(
                                'host'=>'192.168.1.46',
	      		        'user'=>'Admin',
	      		        'pass'=>'2n',
	      		        'port'=>'110'
	      		        ));


$_OfficerouteParamMulti = array(
		           array(
                                'host'=>'192.168.1.46',
	      		        'user'=>'Admin',
	      		        'pass'=>'2n',
	      		        'port'=>'110'
	      		        ),
		           array(
                                'host'=>'192.168.1.45',
	      		        'user'=>'Admin',
	      		        'pass'=>'2n',
	      		        'port'=>'110'
	      		        ),
		           array(
                                'host'=>'192.168.1.44',
	      		        'user'=>'Admin',
	      		        'pass'=>'2n',
	      		        'port'=>'110'
	      		        ));
Save and close the file.
ii. To ensure SMSs are read from all OfficeRoutes, at the command line prompt type the following command:
For version 2.0 users
gedit /usr/local/freedomfone/office_route/pop3_daemon.php
For version 2.S users
gedit /opt/freedomfone/office_route/pop3_daemon.php
Look for the code snippet shown below and change $_OfficerouteParamSingle; to $_OfficerouteParamMulti;
$handle = fopen(LogFile,'a');

$_OfficerouteParam = $_OfficerouteParamSingle;   //Change to $_OfficerouteParamMulti if multiple users are used

$sock = new ESLconnection($host, $port, $pass);
Save and close the file.