


Installing the software
As a start, whether you just want to try and evaluate Freedom Fone or install it for good, the first step for you is to get a proper Freedom Fone installation DVD. For that, you can either download the software as an ISO file from the Freedom Fone website www.freedomfone.org/downloads or, if you have bandwidth constraints, you can request the DVD to be sent to you directly by Freedom Fone. Just send an email to info@freedomfone.org!
If you choose to download the software, you need to burn your Freedom Fone installation DVD. To do so, remember that ISO files are disk image files: do NOT try and 'file copy' the image directly to a DVD - it must be written as an image file to the DVD. Use the Record a disc from disc image feature from your disc burning software.
... Got it?
Getting Started...
Note: before you start using the DVD, we recommend you back up your computer as a common security procedure.
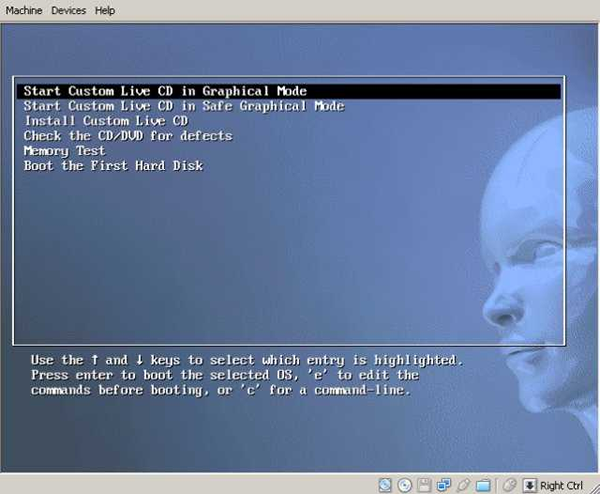
Once you have your Freedom Fone installation DVD, just insert it into the DVD drive of your computer and reboot your machine. The system will boot from DVD and the screen below will appear, displaying different options you have to get started with Freedom Fone:
Evaluating Freedom Fone
If you only wish to play around with Freedom Fone, without installing the software, just do not do anything when the above screen pops up. The LiveCD option is the default option and it will automatically go into live mode - you might have heard someone mention "running a system live": this simply means running the software from the installation media - such as a CD/DVD - without installing it on your hard drive.
You can then play with the Freedom Fone interface in the live mode, and when you are done shutdown and eject the DVD.
Please always remember that the LiveCD option does not install Freedom Fone permanently to the hard drive.
Installing Freedom Fone
To install Freedom Fone, select the option which lets you install on your hard drive: install - start the installer directly and press the Enter key. Then follow the steps below.
This procedure will install both the Ubuntu Operating system and Freedom Fone on your computer.
Important warning: remember that Freedom Fone is a system replacer which requires a dedicated computer; the installation will erase from your hard disk your existing operating system, together with all your data. Make sure you have backed up your important data before you start the installation procedure.
Install Procedure
Please note that during the installation process, the system might take some time to move on between each screen; this depends on the hardware specifications of your computer.
SCREEN 1
The first screen that comes up prompts you to select the language to use during installation.
English is the language selected by default, but you might want to choose another one. Do so, and press Enter or Forward.
SCREEN 2
The next screen you'll get to see is the location map.
Select your location, either from the map or using the pull down menu. Press Forward.
SCREEN 3
This screen is for your keyboard layout.
Select the option that suits you best, and Press Forward.
SCREEN 4
The next screen allows you to choose whether you want to install Freedom Fone on the entire hard drive or side by side with another operating system that may be on your PC already. We strongly discourage that you install Freedom Fone side by side with another operating system for a live deployment. For demonstration purposes you may do so but this is a complex process which requires specific knowledge about computer partitioning. Only for advanced users!
For now, select the Erase and use the entire disk option.
Remember that this will erase all that is on your hard disk, including the operating system. If you have not saved your data at this stage, select the "Quit" button to quit the installation process and restart from the beginning of the procedure after you have cleared up your computer.
Otherwise, press Forward.
SCREEN 5
After selecting to use the entire disk, you are taken to the next screen which prompts you to set up your user name and password, and name your computer:
- Type in your name and the username you want to use each time you log onto Freedom Fone.
- Take time to select a solid password as your system may carry information that could be a security concern if accessed by unauthorised users.
Here are a few tips for a safe password:
- keep it unique (only for your Freedom Fone access)
- make it long and complex enough so that it is difficult to guess
- You might alternate numbers and letters or special characters for your password, while finding a trick to remember it - example: WATER4mydog.
- Set the name of your PC making sure that the name you choose does not include any spaces.
- For log-in options, we recommend that you choose the option require a password to log in for security reasons.
Press Forward.
SCREEN 6
This will only be seen in the case of side-by-side installations.
SCREEN 7
The last screen will complete the installation.
Make sure you are happy with all the choices you made on the previous screens (language, login name...). If you are not, press Back and repeat the steps 1 to 6 above. Otherwise, press Install.
The actual installation process begins. The installation may take a while depending on the hardware specifications of your machine.
Once installation is completed, the system will automatically eject your DVD and you will be prompted to restart your system.
Logging in
After restarting, here is what you will see:
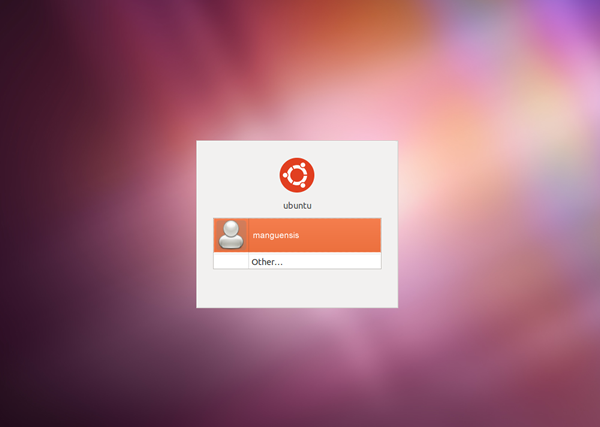
Occasionally Ubuntu might fail to restart the first time after installation. If this is the case, just manually reset your machine, and it should reboot successfully. At the log in prompt, enter the user name and password you have set in the installation process.
After logging into Ubuntu, click on the Freedom Fone icon on the desktop to launch the Freedom Fone administration page. Freedom Fone version 2.S comes with a login screen to restrict access to unauthorised users.
The default username and password are as follows and can be changed later through the User management interface
User name: Admin
Password: thefone
Once you have successfully logged in you can move on to the next chapter Preparing SIM cards before you set up your GSM device(s).