


Lists How To
Lists in Melange are ubiquitous and they have more features (and also annoyances!) than meets the eye. Here are some tips on how to use them.
First of all, it takes a while to load the lists, and you will see them populating dynamically as soon as data is available from the server. The cause of this behavior is out of the scope of this book but is a consequence of how the backend Google AppEngine infrastructure works and its limitations.
Furthermore, what you tweak in each list is saved in a cookie in your local browser. This is done both per page and per list (this means that options for each different list are saved independently from one another). Since the options are saved in a cookie, that also means that you won't see your settings preserved if you use a different browser or different computer than the one used to set your settings. That also means that all the settings will be lost if you clear your browser cookies.
The lists are generally structured in five main sections:
- Ordering
- Searching
- Actions and Options
- Content
- Filtering and Pagination

Ordering
Clicking a column header will order the list by the selected column. Subsequent clicks will toggle between ascending and descending order (indicated by an arrow that appears on the right of the column's header).
Searching
By writing something under a specific column header in the searching section (or selecting one option from a drop-down menu if the possible states for the column are limited to certain possible entries), the list will automatically and dynamically be filtered according to the substring requested. This can be done on more than one column at once, and that would result in searching the list for entries that match both requests (logical AND).
Actions and Options
On the upper side of each list there is some space reserved for optional buttons to appear in order to do some action over the listed entries. You can usually find at least two options: RegExp Search and CSV Export.
RegExp Search
By clicking this checkbox you will be able to search on the columns by using regular expressions rather than plain substring search. If you don't know what regular expressions are you can just ignore it. If you have a grasp of what they are but don't know how to use them, it's out of the scope of this book to explain them, but you can find plenty of information on the Internet about them.
CSV Export
Most of the lists have a button available which allows exporting the content of the list in CSV (Comma-Separated Values) format. By clicking on that button, a popup window will appear showing the content properly formatted as CSV. You will have to copy and paste the content to a new file in your own computer in order to work with it.
Since the data is loaded from the server incrementally, you will want to wait until the whole list has been loaded before pressing the CSV Export button. Hitting the CSV Export button before the list completely loads will display only the data that has already been loaded, which may be incomplete.
The CSV Export has another convenient feature: it will export the data shown on the list in the current state. That means that it will reflect the order, the filtered subset, and the visible columns that are available in the moment the button is clicked.
Please note that the CSV export button will only appear after all the data in your set has finished loading.

Advanced Actions on multiple entries
Sometimes (only for some roles), you will be able to apply some actions to one or more entries displayed on the list.
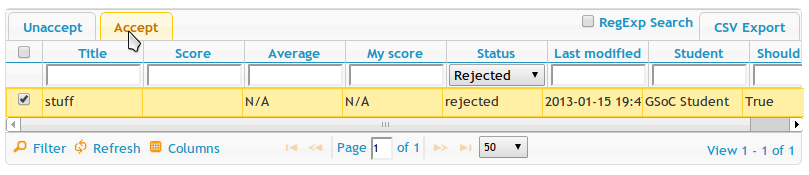
When available, the actions you can take on the selected entries are available on the left side of the Actions and Options section of the list. You can select the desired entries by clicking on the checkbox shown in the first column of the corresponding row. You can also select/deselect all the currently visible rows by clicking on the checkbox shown on the left of the column headers.
Content
This is where the list data is displayed. Sometimes the rows can be clickable, and you'll be able to reach a page with details about the clicked row. In those cases, since the list data needs to be downloaded again from the server each time a page loads, if you have to look at more than one detail, we suggest you open a new tab (this is usually done with Ctrl+click on PCs or Command+click on Macs) instead of clicking the row, since doing the latter will send you to a different page and you will have to click the back button of your browser to reload the previous page all over again.
Furthermore, you can resize any column by dragging and dropping the vertical lines between them.
Filtering and Pagination
The footer of each list displays, from right to left:
- The number of entries currently displayed against the number of entries that are available within the current (eventually filtered) dataset.
- The current page against the total number of pages of the current (eventually filtered) dataset. There are also clickable arrows that allow you to go to the previous, next, first or last page. Furthermore, the current page is editable, so it's easy to change to a specific page by writing the number of the desired page and pressing Return. You might also see a dropdown that allows you to change the number of rows displayed at once for each page.
- A toolbar with different buttons that can be used to tweak the list appearance and/or filter the dataset with something more complicated than the simple string searching that we already explored above.
Show/Hide/Order Columns
Most lists have more data than necessary or useful for your current task. We don't display all of them by default because it might be overwhelming for the interface; we show by default only a subset of data most relevant for the selected page. Also, the columns are displayed in an order that made sense to us. Both these choices might not make sense to you, hence the option to tweak the columns in the list.
By clicking on the Columns button, you will see a simple but powerful interface with the following features:
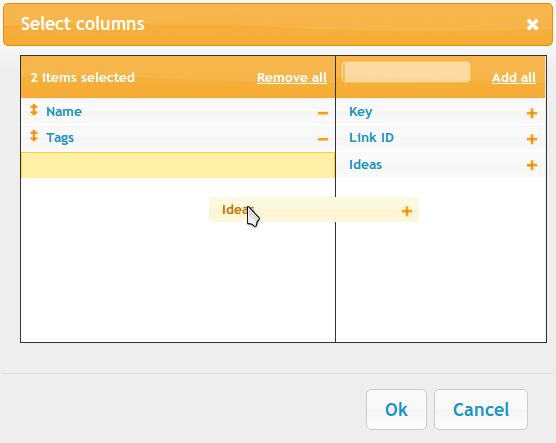
On the left hand side of the interface you can see the columns that are currently visible in the list. The other available columns, currently hidden, are shown on the right.
You can make a column visible either by dragging and dropping it from right to the left, or by clicking on the + button. You can even look for a column name by writing part of its name on the text field displayed above the list of hidden columns.
You can hide a currently visible column by clicking on the - button.
You can reorder the currently visible columns by dragging and dropping columns names on the left hand side.
Finally, you can hide all columns at once or display all columns at once by clicking on the Remove All or Add All links.
Advanced filtering
By clicking on the Filter button, you will be shown a popup window that gives you various options to create an advanced filter on the current list data.
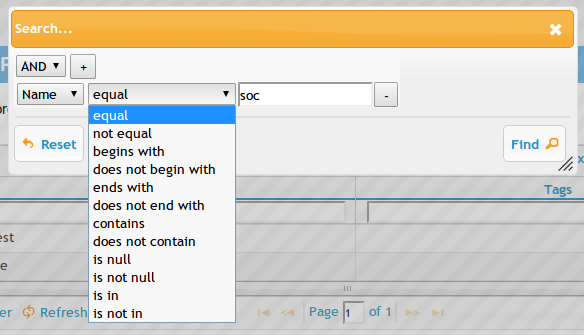
You can create more than one filter that will be applied over the list dataset at once, either by logical AND or logical OR. Each filter consists of a column name, a type of filter to apply, and a substring that the type of filter should match (if applicable).
You can reset the filter(s) applied by visiting the interface again, clicking Reset and either clicking Find or closing the popup window.
Refreshing the lists
Another button might be available on the lists, the Refresh button, which will allow you to reload the data in the list without reloading the whole page and/or other lists that might appear in the same page. This is especially useful when the underlying data changes frequently or you're expecting it to change soon and you want to monitor it.
Editable lists
Some lists have live editing enabled. For those lists you just need to click on the row that you want to change and the cells which are editable will turn into text fields/dropdowns/checkboxes/etc. In order to modify one row you can just change whatever you want and then press Return to automatically save the modified row to the server.

There are currently some gotchas to remember:
- Even though these editable lists have a "Save" button, that button is disabled and doesn't do anything. The only way to save is to change something and then press Return, so don't rely on that button. This is a temporary issue that will hopefully change soon.
- Pressing Return to save the row is required even when you're just modifying a dropdown. So when you change a dropdown, make sure that you press Return afterwards to save the data.
- When you press Return after editing a row, you're not able to change the same row immediately by clicking on the row again. You have to select another row first and then select the original row you want to change again. If your list has just one row, then you can press the Refresh button on the list: refreshing the list will deselect that row automatically.
- When you're editing a row, if you select another row without pressing Return the row will revert back to the previous state, without saving anything to the server.
Credits
Melange's lists are built on top of the jQuery Grid Plugin, A.K.A. jqGrid. More information on that plugin can be found at http://www.trirand.com/blog/.