


Setting Up A New Program
A new program, as defined in this section, is a new year of Google Summer of Code. Here are the steps outlined in this section in the order they need to be completed:
- Become a Program Administrator
- Create a new program
- Edit the program's timeline
- Edit the program's settings
- Create and then add the appropriate documents for the program
- Edit the messages for the program
- Ask for modification of the logos and graphics for the program
- Modify the active program information on the /site/edit page
How to Become A Program Administrator
Ask a Melange developer to create a new user and then to designate the given individual as a Program Administrator. At this time, only a member of the Google Open Source Programs team can become a Program Administrator.
How to Create a New Program
To create a program the Program Administrator should go to:
Admin Dashboard -> Program settings -> Create a Program in a new or existing instance of Melange. This will bring you to the Create a new program page. Fill in the appropriate fields and press the Submit button.
Please note that you should enter the "Age as of" field on the Create a new program page in the format MM/DD/YYYY.
You will be redirected to the Edit program settings page of the new program instance.
How to Edit the Program
Once the Melange developer has created the new program, the Program Administrator has many options available. Most of a program’s data can be edited via the links in the Program settings section of the Admin Dashboard. The majority of the text that will need to be updated is stored in the Edit program settings and List of Documents links. These can be edited on the Edit program messages page and the List of Documents.
There are two types of data on the Edit program settings page, documents and non-document data. Documents, as explained in this section, are a list of webpages that exist on Melange for a specific program and are created initially outside of Melange in a text editor. A program’s non-document data (for example, numbers of allowed students and organizations, latest allowed student birthdate, etc.) can be updated directly on the Edit program settings page. Please note that there is a checkbox for "Messaging enabled" on this page which does not currently have any function; you can safely ignore it.
How to edit/view documents for the program
You should create new documents when creating a new program. Create the following documents in a text editor (outside of Melange) before going into Edit program settings:
- Organization Admin Agreement
- Mentor Agreement
- Student Agreement
- About Page
- Events Page
- Connect with Us Page
- Help Page
Once all of your documents have been created in a text editor go to:
Admin Dashboard -> Program settings -> Edit program settings
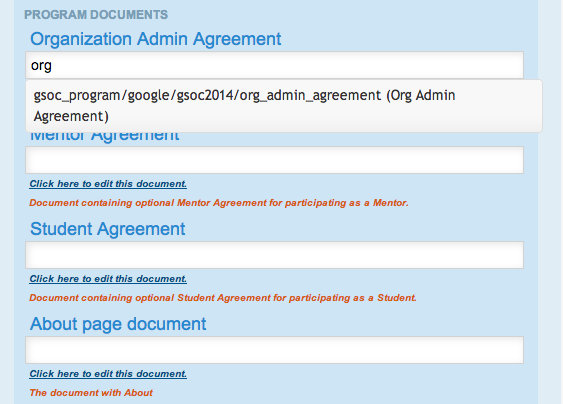
Scroll down to the documents that need to be updated (starting with Organization Admin Agreement). All the documents that are needed to run the program are listed on this page. Click on Click here to edit this document under each corresponding text field on the Edit program settings page. You will be brought to a WYSIWYG (What You See Is What You Get) editor in Melange to edit the document. Cut and paste your appropriate document text into the Title and Content Fields. Press Submit and you'll be taken back to the Edit program settings page. Then in the field corresponding to the document start typing any part of the document title and an auto-complete drop down appears. Choose the correct document from the drop down. Be sure to save the program settings form every time you change the document field.
If you'd like to preview your documents before they go live, you can do so by changing the word "edit" on your web browser's URL to "show". For example http://www.goog
The documents are always viewable to anyone with the document's URL. On the document edit page you are also able to change the locations where the document will appear:
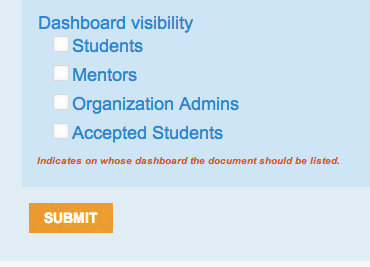
If you tick any of the boxes the document will be on also be specifically available on that user's dashboard in the Important documents section as well as still viewable to anyone with the document's URL.
Before hitting Submit, you must make sure all the text fields have been populated.
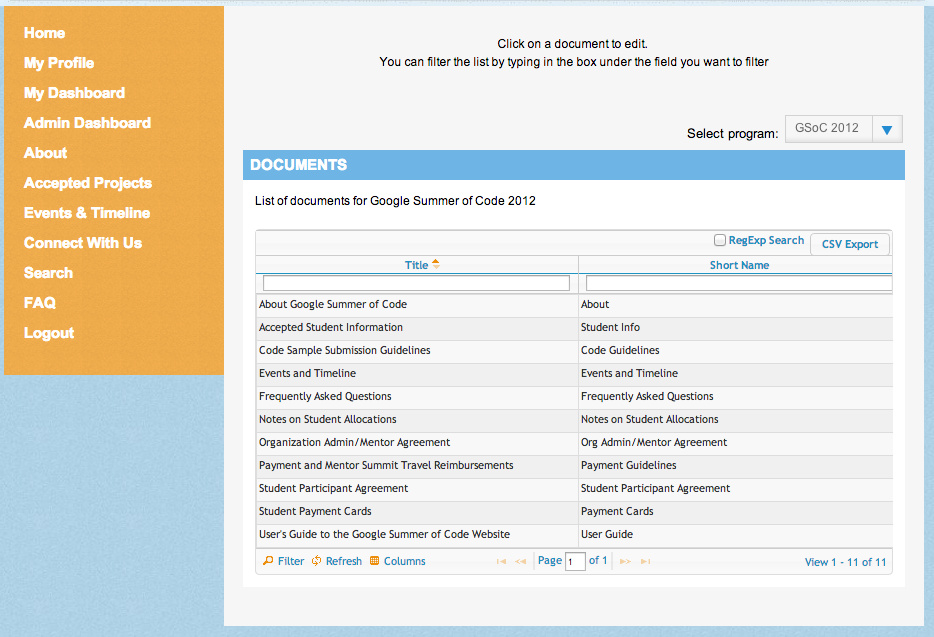
When the program is underway you can easily review the documents in a list view:
- Go to Admin Dashboard
- Click on List of Documents under Program settings
- Click on the name of the document you wish to view under 'Title'
Once you have successfully added the URL's for the new documents continue to fill out the rest of the Edit program settings (Max slots per organization/for the program).
How to add new documents for the program
In the event that a Program Administrator wants to create a document that is not linked from the Edit program settings page, she would visit the following URL:
http://www.google-melange.com/gsoc/document/edit/gsoc_program/google/(current year id)/<name of new document to create>
This will automatically create the document with the name listed above. Pressing Submit will save the document. It will thereafter appear in the List of documents from the Admin Dashboard.
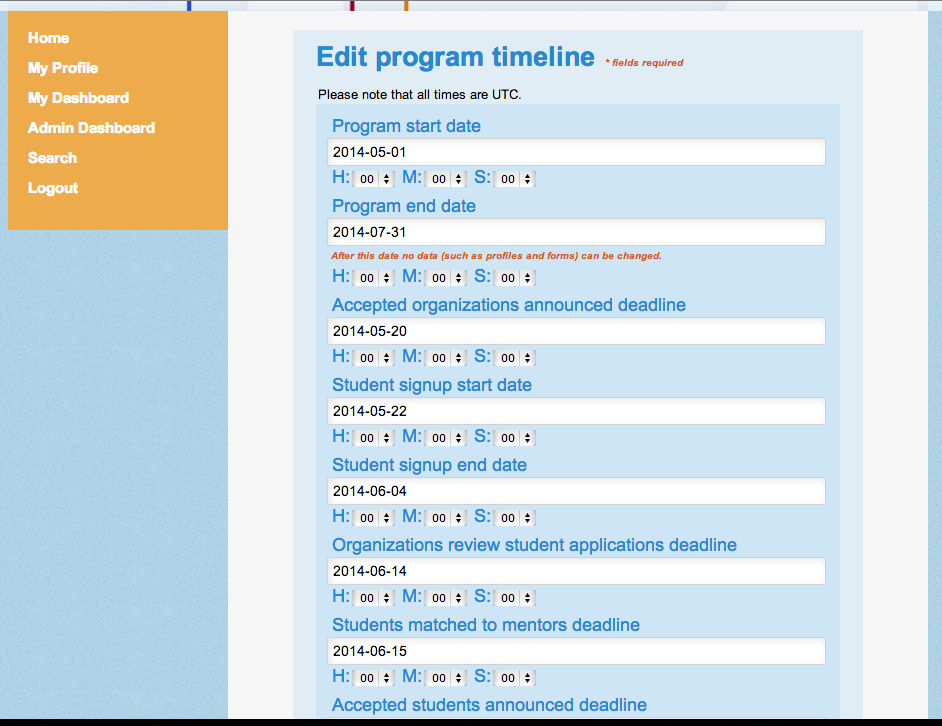
How to Change the Program Timeline
The Program Timeline defines when a specific program begins/ends, student work periods, etc.
- Go to Admin Dashboard
- Program Settings -> Edit program settings -> Edit Timeline
- Update the fields and Submit. Times are all in Coordinated Universal Time (UTC).
How to edit messages for the program
After you have set up the documents and settings for the program you should edit the messages for the program. Go to the Admin Dashboard -> Program settings -> Edit messages section. You will find text editing fields for the emails that will be sent to:
- Accepted organizations
- Rejected organizations
- Accepted Mentors
- Accepted Students
- Rejected Students
We recommend that you use the following text for your template form in order to send a custom email message to each accepted organization:
Accepted organizations message
Your Organization Application for "{{ org }}" in {{ program_name }} has been accepted.
Please click {{ url }} to fill in the necessary information and create your Organization.
Best regards,
{{ sender_name }}
"org" is the name that was filled in by the Organization Administrator in the "Organization Name" field of the organization application.
"program name" is the Name listed on the Edit program settings page.
"url" is the direct URL for the organization to fill in its organization profile. The link is specific to each organization.
"sender_name" is the Site name listed on the Edit site settings page at http://www.google-melange.com/site/edit.
The fields within the curly brackets are customizable and will be filled in as appropriate by Melange depending on the recipient. You can add more welcome text to this message if you choose.
Rejected organizations message
Thank you for submitting "{{ org }}" organization application to {{ program_name }}. Unfortunately, we were unable to accept your organization's application at this time.We received many more applications for the program than we are able to accommodate, and we would encourage you to reapply for future instances of the program.
Best regards,{{ sender_name }}
The fields within the curly brackets are customizable and will be filled in as appropriate by Melange depending on the recipient. Please see the notes above for definitions of each of the types of fields. You can add more rejection text to this message if you choose.
Mentor welcome message
This message will be sent to Mentors when they are accepted by their respective Organization Administrators into the program. You can include information about participating as a Mentor generally to help Mentors get started with the program.
Dear {{ to_name }},
Congratulations! You have been accepted as a Mentor for {{ org_entity.name }}.
With best regards,The Google Summer of Code Program Administration Team
The fields within the curly brackets are customizable and will be filled in as appropriate by Melange depending on the recipient. Please see the notes above for definitions of each of the types of fields. You can add more rejection text to this message if you choose.
Accepted students message
Dear {{ to_name }},
Congratulations! Your proposal "{{ proposal_title }}" as submitted to "{{ org_entity.name }}" has been accepted for {{ program_name }}. Over the next few days, we will add you to the private {{ program_name }} Student Discussion List. Over the next few weeks, we will send instructions to this list regarding turn in proof of enrollment, tax forms, etc.Now that you've been accepted, please take the opportunity to speak with your mentors about plans for the Community Bonding Period: what documentation should you be reading, what version control system will you need to set up, etc., before start of coding begins on xxxx Date.{% if org_entity.accepted_student_msg %}The organization has added the following message:{{ org_entity.accepted_student_msg|safe }}{% endif %}Welcome to {{ program_name }}! We look forward to having you with us.With best regards,The Google Summer of Code Program Administration Team
Please note in the example above that you will need to fill in the section that says "xxxx Date." There is not currently a way to refer to variables in the program timeline in the messages system. The fields within the curly brackets are customizable and will be filled in as appropriate by Melange depending on the recipient. You can add more welcome text to this message if you choose.
Rejected students message
Dear {{ to_name }},
Thank you for applying to {{ program_name }}. Your proposal "{{ proposal_title }}"submitted to "{{ org_entity.name }}" was not selected for the program this year.We annually receive many more proposals than we are able to accept, and wewould like to encourage you to apply again next year.{% if org_entity.rejected_student_msg %}The organization has added the following message:{{ org_entity.rejected_student_msg|safe }}{% endif %}With best regards,The Google Summer of Code Program Administration Team
The fields within the curly brackets are customizable and will be filled in as appropriate by Melange depending on the recipient. You can add more rejection text to this message if you choose. A student will receive one rejection email per each rejected proposal.
Custom content
It is possible to put your own messages rather than the example contents which are shown above. Program Administrators can put dynamically generated variables in the double curly brackets. Here is a short description of the fields which are available
Default context which can be used in any program message:
- {{ sender_name }}: the official name of the site, as defined in Site settings
- {{ program_name }}: the full name of the program
Context specific to "Accepted organizations message":
- {{ org }}: Organization ID which was entered in the organization application
- {{ url }}: URL to create Organization's profile
Context specific to "Rejected organizations message":
- {{ org }}: Organization ID which was entered in the organization application
Context specific to "Accepted students message":
- {{ to_name }}: given name of the student
- {{ proposal_title }}: name of the proposal
- {{ org_entity.name }}: name of the organization for the accepted proposal
- {{ org_entity.accepted_student_message }}: Mentoring Organization's message that is sent out to accepted Students
Context specific to "Rejected students message":
- {{ to_name }}: given name of the student
- {{ proposal_title }}: name of the proposal
- {{ org_entity.name }}: name of the organization for the rejected proposal
- {{ org_entity. rejected_student_message }}: Mentoring Organization's message that is sent out to Students with rejected proposals
Not all of these variables must be actually defined. For instance, an Organization may decide not to set a custom message to rejected students. If a variable only has a value for some users, wrap uses of it within a conditional guard as follows:
{% if variable_name %}
Additional information provided by your organization about your proposal is: {{ org_entity.rejected_student_message }}
{% endif %}
Changing Logos and Program Graphics
Ask a Melange developer - program graphics and layout within Melange are not customizable and generally require code and behavioral changes to update. Program banners are the easiest to update.
How do I modify the landing page for visitors to Melange?
By default, there is no active program when you visit the main URL for Melange. In order to make your program appear on the landing page for Melange, will need to set your new program as the "active program" in the Edit site settings page. Go to the site edit page: http://www.google-melange.com/site/edit. Find the field titled Latest gsoc, enter the field in the format google/<Program id>. The Program id is what you specified when you created the new program. Please also make sure the program is marked "visible" on the Program Profile (Admin Dashboard -> Program Settings -> Edit program settings) on the drop-down for Program Status. The user will receive an "Access Denied" error if the program is invisible and tries to visit the homepage of the program. Finally, please note that the timeline for your program will determine when the program begins and the landing page images display the "Currently Active!" banner.