Audio Editing with Audacity
This chapter is about editing your recordings with Audacity 2.0 to produce a vox pop. Of course there are other editors on the market that you can use instead. The following steps should be compatible with most of them.
Before you start editing, choose a volume setting on your speakers that is not too loud and not too soft, to listen to your recordings.
Setting up your project
- First copy the files from your recorder to a folder on your computer
- Import the files into Audacity via the File > Import function or drag and drop the files into an Audacity window. Audacity will create a track in your project for each file you import.
- Stereo files will be opened in a two channel track in Audacity.
- Since the Freedom Fone software only handles mono files, we will need to change these tracks from stereo to mono.
- Press Ctrl+A to select all tracks and then use the Tracks > Stereo Track to Mono function. Now all tracks have only one channel.
Levels and Editing
- Use the Solo toggle button to the left of a track to listen to only this track. The activated track becomes blue, the other ones turn grey.
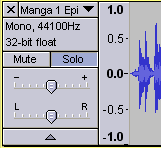
- Use the Selection tool to highlight the entire audio file of one track.
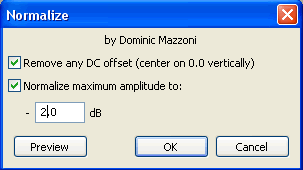
- Use the Normalize effect - Effect > Normalise - to normalize the selection to -2 db. This will set the highest peak of your audio file to -2 db.
- Set the volume level on your speakers to a comfortable level for this track. This should now be your reference setting for all of the other tracks.
- Use the Selection tool to select a part of the file you want to delete. To change the selection move left or right to the outer borders of the selection and use the Hand tool that is automatically displayed.
- To get a closer look at the wave shape of your recording use the Zoom In, or Zoom Out functions to get a better overview. You can also use the Ctrl key and your mouse wheel.

- If you want to keep only the selected portion, use the Trim function (Ctrl+T). The rest of the audio file will be deleted.
- If you want to delete the selected part and keep the rest, use the Cut (Ctrl+X) function
- If you want to split the recording into two clips use the Split function (Ctrl+I)
- After editing your audio file Normalize it again to -2db to get a higher level
- If there are still peaks in your audio file that prevent your recording from achieving a higher level, you should select these parts and edit them further. Reduce their level to the average level of your recording via Normalization.
- If there are no peaks left you are ready to Normalize one last time to -2db. It is very important to get a regular high level!
- When your first piece is done, save it by selecting the area and choose the File > Export Selection function. Give the file a new name and store it in your folder.
- Now deactivate the Solo setting for this track. The waveforms will change colour from blue to grey.
Take the next file on the following track and repeat these steps again.
How to do an Arrangement
At this stage you should have several tracks with edited recordings. The next step is to make an arrangement with them.
In our example we have five mono tracks. For our arrangement we need only two. So you will use the Move tool (also called the Time Shift Tool) to relocate the recordings from the bottom tracks to the two tracks at the top.
- Arrange the clips alternately on the two tracks: the first clip on the first channel, the second on the second channel, the third on the first, the fourth on the second and so on... Read the chapter Vox Pop for more information on how to create variety within a vox pop.
- Delete the unused tracks to provide more space on the screen. Use the X button in the top left hand corner of the track.
- Use the Move tool to adjust the position of the clips so that you don't have gaps between them. However, if you need to add breathing space between clips, you can do so by increasing these gaps.
- Use the Fade tool (or Envelope tool) to create smooth crossings between the clips. With the Fade tool selected, a left mouse click on the blue line on the top of the clip will create a fade point.
- Now drag the blue line down between the fade point and the border of the clip to adjust your fade.
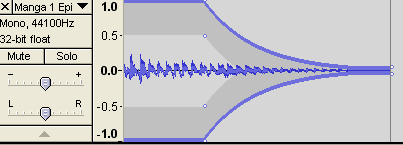
- Create short fades for each clip at the start (Fade in) and the end (Fade out) to get a nice flow. Arrange the clips on the two tracks so that there is an overlap between the fade in and fade out sections. See the screenshot below.
- Listen to your arrangement one more time to check the levels. The goal is to have a constant level across the whole piece.

Fade in and Fade out with overlap between tracks
Export, Effects and Testing
- If you are really satisfied with your arrangement, save the entire project with File > Save Project as. Give it a useful name and save it to a location where you can find it again. The project file will have a .aup extension and will include all edited audio files and your arrangement. If you want to rearrange or edit something later, just open your project again.
- Before mixing your arrangement to create a new audio file, change the project sample rate to 8000 Hz. Look for the Project Rate drop down list in the bottom left hand corner of your screen.

- Use File > Export to export the arrangement to a .wav file with settings that ensure the final file format is 8000 Hz, mono, wav. The file size should be less than 10 MB.
You will be shown a form to add Metadata if you wish, but this is not required to proceed.
If you have followed the steps correctly so far, you will see a warning that your mixdown will be exported as a mono channel. Press the OK button.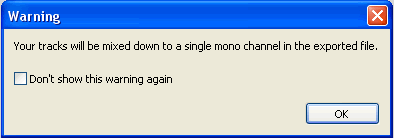
- Close the current project and open a new one (Ctrl+N).
- Import your new mixdown file to the project.
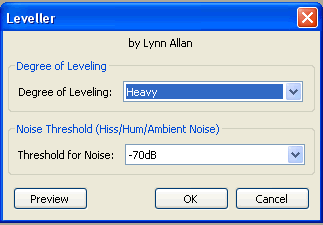
- Choose Effect > Leveller and set 'Degree of Leveling' to Heavy. This will increase the loudness of your mixdown and improve audibility for your callers. If you're not happy with the result, do it a second time with a Moderate setting.
After production, upload the file to a Freedom Fone Voice Menu and listen to it on the phone! Listen through the whole file carefully to ensure everything is understandable.
To be thorough, make sure that you can exit the audio playback by pressing any number on your phone's keypad. You should be returned to the instruction menu. If there is a problem, check your Audacity export settings. They should be 8kHz, mono, wav.


