


Connecting Huawei GSM dongles
Freedom Fone v2.S.4 now supports the Huawei E173 and E1550 GSM dongles. The downside is that Freedom Fone version 2.S.4 no longer supports the Mobigater out of the box.
Please connect one dongle at a time. Follow steps 1-3 below for each Huawei dongle added. If you need to remove a dongle for any reason, switch the Freedom Fone computer off before you do so.
1. Identify the details associated with the Huawei device
After you connect the Huawei dongle to the Freedom Fone computer, open the command terminal (Ctrl+Alt+T) and issue the following commands. Press the Enter key at the end of each line.
When prompted for a password:
FFv2.S.4 users type manguensis
FFv2.S.7 and 2.S.8 users type sharicus
$ sudo su
# ls -l /dev/ttyUSB*
NB: the command above is case sensitive and all spacing must be observed, so please copy exactly!
After issuing the command shown above you should get a display that looks similar to that shown below:
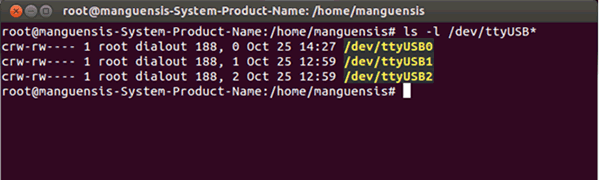
Each Huawei USB device will have 3 entries associated with it. In the above example the device we connected is associated with the following entries /dev/ttyUSB0, /dev/ttyUSB1, /dev/ttyUSB2.
We only need to use 2 of the 3 entries displayed to configure the Huawei device. One of the entries will be used for the line associated with the controldevice_name parameter and the other for the controldevice_audio_name parameter.
The entry with the highest numbered ttyUSB will be associated with the controldevice_name parameter and the entry with the second highest numbered ttyUSB will be associated with the controldevice_audio_name parameter.
2. Editing the Configuration files
To edit the Huawei configuration files issue the following command:
# gedit /opt/freeswitch/conf/autoload_configs/gsmopen.conf.xml
After entering the command above a new page should open on the screen and its contents will look as follows:
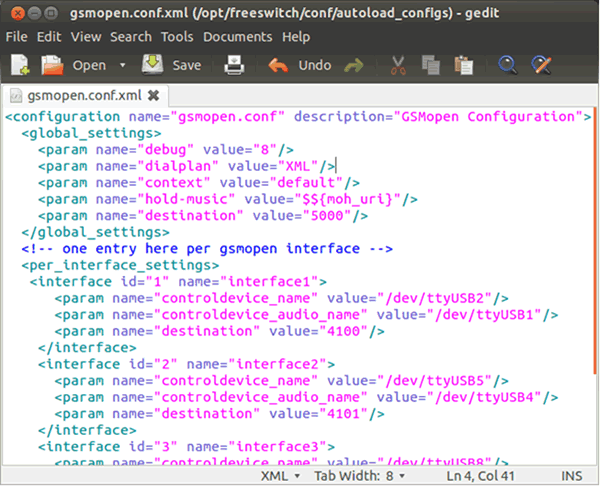
For the first Huawei device connected, update the configuration file for interface 1 to match the settings displayed by the ls -l /dev/ttyUSB* command. In this example we will assign the controldevice_name parameter to /dev/ttyUSB2 because this is the highest numbered entry for the inserted device. On the next line which references the controldevice_audio_name parameter we assign /dev/ttyUSB1 because the second highest numbered ttyUSB entry is /dev/ttyUSB1.
NB: Please note that computers handle the naming of ttyUSB entries differently depending on the USB devices that are already connected, so it is important that you match the configuration according to the settings displayed after inserting the Huawei device.
The last line which references the destination parameter should be edited to point to the service number associated with the voice menu to which you wish to connect callers who phone the SIM in this dongle. The default settings point to 4100 for the first 2 Huawei devices connected and service 2100 for the third device connected. If you have only one device connected just edit the section under "Interface 1".
It is possible to add more than 3 Huawei dongles to the system, but should you wish to do so, we advise that you use a ttyusb hub to connect the dongles. If you decide to add more than 3 Huawei dongles then make sure that you update the configuration file to reflect the number of devices you have added. Each additional device should have a section in the /opt/freeswitch/conf/autoload_configs/gsmopen.conf.xml configuration file similar to the following (remember to change the interface id and name parameters):
   <interface id="3" name="interface3">
      <param name="controldevice_name" value="/dev/ttyUSB8"/>
      <param name="controldevice_audio_name" value="/dev/ttyUSB7"/>
      <param name="destination" value="2100"/>
    </interface>
Copy the section shown above and paste immediately after the third section in the default file, but take care to increment the interface id parameter by 1 and also change the name parameter.
In our example if we wanted to add a fourth device we would copy and paste a section immediately after the third section. The new section should look like:
  <interface id="4" name="interface4">
      <param name="controldevice_name" value="/dev/ttyUSB9"/>
      <param name="controldevice_audio_name" value="/dev/ttyUSB8"/>
      <param name="destination" value="2100"/>
  </interface>
Also make sure that the controldevice_name parameter and controldevice_audio_name parameter are updated according to your specific ttyUSB entries. After you have done all this, save and close the /opt/freeswitch/conf/autoload_configs/gsmopen.conf.xml configuration file using the icons or menus at the top of your window.
3. Restart FreeSWITCH
For the configuration modifications you have made to take effect, you have to restart FreeSWITCH. To do that, open a command terminal (Ctrl+Alt+T) and issue the following commands. Press the Enter key at the end of each line.
$ sudo su
# service freeswitch restart
Wait for the command prompt to be redisplayed (you should see [OK] displayed on the ride hand side of the screen).
Then issue the following command, followed by the Enter key:
# /etc/init.d/dispatcher_in restart
The above commands should restart FreeSWITCH and the Dispatcher. The next time you call you will be directed to the service you have updated in the configuration file.